
Gimmal Physical can be configured to require re-authentication for specific actions using a username and password. This is helpful for compliance and auditing purposes in highly regulated industries.
Available Actions
E-Signatures can be used with the following actions:
-
Bulk Actions (Delete, Expunge, Update)
-
Create
-
Delete
-
Expunge
-
Disposition Decision
-
Requests (Delivery, Pickup)
-
Transfer, Home Transfer
-
Search and Replace
-
Undelete
-
Update
Activating E-Signature Functionality
Before any E-Signatures can be enabled for events, the functionality must first be activated.
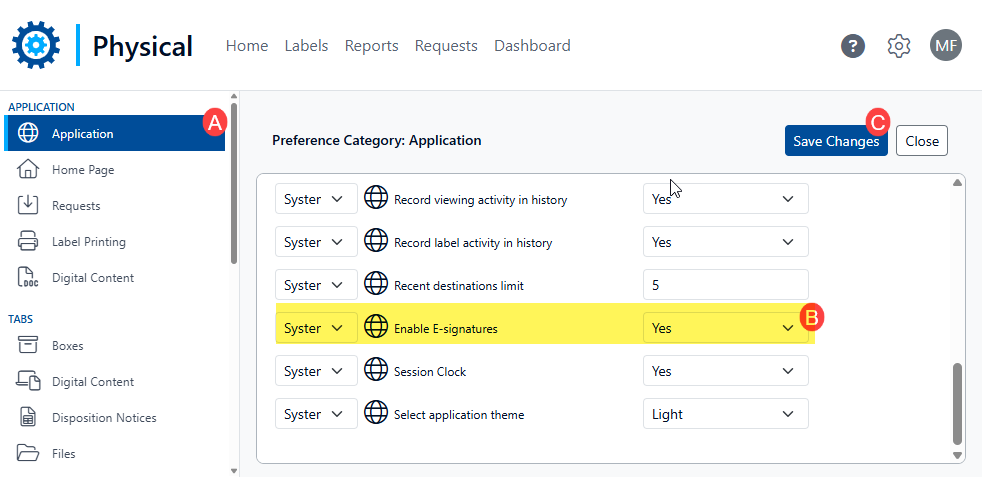
Activating e-signature for the Application is done in the Application Preferences.
-
Navigate to the Preferences by clicking on the gear icon and selecting ‘Preferences’
-
Choose the ‘Application’ node (A)
-
From the drop-down for ‘Enable e-signatures’ choose ‘Yes’ (B)
-
Click ‘Save Changes' to complete the enablement.
Configuring E-Signatures
An E-Signature event will need to be created for each action on each tab you’d like to enable.
Managing existing E-Signature Events
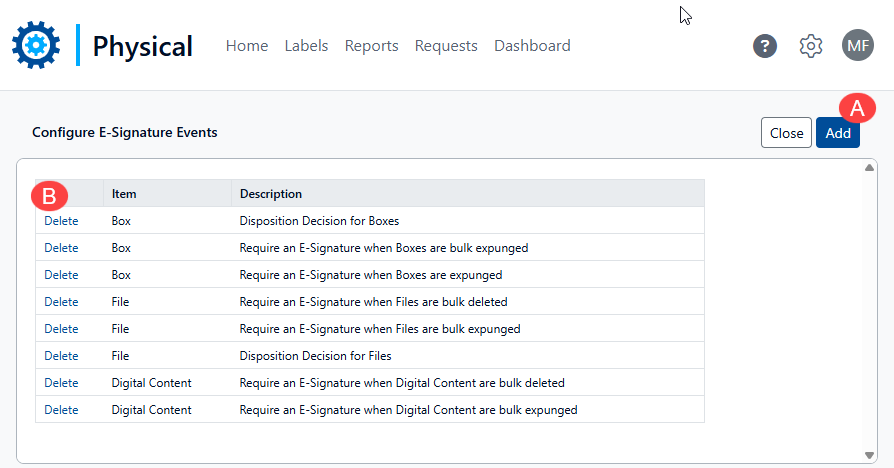
The list of E-Signature events can be reviewed on the Configure E-Signature Events page.
-
New events are added by clicking the ‘Add’ button (A) (see details below for creating new items).
-
The listed events can be removed by choosing the associated ‘Delete’ link (B).
Creating new e-Signature Events
-
Navigate to the Administrator Options by clicking on the gear icon and selecting ‘Admin.’
-
From the Configuration section of the Administrator page, choose ‘E-Signature Events’. This opens the ‘Configure E-Signature Events’ page, where you will manage all e-Signature events.
-
On the ‘Configure E-Signature Events’ event page, click on the Add (A) to add the new E-signature Event by opening the Add E-Signature Event page.
-
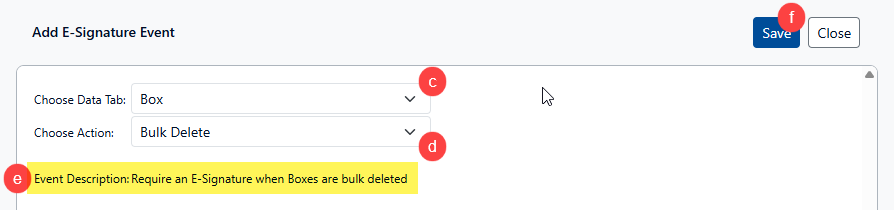
On the Add E-Signature Event page, choose the tab and action to create a new event. To do so:
-
Use the Choose Data Tab drop-down to select the item type (data tab) where to apply the action (c).
-
Select the action to apply an E-Signature by choosing an option from the Choose Action drop-down (d).
-
Validate the event by reviewing the Event Description text (e)
-
Click ‘Save’ to return to create the new e-Signature
-
Repeat as needed.
-
To return to the Configure E-Signature Events page, click ‘Close’
-
-
If an event already exists for the associated item type/action, an error will appear
-
The associated Application preference must be set to 'Yes' for E-Signature Events to be used in the application.