
Introduction
This article outlines the process for configuring a new on-premises installation of Gimmal Physical Version 4.2.
Note: If you are already using an earlier version of Gimmal Physical, please contact Gimmal support for assistance with the upgrade process.
Prerequisites
The following prerequisites are required for the installation of Gimmal Physical
-
Database Server
-
Minimum SQL Server compatibility level 120 (SQL Server 2014)
-
Full-Text and Semantic Extractions for Search feature are installed
-
The account used during the installation process must have the following roles in SQL Server:
-
dbcreator
-
securityadmin
Note: If you are restoring or otherwise replacing an existing database, the account used during installation must be granted dbreader, dbwriter, and dbowner rights on that database.
-
-
-
Visual C++ Redistributable. Links to these files can be found in the installer wizard:
-
Microsoft Visual C++ 2010 Redistributable (x86)
-
Microsoft Visual C++ 2010 Redistributable (x64)
-
-
App Server(s)
-
.Net v4.8
-
-
Required Server Roles (via Server Manager)
-
IIS Web Server
-
Web Server
-
Common HTTP Features
-
Default Document
-
Directory Browsing
-
HTTP Errors
-
HTTP Redirection
-
Static Content
-
-
Health and Diagnostics
-
HTTP Logging
-
-
Performance
-
Static Content Compression
-
-
Security
-
Request Filtering
-
Basic Authentication
-
Windows Authentication
-
-
Application Development
-
.NET Extensibility 4.8
-
ISAPI Extensions
-
ISAPI Filters
-
ASP.NET 4.8
-
-
-
Management Tools
-
IIS Management Console
-
IIS 6 Management Compatibility
-
IIS 6 Metabase Compatibility
-
IIS 6 WMI Compatibility
-
IIS 6 Scripting Tools
-
-
-
-
-
-
Required Server Features (Via Server Manager)
-
.NET Framework 3.5 Features
-
.NET Framework 3.5 (includes .NET 2.0 and 3.0)
-
-
.NET Framework 4.8 Features
-
ASP .NET 4.8
-
WCF Services
-
HTTP Activation
-
-
-
Windows Process Activation Service
-
Process Model
-
Configuration APIs
-
-
Please Note:
-
If installing Gimmal Physical using HTTPS/SSL mode, ensure that the SSL certificate is added to the Trusted Certificate Store before installing the application.
In some environments with elevated server hardening, the installer may fail to properly validate the provided Server and/or App Pool credentials. Where this occurs, please ensure that any Group Policy restrictions on Incoming and Outgoing NTLM traffic are disabled or set to 'Allow All' to ensure the validation of account credentials.
If you need further assistance, please contact Gimmal Support.
Installation
Gimmal Physical will provide an installation file (.iso) for use in the installation process. This file includes the installer and many of the installation components.
To run the installer, please follow the steps below:
-
Mount and open the provided iso format installation package
-
Double-Click the setup.hta to run the installer.
-
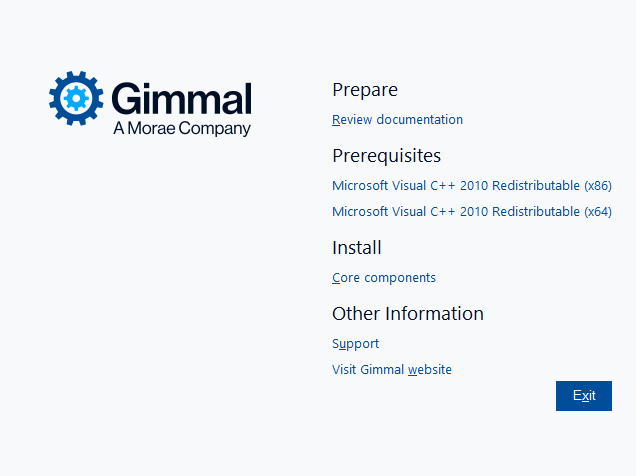
The Installer home page opens with a number of choices.
-
Prepare - provides links to useful documentation
-
Prerequisites - provides links to the two Visual Studio C++ Redistributable prerequisite components that may need to be installed, if not present
-
Install - handles the installation of core components (see below)
-
Other Information - links to support and the Gimmal website
-
-
If necessary, click on each of the entries listed under Prerequisites to install them
-
To install the required components to run the software, click Core Components under the Install option
-
Click ‘Yes’ on the UAC page to continue.
-
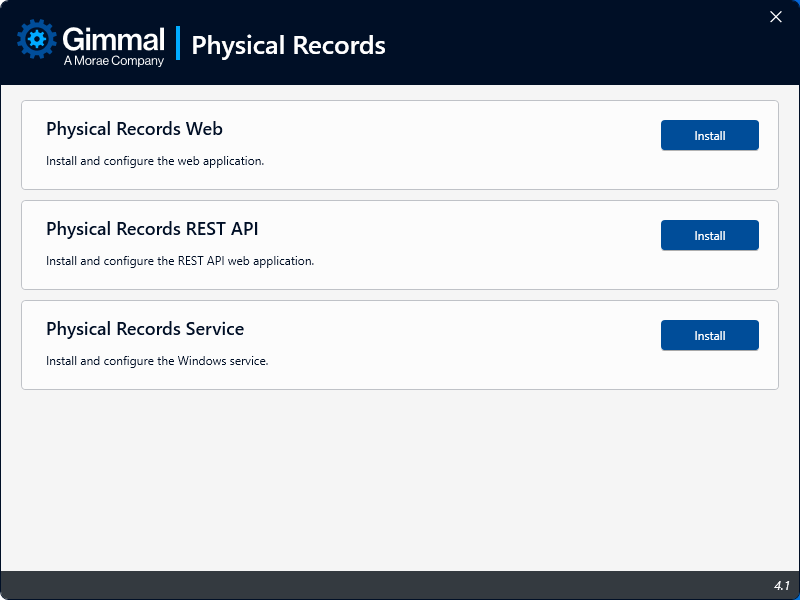
The main installation page will open, providing a choice of the components to install. For a complete program experience, all components need to be installed.
-
Note: The installer will check for prerequisites as it continues and throw a ‘Task Failed’ error message if it encounters missing components.

Physical Records Web
-
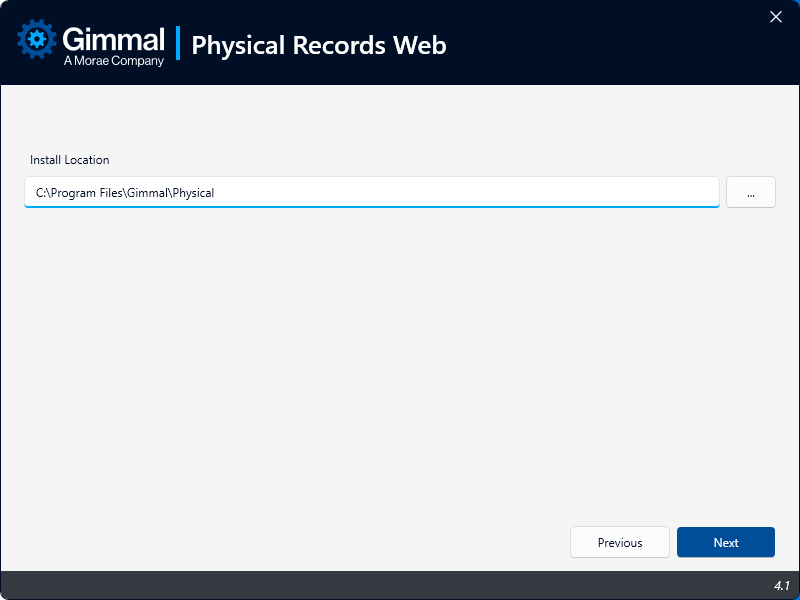
The Web Installer will first verify the Prerequisites. If they verify successfully, click ‘Next’. If any anomalies are detected, resolve them, then restart the process.
-
Choose the installation path and click ‘Next’
-
-
Configure IIS Settings
-
Web Application Name: The default is PhysicalRecords
-
Web Application Port: The default is 8080
-
Fully Qualified Domain Name: Provide the FQDN for the current server host (or alternatively, the FQDN DNS name to be used)
-
SSL Certificate: Choose from the list of installed certificates
Note:-
These settings can be configured manually after the installation, but it is more efficient to set them now.
-
To avoid issues, the selected certificate must be in the Trusted Certificate Store.
-
-
-
Set Application Pool Account
-
Username for a domain account. Note: Use the domain\username format
-
Password for the domain account
Note: The Application Pool account requires Full Control to the application directory.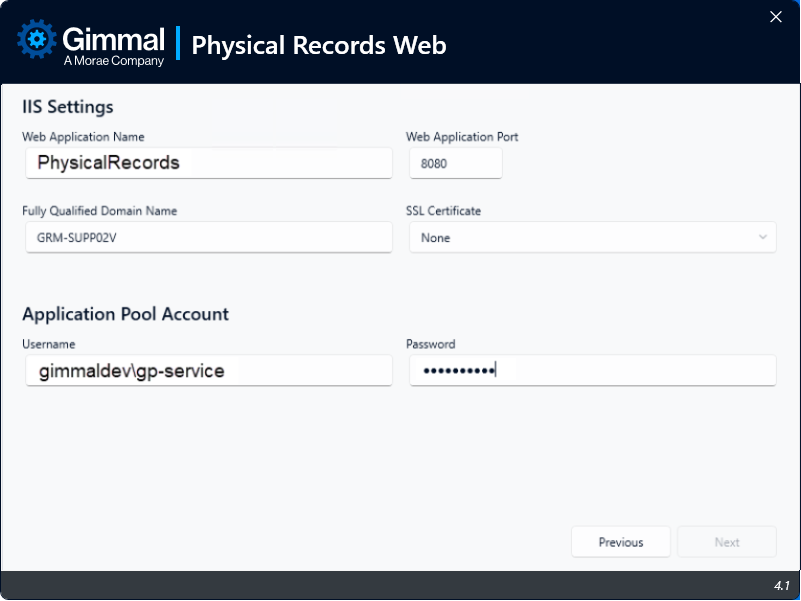
-
-
Click ‘Next’
-
Configure Database Settings
-
Database Server - The name of the database server that will host this database
-
Database Name - the name of the database. The default name is PhysicalRecords
Note: If you are using non-standard regional settings and receive an error, please see the note below.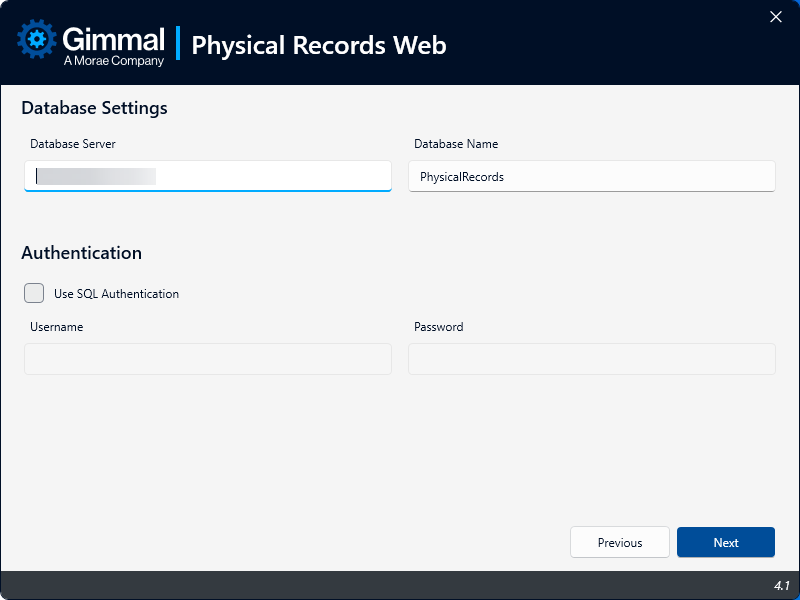
-
-
Authentication (Database)
Note: If these values are not set, then Windows Authentication will be used to connect to the database. In this case, the logged-in user will have the appropriate permissions.-
Use SQL Authentication - Check this option if you prefer to use SQL authentication with the credentials listed below
-
-
Click ‘Next’ to install the Physical Records Web and configure the database.
-
The installer will verify that all components have been installed correctly. Click ‘Next’.
-
Click ‘Finish’ to return to the main menu.
In certain localized (on-prem) installations, when selecting the option to automatically create a database during installation, the installer may fail with an error similar to:
ExecuteNonQuery failed for Database 'DIS_DEV_Dummy'. ---> Microsoft.SqlServer.Management.Common.ExecutionFailureException: An exception occurred while executing a Transact-SQL statement or batch. --->
The result will be that the database is either not created or initialized incorrectly. However, the application binaries themselves are installed correctly. For additional assistance, please contact your Gimmal Team member after completing the installation.
Physical Records REST API
-
The Rest API Installer will first verify the Prerequisites. If they verify successfully, click ‘Next’. If any anomalies are detected, resolve them and then restart the process.
-
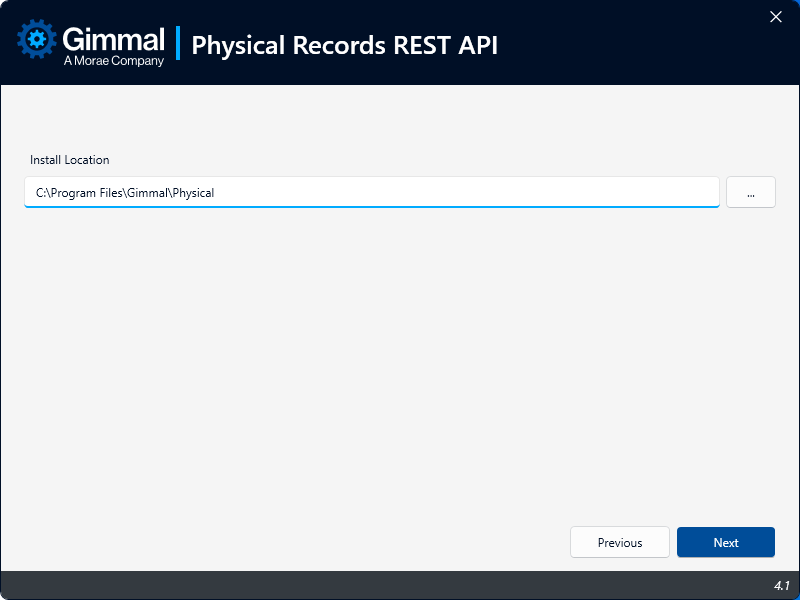
Choose the installation path and click ‘Next’
-
Configure IIS Settings
-
Web Application Name: the default is PhysicalRecords
-
Web Application Port: the default is 8081
Note: Ensure this is a different port from that configured for the Physical Records Web in the steps above. -
Fully Qualified Domain Name: Provide the FQDN for the current (application) server host
-
SSL Certificate: Choose from the list of installed certificates (if available)
Note:-
These settings can be configured manually after the installation, but it is more efficient to set them now.
-
To avoid issues, the selected certificate must be in the Trusted Certificate Store.
-
-
-
Set Application Pool Account
-
Username for a domain account. Note: Use the domain\username format
-
Password for the domain account
Note: The Application Pool account requires Full Control to the application directory.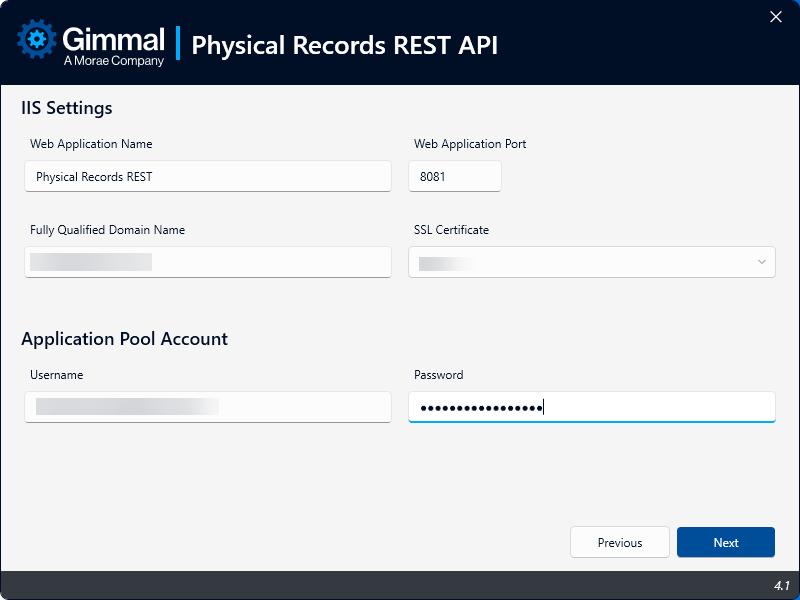
-
-
Click 'Next'
-
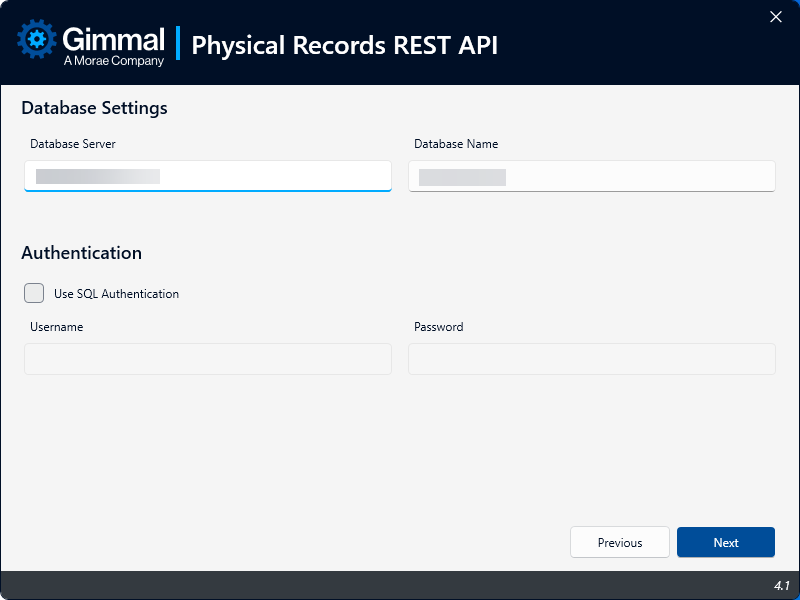
Configure Database Settings
-
Database Server - The name of the database server that will host this Gimmal Physical database
-
Database Name - the name of the database. The default name is PhysicalRecords
-
Authentication (Database)
Note: If these values are not set, then Windows Authentication will be used to connect to the database. In this case, the logged-in user must have the appropriate permissions.-
Use SQL Authentication. Check this option if you prefer to use SQL authentication. Enter the credentials listed below if this option is selected.
-
-
-
Click ‘Next’ to install the Physical Records Rest API.
-
The installer will verify that all components have been installed correctly. Click ‘Next’
-
Click ‘Finish’ to return to the main menu.
Physical Records Service
This component is used to coordinate job services.
Note: For optimal performance, Gimmal recommends installing the Physical Records Service on a machine separate from your web server. This machine must have access to the database server.
-
The Rest API Installer will first verify the Prerequisites. If they verify successfully, click ‘Next’. If any anomalies are detected, resolve them and then restart the process.
-
Choose the installation location and click ‘Next’
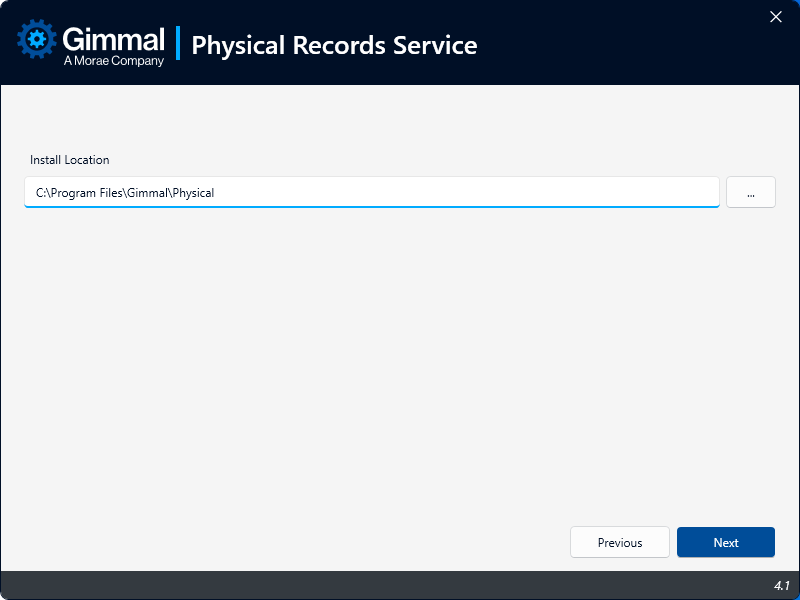
-
Configure Database Settings and Authentication to mimic those used in setting up the Physical Records REST API.
-
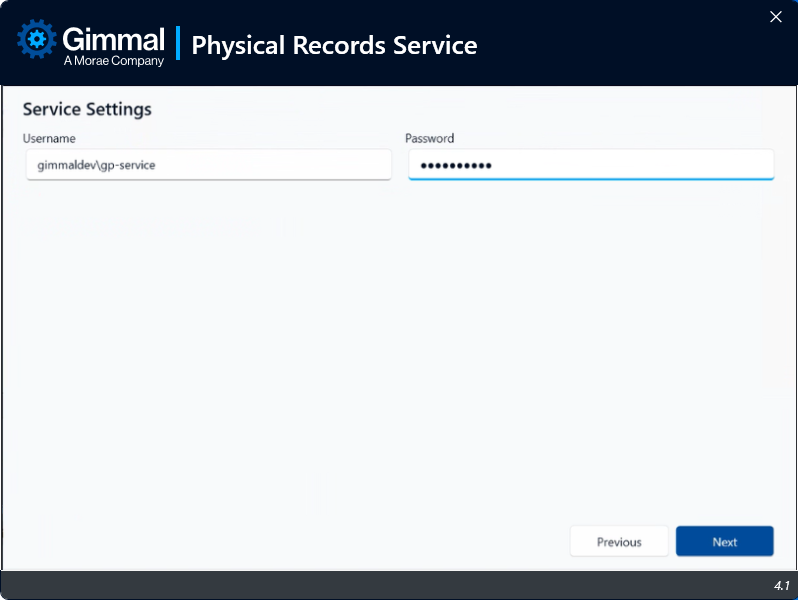
Configure Service Settings by entering the Username and Password of a service account that will run the Physical Records Service. Click ‘Next’ when finished.
-
Click ‘Next’ to begin the setup and configuration of the Physical Records Service
-
Click ‘Next’ to install the Physical Records Service
-
The installer will verify that all components have been installed correctly. Click ‘Next’
-
Click ‘Finish’ to return to the main menu.
Once all three components have been installed, the application is functional and should be tested by opening a browser and navigating to the site.
Upgrade
If you have an existing installation of Gimmal Physical that needs to be upgraded, please contact Gimmal Support for assistance.
Post-Installation
After installing or upgrading the Gimmal Physical Application, there are several optional, but recommended, steps that reset the cache and configuration so the recent updates will be shown correctly. These are performed inside the application on the Admin page.
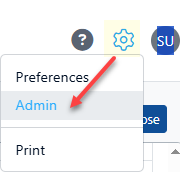
To reach the admin page, click on the gears icon in the upper right of the screen and choose Admin
-
Recreate Resource Files -
-
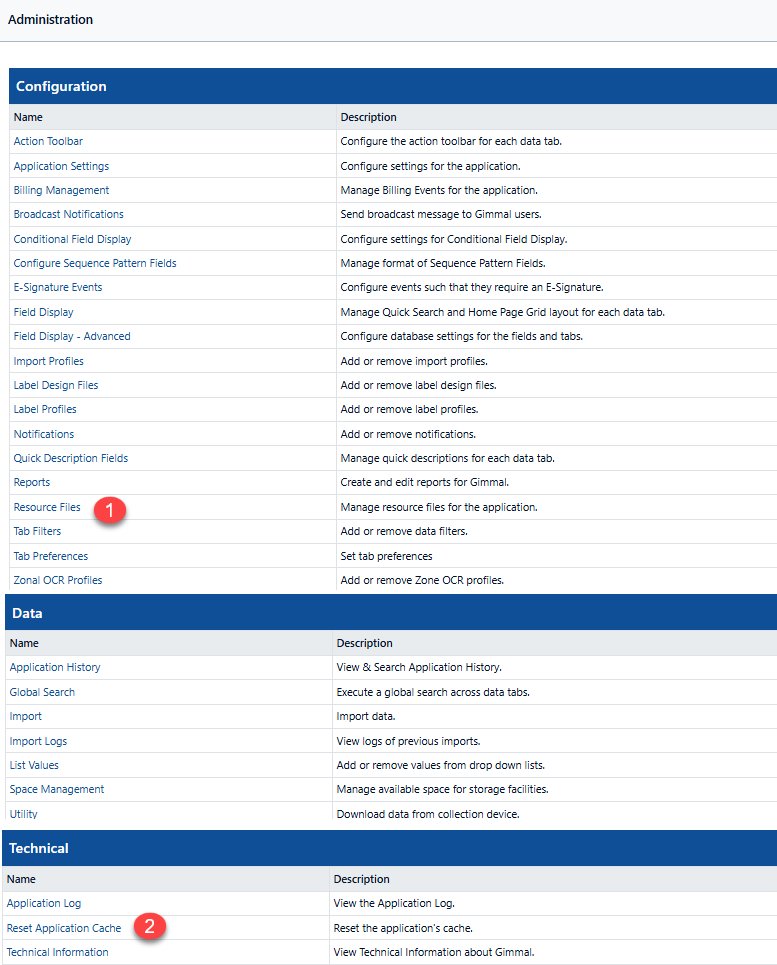
Choose Resource Files close to the bottom of the Configuration section (1).
-
Click the Create Resource Files link at the bottom of the Manage Resource Files page
-
Click the ‘Recreate English’ button from the top right of the ‘Add Language’ screen. This recreates the default pages for the resource pages.
-
-
Reset Application Cache -
-
Choose Reset Application Cache from the Technical section close to the bottom of the Admin screens(2), or return to the previous ‘Manage Resource Files page.’
-
Click the ‘Reset Application Cache’ link towards the bottom of the ‘Manage Resource Files’ page.
-
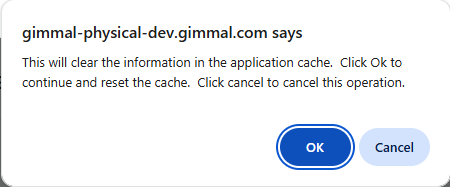
A verification panel will appear. Click ‘OK’ to continue.
-
Troubleshooting
While the installer validates a number of prerequisites and required values, it is always possible for errors to occur. The installer will log any such errors in the Windows Event Viewer.
The Application Log found in Admin | Application Settings may also prove helpful.
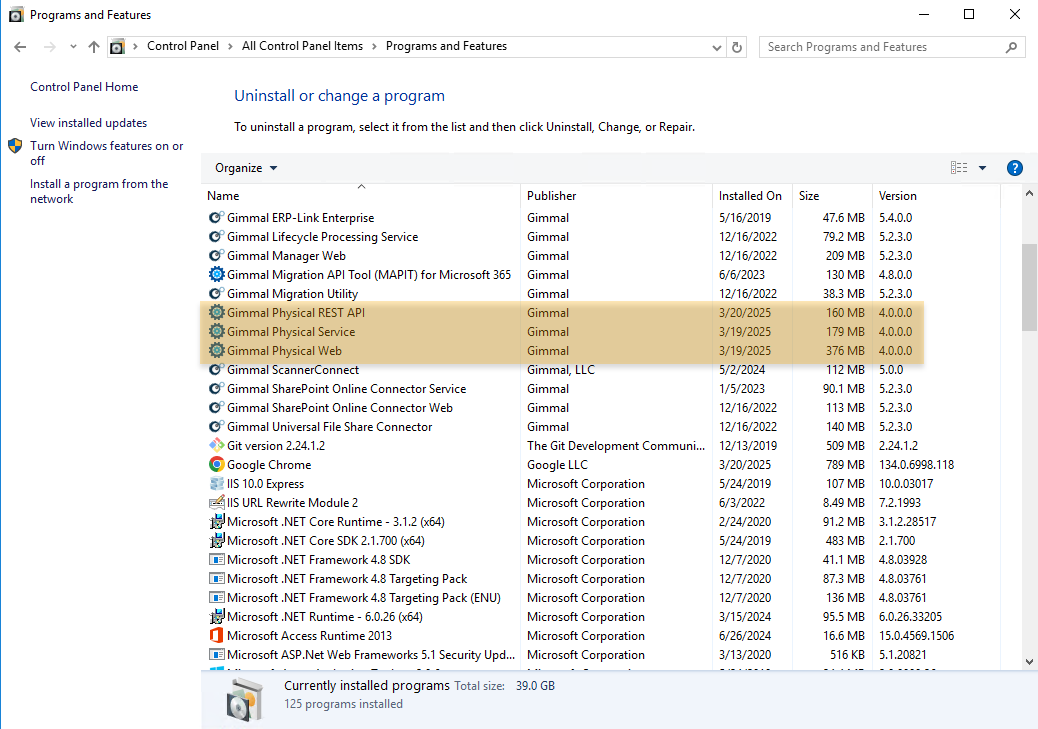
Uninstalling
To Uninstall Gimmal Physical, please use the Programs and Features option in the Control Panel to uninstall each component. This will remove aspects of the application except the database.
Please contact Gimmal Support with any questions or concerns.