Reports Overview
This topic has an interactive tutorial. To view it, click here.
There are two types of reports that are included with Gimmal Physical:
Ad-Hoc Reports: These reports are generated from different view pages based on queries performed by the user. They can be printed (to printer or PDF), or, for more options, exported to CSV format (which can be opened a spreadsheet application like Excel).
Formal Reports: These native reports have a fixed format. There are a set of reports which are standard in Gimmal, or custom reports can be created using Microsoft Report Builder.
Ad Hoc Reporting
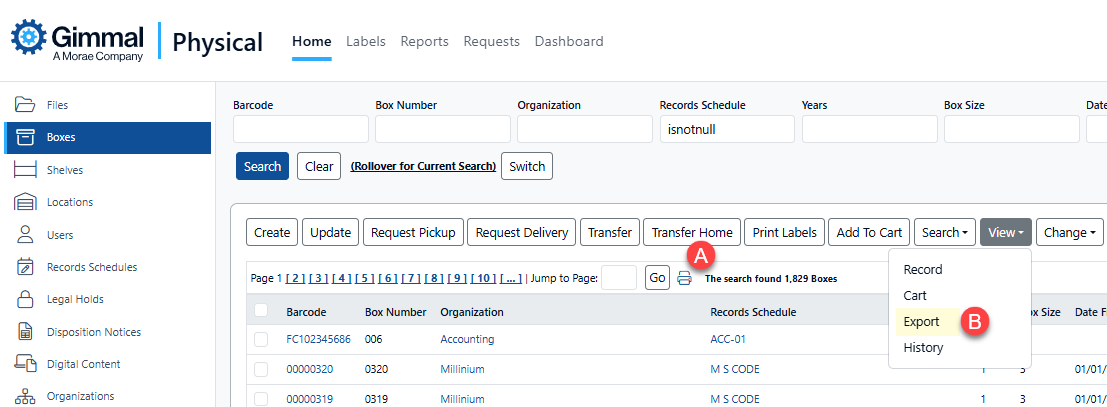
These reports can be created by running a search on any item tab (Boxes in this example) and then choosing your report option.
CSV Reports
This option opens a view that offers a variety of choices for exporting data to CSV. There are options to save reports and queries to avoid double work. To create a CSV report:
Use the Search bar in the Home Page Grid of the item type to query a set of records for the report.
Select the Export option (B). This opens the Export Home Page Grid view for the data tab (e.g. Export Home Page Grid Boxes). Details for exporting items can be found here.
The Export option may be found in another menu based on the setting configured for your application. In this example, it is under the ‘View’ menu.
Printed Reports
This option sends an HTML-based report to the printer. All field columns present on the home page grid will be included with this report. To create a print report:
Use the Search bar in the Home Page Grid of the item type to query a set of records for the report.
Click the Print icon on the Home Page Grid (A). This will open the Item Report Window. This is the exact report that will be sent to the printer, although it will be formatted to fit based on printer settings.

The title of the report (1) will be based on the item type of the data tab (Box in this example).
The query used to filter the data set in the home page grid will be listed (2)
Clicking ‘Send to Printer’ will open the printer interface for the browser.
If a Save as PDF option is enabled on your browser, this ‘Print’ option can be used to save any ad hoc report as a PDF file.
Formal Reports
Gimmal Physical the standard reports listed below. Gimmal Physical reports may be displayed in PDF, or Excel formats. Access to specific reports is controlled via Roles and Permissions.
The standard report categories are:
Category | Description |
Picklist | These reports show valid pickup and delivery requests for files and boxes. |
Delivery | These reports show all boxes and files requiring delivery, grouped by destination. |
Contents | These reports display boxes and files by their current locations, such as boxes/files checked out to a user or files located in boxes, etc. |
Items Out | These reports include boxes and files that are not in their Home Location. |
Past Due | These reports show boxes and files that are past due. |
Max Items Out | These reports show the users that have reached or surpassed the maximum allowed number of boxes or files. |
Security | These reports list users grouped by organization, and organizations grouped by user. |
General | These reports show general activity summaries including overall activity, activity by user, and transfer activity by location. |
Is Missing | These reports show all items that are marked as missing and discrepancies between Gimmal Physical and off-site vendors (if enabled). |
Browse to the Reports page by clicking Reports in the Navigation ribbon.
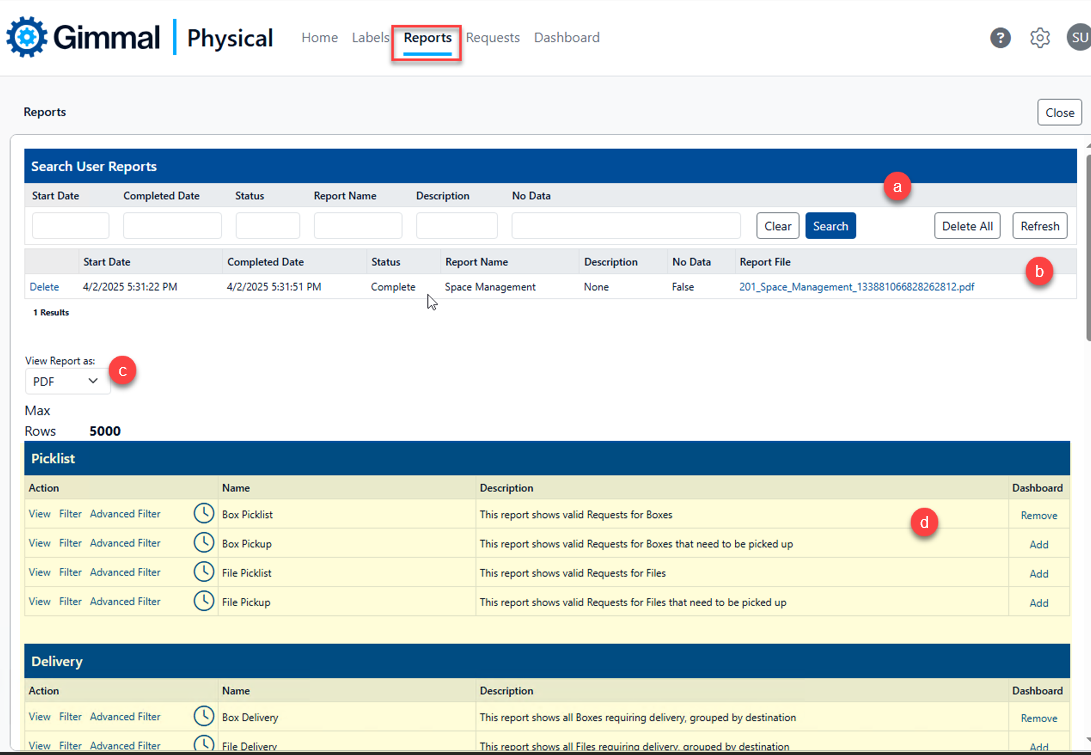
The Reports page includes a number of areas and features:
Search User Reports (a) - After a number of reports have been generated, it may be more difficult to find the one you are interested in. This basic search interface allows you to pare down the list of previous reports. This section also includes the buttons:
Clear - clears the search criteria
Search - searches the previous reports with the currently entered criteria
Delete All - deletes all previous reports
Refresh - refreshes the list of generated reports, useful to determine if a report has completed or is still running
Current/Previous reports (b) - This grid includes previously generated, and currently running, reports with basic information.
Delete - clicking this link deletes the report
Start Date/Completed Date - starting and completion dates and times
Status - current status of the report, e.g. Enqueued, Complete, etc.
Report Name - name of the report
Description - Basic description of the report that was run including any filtering criteria
No Data - True if the report contains no data
Report File - link to the completed report
View Report as (c) - Used to specify the format of the generated report. Choices are PDF or Excel.
Reports list (d) - The list of reports you have access to. Each report may include up to three actions: View, Filter, Advanced Filter. See below for more details on the report actions.
View - Clicking View generates the report with no filtering
Filter - Allows you to create/save a basic filter for the report using filterable properties for the report
Advanced Filter - Provides an interface similar to Advanced Search to create/save an advanced filter using filterable properties for the report
Clock icon - click this to schedule this report to run nightly
Dashboard-Add - click the Add link for the report to add it to your user dashboard
Generating reports
View
To view a report with no filtering at all, simply click View for the desired report
Filter
To generate a report with basic filtering, click Filter for the desired report to display the Filter Report page.
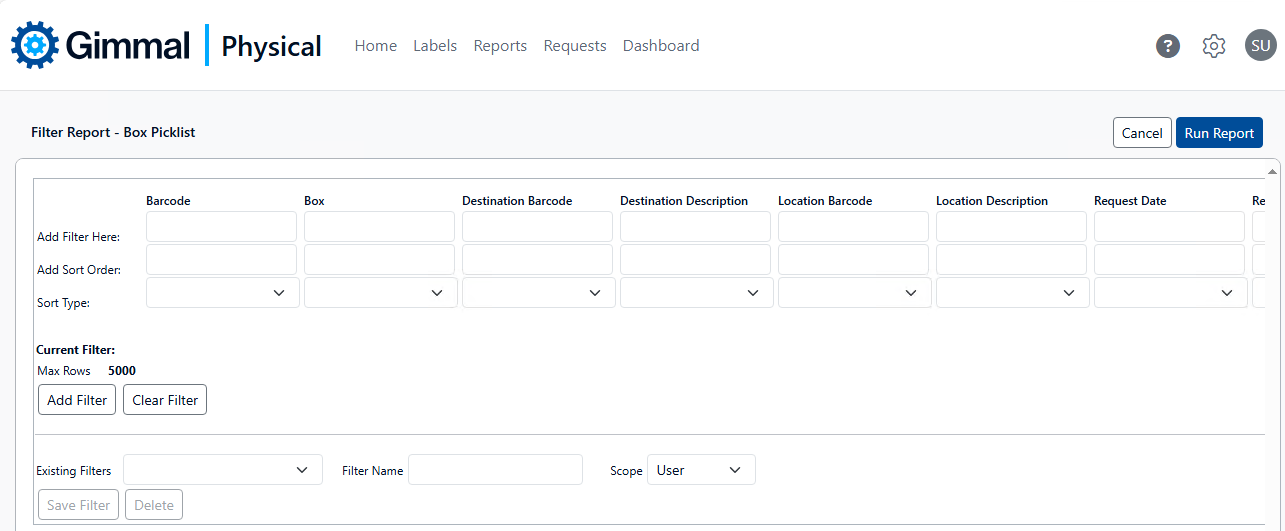
Filter configuration for the Box Picklist report
Filterable properties for this report (configured in Admin->Configuration->Reports->Edit Metadata) are displayed with the ability to specify filter criteria, sort order, and sort type. This filter configuration can be saved (enter a Filter Name and click Save Filter) for reuse by yourself or others (select the appropriate Scope).
Enter your desired filter criteria into any or all of the fields. Search operators (>, <, Today, etc.) can be included.
To sort the report results by one or more fields, enter the desired sort order (Add Sort Order) for the fields you want the results sorted by, and whether the sorting for each field should be ascending or descending.
After specifying all criteria, click Add Filter, then click Run Report.
Advanced Filter
To create and use an advanced filter, click Advanced Filter for the desired report. The Advanced Filter for reports works identically to Advanced Search, which can be referenced here: Advanced Search.
Although the two methods work in the same way, there are some notable differences:
Only properties marked as filterable for this report (configured in Admin->Configuration->Reports->Edit Metadata) can be used in the Advanced Filter.
Saved Advanced Filter queries are not interchangeable with Advanced Search queries.
Scheduling Reports
To schedule a report to run nightly, click the clock icon for the desired report to display the Nightly Reports page.
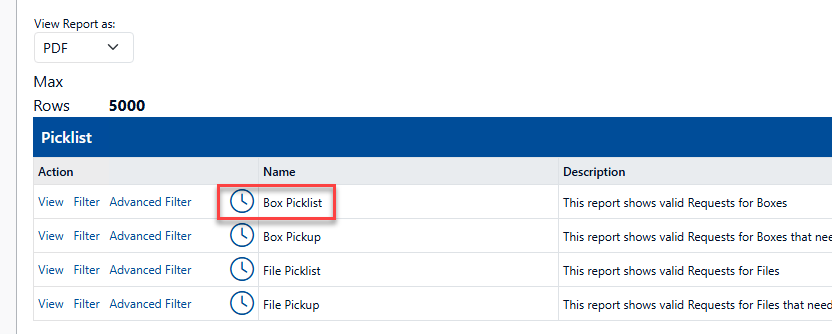
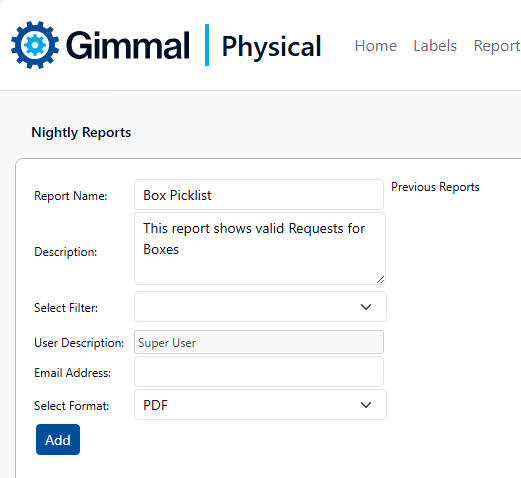
Set the properties as necessary then click Add to schedule the report. As reports are generated, they will be listed under Previous Reports.
Report Name: Defaults to the selected report name. Can be changed if desired. This is only used for the scheduled name and does not affect the name of the report file or the report heading.
Description: Basic description for this report. Can be changed if necessary.
Select Filter: If desired, select a previously saved report filter to apply to this report when it runs.
User Description: Username of the person creating the scheduled report.
Email Address: Optional field, notification of report completion is sent to this address.
Select Format: Select PDF or Excel for the desired report format
