
Before you configure Metadata Rule Actions, ensure that you have installed the Metadata Rule Actions app, completed the post-installation tasks, and have updated the Gimmal Job Scheduler files (if applicable). See the Content Governance for SharePoint installation section for information on these tasks.
There are two configuration options available for MRA, as illustrated below. See the following diagram for information on how each option differs:
-
Configure MRA Send To Locations and MRA rules globally from the Governance Hub.
-
Configure MRA Send To Locations and MRA rules locally from the Governance Hub, or optionally, from the host site.
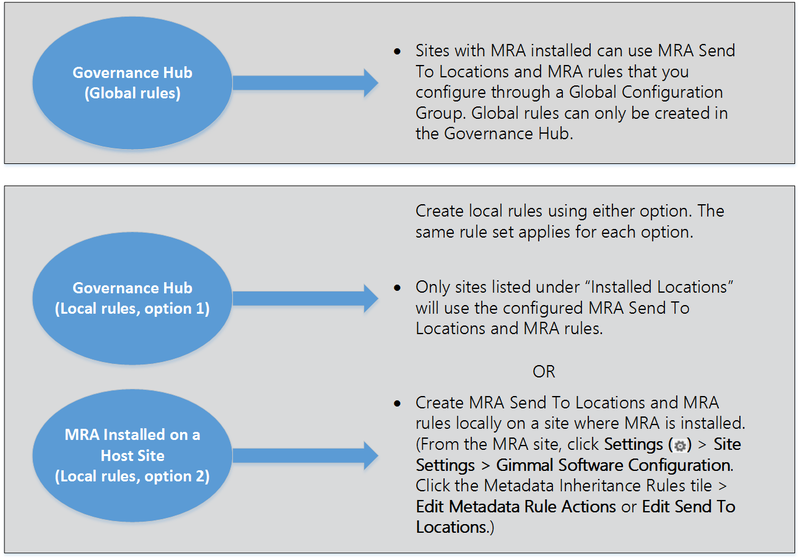
If you configure your MRA Send To Locations and MRA rules globally, any sites with MRA can use the globally configured MRA Send To Locations or MRA rules. If you configure your MRA Send To Locations and MRA rules locally, only that site will have that particular Send To Location or MRA rule. You can have unique rules per site, or you can have rules that apply to all sites. For more information on MRA Send To Locations and MRA Rules, see Understanding MRA Send To Locations and Understanding MRA Rules.
Understanding MRA Send To Locations
MRA enables you to move a document to a different location, move a document and leave a link, or use CCM actions when a given rule's criteria are met. When using either the Move or Move and Leave a Link actions, you must first create a MRA Send To Location within MRA before you can specify that location as a target destination for a rule's action. For CCM actions, a variety of actions can occur to the list item based on the target destination. The following table lists the type of MRA Send to Location based on the action.
|
Action Type |
Action |
Send to Location Type |
|
Send to Location |
Move |
(Any item in the MRA Send To Location list) |
|
Send to Location |
Create a Convenience Copy |
Create a Convenience Copy |
|
CCM |
Create a Convenience Copy |
Create a Convenience Copy |
|
CCM |
Create Principal and Link |
|
You must create MRA Send To Locations before you create MRA rules because a rule has to refer to an MRA Send To Location.
MRA (FA) does not use SharePoint 2013/2016 or SharePoint Online built-in Send To Connections. Instead, MRA enables you to create and define MRA Send To Locations globally and locally (using Governance Hub) and locally from the host site. You can target an individual location (library, folder in a library or a Drop Off Library).
When using MRA to send documents to a Drop Off Library, the user specified in the Gimmal.MetadataRuleActions Secure Store entry must be in the "Records Center Web Service Submitters" group on the destination site. For more information on the Gimmal.MetadataRuleActions Secure Store entry, see the Content Governance (FA) Installation section.
Understanding MRA Rules
MRA enables you to define criteria that determine when and which action occurs for a document. The rule scope can be defined by Location (i.e., library, folder, etc.), by Content Type, or both. Once the rule's scope is defined, the rule's criteria can be set using metadata applicable to the chosen scope. Finally, the desired action can be defined.
Metadata Rule Actions (MRA) rules are triggered on document libraries only. Once a document has been added to a document library, or its metadata has been changed, then the rule will initiate if that document matches the MRA rule.
Pre-Configuration Tasks: Metadata Rule Actions
Prior to configuring Metadata Rule Actions (MRA) and using it in a site, you must perform the following tasks. These tasks is described in the following sections.
-
Add the Metadata Rule Actions app to a host site
-
Create a Governance Hub Secure Store item
-
Edit the MRA global setting (optional)
Adding the Metadata Rule Actions App to Host Site
Before you can configure Metadata Rule Actions (MRA) and use it in a site, you must add the MRA app to the site. Note that you can add the MRA app to only the root web of the host site. For MRA to work in a subsite, install the app on the root web of the site collection.
-
The MRA app must be added to the Governance Hub site, and you must also have at least one other instance of the MRA app installed in one or more sites in your organization.
-
Microsoft does not allow you to use the System Account to add apps! Use a non-system account with appropriate permissions to perform these steps.
-
Navigate to the host site as a user with "full control" permissions.
-
Select Settings > Site Contents. The Site Contents page displays.
-
Select + add an app from the top of the page. A Metadata Rule Actions tile displays under Apps you can add.
-
Click the Metadata Rule Actions tile. A window displays: Do you trust Metadata Rule Actions?
-
Click Trust It. The page refreshes when the app is installed. Depending on your system, this can take several minutes.
-
Click on the newly installed MRA app tile to provision the app.

7. Ensure that the App Provisioned successfully message displays under Event Log, and the green checkmark displays next to Status. This could take several minutes.
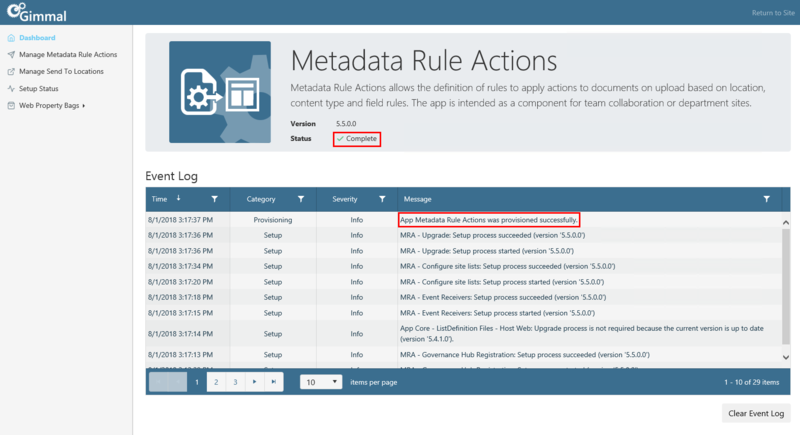
8. Verify that the MRA app displays on the Governance Hub Dashboard by following these steps:
-
Navigate to the site where Governance Hub is installed.
-
Select Settings > Site Settings to display the Site Settings page.
-
Under the Site Administration section, click Governance Hub. The Governance Hub Dashboard displays.
-
Verify the MRA tile displays on this page, as shown in the following figure.
Creating a Governance Hub Secure Store Item
After you install the Governance Hub, or you upgrade to the latest version, you must manually create the following MRA Secure Store list item in the Gimmal Secure Store list located on the Governance Hub site: Gimmal.MetadataRuleActions
The Governance Hub Secure Store list contains user credentials and specifies the required permissions for MRA. This Secure Store item must be created for MRA to function properly.
For on-premises installations, do not use a web application App Pool Identity account for any Secure Store Credentials. Ensure that you do not use multi-factor authentication when entering secure store credentials.
-
Navigate to the Governance Hub site as a user who has Contribute permission.
-
Access the Governance Hub – Secure Store page by navigating to the following list: <Governance Hub Site>/Lists/GimmalSecureStore, or by clicking Secure Store on the left navigation pane of the Governance Hub.
-
Click +new item. The list item page displays.Enter the following information in the fields:
-
Key: Gimmal.MetadataRuleActions
-
Username: Username for farm or tenant account
-
Password: Password for farm or tenant account
-
Ensure that the username is in the form of '<username>@<domain>' and not '<domain>\<usersername>'.
4. Click Save. The Gimmal.MetadataRuleActions list item displays on the Secure Store page, as shown the following figure.
When using MRA to send documents to a Drop Off Library, the user specified in the Gimmal.MetadataRuleActions Secure Store entry must be in the "Records Center Web Service Submitters" group on the destination site.
Editing the Metadata Rule Actions Global Settings
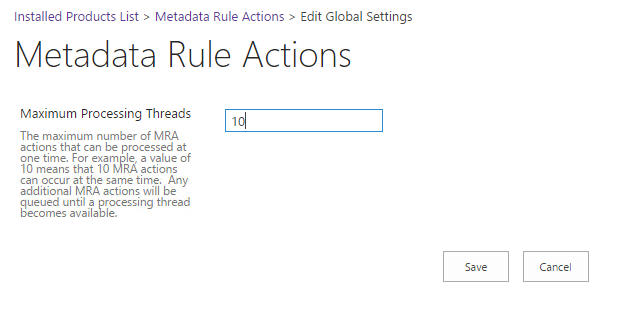
Prior to configuring Metadata Rule Actions (MRA) and using it in a site, you can edit the MRA global setting. The MRA Global Setting page, located in the Governance Hub, enables you to set the property for the MRA global setting. The MRA Global Settings page provides an optional setting that enables you to enter a maximum number of MRA actions that can be processed at one time. Any MRA actions/events that exceed this number will be put in a queue to wait until additional threads are available. When additional threads are available, processing will continue. In most cases, you would adjust this number down from the default setting of "10" if you're receiving MRA errors related to load "429", or if you receive an error message in the MRA log that reads:
"Too many requests, will retry". Typically, this is only necessary in environments with heavy loads, such as when multiple users upload several documents at once using Gimmal's Drop Zone application, or a bulk load tool is being employed to upload data that is subject to an MRA rule.
Although you can apply this setting to any Global Configuration Group, the setting you apply for the All Sites group, shown in the figure below, will take precedence over (override) any other configuration group's setting. You cannot apply this setting to the installed locations listed at the bottom of the page.
1. On the site where Governance Hub is deployed, click Settings > Site Settings > Site Administration > Governance Hub. The Governance Hub Dashboard displays.
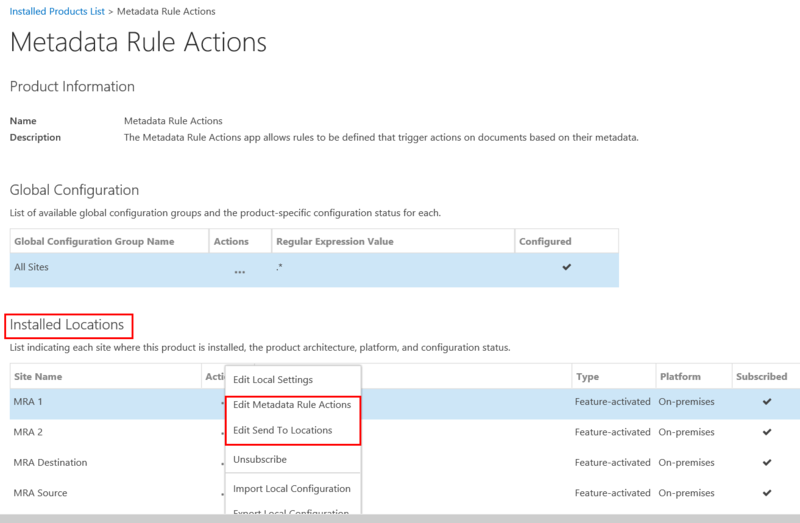
2. Click the Metadata Rule Actions tile on the Dashboard. The Metadata Rule Actions configuration page displays.
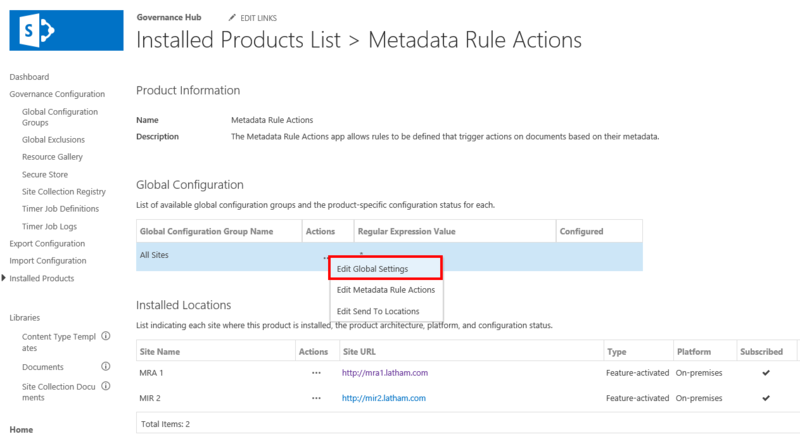
3. In the Global Configuration section, under the Actions column, click the Action menu (…) next to the All Sites Global Configuration Group, and then select Edit Global Settings. The Metadata Rule Actions Edit Global Settings page displays.
4. Edit the setting:
-
Maximum Processing Threads – Enter the maximum number of MRA actions that can be processed at one time. For example, a value of 10 means that 10 MRA actions can occur at the same time. Any additional MRA actions will be queued until a processing thread becomes available. You can enter any number you choose. The default is 10, the minimum number is 1, and there is no maximum number.
5. Click Save to save the setting.
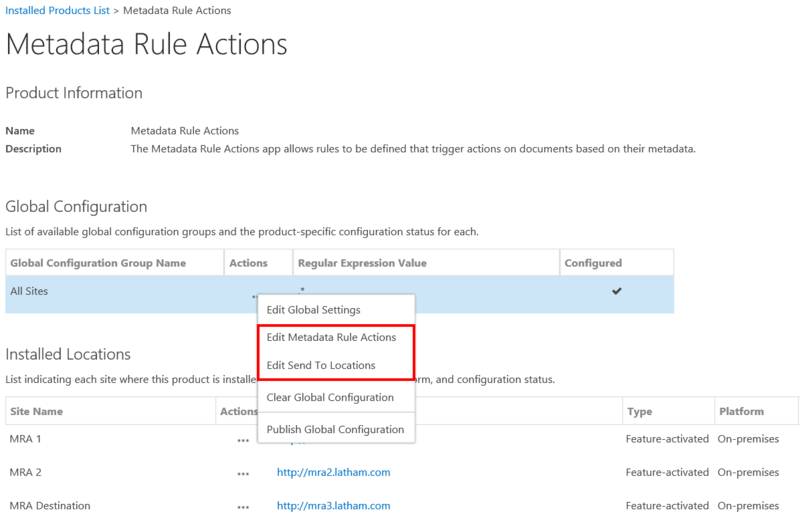
Configure MRA Globally from Governance Hub
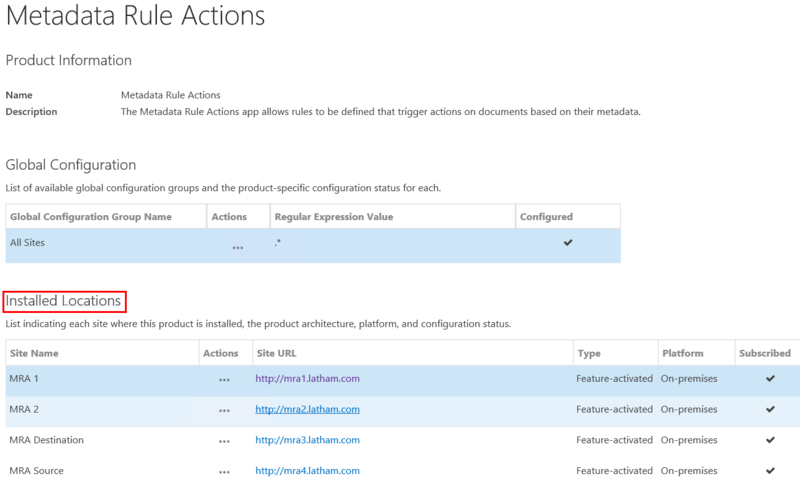
You can use Governance Hub to configure MRA Send To Locations and MRA rules for a Global Configuration Group. A Global Configuration Group is a unique set of product configuration settings that Governance Hub applies to one or more sites associated with this Global Configuration Group and on which a specific product is instantiated. Governance Hub automatically publishes the configuration data to the sites listed under the Installed Locations section shown in the following figure.
The sites listed under the Installed Locations section are sites where the MRA app has been added. If a site doesn't have the MRA app added, it won't display under Installed Locations.
Creating, Editing, & Deleting Send to Location
Creating Sent to Location
You must create MRA Send To Locations before you create MRA rules because the MRA rule must refer to a Send To Location.
-
On the site where Governance Hub is enabled, click Settings > Site Settings > Site Administration > Governance Hub. The Governance Hub Dashboard displays.
-
Click the Metadata Rule Actions tile. The Metadata Rule Actions configuration page displays.
-
Under Global Configuration, click the Actions menu (…) next to the Global Configuration Group you want to configure, and then select Edit Send To Locations. The Send To Locations list page displays.
-
Click + new item on the Send To Locations list page to create a new MRA Send To Location. The Send To Location Editor displays.
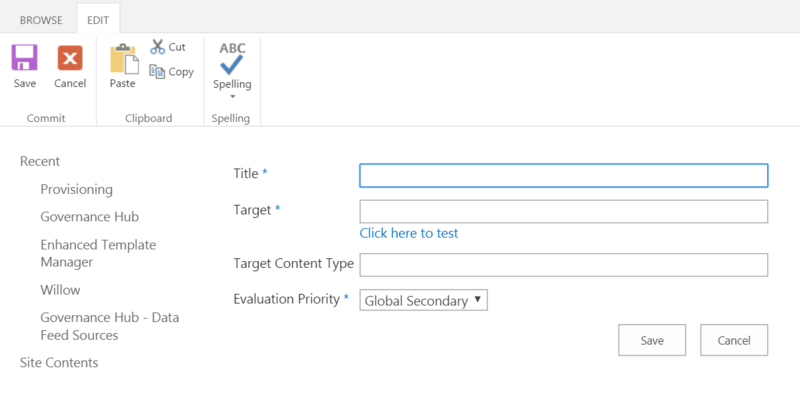
5. On the Send to Location Editor: Then click Save.
-
Enter a location name in the Title field. This title displays in the rule creation screen when you choose a target destination for either a Move or Move and Leave a Link action.
-
Enter a valid URL in the Target field for this location. This is the location where a document is moved to when a rule using this Send To Location is executed, and is where the MRA app must be installed. This URL must represent a SharePoint library or folder.
You can validate your Target URL by selecting the Click here to test link. If a Target Content Type is specified, it is also validated. Enter the name of a content type in the Target Content Type field to assign to documents when they are moved to the Target location (optional). If the content type specified in the rule is different from the document's original content type, only the common columns' metadata is retained. The following criteria describe which content type is assigned to the moved document in the Send To Location:
-
Target Content Type is Specified:
-
If Target Content Type is specified, and the MRA Send To Location contains that content type, then the document is assigned the specified Target Content Type when moved.
-
If the Target Content Type is specified and the MRA Send To Location does not contain that content type, then the document move does not occur.
-
-
Target Content Type is Blank:
-
If Target Content Type is blank, and the MRA Send To Location contains the document's original content type, the document retains that content type when moved.
-
If Target Content Type is blank, and the MRA Send To Location does not contain the document's original content type, then the Send To Location's default content type is assigned.
-
-
If the Drop Off library is in a Record Center site, then in addition to the Content Type existing in that library, there must also be an associated Content Organizer Rule defined for that Content Type. If not, the document will be assigned the default Content Type that is defined.
Leave the Target Content Type field blank if you're configuring the MRA Send To Location to point to a Drop Off Library, and you will use Alternate Names for a Content Type. Select an Evaluation Priority to determine which MRA Send To Location is applied if more than one location is defined. (This option has no effect on MRA Send To Locations.) The choices are:
-
Global Primary – This option has priority over locally-created locations and Global Secondary rules.
-
Global Secondary – This option has the lowest priority. Both Global Primary and any locally-created locations have higher priority.
Editing & Deleting Send to Location
Use caution when deleting MRA Send To Locations. Undesired behavior will occur if you delete a Send To Location that is referenced by a rule. MRA will not prevent this situation.
1. On the Metadata Rule Actions list page, click the ellipsis (…) next to the Send To Location you want to edit or delete.
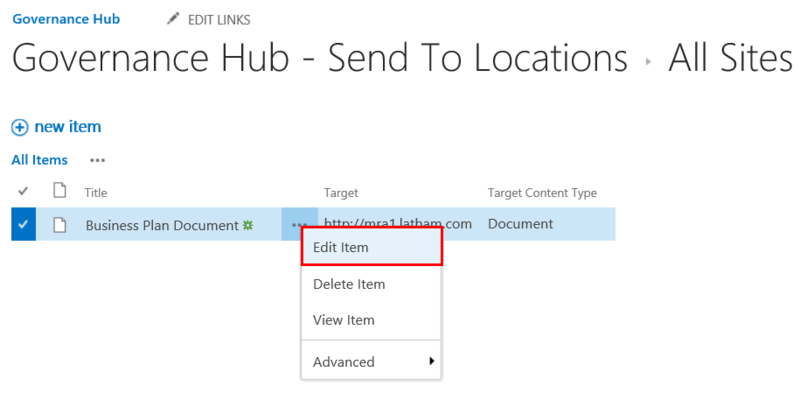
2. Next Step:
-
Edit: Select Edit Item. The Send To Location Editor displays.
-
Delete: Select Delete Item. A confirmation message displays. Click OK. The MRA Rule is deleted.
3. If you chose to Edit, on the MRA Rules Editor, change the values as desired. (For more information on these values, see Creating a New Global Send To Location at top of page.). Click Save.
To delete multiple global MRA Rules, follow these steps:
-
Click the checkmark next to each MRA Send To Location you want to delete, or click the checkmark in the column heading to select all Send To Locations.
-
Press the Delete key on your keyboard, or click Delete Item from the Items tab on the Ribbon. You are asked to confirm the deletion.
-
Click OK. The Send To Locations are deleted.
Creating, Editing, & Deleting Global MRA Rule
Creating a Global MRA Rule
You must create a MRA Send To Location before you create an MRA rule because the MRA rule must refer to a Send To Location. Global rules are published to the local instances that are members of the selected Global Configuration Group. For more information on Global Configuration Groups, see the Governance Hub section of this Help.
-
On the site where Governance Hub is enabled, click Settings > Site Setting > Site Administration, and then click Governance Hub. The Governance Hub Dashboard displays.
-
Click the Metadata Rule Actions tile. The Metadata Rule Actions configuration page displays.
-
Under the Global Configuration section, click the Actions menu (…) next to the Global Configuration Group you want to configure, and then select Edit Metadata Rule Actions. The Metadata Rule Actions list page displays.
-
Click + new item on the Metadata Rule Actions list page to add a new rule. The MRA Rule Editor displays.
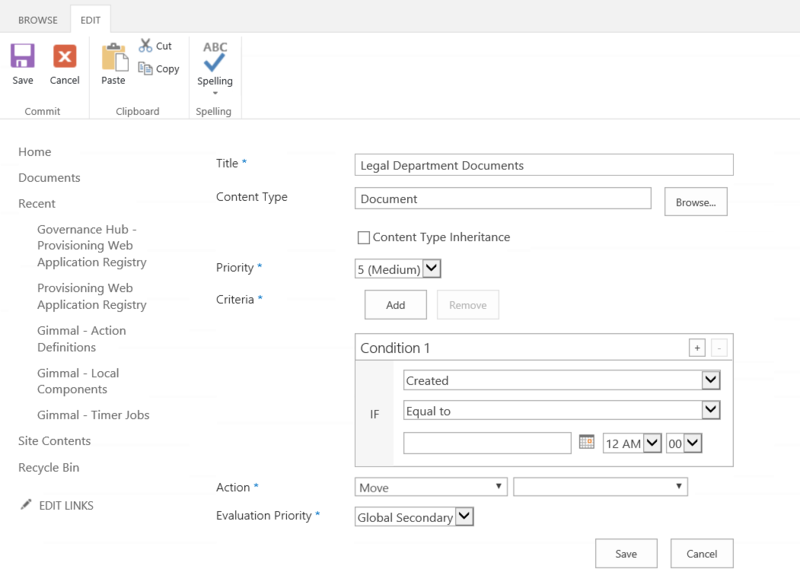
5. On the MRA Rule Editor, perform the following steps:
-
Enter a rule name in the Title field (required). Select a Content Type to restrict the rule's scope to only the selected content type.
-
To select a Content Type, follow these steps:
-
Click the Browse button. A list of content types displays.
-
Select a content type from the list.
-
Click OK. Then click Save.
-
Upon selecting a Target Content Type, a Content Type Inheritance checkbox displays below the Content Type field. Select this checkbox if you want your new rule to apply not only to the Target Content Type you selected above, but also to any "child" content types that fall under this Target Content Type. There are several advantages to using this option: it reduces the amount of new rules you have to create, because multiple content types can be encompassed by this one rule, and a new rule does not have to be created if a new child content type is created in the future.
-
Select a Priority from 1 (highest) to 9 (lowest) for your rule. Priority determines which rule is executed when a document meets two or more rules' criteria at the same time. Only one rule executes for a given document.
-
Add one or more Criteria for this rule. Criteria are the conditions under which you want this rule to be executed. Each box labeled "Condition n" contains criteria for the selected metadata field. You can create multiple criteria for a given metadata field. You can also create additional conditions if you want to further restrict your rule using additional metadata fields. The metadata fields that display in this section are based on the Content Type value you specified.
-
Enter criteria for a Condition – In the Condition 1 box, select a metadata field, an operator, and a comparison value.
-
Create additional comparisons within a Condition – Use the + icon in the Condition box to add another comparison operator and comparison value for the current metadata field. Comparisons within a Condition are evaluated using an Or operation.
-
Delete comparison from a Condition – Use the - icon in the Condition box to delete a comparison. Each time you click -, the most recently created comparison is deleted. The original comparison cannot be deleted.
-
Add New Condition – Click the Add button to add a new Condition. Conditions within the rule are evaluated using an And operation.
-
Delete Existing Condition – Click the Remove button to delete a Condition. Each time you click Remove, the most recently created Condition is deleted. The original Condition cannot be deleted.
-
When creating criteria that contain User fields, use the Contains operator and compare against the desired user's login name. When creating criteria that contain Date/Time fields, avoid using the Equals operator, as it is highly unlikely that a document's metadata value will match a specified time down to the second. Deleting or renaming a content type or column that is referenced in a rule may cause undesired behavior.
Select an Action from the dropdown list. These options determine the action that will be taken on a document under which the rule operates. You must select an action from the first dropdown list and an action target from the adjacent dropdown list. The action choices are:
-
Send To Location – This is a default MRA action group that contains the following actions:
-
Move – The document is moved from its original location to the specified target in the Send To Location in the adjacent dropdown list.
-
Move and Leave a Link – The document is moved from its original location to the specified target in the Send To Location in the adjacent dropdown list, and a link to the document is created in the original location.
-
For an MRA Send To Location action, you must first select the action, and then select a Send To Location in the adjacent dropdown list. MRA can perform a Move or Move and Leave a Link on a record if you change the record's declaration settings to Always allow manual declaration of records.
CCM – This is the action group that is available only if Convenience Copy Management is also installed in the same host site from where the Metadata Rule Action is being created. You must select a CCM Action Type from the first dropdown. Select a CCM action and a corresponding value in the adjacent dropdown list:
-
Create Convenience Copy
-
Create Convenience Link
-
Create Principal and Copy
-
Create Principal and Link
For a CCM action, you must select the action type first, and then select the named action from the adjacent dropdown field. The underlying CCM action must have the Require User Access checkbox unchecked.
6. Click Save.
Editing & Deleting a Global MRA Rule
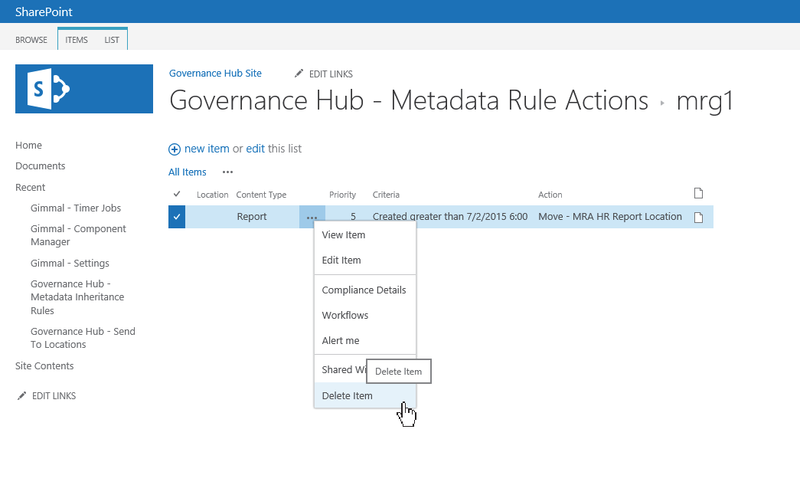
1. On the Metadata Rule Actions list page, click the ellipsis (…) next to the Send To Location you want to edit or delete.
2. Next Step:
-
Edit: Select Edit Item. The Send To Location Editor displays.
-
Delete: Select Delete Item. A confirmation message displays. Click OK. The MRA Rule is deleted.
3. If you chose to Edit, on the MRA Rules Editor, change the values as desired. (For more information on these values, see Creating a New Global Send To Location at top of page.). Click Save.
To delete multiple global MRA Rules, follow these steps:
-
Click the checkmark next to each MRA Send To Location you want to delete, or click the checkmark in the column heading to select all Send To Locations.
-
Press the Delete key on your keyboard, or click Delete Item from the Items tab on the Ribbon. You are asked to confirm the deletion.
-
Click OK. The MRA Rules are deleted.
Configure MRA Locally from Governance Hub
You can use Governance Hub to configure MRA Send To Locations and MRA rules that are local to the site where MRA is installed. This section describes how to configure local Send To Locations and MRA rules using the Governance Hub for sites listed under the Installed Locations section, as shown in the following figure. The Installed Locations section lists all of the sites where MRA has been installed.
You must install Metadata Rule Actions on both the source and target sites.Managing MRA Rules and Send To Locations locally for a given MRA instance does not affect any other instances.To add MRA to a newly-created site, you can use Gimmal's Provisioning product.
Creating, Editing, & Deleting Send to Location
Creating Send to Location Locally
You must create MRA Send To Locations before you create MRA rules because the MRA rule must refer to a Send To Location.
-
On the site where Governance Hub is enabled, click Settings > Site Settings > Site Administration > Governance Hub. The Governance Hub Dashboard displays.
-
Click the Metadata Rule Actions tile. The Metadata Rule Actions configuration page displays.
-
Under Global Configuration, click the Actions menu (…) next to the Global Configuration Group you want to configure, and then select Edit Send To Locations. The Send To Locations list page displays.
-
Click + new item on the Send To Locations list page to create a new MRA Send To Location. The Send To Location Editor displays.
5. On the Send to Location Editor: Then click Save.
-
Enter a location name in the Title field. This title displays in the rule creation screen when you choose a target destination for either a Move or Move and Leave a Link action.
-
Enter a valid URL in the Target field for this location. This is the location where a document is moved to when a rule using this Send To Location is executed, and is where the MRA app must be installed. This URL must represent a SharePoint library or folder.
You can validate your Target URL by selecting the Click here to test link. If a Target Content Type is specified, it is also validated. Enter the name of a content type in the Target Content Type field to assign to documents when they are moved to the Target location (optional). If the content type specified in the rule is different from the document's original content type, only the common columns' metadata is retained. The following criteria describe which content type is assigned to the moved document in the Send To Location:
-
Target Content Type is Specified:
-
If Target Content Type is specified, and the MRA Send To Location contains that content type, then the document is assigned the specified Target Content Type when moved.
-
If the Target Content Type is specified and the MRA Send To Location does not contain that content type, then the document move does not occur.
-
-
Target Content Type is Blank:
-
If Target Content Type is blank, and the MRA Send To Location contains the document's original content type, the document retains that content type when moved.
-
If Target Content Type is blank, and the MRA Send To Location does not contain the document's original content type, then the Send To Location's default content type is assigned.
-
-
If the Drop Off library is in a Record Center site, then in addition to the Content Type existing in that library, there must also be an associated Content Organizer Rule defined for that Content Type. If not, the document will be assigned the default Content Type that is defined.
Leave the Target Content Type field blank if you're configuring the MRA Send To Location to point to a Drop Off Library, and you will use Alternate Names for a Content Type. Select an Evaluation Priority to determine which MRA Send To Location is applied if more than one location is defined. (This option has no effect on MRA Send To Locations.) The choices are:
-
Global Primary – This option has priority over locally-created locations and Global Secondary rules.
-
Global Secondary – This option has the lowest priority. Both Global Primary and any locally-created locations have higher priority.
Editing & Deleting Send to Location from Governance Hub
Use caution when deleting MRA Send To Locations. Undesired behavior will occur if you delete a Send To Location that is referenced by a rule. MRA will not prevent this situation.
1. On the Metadata Rule Actions list page, click the ellipsis (…) next to the Send To Location you want to edit or delete.
2. Next Step:
-
Edit: Select Edit Item. The Send To Location Editor displays.
-
Delete: Select Delete Item. A confirmation message displays. Click OK. The MRA Rule is deleted.
3. If you chose to Edit, on the MRA Rules Editor, change the values as desired. (For more information on these values, see Creating a New Global Send To Location at top of page.). Click Save.
To delete multiple global MRA Rules, follow these steps:
-
Click the checkmark next to each MRA Send To Location you want to delete, or click the checkmark in the column heading to select all Send To Locations.
-
Press the Delete key on your keyboard, or click Delete Item from the Items tab on the Ribbon. You are asked to confirm the deletion.
-
Click OK. The Send To Locations are deleted.
Creating, Editing, & Deleting Local MRA Rule from Governance Hub
Creating Local MRA Rule
You must create a MRA Send To Location before you create an MRA rule because the MRA rule must refer to a Send To Location. Global rules are published to the local instances that are members of the selected Global Configuration Group. For more information on Global Configuration Groups, see the Governance Hub section of this Help.
-
On the site where Governance Hub is enabled, click Settings > Site Setting > Site Administration, and then click Governance Hub. The Governance Hub Dashboard displays.
-
Click the Metadata Rule Actions tile. The Metadata Rule Actions configuration page displays.
-
Under the Global Configuration section, click the Actions menu (…) next to the Global Configuration Group you want to configure, and then select Edit Metadata Rule Actions. The Metadata Rule Actions list page displays.
-
Click + new item on the Metadata Rule Actions list page to add a new rule. The MRA Rule Editor displays.
5. On the MRA Rule Editor, perform the following steps:
-
Enter a rule name in the Title field (required).Select a Content Type to restrict the rule's scope to only the selected content type.
-
To select a Content Type, follow these steps:
-
Click the Browse button. A list of content types displays.
-
Select a content type from the list.
-
Click OK. Then click Save.
-
Upon selecting a Target Content Type, a Content Type Inheritance checkbox displays below the Content Type field. Select this checkbox if you want your new rule to apply not only to the Target Content Type you selected above, but also to any "child" content types that fall under this Target Content Type. There are several advantages to using this option: it reduces the amount of new rules you have to create, because multiple content types can be encompassed by this one rule, and a new rule does not have to be created if a new child content type is created in the future.
-
Select a Priority from 1 (highest) to 9 (lowest) for your rule. Priority determines which rule is executed when a document meets two or more rules' criteria at the same time. Only one rule executes for a given document.
-
Add one or more Criteria for this rule. Criteria are the conditions under which you want this rule to be executed. Each box labeled "Condition n" contains criteria for the selected metadata field. You can create multiple criteria for a given metadata field. You can also create additional conditions if you want to further restrict your rule using additional metadata fields. The metadata fields that display in this section are based on the Content Type value you specified.
-
Enter criteria for a Condition – In the Condition 1 box, select a metadata field, an operator, and a comparison value.
-
Create additional comparisons within a Condition – Use the + icon in the Condition box to add another comparison operator and comparison value for the current metadata field. Comparisons within a Condition are evaluated using an Or operation.
-
Delete comparison from a Condition – Use the - icon in the Condition box to delete a comparison. Each time you click -, the most recently created comparison is deleted. The original comparison cannot be deleted.
-
Add New Condition – Click the Add button to add a new Condition. Conditions within the rule are evaluated using an And operation.
-
Delete Existing Condition – Click the Remove button to delete a Condition. Each time you click Remove, the most recently created Condition is deleted. The original Condition cannot be deleted.
-
When creating criteria that contain User fields, use the Contains operator and compare against the desired user's login name. When creating criteria that contain Date/Time fields, avoid using the Equals operator, as it is highly unlikely that a document's metadata value will match a specified time down to the second. Deleting or renaming a content type or column that is referenced in a rule may cause undesired behavior.
-
Select an Action from the dropdown list. These options determine the action that will be taken on a document under which the rule operates. You must select an action from the first dropdown list and an action target from the adjacent dropdown list. The action choices are:
-
Send To Location – This is a default MRA action group that contains the following actions:
-
Move – The document is moved from its original location to the specified target in the Send To Location in the adjacent dropdown list.
-
Move and Leave a Link – The document is moved from its original location to the specified target in the Send To Location in the adjacent dropdown list, and a link to the document is created in the original location.
-
-
For an MRA Send To Location action, you must first select the action, and then select a Send To Location in the adjacent dropdown list. MRA can perform a Move or Move and Leave a Link on a record if you change the record's declaration settings to Always allow manual declaration of records.
-
CCM – This is the action group that is available only if Convenience Copy Management is also installed in the same host site from where the Metadata Rule Action is being created. You must select a CCM Action Type from the first dropdown. Select a CCM action and a corresponding value in the adjacent dropdown list:
-
Create Convenience Copy
-
Create Convenience Link
-
Create Principal and Copy
-
Create Principal and Link
-
For a CCM action, you must select the action type first, and then select the named action from the adjacent dropdown field. The underlying CCM action must have the Require User Access checkbox unchecked.
Editing & Deleting Local MRA Rule
1. On the Metadata Rule Actions list page, click the ellipsis (…) next to the Send To Location you want to edit or delete.
2. Next Step:
-
Edit: Select Edit Item. The Send To Location Editor displays.
-
Delete: Select Delete Item. A confirmation message displays. Click OK. The MRA Rule is deleted.
3. If you chose to Edit, on the MRA Rules Editor, change the values as desired. (For more information on these values, see Creating a New Global Send To Location at top of page.). Click Save.
To delete multiple global MRA Rules, follow these steps:
-
Click the checkmark next to each MRA Send To Location you want to delete, or click the checkmark in the column heading to select all Send To Locations.
-
Press the Delete key on your keyboard, or click Delete Item from the Items tab on the Ribbon. You are asked to confirm the deletion.
-
Click OK. The MRA Rules are deleted.
Configure MRA Locally from Host Site
In addition to configuring Metadata Rule Actions (MRA) using the Governance Hub, you can configure MRA from any site where MRA is deployed. The Installed Locations section lists all of the sites where MRA has been installed.
You must install Metadata Rule Actions on both the source and target sites. Managing MRA Rules and Send To Locations locally for a given MRA instance does not affect any other instances. To add MRA to a newly-created site, you can use Gimmal's Provisioning product.
Creating, Editing, & Deleting Send to Location
Creating a Local Send to Location from Host Site
-
Navigate to the site where MRA is deployed.
-
Select Settings > Site Settings. The Site Settings page displays.
-
Click Gimmal Software Configuration under the Site Administration section. The Installed Products List displays.
-
Click the Metadata Rule Actions tile. The MRA local configuration page displays.
-
Under the Actions section, click Edit Send To Locations. The Send To Location list page displays.
-
Click + new item on the Send To Locations list page. The Send To Location Editor displays.
-
On the Send to Location Editor page, perform the following steps then click Save:
-
Enter a location name in the Title field. This title displays in the rule creation screen when you choose a target destination for either a Move or Move and Leave a Link action.
-
Enter a valid URL in the Target field for this location. This is the location where a document is moved to when a rule using this MRA Send To Location is executed. This URL must represent a SharePoint library or folder.
-
Enter the name of a content type in the Target Content Type field to assign to documents when they are moved to the Target location (optional). If the content type specified in the rule is different from the document's original content type, only the ommon columns' metadata is retained. The following criteria describe which content ype is assigned to the moved document in the Send To Location:
-
Target Content Type is Specified:
-
If Target Content Type is specified, and the MRA Send To Location contains hat content type, then the document is assigned the specified Target Content ype when moved.
-
If Target Content Type is specified, and the MRA Send To Location does not ontain that content type, then the document will have the MRA Send To ocation's default Content Type assigned.
-
-
Target Content Type is Blank:
-
If Target Content Type is blank, and the MRA Send To Location contains the document's original content type, the document retains that content type when moved.
-
If Target Content Type is blank, and the MRA Send To Location does not contain the document's original content type, then the MRA Send To Location's default content type is assigned.
-
If the Drop Off library is in a Record Center site, then in addition to the Content Type existing in that library, there must also be an associated Content Organizer Rule defined for that Content Type. If not, the document will be assigned the default Content Type that is defined.
-
Leave the Target Content Type field blank if you're configuring the MRA Send To Location to point to a Drop Off Library, and you will use Alternate Names for a Content Type.
-
-
-
-
Editing & Deleting a Local Send to Location from the Host Site
Use caution when deleting MRA Send To Locations. Undesired behavior will occur if you delete an MRA Send To Location that is referenced by a rule. MRA will not prevent this situation.
-
Click the ellipsis (…) next to the MRA Rule you want to edit on the Send To Locations list page.
-
Next Step:
-
Edit: Select Edit Item. The MRA Rule Editor displays.
-
Delete: Select Delete Item. A confirmation message displays. Click OK. The MRA Rule is deleted.
-
-
If you chose to Edit, on the MRA Rule Editor, change the values as desired. (For more information on these values, see Creating a MRA Rule from the Host Site at the top of the page.) Click Save.
To delete multiple MRA Rules, follow these steps:
-
Click the checkmark next to each MRA Send MRA Rule you want to delete, or click the checkmark in the column heading to select all Send To Locations.
-
Press the Delete key on your keyboard, or click Delete Item from the Items tab on the Ribbon. You are asked to confirm the deletion.
-
Click OK. The Send To Locations are deleted.
Creating, Editing, & Deleting Local MRA Rule from Host Site
Creating a Local MRA Rule from Host Site
You must create a MRA Send To Location before you create an MRA rule because the MRA rule must refer to a Send To Location. Global rules are published to the local instances that are members of the selected Global Configuration Group. For more information on Global Configuration Groups, see the Governance Hub section of this Help.
-
Navigate to the site where MRA is deployed.
-
On the site where Governance Hub is enabled, click Settings > Site Setting
-
Click Gimmal Software Configuration under the Site Administration section. The Installed Products List displays.
-
Click the Metadata Rule Actions tile. The Metadata Rule Actions configuration page displays.
-
Under the Global Configuration section, click the Actions menu (…) next to the Global Configuration Group you want to configure, and then select Edit Metadata Rule Actions. The Metadata Rule Actions list page displays.
-
Click + new item on the Metadata Rule Actions list page to add a new rule. The MRA Rule Editor displays.
7. On the MRA Rule Editor, perform the following steps:
-
Enter a rule name in the Title field (required). Select a Content Type to restrict the rule's scope to only the selected content type.
-
To select a Content Type, follow these steps:
-
Click the Browse button. A list of content types displays.
-
Select a content type from the list.
-
Click OK. Then click Save.
-
Upon selecting a Target Content Type, a Content Type Inheritance checkbox displays below the Content Type field. Select this checkbox if you want your new rule to apply not only to the Target Content Type you selected above, but also to any "child" content types that fall under this Target Content Type. There are several advantages to using this option: it reduces the amount of new rules you have to create, because multiple content types can be encompassed by this one rule, and a new rule does not have to be created if a new child content type is created in the future.
-
Select a Priority from 1 (highest) to 9 (lowest) for your rule. Priority determines which rule is executed when a document meets two or more rules' criteria at the same time. Only one rule executes for a given document.
-
Add one or more Criteria for this rule. Criteria are the conditions under which you want this rule to be executed. Each box labeled "Condition n" contains criteria for the selected metadata field. You can create multiple criteria for a given metadata field. You can also create additional conditions if you want to further restrict your rule using additional metadata fields. The metadata fields that display in this section are based on the Content Type value you specified.
-
Enter criteria for a Condition – In the Condition 1 box, select a metadata field, an operator, and a comparison value.
-
Create additional comparisons within a Condition – Use the + icon in the Condition box to add another comparison operator and comparison value for the current metadata field. Comparisons within a Condition are evaluated using an Or operation.
-
Delete comparison from a Condition – Use the - icon in the Condition box to delete a comparison. Each time you click -, the most recently created comparison is deleted. The original comparison cannot be deleted.
-
Add New Condition – Click the Add button to add a new Condition. Conditions within the rule are evaluated using an And operation.
-
Delete Existing Condition – Click the Remove button to delete a Condition. Each time you click Remove, the most recently created Condition is deleted. The original Condition cannot be deleted.
-
When creating criteria that contain User fields, use the Contains operator and compare against the desired user's login name. When creating criteria that contain Date/Time fields, avoid using the Equals operator, as it is highly unlikely that a document's metadata value will match a specified time down to the second. Deleting or renaming a content type or column that is referenced in a rule may cause undesired behavior.
Select an Action from the dropdown list. These options determine the action that will be taken on a document under which the rule operates. You must select an action from the first dropdown list and an action target from the adjacent dropdown list. The action choices are:
-
Send To Location – This is a default MRA action group that contains the following actions:
-
Move – The document is moved from its original location to the specified target in the Send To Location in the adjacent dropdown list.
-
Move and Leave a Link – The document is moved from its original location to the specified target in the Send To Location in the adjacent dropdown list, and a link to the document is created in the original location.
-
For an MRA Send To Location action, you must first select the action, and then select a Send To Location in the adjacent dropdown list. MRA can perform a Move or Move and Leave a Link on a record if you change the record's declaration settings to Always allow manual declaration of records.
CCM – This is the action group that is available only if Convenience Copy Management is also installed in the same host site from where the Metadata Rule Action is being created. You must select a CCM Action Type from the first dropdown. Select a CCM action and a corresponding value in the adjacent dropdown list:
-
Create Convenience Copy
-
Create Convenience Link
-
Create Principal and Copy
-
Create Principal and Link
For a CCM action, you must select the action type first, and then select the named action from the adjacent dropdown field. The underlying CCM action must have the Require User Access checkbox unchecked.
Either Location or Content Type must contain a value.
Editing & Deleting Local MRA Rule from Host site
-
Click the ellipsis (…) next to the MRA Rule you want to edit on the Send To Locations list page.
-
Next Step:
-
Edit: Select Edit Item. The MRA Rule Editor displays.
-
Delete: Select Delete Item. A confirmation message displays. Click OK. The MRA Rule is deleted.
-
-
If you chose to Edit, on the MRA Rule Editor, change the values as desired. (For more information on these values, see Creating a MRA Rule from the Host Site at the top of the page.) Click Save.
To delete multiple MRA Rules, follow these steps:
-
Click the checkmark next to each MRA Send MRA Rule you want to delete, or click the checkmark in the column heading to select all Send To Locations.
-
Press the Delete key on your keyboard, or click Delete Item from the Items tab on the Ribbon. You are asked to confirm the deletion.
-
Click OK. The MRA Rules are deleted.