
This section provides a high-level description of the installation process for the Content Governance for SharePoint Feature-Activated (FA) components. For more detailed installation information, including installation requirements, see the remaining help topics in this section. The following diagram describes the high-level tasks that you must complete to install the Content Governance for SharePoint (FA) components. You must complete the steps in this order.

Installation Prerequisites
To successfully install and run the Content Governance for SharePoint components, ensure your system meets the requirements described below.
-
Site Owner/Full Control permission is required to activate FA features; Site Collection Administrator permission is required for site collection level features.
-
You have installed the latest version of the SharePoint 2013/2016/2019 Gimmal Solution Development Kit (SDK) in your SharePoint 2013/2016/2019 environment. You can retrieve the latest version of the SDK package from the Gimmal Software Download site under the Content Governance for SharePoint > Product Download section.
-
You have installed and deployed Governance Hub. (See Performing a New Installation.) (Note: Governance Hub does not currently support operating in an ADFS or mixed authentication environment.)
-
You have created the Governance Hub site.You have identified the full path to a certificate file (e.g., .cer or .pfx file), which is required for several installation tasks found later in the installation steps (i.e, Running the Governance Hub Encryption Script and Installing the Gimmal Job Scheduler Service (link)).
-
You have created and configured a Content Type Hub*.
-
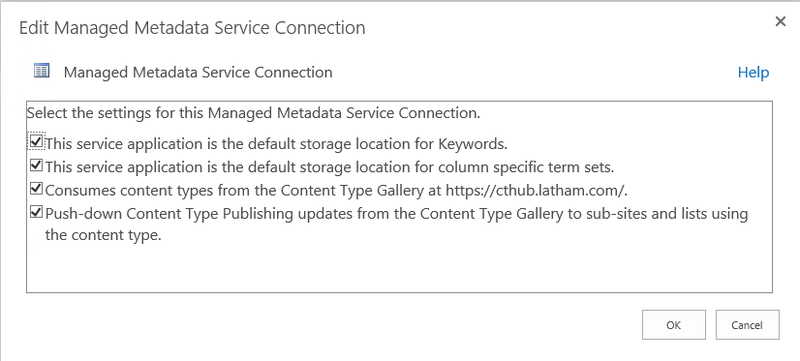
You have created and configured a Managed Metadata Service* (MMS). To configure MMS, ensure the following properties are set for the MMS connection:
-
You have installed the following:
-
SharePoint Server 2013 with April 2018 Cumulative Update OR SharePoint Server 2016 with April 2018 Cumulative Update OR SharePoint Server 2019 with March 2020 Cumulative Update.
-
Microsoft .NET Framework 4.6.1 or later.
-
Some content in this guide includes SharePoint out-of-the-box (OOTB) procedures. It is beyond the scope of this guide to include SharePoint documentation. For more information on OOTB procedures, see Microsoft's SharePoint 2013/2016/2019 documentation.
Installing/Upgrading the Gimmal SDK
If you're performing a new installation of the Gimmal SDK, complete both sections. If you're upgrading the SDK, perform the first section only.
Downloading and Running the SDK Script
-
Retrieve the latest version of the SharePoint 2013/2016/2019 SDK package from the Gimmal product download site under the Content Governance for SharePoint > Product Download section.
-
Extract the package files to a local folder.
-
Open the SharePoint 2013/2016/2019 Management Shell as an administrator (right-click and choose Run as Administrator).
-
In the Management Shell window, navigate to the <Extract Folder>\Gimmal Software\ WSPs folder.
When executed, the setup.ps1 script performs an iisreset and stops and starts the SharePoint Timer Service.
-
Run the setup.ps1 script found in the directory.
If you see a message similar to "setup.ps1 cannot be loaded because the execution of scripts is disabled on this system," you must enable running scripts. Run the following command: Set‐ExecutionPolicy Unrestricted. For more information, see Using the Set-ExecutionPolicy Cmdlet.
-
Wait for the script to complete.
Granting Application Pool Account Permissions
Perform the following steps for each content web application in the farm, after you first install the SDK.
-
Ensure the application pool account has at least Read access to the Central Administration site, and then perform these steps:
-
Navigate to Central Administration > Site Settings > Site Permissions.
-
From the Permissions tab, click Grant Permissions in the ribbon. The 'Central Administration' dialog displays.
-
Click the SHOW OPTIONS link.
-
From the Select a group or permission level drop-down list, select Read.
-
In the Invite people to 'Read' field, enter the web application pool account (service account) for each content web application in your farm.
-
Click Share.
-
-
Ensure the application pool account has at least Read access to the Carbon Configuration list, and then perform these steps:
-
Navigate to Central Administration > Site Contents, then click the Carbon Configurationlist.
-
On the Carbon Configuration list page, click the List tab.
-
In the ribbon, click the List Settings button. The list settings screen displays.
-
Click Permissions for this List.
-
Ensure that all content web application pool accounts (service accounts) have Read access to the list.
If the Carbon Configuration list permissions are inherited from the parent site, the content web application pool accounts will have the proper Read permission.
-
-
Ensure the application pool account has at least Contribute access to the Carbon Job Definitions list, and then perform these steps:
Each time you create a new application pool account for a content web application, perform the steps in this section for the application pool account.
-
Navigate to Central Administration > Site Contents, then click the Carbon Job Definitions list.
-
On the Carbon Job Definitions list page, click the List tab.
-
In the ribbon, click the List Settings button. The list settings screen displays.
-
Click Permissions for this List.
-
In the Permissions tab, click the Stop Inheriting Permissions button. (Note that permission inheritance may already be broken, and that the service accounts may already be added to the list with Contribute permissions.)
-
Click OK in the confirmation dialog.
-
In the Permissions tab, click the Grant Permissions button. The Share 'Carbon Job Definitions' screen displays.
-
In the Invite people to 'Contribute' field, enter the web application pool account (service account) for each content web application in your farm.
-
Click Share.
-
Installing
The following steps provide a high-level overview of the installation process. See the next two help topics in this section for more detailed instructions. Perform these steps on a SharePoint Web Front End (WFE) as a member of the local server Administrators group.
-
Ensure that you meet the prerequisites listed in Installation Prerequisites.
-
Download and extract the Content Governance for SharePoint Feature-Activated download package from the Gimmal product download site.
-
Run the Setup.ps1 script to deploy the product solutions.
-
In Central Administration, verify solution(s) deployment.
-
Run the Set‐GovernanceHubProperties.ps1 script.
You must create your Governance Hub site before you run this script, or else it will fail.
-
Run the Set‐GovernanceHubEncryption.ps1 script.
-
Create any required Governance Hub Secure Store list items.
-
Activate Content Governance for SharePoint features.
-
Install the Gimmal Job Scheduler.
-
Update the Gimmal Job Scheduler files.
You must install Governance Hub into its own dedicated site. The site must be subscribed to the Content Type Hub, but it is recommended that you do not install Governance Hub on the same site as the Content Type Hub. Do not install Governance Hub to a subsite. Only activate the Governance Hub feature in one site collection in a farm!
Performing a New Installation
-
Retrieve the Content Governance for SharePoint Feature-Activated download package from the Gimmal product download site, and download it to a single folder on the SharePoint Server.
-
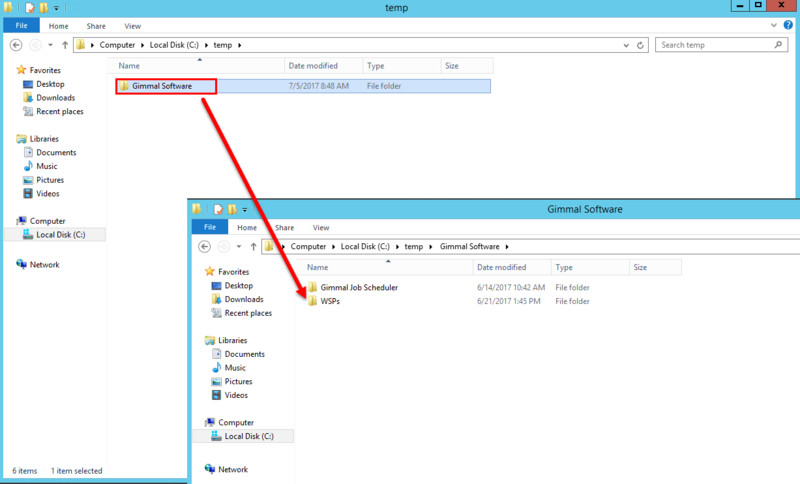
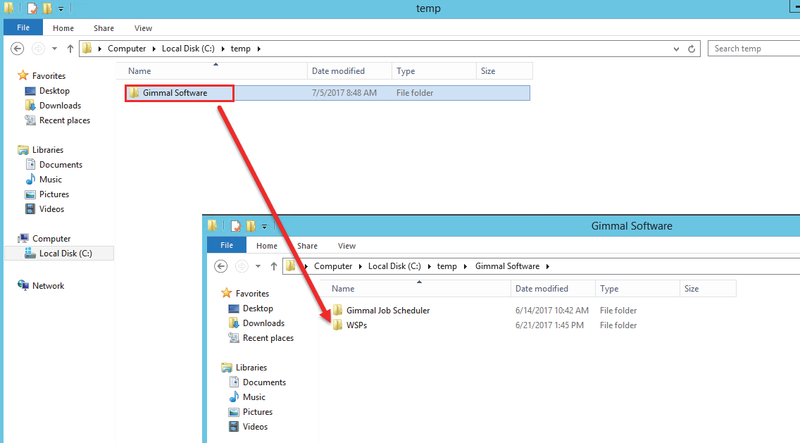
Extract the download package to the same folder where you saved the zipped file, ideally in the same root folder where you extracted the Gimmal SDK. The download package extracts its file contents to a common folder structure, as shown in the figure below. If prompted, select to replace all existing files. Do not extract to a folder that contains older versions of any of the Content Governance for SharePoint components. After you extract the files, you see a Gimmal Software folder that contains a WSPs subfolder.
-
After you extract the files, you see a Gimmal Software folder that contains a WSPs subfolder.Navigate to the WSPs folder. This folder contains all of the WSP files and setup files that you will need to install the Content Governance for SharePoint components.
If you do not want to install a specific Content Governance for SharePoint component, delete the WSP for that component from the WSPs folder. If you do not delete any WSPs, all of the Content Governance for SharePoint components will be installed. Do NOT delete the Governance Hub WSP or any supporting files in the WSPs folder. You must install Governance Hub.
-
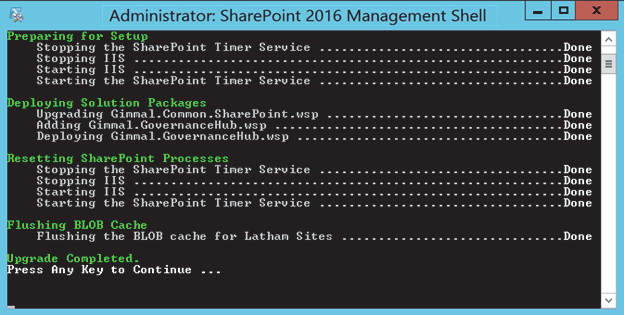
Launch the SharePoint 2013/2016/2019 Management Shell window as an Administrator and run the Setup.ps1 script located in the WSPs folder where the files were extracted from the package.
If you see a message similar to "setup.ps1 cannot be loaded because the execution of scripts is disabled on this system," you must enable running scripts. Run the following command: Set-ExecutionPolicy Unrestricted. For more information, see Using the Set-ExecutionPolicy Cmdlet. The Setup.ps1 script performs an iisreset and stops and starts the SharePoint Timer Service.
-
Two screens display; press any key when prompted to close the second window and once again to close the first window.
-
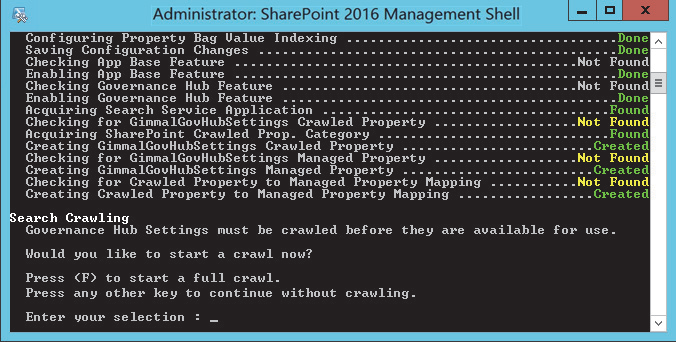
Return to the WSPs folder and run the Set‐GovernanceHubProperties.ps1 script that is located there* (new installation only). This script creates a new search managed property called GimmalGovHubSettings for on-premises installations, and it activates several Governance Hub-related features, including the Gimmal - Governance Hub feature.
You must create the Governance Hub site before you run this script, or else it will fail. Install Governance Hub into its own dedicated site. The site must be subscribed to the Content Type Hub. It is recommended that you do not install Governance Hub on the same site as the Content Type Hub. Do not install Governance Hub to a subsite.
-
You are prompted for the full URL to the site where Governance Hub will be installed. Enter the full URL for the Governance Hub site and press Enter.
-
You are prompted to perform a search crawl. Press the F key to initiate a full crawl immediately, or press any other key to continue without performing a full crawl.
A full crawl is required to allow Gimmal Feature-Activated components to self-register with the Governance Hub when they are activated. You may perform the full crawl at any time, but Gimmal Feature-Activated components cannot self-register until the crawl is performed.
-
You are prompted to Press Any Key to Continue.... Press a key to exit the script.
Verifying Solution Deployment
-
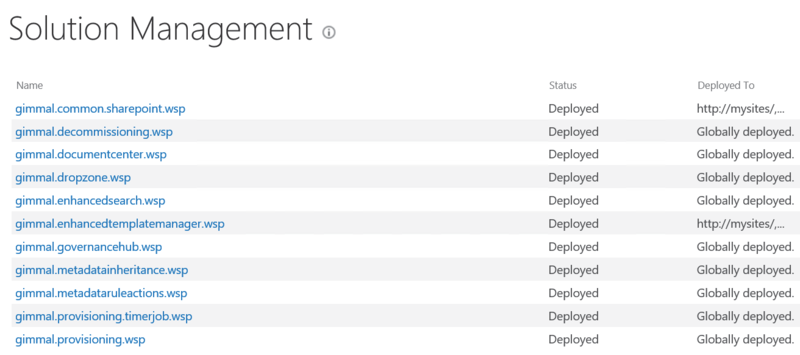
From SharePoint's Central Administration, select System Settings > Manage Farm Solutions. The Solution Management page displays.
-
Ensure that the solution file name(s) display on the Solution Management page for the components you installed, as shown in the following figure.
Configuring the Gimmal Secure Store
After you install or upgrade to a new version of Governance Hub, you must manually create Secure Store list items in the Gimmal Secure Store list located on the Governance Hub site if you're installing into a Feature-Activated environment.
The Governance Hub Secure Store list contains user credentials and specifies the required permissions for several of Gimmal's Feature-Activated components, including:
-
Decommissioning
-
Enhanced Template Manager
-
Metadata Rule Actions
-
Provisioning
Before you create these Secure Store list items, you must run the Governance Hub encryption script, which creates the encryption key required for encrypting and decrypting contents in the Secure Store. This script is a PowerShell script that must be executed on a SharePoint server and requires the Gimmal Solution Development Kit (SDK) to be installed. See Installing/Upgrading the Gimmal SDK for instructions for how to install the SDK.
For on-premises installations, do not use a web application App Pool Identity account for any Secure Store credentials.
Running the Governance Hub Encryption Script
-
Connect to the SharePoint Server using the Farm Administrator account.
-
Open the SharePoint 2013/2016/2019 Management Shell as an administrator (right-click and choose Run as Administrator).
-
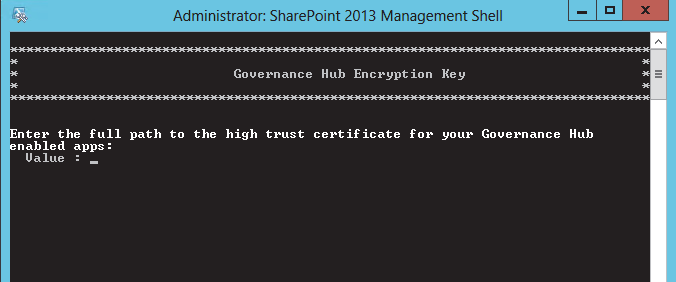
Run the Set-GovernanceHubEncryption.ps1 script located in the WSPs folder where the files were extracted from the package (new installation only).
-
Change to the location where the script file was copied/extracted, and then execute the script using the command:.\Set-GovernanceHubEncryption.ps1
-
When prompted, enter the full path to a certificate file (e.g., .cer or .pfx file), as listed on the
Installation Prerequisites
at the top of this page.
6. After the script completes, press any key to finish and close the SharePoint Management Shell window.
Creating the Secure Store List Items
Decommissioning
After you install or upgrade to a new version of Governance Hub, you must manually create the following Secure Store list item in the Gimmal Secure Store list located on the Governance Hub site to ensure that Decommissioning functions properly:
-
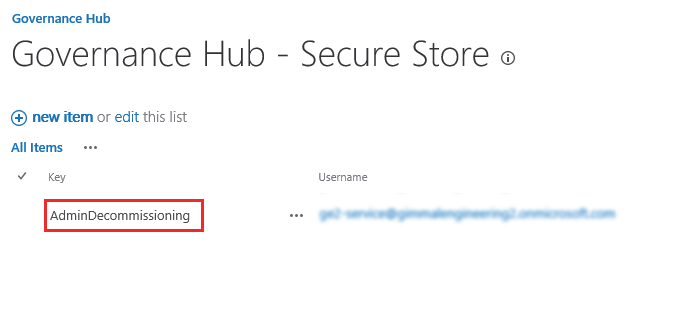
AdminDecommissioning – Supports the deletion of site collections
For on-premises installations, do not use a web application App Pool Identity account for any Secure Store Credentials.
-
Key: AdminDecommissioning
-
Username: Username for farm or tenant account
-
Password: Password for farm or tenant account
Ensure that the username is in the form of '<username>@<domain>' and not '<domain>\<username>'.
-
-
Click Save. The AdminDecommissioning list item displays on the Secure Store page, as shown in the following figure.
Enhanced Template Manager
After you install or upgrade to a new version of Governance Hub, you must manually create the following Secure Store list item in the Gimmal Secure Store list located on the Governance Hub site to ensure that Enhanced Template Manager functions properly:
-
Gimmal.EnhancedTemplateManager
To add this Secure Store item, follow these steps as a user who has Contribute permission:
-
On the site where Enhanced Template Manager is deployed, navigate to Settings > Site Settings. The Site Settings page displays.
-
Under the Site Administration section, click Governance Hub to launch the Governance Hub dashboard.
-
Access the Governance Hub – Secure Store page by clicking Secure Store on the left navigation pane of the Governance Hub dashboard.
-
Click +new item. The list item page displays.
-
Enter the following information in the fields:
-
Key: Gimmal.EnhancedTemplateManager
-
Username: Username for farm or tenant account
-
Password: Password for farm or tenant account
Ensure that the username is in the form of '<username>@<domain>' and not '<domain>\<username>'.
-
-
Click Save. The Gimmal.EnhancedTemplateManager list item displays on the Secure Store page, as shown in the following figure.
Metadata Rule Actions
After you install or upgrade to a new version of Governance Hub, you must manually create the following Secure Store list item in the Gimmal Secure Store list located on the Governance Hub site to ensure MRA functions properly:
-
Gimmal.MetadataRuleActions
To add this Secure Store item, follow these steps as a user who has Contribute permission:
-
On the site where MRA is deployed, navigate to Settings > Site Settings. The Site Settings page displays.
-
Under the Site Administration section, click Governance Hub to launch the Governance Hub dashboard.
-
Access the Governance Hub – Secure Store page by clicking Secure Store on the left navigation pane of the Governance Hub dashboard.
-
Click +new item. The list item page displays.
-
Enter the following information in the fields:
-
Key: Gimmal.MetadataRuleActions
-
Username: Username for farm or tenant account
-
Password: Password for farm or tenant account
Ensure that the username is in the form of '<username>@<domain>' and not '<domain>\<username>'.
-
-
Click Save. The Gimmal.MetadataRuleActions list item displays on the Secure Store page, as shown in the following figure.
When using MRA to send documents to a Drop Off Library, the user specified in the Gimmal.MetadataRuleActions Secure Store entry must be in the "Records Center Web Service Submitters" group on the destination site. For more information, see the Configuring MRA section.
Provisioning
To install add-ins during the provisioning process, you can create a secure store list item called AppProvisioning in the Secure Store list located on the Governance Hub site. This list item contains user credentials that are required to install the desired Gimmal add-ins.
For on-premises installations, do not use a web application App Pool Identity account for any Secure Store credentials.
To add this Secure Store item, follow these steps as a user who has Contribute permission:
-
On the site where Provisioning is deployed, navigate to Settings > Site Settings. The Site Settings page displays.
-
Under the Site Administration section, click Governance Hub to launch the Governance Hub dashboard.
-
Access the Governance Hub - Secure Store page by navigating to the following list: <Governance Hub Site>/Lists/GimmalSecureStore.
-
Click +new item. The list item page displays.
-
Enter the following information in the fields:
-
Key: AppProvisioning
-
Username: Username for farm or tenant account
-
Password: Password for farm or tenant account
Ensure that the username is in the form of '<username>@<domain>' and not '<domain>\<username>'.
-
-
Click Save. The AppProvisioning list item displays on the Secure Store page, as shown in the following figure.
Activating Content Governance Components
After you install the Content Governance for SharePoint components and create the required Secure Store list items, you must activate the features for each component you're installing to enable the full functionality of the component and load it into the Governance Hub. The steps for activating Content Governance for SharePoint features varies, depending on the scope of the feature (i.e., farm level, site collection level, or site level). The following table provides information on which features to activate for each component, the feature's scope (e.g. farm, site collection, or site), and the number of instances the component can be activated. Refer to this table, and then see the remaining help topics in this section for steps on how to activate each feature, according to scope.
|
Component |
Feature |
Scope/Comments |
|
Decommissioning |
Gimmal - Decommissioning Administration |
Note: If you must move Decommissioning to another site after it was previously installed, please see the Decommissioning Known Issues section in the release notes for important information regarding this process. |
|
Document Center |
Gimmal - Document Center |
Note: The Document Center feature is not supported on MySites. |
|
Drop Zone |
Gimmal - Drop Zone |
|
|
Enhanced Search |
Gimmal - Enhanced Search |
|
|
Enhanced Template Manager |
Gimmal - Enhanced Template Manager |
|
|
Governance Hub |
Gimmal - Governance Hub |
|
|
Metadata Inheritance Rules |
Gimmal - Metadata Inheritance Rules |
|
|
Metadata Rule Actions |
Gimmal - Metadata Rule Actions |
|
|
Provisioning |
|
|
|
Gimmal Solution Development Kit (SDK) |
Gimmal Common - Configuration |
|
Provisioning is only deployed once for the enter SharePoint farm, and Gimmal recommends adding it to a site subscribed to the Content Type Hub so that all of the published content types are available.
Activating a Feature
Activating a Feature on a Farm
-
Navigate to Central Administration > System Settings > Manage Farm Features as a Site Administrator.
-
Locate the Gimmal - <Feature Name> in the Manage Farm Features list, and click Activate. The feature deploys into the farm.
Activating a Feature on a Site Collection
-
From the root site where you installed the Content Governance for SharePoint component, as a Site Collection Administrator, select Settings > Site Settings to display the Site Settings page.
-
Under the Site Collection Administration section, click Site collection features.
-
Locate the Gimmal - <Feature Name> in the Site Collection Features list, and click Activate. The feature deploys in the site collection.
Activating a Feature on a Site
-
From the site where you installed the Content Governance for SharePoint component, as a Site Administrator, select Settings > Site Settings to display the Site Settings page.
-
Under the Site Actions section, click Manage site features.
-
Locate the Gimmal - <Feature Name> in the Site Features list, and click Activate. The feature deploys on the host site.
Verifying Governance Hub Integration
-
On the site where Governance Hub is deployed, select Settings > Site Settings to display the Site Settings page.
-
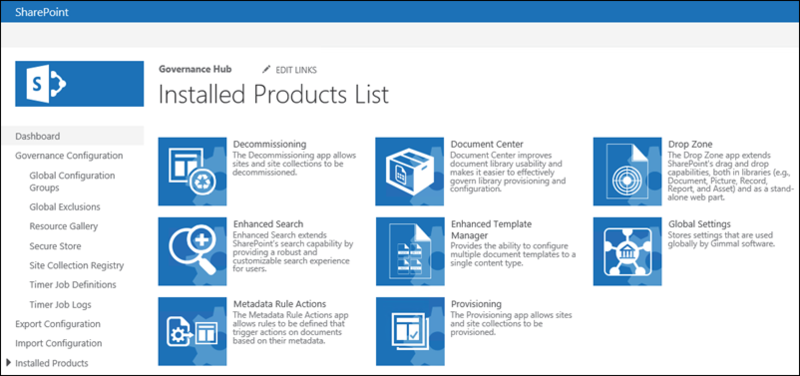
Under the Site Administration section, click Governance Hub. The Governance Hub dashboard displays.
-
Verify the product icons display on this page, as shown in the following figure:
Installing Job Scheduler Service
You must install the Gimmal Job Scheduler Service to run a component's scheduled jobs, and for Governance Hub to propagate Gimmal software configuration settings from the Governance Hub to local instances. See the following notes about the Job Scheduler Service:
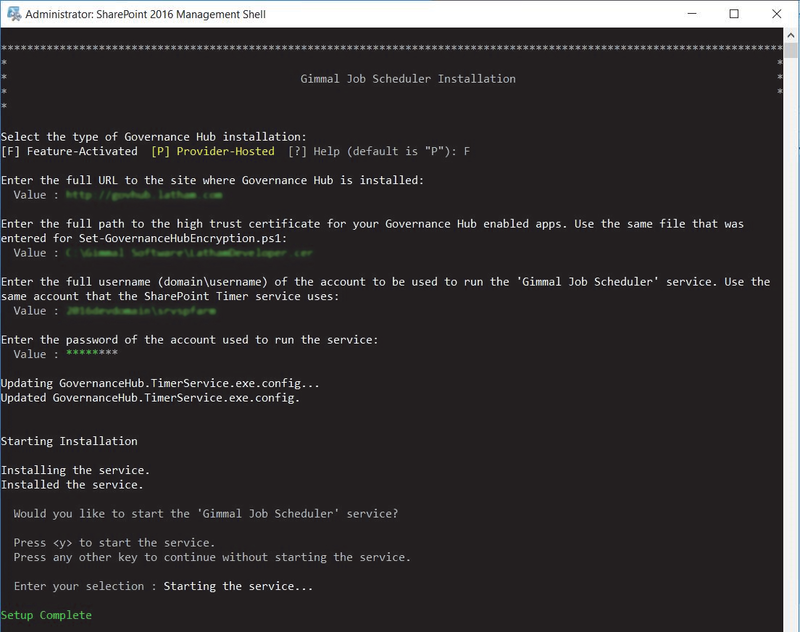
Perform the following procedure for a new Governance Hub installation. You do not need to perform this task if you are upgrading Governance Hub. The service account being used by the Gimmal Job Scheduler needs at least "Read" permission so that it can access the jobs in Governance Hub and pick up the Secure Store credentials. Gimmal recommends using the same service account that is used by the SharePoint Timer Service since that account typically has access to all the sites. For a Feature-Activated installation, Gimmal recommends that you install the Gimmal Job Scheduler Service on a web front end (WFE) or a server where your SharePoint site is accessible.
A scheduled job is a background process that is run to execute specific tasks on a scheduled basis. Scheduled jobs may be long-running or short-lived, scheduled to execute one-time only, on a regular basis, or somewhere in between. The Governance Hub Job Definitions link provides a central location for component scheduled jobs that run within the Gimmal Job Scheduler Service. You can change when a job is run by editing the job definition and modifying the Job Schedule setting. For more information, see the Configuring Governance Hub section.
|
Component |
Scheduled Job |
|
Decommissioning |
|
|
Document Center |
|
|
Enhanced Search |
|
|
Enhanced Template Manager |
|
|
Provisioning |
|
Installation Steps
Perform the following task for a new Governance Hub installation. You do not need to perform this task if you are upgrading Governance Hub.
-
Navigate to the <Extract Folder>\Gimmal Software\Gimmal Job Scheduler folder under the root folder where you extracted both the Content Governance installation package and the SDK files.
-
Select the Gimmal Job Scheduler folder and copy or move it, and all of its contents, to a permanent location on the machine that hosts the Gimmal Job Scheduler Service.
The Gimmal Job Scheduler Service is a Windows Service that must have persistent access to the contents of the Gimmal Job Scheduler source folder.
-
If installing the Gimmal Job Scheduler on a non-SharePoint farm host (such as on the Provider-Hosted server, which is the recommended configuration), it is necessary to:
-
Download the latest version of the Gimmal SDK ZIP archive.
-
Extract the Solution Development Kit Vn.n.n.zip file to a temporary location.
-
Copy all the DLLs from the extracted folder \Gimmal Software\Gimmal Job Scheduler to the Gimmal Job Scheduler folder created/set up as part of Step #2.
-
-
From the new Gimmal Job Scheduler folder, use Windows PowerShell (start the PowerShell console as an administrator) to run Setup‐GimmalJobScheduler.ps1.
-
Enter the installation type and your Governance Hub URL, when prompted.
-
Enter the full path to a certificate file (e.g., .cer or .pfx file).
-
When prompted for the user account to run the Gimmal Job Scheduler Service, find the account name by going to Windows Services > SharePoint Timer Service > Properties > Log On and viewing the account name.
-
Enter the password to run the Gimmal Job Scheduler timer service.
-
Press Y to start the service. You can confirm that the service is running by going to Windows Services > Gimmal Job Scheduler and reviewing the Status column.
Updated Gimmal Job Scheduler Service
To update a component's scheduled job, you must copy its scheduled job files to the Gimmal Job Scheduler location on the server that is hosting the Gimmal Job Scheduler Service by following these steps:
-
Stop the Gimmal Job Scheduler Service by executing the following command in a command prompt or in PowerShell:
-
net stop "Gimmal Job Scheduler"
-
-
Copy all files EXCEPT GovernanceHub.TimerService.exe.config from the <Extract Folder>\Gimmal Software\Gimmal Job Scheduler folder and paste them into the Gimmal Job Scheduler Service deployment location. (The Gimmal Job Scheduler Service deployment location can be determined by double-clicking Gimmal Job Scheduler in the Windows Services panel and looking at the value in the Path to executable section.)
Overwrite/replace any files, if you are prompted, but do not overwrite your existing GovernanceHub.TimerService.exe.config file!
-
Start the Gimmal Job Scheduler Service by executing the following command in a command prompt or PowerShell and the Gimmal Job Scheduler Service will be complete:
-
net start "Gimmal Job Scheduler"
-
Performing an Upgrade
Before you upgrade, ensure that you meet the requirements listed in Installation Prerequisites.
This section describes how to upgrade Content Governance for SharePoint components for the SharePoint 2013/2016 environment. Perform these steps on a SharePoint Web Front End (WFE) as a member of the local server Administrators group. You can only upgrade your Content Governance for SharePoint component(s) to V5.5.1 if you are running the previous version (V5.5) of the same component(s). If the component you are upgrading is not currently the previous version (V5.5), you must upgrade to that version first before upgrading to Content Governance for SharePoint V5.5.1.
Upgrade Steps
-
Retrieve the latest version of the Content Governance for SharePoint Feature-Activated download package from the Gimmal product download site, and download it to a single folder on the SharePoint Server.
-
Extract the download package to the same folder where you saved the zipped file, ideally in the same root folder where you extracted the Gimmal SDK. Each download package extracts its file contents to a common folder structure, as shown in the following figure. If prompted, select to replace all existing files. Do not extract to a folder that contains older versions of Content Governance for SharePoint components. After you extract the files, you will see a Gimmal Software folder that contains a WSPs subfolder.
-
Navigate to the WSPs folder. This folder contains all of the WSP files and setup files that you will need to upgrade the Content Governance for SharePoint components.
If you do not want to upgrade a specific Content Governance for SharePoint component(s), delete the WSP(s) for that component(s) from the WSPs folder. If you do not delete any WSPs, all of the eligible Content Governance for SharePoint components will be upgraded. Do NOT delete the Governance Hub WSP. Governance Hub is a required component.
-
Launch the SharePoint 2013 or 2016 Management Shell window as an Administrator and run the Setup.ps1 script located in the WSPs folder where the files were extracted from the package.
If you see a message similar to "setup.ps1 cannot be loaded because the execution of scripts is disabled on this system," you must enable running scripts. Run the following command: Set-ExecutionPolicy Unrestricted. For more information, see Using the Set-ExecutionPolicy Cmdlet. The Setup.ps1 script performs an iisreset and stops and starts the SharePoint Timer Service.
-
Two screens display; press any key when prompted to close the second window and once again to close the first window.
-
Update the Job Scheduler Service for the component(s) you upgraded. See Updating the Gimmal Job Scheduler Service.
Uninstalling
This section describes how to uninstall the Content Governance for SharePoint components. You must perform several tasks in order to remove the components from your environment. These tasks are described in the following sections. You must have Administrator permissions to uninstall the Content Governance for SharePoint components.
Deactivating Content Governance ComponentsThe steps for deactivating Content Governance for SharePoint features vary, depending on the scope of the feature (i.e., farm feature, site collection feature, or site feature). The steps for each scope are provided below. See the Feature Scope column for information on product scope.
Deactivating a Feature from the Farm
-
Navigate to Central Administration > System Settings > Manage Farm Features.
-
Locate the Gimmal - <Feature Name> in the Manage Farm Features list, and click Deactivate. A confirmation message displays.
-
Click Deactivate this feature.
Deactivating a Feature from a Site Collection
-
From the site collection where the feature is activated, select Settings > Site Settings to display the Site Settings page.
-
Click Site collection features under Site Collection Administration.
-
Locate the Gimmal - <Feature Name> in the Site Collection Features list, and click Deactivate. A confirmation message displays.
-
Click Deactivate this feature.
Deactivating a Feature from a Site
-
From the site where the feature is activated, select Settings > Site Settings to display the Site Settings page.
-
Under the Site Actions section, click Manage site features.
-
Locate the Gimmal - <Feature Name> in the Site Features list, and click Deactivate. A confirmation message displays.
-
Click Deactivate this feature.
Removing Content Governance Components from the SharePoint Environment
-
Navigate to Central Administration > System Settings > Manage Farm Solutions. The Solution Management page displays.
-
Select the WSP name for the component you want to remove from the list of displayed solutions. See the following table for a list of the Content Governance for SharePoint WSPs.
Component
WSP name(s)
Decommissioning
gimmal.decommissioning.wsp
Document Center
gimmal.documentcenter.wsp
Drop Zone
gimmal.dropzone.wsp
Enhanced Search
gimmal.enhancedsearch.wsp
Enhanced Template Manager
gimmal.enhancedtemplatemanager.wsp
Governance Hub
gimmal.governancehub.wsp
Metadata Inheritance Rules
gimmal.metadatainheritance.wsp
gimmal.metadatainheritance.transfer.wsp (optional; only needed forlegacy Silverlight transfer)
Metadata Rule Actions
gimmal.metadataruleactions.wsp
gimmal.metadatarulesactions.transfer.wsp (optional; only needed for legacy Silverlight transfer)
Provisioning
gimmal.provisioning.wsp
gimmal.provisioning.timerjob.wsp
-
Click Retract Solution from the top of the page. The Retract Solution page displays.
-
Click OK. You are returned to the Solution Management page and the gimmal.<component name>.wsp solution status displays Retracting.
-
Refresh the page until the gimmal.<component name>wsp solution status displays Not Deployed.
-
Select the gimmal.<component name>.wsp from the list of displayed solutions. The Solution Properties page displays.
-
Click Remove Solution. You are prompted to confirm the removal.
-
Click OK. The solution is removed.
-
Repeat these steps for any remaining components you want to remove.
Deleting the Gimmal Job Scheduler Service
To delete the Gimmal Job Scheduler Service, run the following command from an Administrator command prompt: sc delete "Gimmal Job Scheduler" Then, delete the Gimmal Job Scheduler folder.