
Gimmal Physical contains a number of features supporting billing activities for storage and other activities.
Configure Billing
Storage Costs
To configure billing for storage cost, information needs to be entered on several different tabs in Gimmal Physical.
-
Locations – Two key values need to be set to identify a location where costs can accrue for storage.
-
The “Charge Designation” list will need to be set to a value of “Chargeable – Storage.”
-
The “Hub Location” checkbox must be enabled for any Location where costs will accrue for Box storage.
When these properties are set, an item transferred to one of these Locations (or to a Shelf in one of these Locations) will have its “Accession” field set to true and its “Accession Date” field updated to the current date. An item is only accessioned once.
-
-
Shelves – The “Current Location” of Shelf records needs to be one of the hub locations designated with a ‘Chargeable - Storage’ as noted above. When these properties are set, an item transferred to one of these Shelves will have its “Accession” field set to true and its “Accession Date” field updated to the current date. An item is only accessioned once.
-
Boxes – If the “Current Location” of a Box is either a Shelf or a Location as designated above for any time during the billing period, storage costs will accrue. Additionally, setting the “Box Size” for Box records will allow for different amounts to be charged based on the size of the Box.
Create Locations
-
Click on the Locations tab.
-
Click on the Create action button.
-
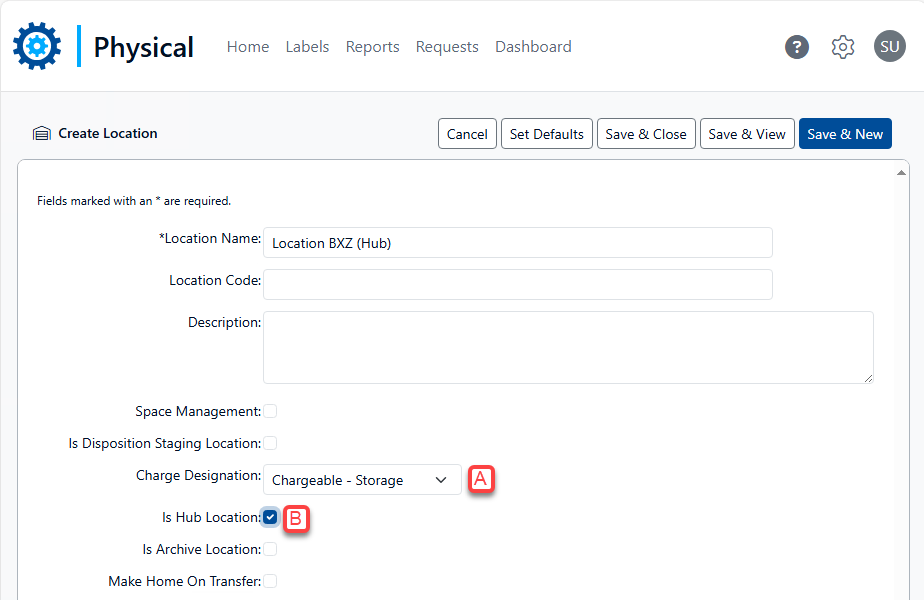
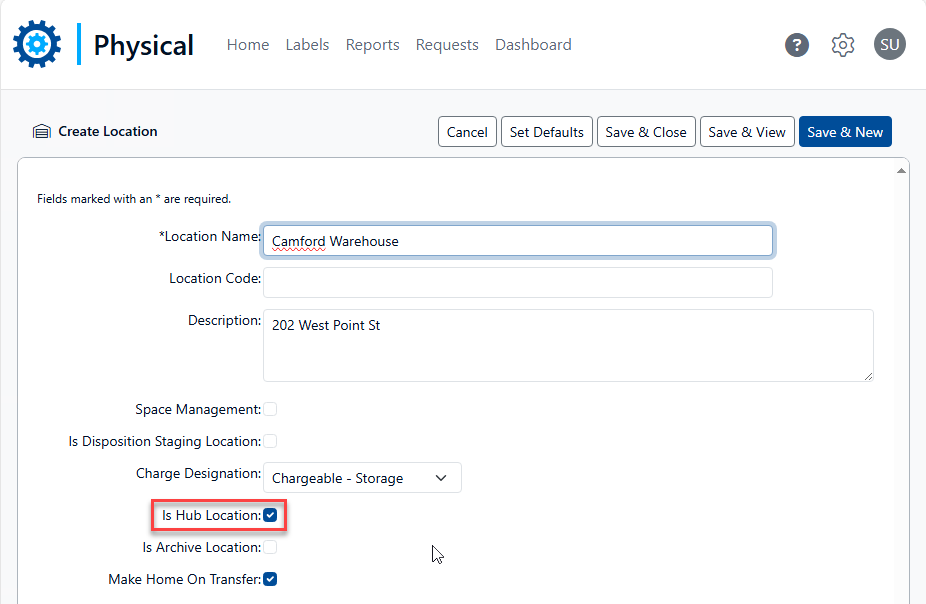
Enter metadata for the Location,
-
Be sure to check the “Is Hub Location” checkbox.
-
Select “Chargeable – Storage” from the “Charge Designation” list. (Note: Not shown in screenshot below)
-
-
Click Save & Close.
Create Shelves
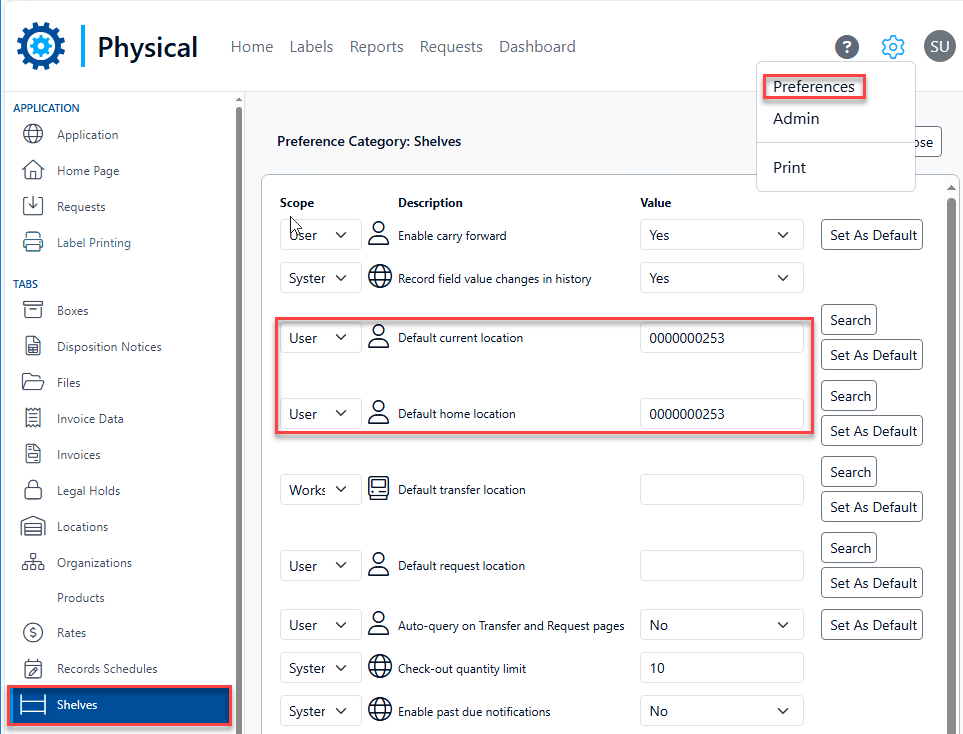
There are a number of methods for creating shelves. Before doing so, first verify the Preference settings in the Shelves category on the Preferences page.
The “Default current location” and the “Default home location” should be set to the barcode of a Hub Location that has been designated as a “Chargeable – Storage” Location.
Create the Shelf from the Shelf tab
-
Click on the Shelves tab from the Home Page.
-
Click on the Create action button.
-
Enter metadata for the Shelf record, being sure to select “Chargeable Storage” from the “Charge Designation” list.
-
Save the Shelf record.
-
Verify the Shelf record was created in the specified Location.
Create Shelf data from the View Location page
-
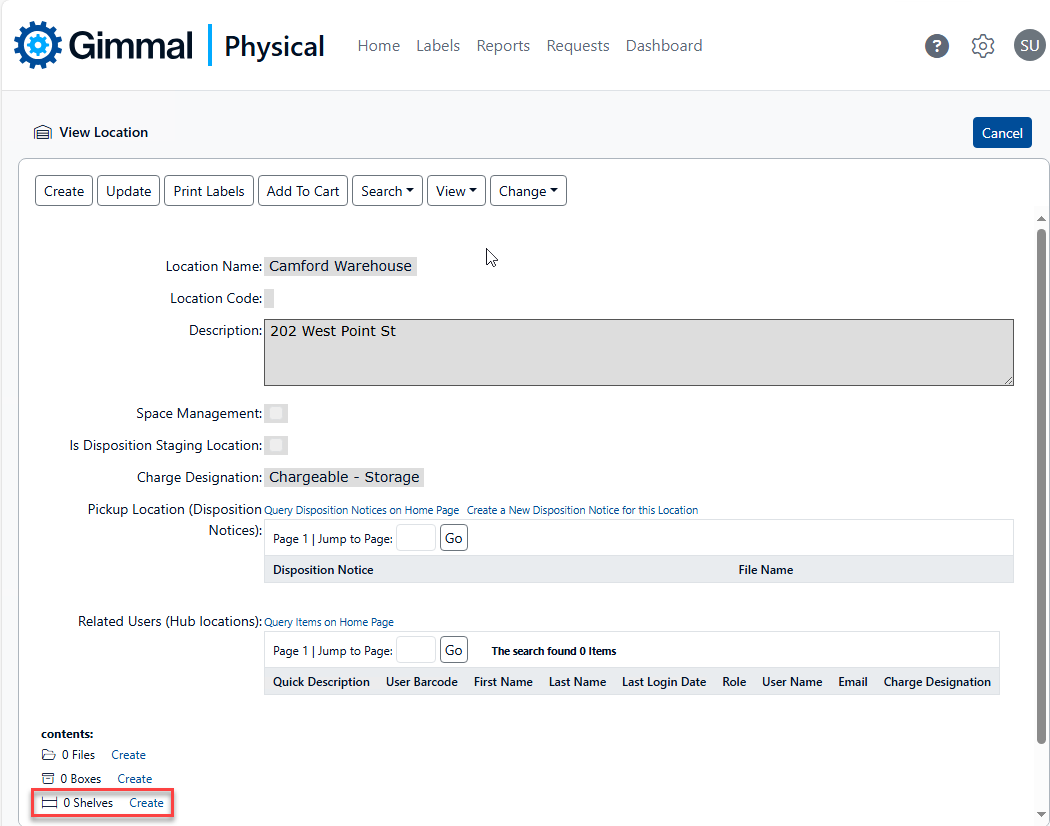
Go to the View page for the Location where the Shelves will be placed.
-
Click on the Create link next to the Shelf icon near the bottom of the View Location page.
-
Enter metadata for the Shelf record, being sure to select “Chargeable Storage” from the “Charge Designation” list.
-
Save the Shelf record.
Create Shelf via Import
Please view the Import Guide for more information on importing data via a file import.
Create Boxes
There are a number of methods for creating boxes.
Create Box from Box tab
Please see guide to Creating & Updating Records, Bulk Creation or Bulk Update for more information.
Create Box data from the Shelf view page.
-
Go to the View page for the Shelf where the Boxes will be placed.
-
Click on the Create link next to the Box icon near the bottom of the page.
-
Enter metadata for the Box record, being sure to select a “Box Size” value.
-
Save the Box record.
Create Boxes via Import
Please view the Import Guide for more information on importing data via a file import.
Create Rates
Before billing can commence, Rates need to be created for associating with billing events.
Note: Rates can be created from the Create Billing Events screen, if needed.

-
Select the Rates tab
-
Click the Create action button.
-
Enter data for the available fields.
-
Click on any of the available Save action buttons to save the Rate.
Billing Management
To manage the various steps in the billing process, navigate to the Billing screen:
-
Click “Admin” in the top navigation menu.
-
Under the Configuration section, click “Billing Management.”
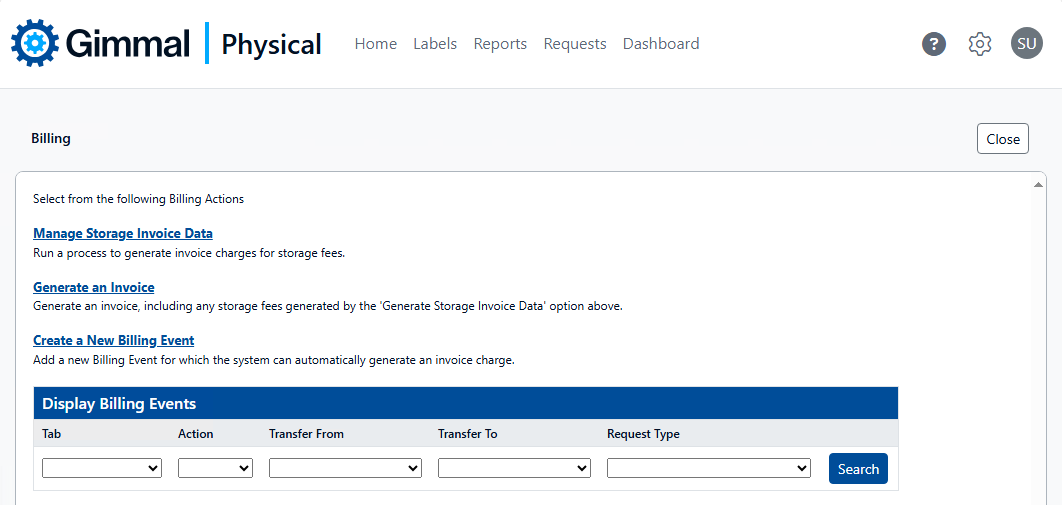
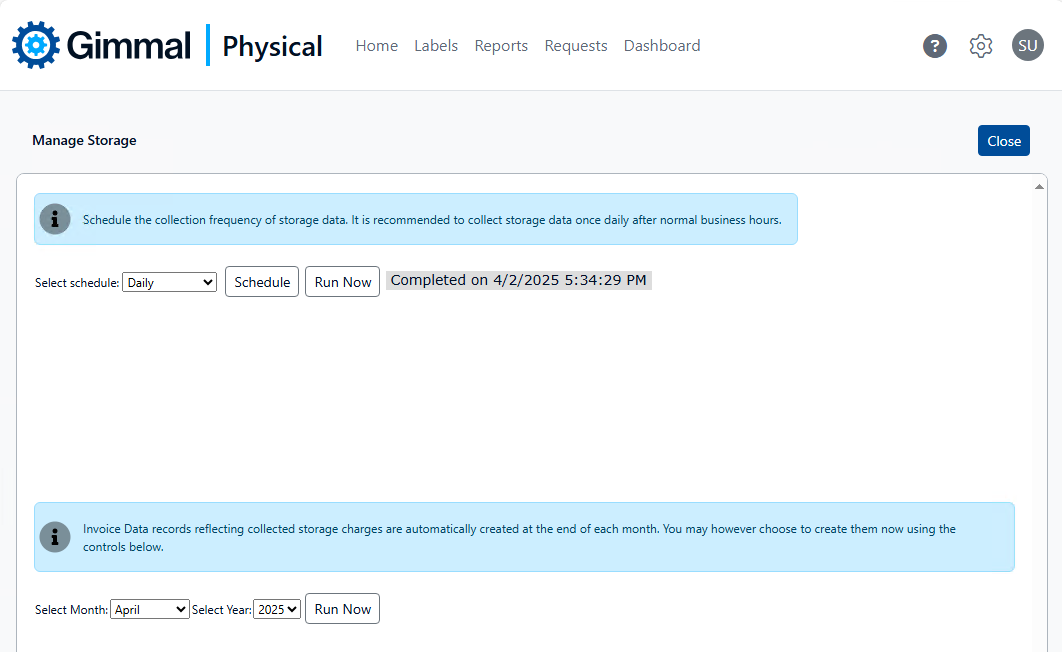
Manage Storage Invoice Data
Set the options for collection frequency with ‘Run Now’ options for generating ad hoc invoice data records.
-
By default, storage charges are collected daily. This option can be changed, or a job can be run ad hoc:
-
To change the schedule for the nightly job:
-
Choose the preferred option from the ‘Select Schedule’ drop down list.
-
Choose the preferred start time.
-
Click ‘Schedule’. This will set the new option.
-
-
To run as a one-time, ad hoc collection job, click the ‘Run Now’ button. This will schedule the background job to run at the next available time.
-
-
Invoice data records are automatically created at the end of the month. However, there may be reasons to create them ad hoc. To do so:
-
Select the month and year of the invoice data records you’d like to create.
-
Click ‘Run Now’ to schedule the job to start at the next available time.
-
Generating Invoices
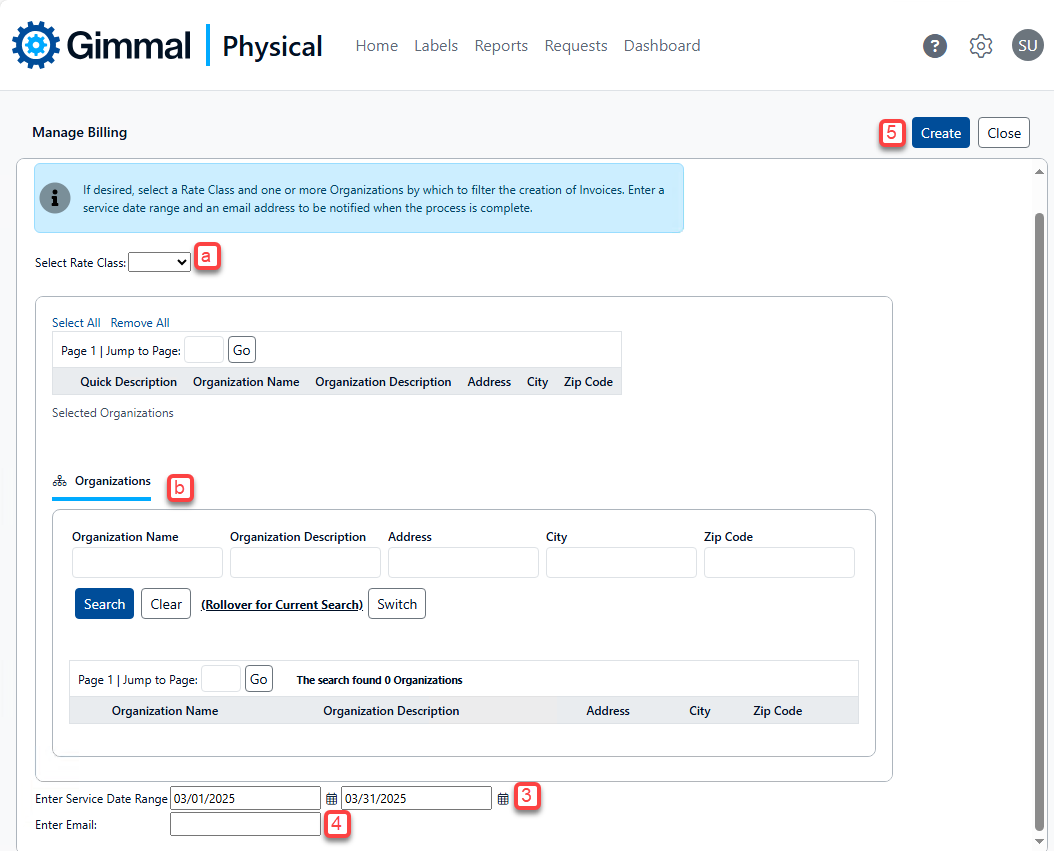
Before generating invoices, billing events need to be created and associated with actions, and at least one invoice data collection job should be run. Once the requisite data is in place, invoices can be generated.
-
Click on the “Generate an Invoice” link. This opens the Manage Billing screen.
-
Invoices can be filtered by Rate Class or Organization
-
Filter by Rate Class: Choose the preferred rate class by choosing ‘Select Rate Class’ drop down.
-
Filter by Organization: Use the search control to limit the invoice creation to one or more organizations.
-
-
Gimmal Physical will automatically display “Service Date Range” for the month prior to today’s calendar date. The date fields can be overwritten to update to a preferred date range using the ‘Enter Service Date Range’ fields.
-
Enter an email address if you’d like a notification when the invoice creation process has completed.
-
Click the Create button. This will kick off the process.
-
Records will be created on the Invoice Data tab. Invoices will also be generated and displayed on the Invoices tab.
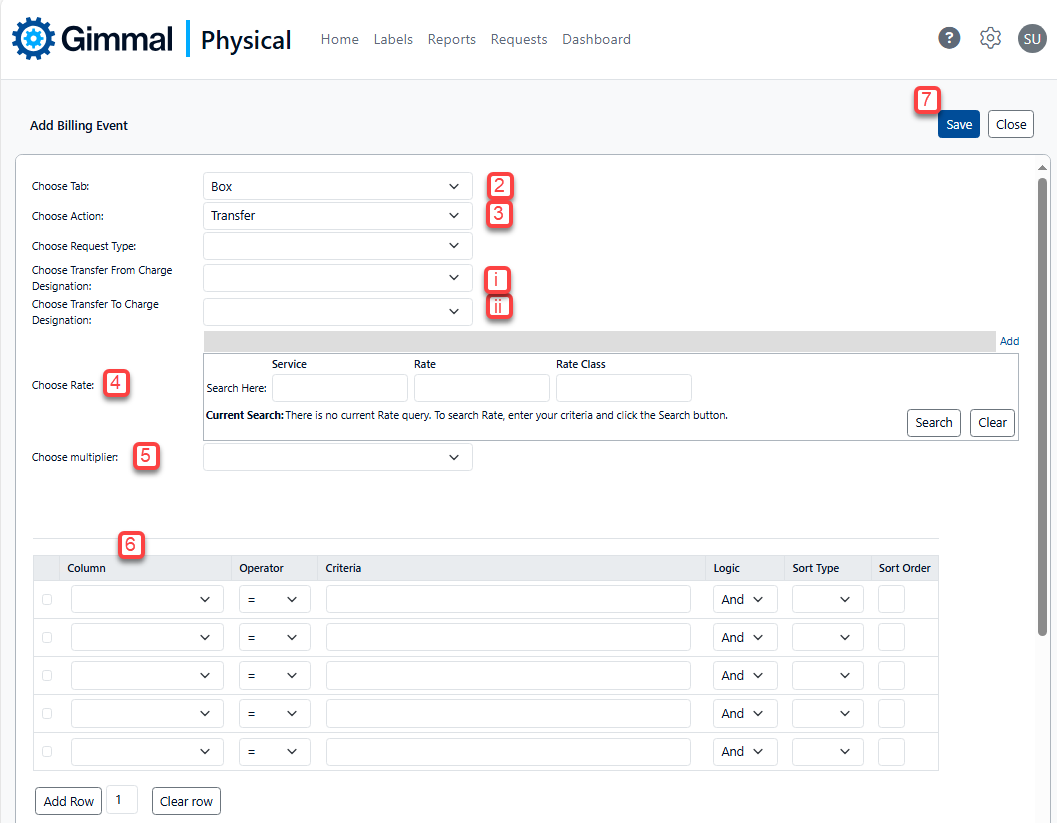
Create Billing Events
Billing Events are used to associate chargeable actions to established rates. Please note, fields shown on this page will depend on the selected options.
-
Click on the “Create a New Billing Event” link from the Billing Management screen.
-
Select the tab for this billing event by choosing an available option from the ‘Choose Tab’ drop down list.
-
Select the action for this billing event by choosing an available action from the ‘Choose Action’ drop down. Actions include:
-
Accession occurs when an item is transferred to a hub location for the first time.
-
Create occurs when an item is created in the system.
-
Delete occurs when an item is deleted from the system.
-
Delivery occurs when items are transferred from a hub location.
-
Storage is used to charge for the storage of items.
-
Transfer occurs when items are moved between records with specified “Charge Designations”. There are configurable options for this action:
-
Request Type can used as a cost factor when setting up Transfer rates. To do so, select from the ‘Choose Request Type’ drop down list.
-
“Transfer From” and “Transfer To” Charge Designations will also need to be set for Transfer actions.
-
-
Update occurs when item records are updated.
-
-
Choose a Rate from the Rate control by using the ‘Search’. Alternately, click on the Add button to add a new Rate for this action.
-
Select a multiplier (optional). Any fields that are defined as integer fields will be displayed in this list.
-
Logic can be added using the filters to further refine which items will receive this charge (optional).
-
Click the Save button.
Once configured, when any of these billing events occur occur in the application, records will be created on the Invoice Data tab.
Display Existing Billing Events
To view billing events which have already been created, use the available filters and click ‘Search’
Billing Related Administrator Settings
Use hierarchical billing for Invoice creation
This option is only applicable for installations which are configured to have a hierarchical organization structure. By enabling this option, billing can be performed on the preferred organization level, rather than just the organization level which incurred the charge.
-
Options: Yes/No
Interval to use for Storage charges
Option to determine at what interval the storage charges will be collected. For more fine tuned billing and reporting, the Daily option can be used. For billing entire month for any part of the month, choose ‘Monthly’. ‘Monthly’ is the default.
-
Options: Daily/Monthly
Storage charges use reserved space for billing
By selecting ‘Yes’, storage charges continue to accrue even when an item is checked-out. This essentially reserves the space for the eventual return of the item. The default is ‘No'.