
This topic has an interactive tutorial. To view this tutorial, click here.
General Information
Gimmal Physical includes several options for adding or modifying data in the application
-
Entering data via the interface, one record at a time. See Creating & Updating Records (User Interface) for more details.
-
Importing multiple records via the interface using a .CSV or .TXT formatted document
-
Setting up an automated import using Gimmal FileConnect. See the FileConnect User Guide for more information.
This article covers the multi-record imports via the interface (#2 above).
Prerequisites
-
Import files must be in UTF-8 format
-
Files must be in .CSV or .TXT format
-
Import Profiles must be defined before a file import can proceed
-
If you are queuing labels for printing based on imported values, the Preferences | Label Printing must be set to 'Yes'.
Configure Import Profile
An Import Profile is a specification that tells the Gimmal Physical application how the data file is structured and where the data needs to be imported.
To configure an Import profile:
-
Click on the Admin link in the Navigation Menu.
-
Click on the Import Profiles link under ‘Configuration’ on the Administration page.
-
Click on the Add Profile link on the Configure Import Profiles page. The Add Import Profile page will open.
-
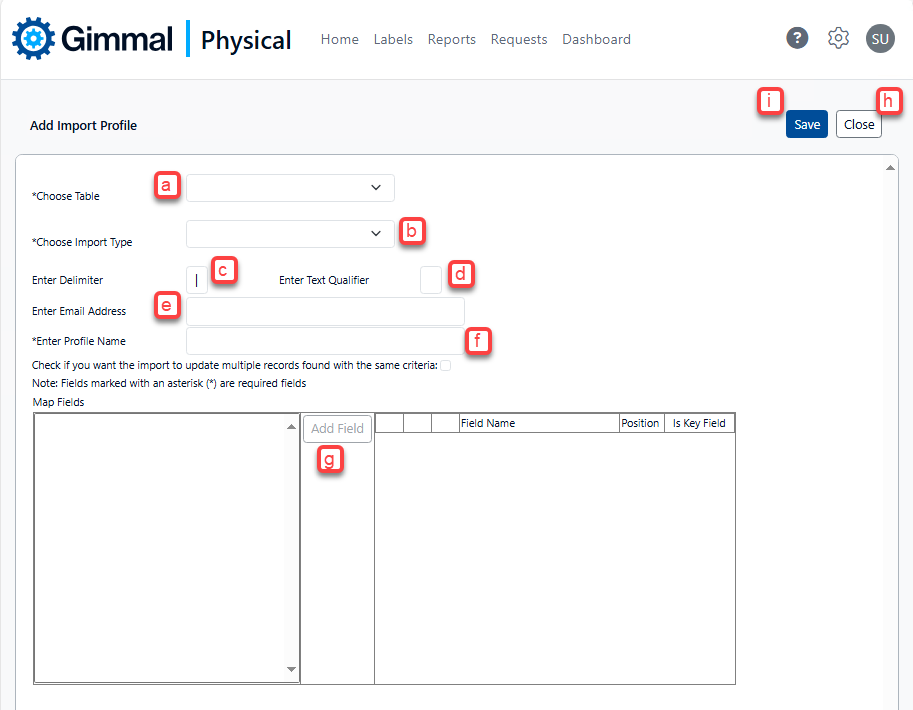
Configure an Import Profile by following these steps:
-
Choose the Table for which data will be imported.
-
Choose the Import Types. Depending on the type of table, you will be given different Import Types to select from:
-
Tables with each listed record matching just a single entry (one-to-one):
-
Add – all entries will be added to the chosen table
-
Modify – listed entries in the import file will modify entries only if they match records in the chosen table
-
Add/Modify- listed in the import file will update entries already existing in the listed table and add new records for items that do not have a match
-
-
Tables are listed as x to y, where x and y are values linked together. Each entry can have multiple options listed in the import (many-to-many). Please see Many-to-Many Notes below for further tips.
-
Add – new records will be added to the chosen table, and the relationship between the records will be established
-
Delete/Add – items that match the first column identifier will be cleared, and items from the list re-added.
-
-
-
Accept the default delimiter or enter another.
-
Specify the text qualifier if applicable.
-
Enter the email address to notify upon completion of the Import.
-
Enter a meaningful name to give this Import Profile.
-
Map Fields – Select the fields that will be used in the import file. The fields should be mapped in the order in which they will occur in the source file.
Note, for either Add/Modify or Modify Import types, you must specify at least one field as a Key Field. You may specify multiple fields to be used in conjunction if appropriate. Gimmal Physical will use Key Fields data to determine whether to add an incoming record as new or to modify an existing record already in the application. -
Click Save.
-
Click Close.
-
Importing Data from Files
Gimmal Physical offers a choice: manually import files or set up an automated import via FileConnect.
Regardless of the method, when an Import Profile is executed via an import command (manual or automated), the Import will process each line of the source file.
After the Import is complete, an email specifying the results will be sent to the specified email address. Import Logs and Import Error files will be generated, as appropriate.
Note: To execute a Gimmal Physical Import, you must have a valid Import Profile. If you have not created an Import Profile, please refer to the Configure Import Profile section above.
Manually Import File
To import files one at a time manually, first navigate to the Import option under the ‘Data’ Section of the Admin Navigation Menu.
To navigate to the Execute Import page, click on the Admin Navigation Menu. Then click on the Import link on the Administration page under the Data Section.
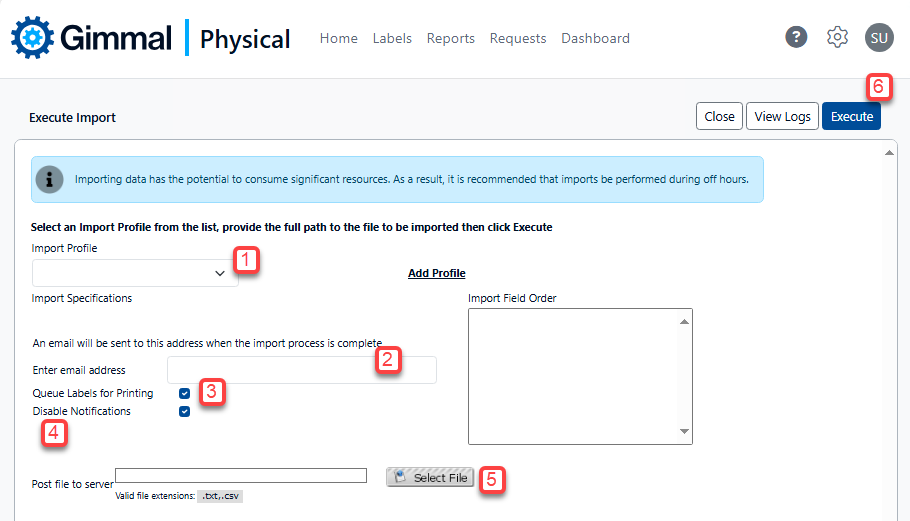
To execute an Import profile:
-
Choose the profile to execute from the drop-down list. The Import Field Order will be populated based on the Import Profile selected.
-
To send a notification to a specific email address once the import is complete, enter the chosen address in the ‘Enter email address’ text box.
-
The 'Queue Labels for Printing' checkbox is used if labels are being printed. Leave unchecked if labels are not being printed as part of the import.
-
When you import data, the application may be configured to send notifications regarding item creation, update, transfer, or other actions that an import can perform. If these notifications remain enabled, this can result in an unwanted amount of communication. We therefore suggest disabling notifications when using the imports by checking the ‘Disable Notifications’ box.
-
Choose the file to be imported by using the ‘Select File’ button.
-
Click the 'Execute' button to run the import.
Note: Imports may take some time. Review the Import logs once the import is completed. We recommend using the email option to alert you when the import is complete.
Automating a File Import
If you have data that will be updated often, it may be beneficial to automate a file import. This functionality is covered in the FileConnect User Guide.
Import Logs
The import logs and Import error files can be viewed from the Import Profile page or the Admin > Data > Import Logs page.
a. Search Import Logs by any of the fields provided.
b. Result Log File: This file shows the number of successful files and the files that failed. If there are errors, this file explains the errors.
c. Result Error File: This file is a copy of the errors that failed. The errors can be corrected within the error file and re-imported.
Note: Even though Gimmal Physical will generate an error file if you use column headers, we still recommend the use of column headers to help identify the individual columns for troubleshooting purposes.
Import Tips
-
If you are importing Files and/or Boxes, ensure any related higher-level data is already present in the application before starting the importing process. It is best to work down the hierarchy within the application. An example hierarchy beginning at the highest level:
-
Organizations
-
Record Schedules
-
Locations
-
Shelves
-
Boxes
- Files
-
-
-
-
-
-
Quick Descriptions should be used for the following logical tabs: Organization and Record Schedules.
-
A barcode should be used for the Current and Home Location.
-
Access to the Import functionality is controlled under the Roles and Permissions.
-
List Values need to be added before importing. See below for adding list values.
-
Required fields must be included in the Import Profile.
-
Any data that is a Tab or a List can be imported into the application via the Import Profile.
-
If you want the application to automatically assign barcodes for newly created items, do not add the barcode to your Import Profile. However, keep in mind that:
-
Your application must be configured to automatically add barcodes for new items
-
Barcodes are often required when using a Many to Many Import
-
-
Add an “Ignore” value if you have columns in your CSV file that are not needed in the current Import Profile. When you proceed with executing the Import, the Ignore field will also appear in the Field Order; however, the values will not be imported.
-
Scheduling of imports can only be accomplished via the FileConnect Utility, not from within the Gimmal Physical interface.
Many to Many Notes
-
Only tables whose schema supports Many to Many will show in the ‘Choose Table’ List alongside traditional single-level tab imports
-
The Quick Description is used for the source key field in Many to Many Imports. If the Quick Description is set to something other than the key field (and only that field), the Many to Many import will not work.
Adding List Values
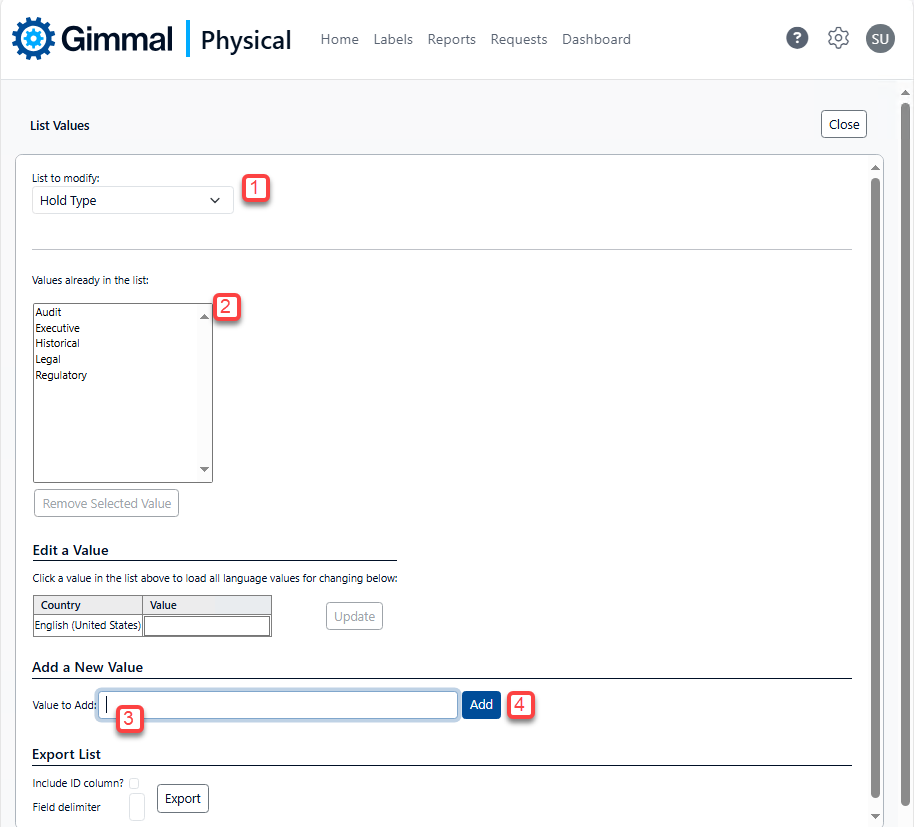
The list values can be added at Admin > Data > List Values. To add values to the simple list,
-
Select the appropriate list from the "List to Modify" drop-down box.
-
If you wish to edit an existing value, select it in the ‘Values already in the list” control.
-
Type the values you wish to add in the 'Value to Add' text box.
-
Finally, click the 'Add' button or press the enter key.
Questions
Please direct any questions to the Technical Support Team.