
This section provides a high-level description of the installation process for the Content Governance Provider-Hosted (PH) solution. For more detailed installation information, including installation requirements, see the remaining help topics in this section. The following diagram describes the high-level tasks that you must complete to install the Content Governance (PH) products. You must complete the steps in this order.

Supporting a Load Balanced IIS Configuration
For load-balanced IIS configuration, copy each app's virtual directory to the corresponding location on other load-balanced IIS servers.
Installation Prerequisites
Getting Started
-
Where is your SharePoint App Catalog located?
-
SharePoint 2013/SharePoint 2016 or SharePoint Online
-
-
What is your remote web host environment?
-
Internet Information Services* (IIS), or Azure App Service (Azure) (See Appendix D: Creating a New Azure App Service Web App for more information (link).)
-
-
On which machine will you host the Gimmal Job Scheduler Service? (See Installing the Gimmal Job Scheduler Service. For first time Governance Hub installation only.)
-
What is the Governance Hub URL? You will be prompted for this URL when you install any subsequent Gimmal components, (after you install the Governance Hub). If you have not already installed Governance Hub, you must do this first, before you can install any remaining components. (Note: Governance Hub does not currently support operating in an ADFS or mixed authentication environment.)
If you are installing Provider-Hosted components in SharePoint Online and using IIS to host the remote web, if there are multiple https bindings in IIS Manager (under Site Bindings), then the hostname bound to port 443 must be listed first. This is due to a limitation that SharePoint Online only works with event receivers residing on the default SSL port 443.
Prerequisites
For a smooth installation of Content Governance for SharePoint applications, ensure that you fulfill all of the following environment setup and software prerequisites before you attempt installation.
-
To install the Content Governance for SharePoint applications, you must have the following permissions:
-
For SharePoint 2013/2016 On-Premises – Farm Administrator
-
For SharePoint Online – Tenant Administrator; and Full Control of the App Catalog in SharePoint Online
-
-
SharePoint 2013/2016 or SharePoint Online environment is configured for SharePoint apps
-
The latest version of the Gimmal Solution Development Kit (SDK) is installed (available on the Gimmal product download Site, under the Content Governance for SharePoint product section)
-
Governance Hub site is created
-
Content Type Hub is created
-
Managed Metadata Service (MMS) has been created and configured
-
SharePoint Server 2013 with April 2018 Cumulative Update OR SharePoint Server 2016 with April 2018 Cumulative Update is installed, if applicable
-
Microsoft .NET Framework 4.6.1 or later is installed on the machine(s) where you plan to host a remote web
Pre-installation Considerations and Tasks
Provider-Hosted Apps in SharePoint Online using IIS
If you are installing Provider-Hosted apps in SharePoint Online, you are using IIS to host the remote web, and if there are multiple https bindings in IIS Manager (under Site Bindings), then the host name bound to port 443 must be listed first. This is due to a limitation that SharePoint Online only works with event receivers residing on the default SSL port 443.
Enhanced Template Manager
You must install the Enhanced Template Manager app into the Governance Hub site.
Supported Installation Configurations
The Gimmal App Installer for Content Governance for SharePoint supports the following installation configurations:
-
SharePoint 2013/2016 with IIS remote web
-
SharePoint 2013/2016 with Azure remote web
-
Office 365 with IIS Remote Web
-
Office 365 with Azure Remote Web
App Prerequisites
Before installing the Content Governance for SharePoint applications, you must confirm the following app prerequisites. The prerequisites are based on the location of your App Catalog (SharePoint 2013/2016 or SharePoint Online) and your remote web host environment (IIS or Azure App Service).
If your App Catalog is in SharePoint 2013/2016...
-
Ensure that your SharePoint 2013/2016 environment is configured for SharePoint apps. To configure your environment, follow these steps:
-
Configure an environment for apps for SharePoint.
-
Set up a SharePoint App catalog (perform step 1 only).
-
Configure SharePoint for High Trust Apps.*
SharePoint High Trust apps require that you use certificates that are based on a CAPI1 key. CNG key-based certificates are not supported. For more information see How to Determine if a Certificate is Using a CAPI1 or CNG key and Request an Internet Server Certificate.
-
-
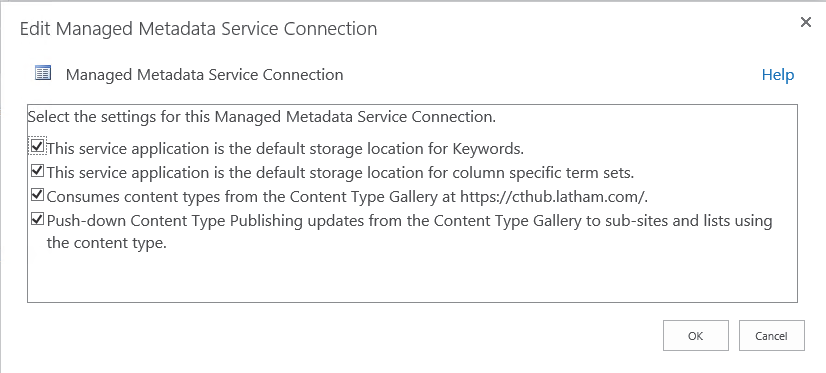
Create and configure a Content Type Hub and Managed Metadata Service (MMS). To create and configure these items, refer to Microsoft's SharePoint documentation. Ensure the following properties are set for the MMS Connection:
If your App Catalog is in SharePoint Online...
Ensure that your SharePoint Online environment is configured for SharePoint apps. To configure your environment, follow this step: Set up a SharePoint App catalog (perform step 1 only).
If your remote web is on IIS...
Install .NET Framework 4.6.1 or higher on the machine(s) where you plan to host a remote web. (Available through the Windows Server Update Services.)
If your remote web is on Azure App Service...
-
Ensure that the .NET Framework version configured on the Azure App Service is version 4.6 or higher.
-
For information on how to install with Azure SQL Database, please reference Appendix G: Installing Azure SQL Database (link).
-
Ensure that you have an Azure Web App for each Workplace Governance app that you install. See Appendix D: Creating a New Azure App Service Web App for more information (link).
If you select Azure App Services as your target web host, see Appendix E: Configuring Azure to Run Azure WebJobs (link).
Installing: SharePoint 2013/2016 Online Environment
The Provider-Hosted app package contains an app and a remote web. You must use the Gimmal App Installer to install the app into the SharePoint 2013, SharePoint 2016, or SharePoint Online App Catalog and install the remote web (if applicable) on an Internet Information Services (IIS) server or Azure App Services server.
Preparing & Permissions
To install the Content Governance for SharePoint components, you must have the following permissions:
-
For SharePoint 2013/2016 On-Premises: Farm Administrator
-
For SharePoint Online: Tenant Administrator; and Full Control of the App Catalog in SharePoint Online
Ensure that the account used to connect to the App Catalog does not use multi-factor authentication, as this may cause issues with the Gimmal App Installer.
Preparing the Gimmal App Installer Server
You must use the Gimmal App Installer to install the Content Governance for SharePoint applications. If your remote web host is using IIS, then the App Installer must be executed on the Windows server that is hosting the remote web IIS instance. This server will be referred to as the "App Installer Server" throughout this Help, and it must meet the following requirements:
-
Install Web Deploy (msdeploy.exe) on the machine where you will run the Gimmal App Installer.
-
Install SharePoint Server 2013 Client Components SDK, if you run the Gimmal App Installer on a server that does not have SharePoint installed (such as the Provider Host Server).
-
The server must have access to the SharePoint App Catalog.
Gimmal recommends that you do NOT install the Content Governance for SharePoint (PH) remote web on an IIS server that is either a SharePoint Web Front End (WFE) server or a SharePoint web application server (although this may be done for single-server DEV or TEST systems, if necessary).
If you decide to use this type of single-server configuration, then you must install or upgrade the Gimmal Solution Development Kit (SDK) on that server BEFORE running the App Installer. For more information, see Appendix C: Installing/Upgrading the Gimmal SDK (link). Ensure that the account used to connect to the App Catalog does not use multi-factor authentication, as this may cause issues with the Gimmal App Installer.
Downloading & Extracting
Downloading and Extracting the Gimmal App Installer
-
Retrieve the latest version of the Gimmal App Installer from the Gimmal product download site.
-
Extract the files to a folder on the App Installer Server.
Note on Extracting Zip Files:
Using the default Windows "Extract files …", "Extract here", or "Extract All…" command and path settings will extract the files to a location similar to: <Current Directory>\App Installer Vn.n.n. This location contains a Gimmal Software folder that contains the App Installer Vn.n.n subfolder. If you change the extract location to something like C:\temp, instead of accepting the default location, the files will be extracted to C:\temp\Gimmal Software. After downloading the .zip file, right-click on the .zip file(s) and select Properties from the menu. The Properties dialog displays. On the General tab, ensure that Unblock is selected (see figure) so that the zip file is not blocked when you try to unzip it. This setting depends on the server's security configuration.

Downloading and Extracting the Content Governance Apps
Perform these steps on the App Installer Server. Use an account that is a member of the local server Administrators group.
-
Retrieve the latest version of the Content Governance applications you want to install, including the Governance Hub and (if applicable) Gimmal's Solution Development Kit (SDK), from the Gimmal product download site and download them all to a temporary folder (e.g. C:\temp) on the App Installer Server. Download the Gimmal Solution Development Kit (SDK) ONLY if you are setting up a single-server configuration, as previously discussed.
-
Unzip the package(s) and extract all of the app installation zip files into the same root folder (e.g. C:\temp) on the App Installer Server.
See above Note on Zip Files
Installing
Installing the Governance Hub
You must install the Governance Hub and deploy it to its own dedicated site before installing any other applications. The App Installer will not permit you to install other applications until you install the Governance Hub. The dedicated site must be subscribed to the Content Type Hub, and it is recommended that you do not install Governance Hub on the same site as the Content Type Hub.
-
Navigate to the directory where you extracted the Gimmal App Installer files (e.g. \temp\Gimmal Software\App Installer Vn.n.n), right-click the Gimmal.AppInstaller.exe file, and select Run as Administrator. The Gimmal App Installer displays.
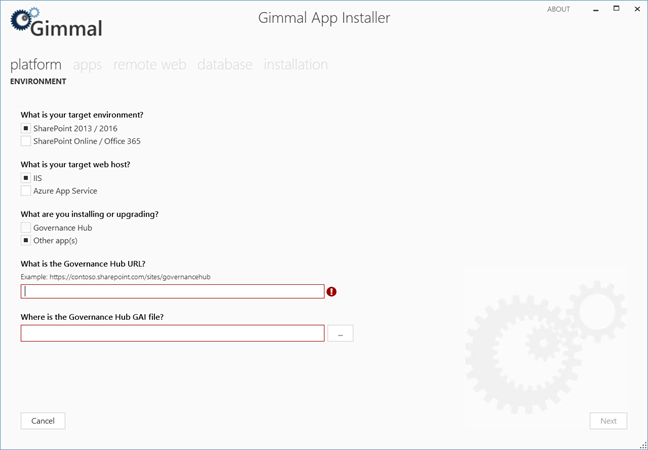
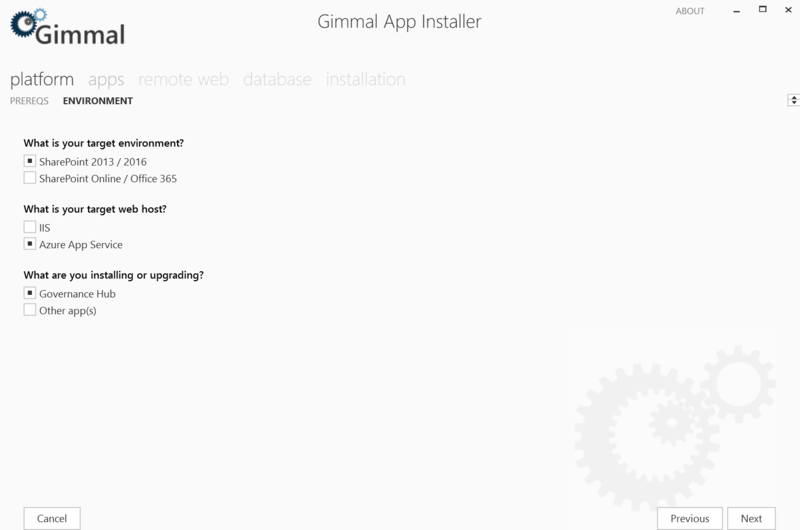
2. On the Platform - Environment page:
-
Select your target environment: SharePoint 2013/2016 or SharePoint Online.
-
Select your target web host: IIS or Azure App Services. (If you select Azure App Services, you will be prompted for an Azure Publish Settings file and related information when you get to the Remote Web Info page of the App Installer.)
If you want to deploy to multiple IIS servers, see Supporting a Load Balanced IIS Configuration.
-
Select the option to install the Governance Hub.
3. Click Next. The Apps - App Catalog page displays.
4. On the Apps - App Catalog page, enter the following:
-
Where is your app catalog? Enter your SharePoint 2013/2016 or SharePoint Online App Catalog URL. Click Validate to verify the catalog can be reached.
-
If you are installing as a user who does not have permission to add items in the App Catalog, or if you selected SharePoint Online as your target environment, enter the app catalog username and password for the site.
If you are installing into the SharePoint Online App Catalog, you must have Full Control permission. Ensure that he account used to connect to the App Catalog does not use multi-factor authentication, as this may cause issues with the App Installer.
5. Click Next. The Apps – Load page displays.
6. Click ... to select the Gimmal Software folder where your Gimmal applications have been downloaded and extracted (e.g. C:\temp), and then click Select Folder. The folder name displays in the Gimmal app folder field. 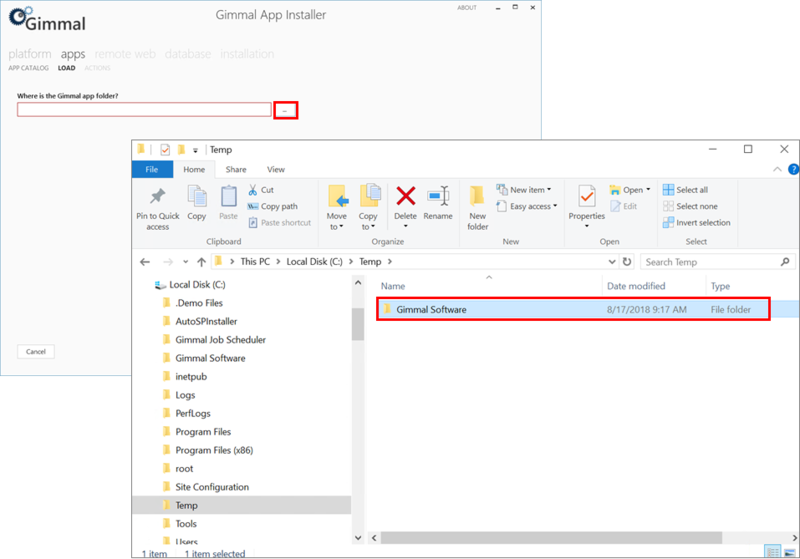
7. Click Next. The Apps - Actions page displays.
8. The installer automatically selects an action - Install, Skip, or Upgrade - based on the version that is being installed and what is currently installed.
The installer checks for currently installed versions of the applications. If a application is up-to-date, the Action defaults to Skip, and the App Installer will not allow you to select any other action. If a new version is available for a application that is already installed, you will have the option to Upgrade.
9. Click Next. The Apps – Follow-Up page displays.
10. Click ... to select the folder where you want to save your GAI file, and then click Select Folder. The folder name displays in the Save GAI Files field. If the desired folder* does not yet exist, you must create it before continuing.

If the folder for the GAI files does not yet exist, you must create this folder manually before running the App Installer. If you select/enter a folder that does not already exist, the install will fail because the App Installer will not create this folder for you.
11. Click Next. The Remote Web – Info page displays.
12. If you are installing into IIS, then continue with step 12a. If you are installing into Azure, then go down to step 12b.
-
12a: On the Remote Web – Info page, the following options display for the IIS web host (options will vary, depending on which environment you're installing into):
-
Enter the URL for your remote web.
-
Select the IIS site you want to use.
-
Click ... to select your high trust certificate, and then click Open. The certificate name displays in the Gimmal certificate location field. (The High Trust Certificate options are only available for on-premises installations.)
-
Enter the password for your certificate.
-
Re-enter the certificate password.
-
Enter the certificate's Issuer ID number.
-
-
12b: On the Remote Web – Info page, the following options display for the Azure App Services web host:
-
Enter the URL for your remote web.
-
Indicate whether you have an Azure Publish Settings file. If you click Yes, you are prompted for the location of the settings file.
-
Click ... to select your publish settings file, and then click Open. The publish settings file credentials display on the screen. See the following figure.
-
If you click No, additional credentials fields display on the page, prompting you for more information about your Azure publish settings.
-
Enter the App Publish URL. This URL will be used by MSDeploy to deploy files to your Azure App Service.
-
Enter the App Service name. This is the name of your App Service as specified in your Azure Portal.
-
Enter your Azure username and password, and confirm your password.
-
13. Click Next. The Database Info page displays.
The steps you perform on the Database Info page will only work with the Gimmal App Installer version 5.4.1.
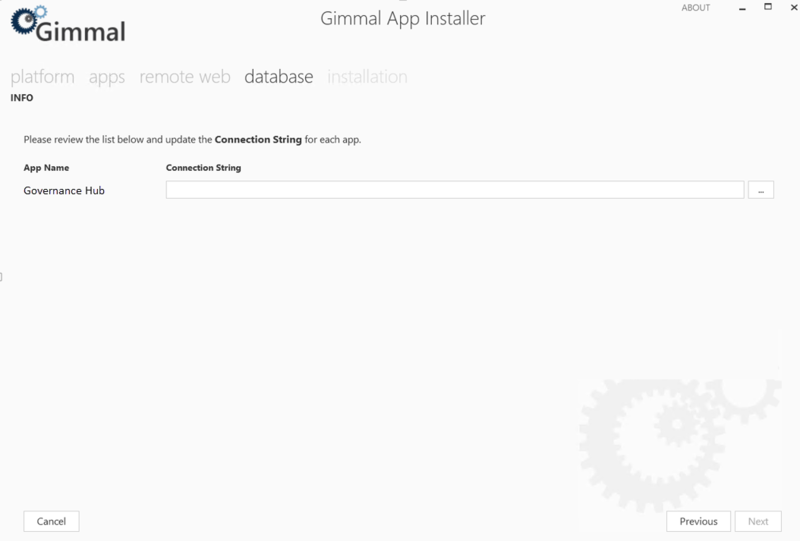
14. If you are installing into a SQL Server Database, then continue with bulleted steps below. If you are installing into an Azure SQL Database, then see Appendix G. On the Database Info page, perform the following steps:
-
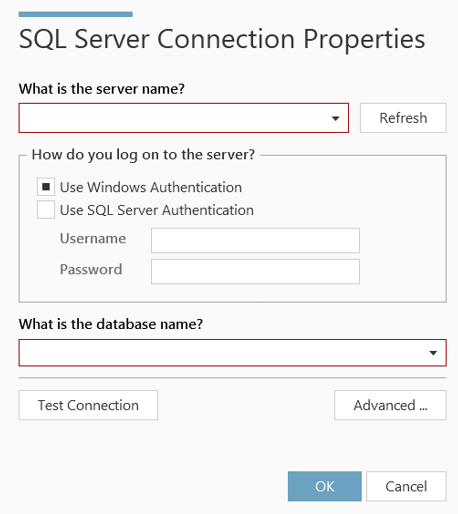
Click the ellipsis (...) next to the Governance Hub app. The SQL Server Connection Properties dialog displays.
-
Type or select the name of the SQL Server you will be using.
-
Choose an authentication method.
-
Type or select the name of the Database. If the database does not exist, the Gimmal App Installer will create the database.
-
Click OK.
-
If you are installing more than one app, copy and enter this connection information for any remaining apps.
-
For information on installing Azure SQL Database, please reference Appendix G: Installing Azure SQL Database (link)
-
15. Click Next. The Installation Summary page displays.
16. Review your installation settings. To adjust your settings, click Previous to go back to the desired page(s). When your settings are correct, click Next to return to the Installation Summary Page (if necessary).
17. Click Install to begin the installation process. The Installation Progress page provides a status list and progress bar so that you can monitor the installation. If any warnings or errors occur, an icon displays for that process, as well as a brief description.
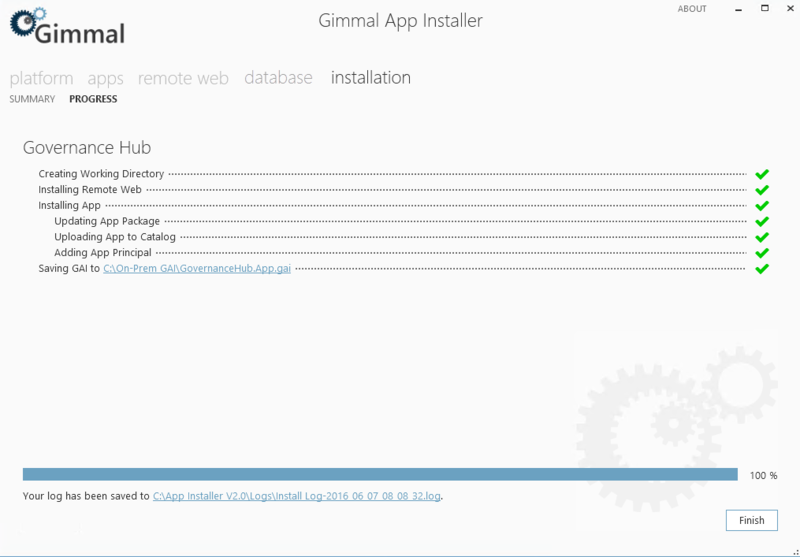
18. When the installation is complete, you can review the results of the installation by clicking the log file link at the bottom of the Installation Progress page, or by accessing the Logs sub-folder located in the App Installer folder.
19. Click Finish to close the app installer.
20. To verify that the Governance Hub was properly installed into the SharePoint 2013/2016 or SharePoint Online App Catalog, perform these steps:
-
Navigate to the SharePoint 2013/2016 or the SharePoint Online App Catalog site. The App Catalog page displays.
-
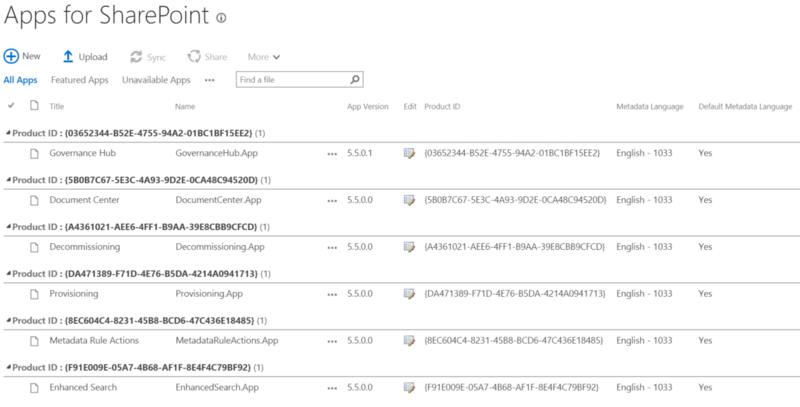
Select Apps for SharePoint from the left navigation pane. The Apps for SharePoint page displays, showing a list of installed apps.
-
Verify that the Governance Hub displays in the list, as shown in the following figure.
21. If the Governance Hub displays properly, install the Gimmal Job Scheduler Service by following the steps in the section Installing the Gimmal Job Scheduler Service.
Add Governance Hub to a site before installing any remaining Workplace Governance applications. The App Installer requires the Governance Hub URL in order to install these additional applications. For the steps on adding Governance Hub to a site, see Adding the Governance Hub App to a Site.
Installing other Content Governance Apps
After installing the Governance Hub application, you can install additional applications as needed. In general, installations of all Provider-Hosted applications are processed using the steps in this section. However, it is recommended that you review the application-specific configuration guides (located under each application's documentation folder on the left TOC pane, before installing, to determine any additional requirements.
If you intend on using Provisioning to provision sites into a SharePoint 2013 or SharePoint 2016 on-premises environment, perform the steps in Appendix B: Provisioning Pre-Installation Tasks (link) prior to adding Provisioning to a site.
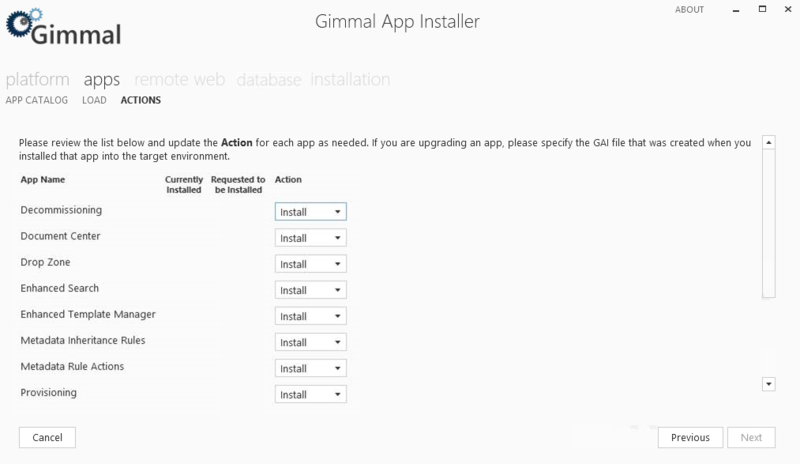
After you install the Governance Hub, you can install additional Content Governance applications as needed. Repeat the steps in the previous section, but this time on the Apps - Actions page, select the additional applications you want to install. See the following figure.
After you install any remaining applications, perform the following steps to verify that the selected applications were successfully installed into the SharePoint 2013/2016 or SharePoint Online App Catalog:
-
Navigate to the SharePoint 2013/2016 or the SharePoint Online App Catalog site. The App Catalog page displays.
-
Select Apps for SharePoint from the left navigation pane. The Apps for SharePoint page displays, showing a list of installed applications.
-
Verify that the installed applications display in the list. See the following figure.
Post-Installation Tasks
If your remote web is on Azure App Service, you can use Azure WebJobs in place of the Gimmal Job Scheduler. See Appendix E: Configuring Azure to Run Azure WebJobs (link) for more information. If your remote web is on IIS, you must install the Gimmal Job Scheduler. For more information, see Installing the Gimmal Job Scheduler Service below.
Ensure that you install and configure the Governance Hub and complete the Governance Hub post-installation task (see table below) before you perform any of the remaining post-installation tasks.
A summary of post-installation tasks can be found in Appendices (link)
Installing Job Scheduler Service
You must install the Gimmal Job Scheduler Service to run a component's scheduled jobs, and for Governance Hub to propagate Gimmal software configuration settings from the Governance Hub to local instances. See the following notes about the Job Scheduler Service:
Perform the following procedure for a new Governance Hub installation. You do not need to perform this task if you are upgrading Governance Hub. The service account being used by the Gimmal Job Scheduler needs at least "Read" permission so that it can access the jobs in Governance Hub and pick up the Secure Store credentials. Gimmal recommends using the same service account that is used by the SharePoint Timer Service since that account typically has access to all the sites. For a Feature-Activated installation, Gimmal recommends that you install the Gimmal Job Scheduler Service on a web front end (WFE) or a server where your SharePoint site is accessible.
A scheduled job is a background process that is run to execute specific tasks on a scheduled basis. Scheduled jobs may be long-running or short-lived, scheduled to execute one-time only, on a regular basis, or somewhere in between. The Governance Hub Job Definitions link provides a central location for component scheduled jobs that run within the Gimmal Job Scheduler Service. You can change when a job is run by editing the job definition and modifying the Job Schedule setting. For more information, see the Configuring Governance Hub section.
|
Component |
Scheduled Job |
|
Decommissioning |
|
|
Document Center |
|
|
Enhanced Search |
|
|
Enhanced Template Manager |
|
|
Provisioning |
|
Installation Step
Perform the following task for a new Governance Hub installation. You do not need to perform this task if you are upgrading Governance Hub.
-
Navigate to the <Extract Folder>\Gimmal Software\Gimmal Job Scheduler folder under the root folder where you extracted both the Content Governance installation package and the SDK files.
-
Select the Gimmal Job Scheduler folder and copy or move it, and all of its contents, to a permanent location on the machine that hosts the Gimmal Job Scheduler Service.
The Gimmal Job Scheduler Service is a Windows Service that must have persistent access to the contents of the Gimmal Job Scheduler source folder.
-
If installing the Gimmal Job Scheduler on a non-SharePoint farm host (such as on the Provider-Hosted server, which is the recommended configuration), it is necessary to:
-
Download the latest version of the Gimmal SDK ZIP archive.
-
Extract the Solution Development Kit Vn.n.n.zip file to a temporary location.
-
Copy all the DLLs from the extracted folder \Gimmal Software\Gimmal Job Scheduler to the Gimmal Job Scheduler folder created/set up as part of Step #2.
-
-
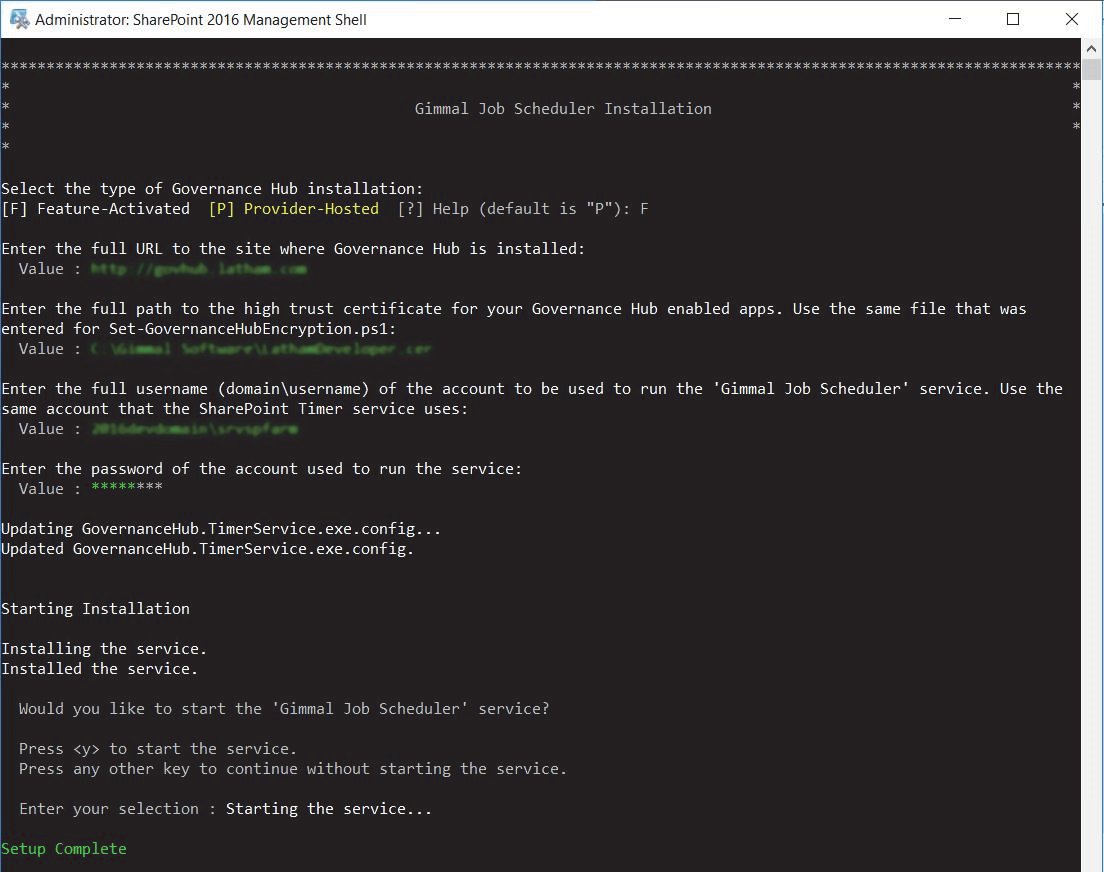
From the new Gimmal Job Scheduler folder, use Windows PowerShell (start the PowerShell console as an administrator) to run Setup‐GimmalJobScheduler.ps1.
-
Enter the installation type and your Governance Hub URL, when prompted.
-
Enter the full path to a
certificate file
(e.g., .cer or .pfx file).
-
When prompted for the user account to run the Gimmal Job Scheduler Service, find the account name by going to Windows Services > SharePoint Timer Service > Properties > Log On and viewing the account name.
-
Enter the password to run the Gimmal Job Scheduler timer service.
-
Press Y to start the service. You can confirm that the service is running by going to Windows Services > Gimmal Job Scheduler and reviewing the Status column.
Upgrade Content
This section describes how to upgrade a previous version of the Content Governance for SharePoint components (including Governance Hub) to the current version for the SharePoint 2013/2016 and SharePoint Online environments, using the Gimmal App Installer. You must perform these steps on the server where the previous component(s) were installed, and you must have the following permissions:
-
Farm Administrator permissions for SharePoint 2013/2016 on-premises.
-
Tenant Administrator permissions for SharePoint Online. You must also have Full Control permission for the SharePoint Online App Catalog.
Gimmal only supports upgrades from the latest released version of an application to the newest version. If the latest released version of Gimmal software is not available, upgrade to that version first before upgrading to the newest released version.
Before You Begin
If you intend to use Provisioning to provision sites into a SharePoint 2013 or SharePoint 2016 on-premises environment, perform the steps in Appendix B: Provisioning Pre-Installation Tasks (link) prior to upgrading the Provisioning app.
Ensure that you upgrade and configure Governance Hub first! Then, you can upgrade any remaining components. To upgrade successfully, you must re-use the authentication information that you provided during the initial component installation. This authentication information is located in the .GAI file.
Upgrade Steps
Before you perform these steps, ensure that the latest version of the Gimmal Solution Development Kit (SDK) is installed (available on the Gimmal product download site, under the Content Governance for SharePoint product section).
-
Retrieve the latest version of the Content Governance for SharePoint application(s) you want to upgrade to from the Gimmal product download site and download them to a single folder on the App Installer Server.
-
Extract all of the app installation package zip files into the same root folder, on the App Installer Server*. Your files are extracted to the Gimmal Software folder. (*For information on the App Installer Server, see Preparing the Gimmal App Installer Server.)
-
Retrieve the latest version of the Gimmal App Installer from the Gimmal product download site.
-
Extract the files to a folder on the App Installer Server*. (*For information on the App Installer Server, see Preparing the Gimmal App Installer Server.)
-
Open the App Installer folder you extracted to, right-click GimmalAppInstaller.exe, and then select Run as administrator from the menu. The Gimmal App Installer displays.
-
Proceed through the first three app installer pages as described in
Installing the Governance Hub
, until you get to the Apps Actions page.
-
On the Apps Actions page, a list displays, indicating the components that you can upgrade, and their current and new version numbers.
-
Verify that the Upgrade action displays, and then click ... to the right of the GAI File Location field to select the app's GAI file.
If you cannot locate your app's GAI file, contact Gimmal Support.
-
Click Next. The Remote Web Info page displays.
-
Confirm the remote web settings for your remote web type (IIS or Azure).
-
Click Next. The Database Info page displays.
The steps you perform on the Database Info page will only work with the Gimmal App Installer version 5.4.1.
-
If you are installing into a SQL Server Database, then continue with step 12a. If you are installing into an Azure SQL Database, then go to step 12b.
-
12a: On the Database Info page, perform the following steps:
-
Click the ellipsis (...) next to the Governance Hub app. The SQL Server Connection Properties dialog displays.
-
Type or select the name of the SQL Server you will be using.
-
Choose an authentication method.
-
Type or select the name of the Database. If the database does not exist, the Gimmal App Installer will create the database.
-
Click OK.
-
If you are installing more than one app, copy and enter this connection information for any remaining apps.
-
-
12b: To set up your Azure SQL Database, log in to your Azure portal and perform the following steps:
-
a. Click SQL databases in the left-hand pane of the Azure portal. The SQL databases page displays. 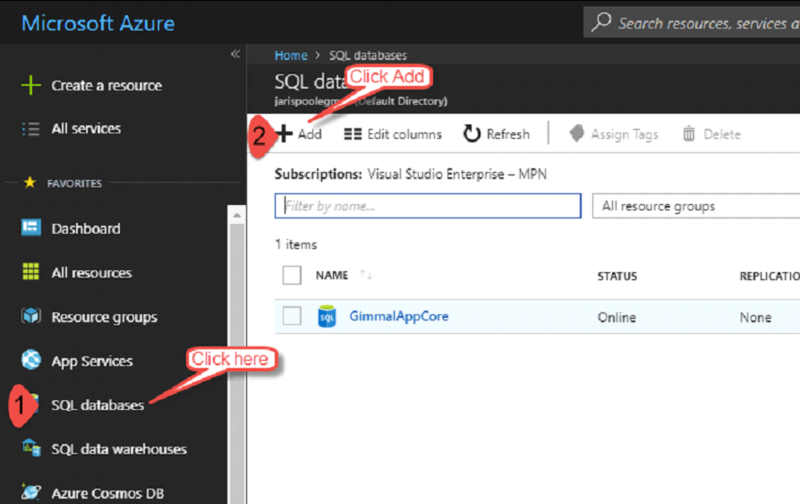
b. Click + Add in the upper left-hand corner of the SQL databases page. The database settings page displays.
c. On the settings page, enter the following information as shown below in the following two figures: 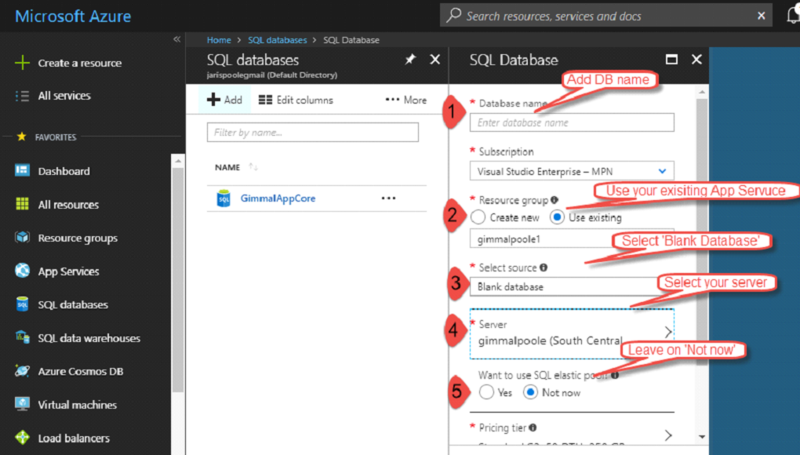
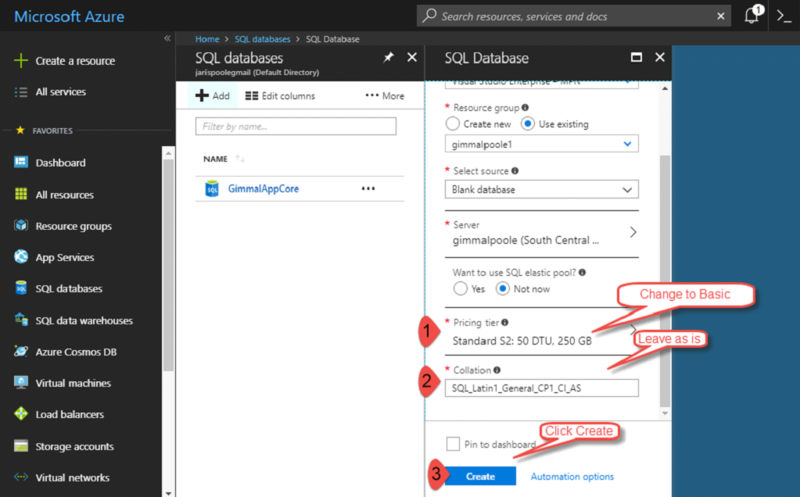
d. Click Create to create the database. The new database displays in a list on the SQL databases page. 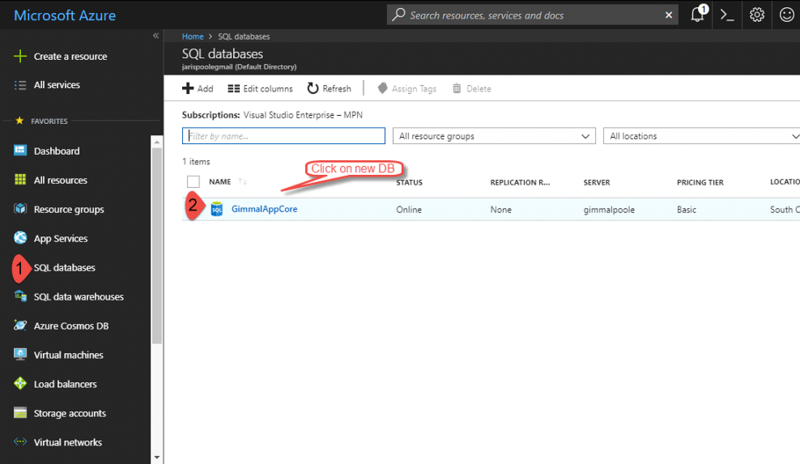
e. Click the new database name. The database Overview page displays.
f. Next, you must create a firewall rule to enable your computer to connect to the database. To do this, click Set server firewall.

g. On the Firewall settings page, click +Add client IP. (Note that the client IP address is automatically created in the list of Firewall rules.)
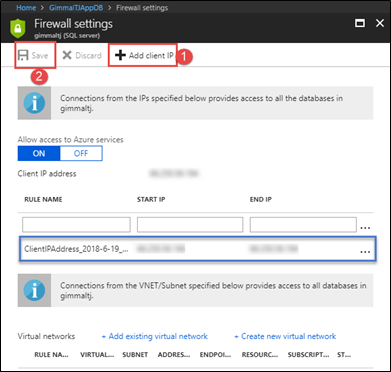
h. Click Save.
i. Return to the database Overview page and click the link under "Connection strings". The Connection strings page displays:
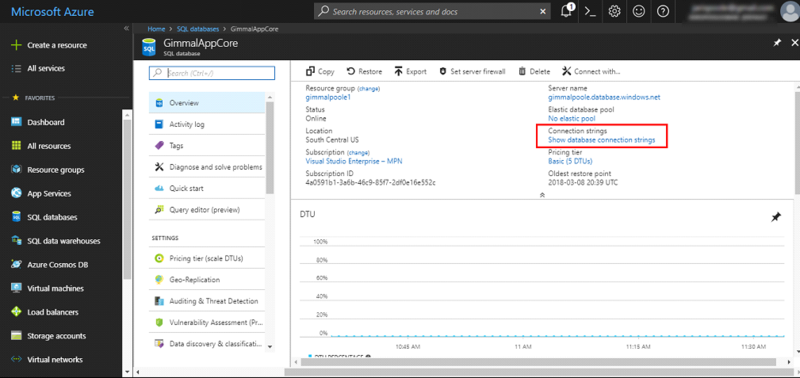
j. Click the Copy icon to the right of the connection string to copy the string to the clipboard.
k. Return to the App Installer Database Info page, and paste the connection string data into the Connection String field for the desired app, entering your valid username and password.
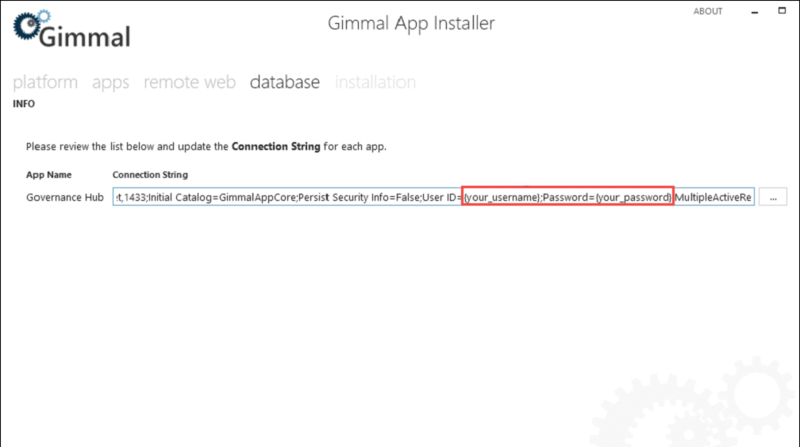
13. Click Next. The Installation Summary page displays, showing the version you're upgrading to.
14. Review your installation settings. To adjust your settings, click the Previous button to go back to the desired page(s). When your settings are correct, click Next to return to the Installation Summary Page (if necessary).
15. Click Install to begin the upgrade process. The Installation Progress page provides a status list and progress bar so that you can monitor the installation. If any warnings or errors occur, an icon displays for that process, as well as a brief description.
16. When the upgrade is complete, click Finish to close the app installer. You have completed the upgrade steps. Continue with the Post-Upgrade Tasks.
Upgrading Component Used in a Site
After you upgrade an component using the App Installer, in order for the upgraded component to take effect, you must also upgrade the component on each site where it is installed. If you are not sure where your components are installed, see the Governance Hub Installed Locations list. Perform the following steps on the site(s) where your upgraded component will be used.
The following steps show how to upgrade the Metadata Inheritance Rules (MIR) component in a site, as an example, but they also apply to any of the Content Governance components.
Microsoft does not allow you to use the System Account to add components! Use a non-system account with appropriate permissions to perform these steps.
-
In SharePoint, on the site where MIR is installed, click Settings > Site Contents. The Site Contents page displays.
-
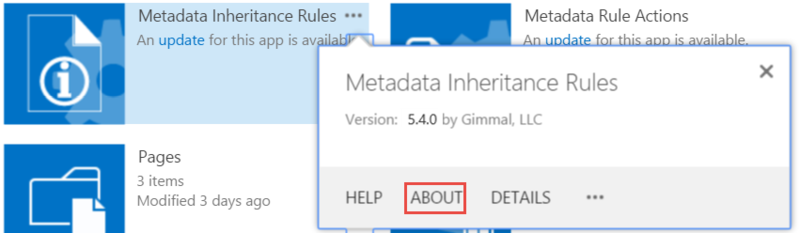
Hover your cursor over the MIR component you're upgrading in SharePoint, and click on the ellipsis in the upper-right corner. A callout displays. Click About. The MIR description page displays.
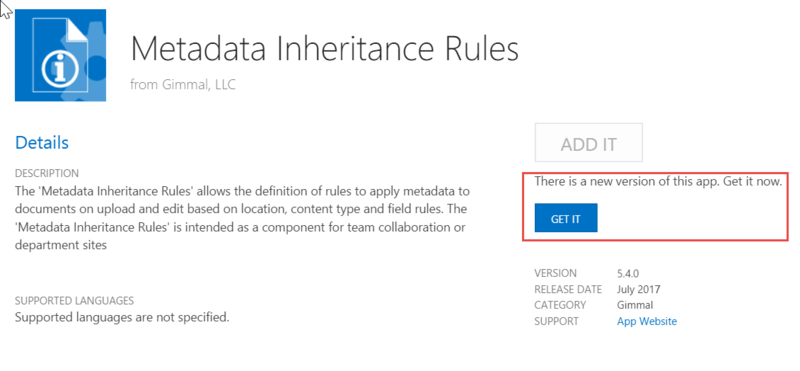
3. To the right, a message displays stating that there is a new version of this app. Click the Get It button.
4. Click Trust It on the following screen to begin the update process. The page refreshes when the component is installed. Depending on your system, this can take several minutes to perform.
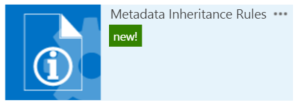
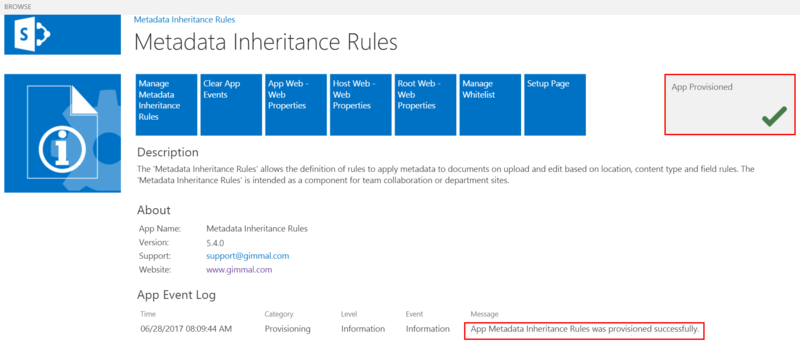
5. Click the new MIR tile to verify that the upgrade has completed successfully.
6. Verify that the version number has incremented (for example, from 5.3.0 to 5.4.0), and that a successful installation message displays under the App Event Log, as shown in the figure below. This can take several minutes, depending on your system. The App Provisioned green checkmark is not an indication that the process has completed.
Post Upgrade Tasks
If your remote web is on IIS, perform the post-upgrade tasks listed in Appendices(link) for the component(s) you upgraded.
Uninstalling Content Governance Components
This section describes how to uninstall the Content Governance for SharePoint components from your SharePoint 2013/2016 environment. To remove a component, you must remove it from a site(s), the SharePoint 2013/2016 or SharePoint Online App Catalog, remove the remote web from the IIS server, and then remove the app principal (removing the app principal applies only to SharePoint Online). You must have Administrator permissions to uninstall the Content Governance components.
Removing a Content Governance Component from a Site
Follow these steps to remove a Content Governance for SharePoint component from a site/site collection:
-
Navigate to the site as a user who has tenant-level permission and select Settings > Site Contents. The Site Contents page displays.
-
Click the ellipsis (...) on the tile of the component you want to remove. The component menu displays.
-
On the component menu, click the ellipsis (...), and then click Remove. You are prompted to confirm the removal. (See the following example.)
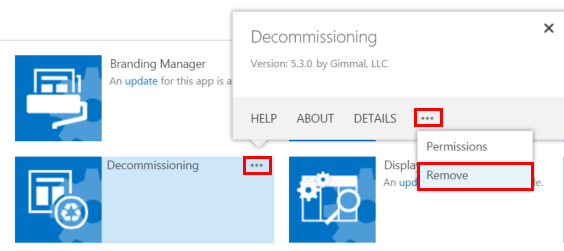
4. Click OK. The component is removed.
Removing a Content Governance Component from the SharePoint Online App Catalog
Perform the following steps to remove a component from the SharePoint 2013/2016 or SharePoint Online App Catalog site:
-
Navigate to the SharePoint 2013/2016 or SharePoint Online App Catalog site. The App Catalog page displays.
-
Select Apps for SharePoint from the left navigation. The Apps for SharePoint page displays showing the list of installed apps.
-
Select the ellipsis (…) next to the app you want to delete. The app's context menu displays.
-
Select the ellipsis (…) on the app's context menu. Another menu displays.
-
Select Delete. You are prompted to confirm the deletion.
-
Click OK. The app is removed from the App Catalog.
Removing Component Lists and Associated Data from Local Sites
To completely remove a component from your system, you must also remove any lists, libraries, and other data associated to a component from your local site(s). Follow these steps to remove any component lists, libraries, and associated data.
This is a destructive action, which will remove all of the list entries and data for a given component.
-
From the site where the component is deployed, select Settings > Site Contents. The Site Contents page displays.
-
Under the Lists, Libraries, and other Apps section, locate the list/library tile for the component that you're uninstalling, hover your cursor over the tile, click the ellipsis (...), and then select Remove from the callout menu. You are prompted to confirm the removal. See the following figure for an example.
-
Click OK.
-
Delete the item from the recycle bin and the second stage recycle bin (if configured).
-
Repeat these steps for any remaining lists/libraries.
Removing an Component's Remote Web from IIS
Perform the following steps to remove a component's remote web from IIS.
-
Open Internet Information Server Manager.
-
Navigate to the component's remote web under the Sites folder.
-
Right-click on the remote web and select Deploy > Delete Application and Content. You are prompted to confirm the deletion.
-
Click OK. The remote web is deleted.
Removing a Component's Remote Web from Azure App Service
Perform the following steps to remove a component's remote web from the Azure App Service, and, if applicable, any associated WebJobs.
The following steps show how to remove the Decommissioning component's remote web, as an example, but the steps apply to any of the Workplace Governance components.
-
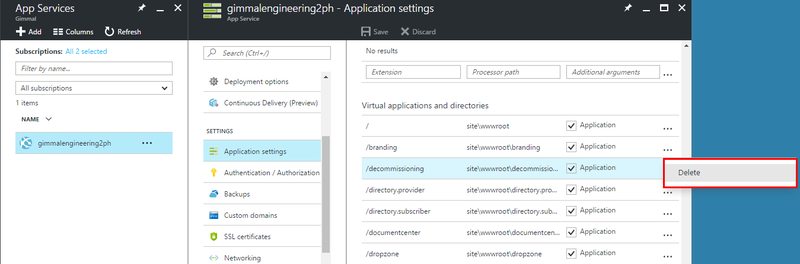
From your Azure portal, navigate to App Services, and then select your app service. The app service properties display in the middle pane.
-
Scroll down to the Settings section and click Application Settings. The General Settings page opens in the right pane.
-
Scroll down to the Virtual applications and directories section and find the application you want to delete; for example, Decommissioning. Click the ellipsis (...), and then click Delete.
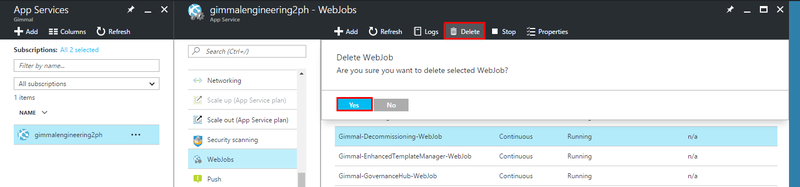
4. To remove the WebJob(s), click the app service again, and in the middle pane, scroll down to the Settings section and click WebJobs. The WebJobs load on the right side of the screen. Find the WebJob(s) for the application you want to delete. (They're typically named Gimmal-<product name>-WebJob.)
5. Select the WebJob, and then click Delete on the toolbar at the top of the screen. You will be prompted to confirm the deletion.
6. Click Yes.
Removing the App Principal (SharePoint Online Only)
Perform these steps only if you want to remove a Gimmal component permanently from your environment, and have already removed it from the app catalog and removed the corresponding remote web.
-
Run PowerShell as an administrator.
-
Run the command Connect-MsolService and enter your SharePoint Online credentials when prompted.
To run these commands, you must be a global administrator on the tenant.
You must configure PowerShell to connect to Azure. For more information on connecting to Azure Active Directory with PowerShell, see https://msdn.microsoft.com/en-us/library/jj151815.aspx#bkmk_installmodule.
3. Use the command Get-MsolServicePrincipal(link page not found) | select -Property DisplayName, AppPrincipalId to see the registered principals on your environment.
4. Copy the AppPrincipalId of the principal you wish to remove.
5. Use the command Remove-MsolServicePrincipal(link page not found) -AppPrincipalId <copiedAppPrincipalId> with the copied AppPrincipalId to remove the principal