
Appendix A: About Enhanced Search Display Templates
When you create a Search Experience Profile, you have the option to select from a number of Enhanced Search OOTB display templates that control the appearance of various components in the Enhanced Search interface. These templates include the following:
-
Search Box Display Templates:
-
Enhanced Search Box Control
-
Enhanced Search Box Advanced Control
-
-
Refiner Control Template:
-
Enhanced Search Refiner Control
-
-
Refiner Display Templates:
-
Enhanced Search Grouped
-
Enhanced Search Choice Hierarchy
-
Enhanced Search Pie Chart
-
You can also create your own custom display templates by copying and then modifying the Enhanced Search OOTB templates. See the following sections for more information on the stock display templates. For information on modifying the display templates, see Appendix B: Modifying the Enhanced Search Display Templates.
Enhanced Search Display Template Descriptions
As described above, Enhanced Search provides a number of OOTB display templates that control how the Enhanced Search interface looks. This section describes each display template, the component it controls, and what the component will look like as an end result when you apply a certain display template to it.
Search Box Display Templates
The Search Box Display Template controls how the search box looks on the main Enhanced Search page.
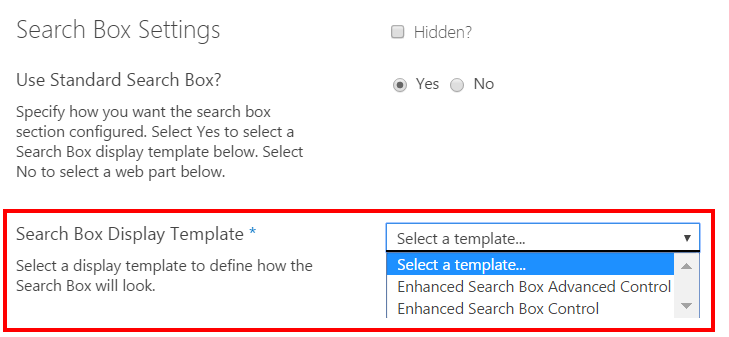
The following display templates are available from the drop-down list:
-
Enhanced Search Box Advanced Control – Displays a keyword search box, and some additional advanced search parameters, as shown below. Enables you to add properties to further refine the search. Also enables you to save searches for future use.
-
Enhanced Search Box Control – Displays a simple keyword search box, as shown below.
Refiner Control Template
The Search Refiner Display Template controls the look of the refiner web part and how the refiners are organized within it. The following display template is available from the drop-down list:
-
Enhanced Search Refiner Control – Displays a refiner web part panel on the left side of the Enhanced Search page.

Refiner Display Templates
Enhanced Search comes with several proprietary refiner display templates, in addition to using the SharePoint OOTB refiner display templates, so that you can control how the refiners display in the Refiner panel on the left side of the Enhanced Search pages (see figure above). You can select these display templates from the SharePoint OOTB Refiners dialog, as shown in the following figure. When configuring the refiners for your Search Experience Profile or Enhanced Search instance, you can apply the following refiner display templates for each selected refiner.
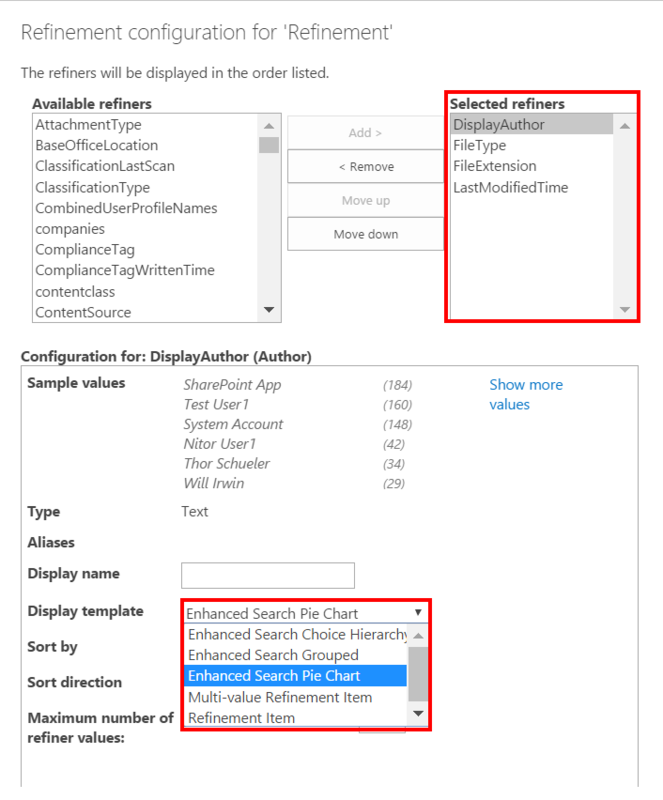
The Enhanced Search-specific templates are listed below, followed by a description of each:
-
Enhanced Search Choice Hierarchy
-
Enhanced Search Grouped
-
Enhanced Search Pie Chart
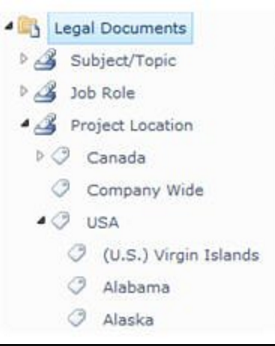
Enhanced Search Choice Hierarchy
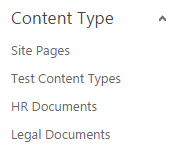
This display template is intended to be used with hierarchical managed metadata (MMD) fields, but can be used with any Text refiner. The template expects the full hierarchy of values for each item as colon-separated text data. The template will look for this text data and create the hierarchy automatically. Note that the MMD fields must have its Display Format set to "Display the entire path to the term in the field". To apply this setting, navigate to the column/field Edit page. When you apply this display template to a selected refiner, it displays in the Refiner panel on the left side of the search results page as shown below:
For additional information on configuring managed properties, see Appendix I: Managed Property Configuration Tips for O365.
Enhanced Search Grouped
The Enhanced Search Grouped display template can be used with any refiner. You must configure several settings for any managed properties before the template will function properly.
This list is not created until you open a search results page that uses this refiner.
To configure the settings for this template, perform the following steps:
-
Navigate to the Grouped Refiner Configuration list. This is a hidden list that can be accessed from the following location: <Local Site URL>/Lists/Grouped Refiner Configuration.
-
On the list page, click +new item to add a new managed property and define its refinement values, as shown in the following figure.
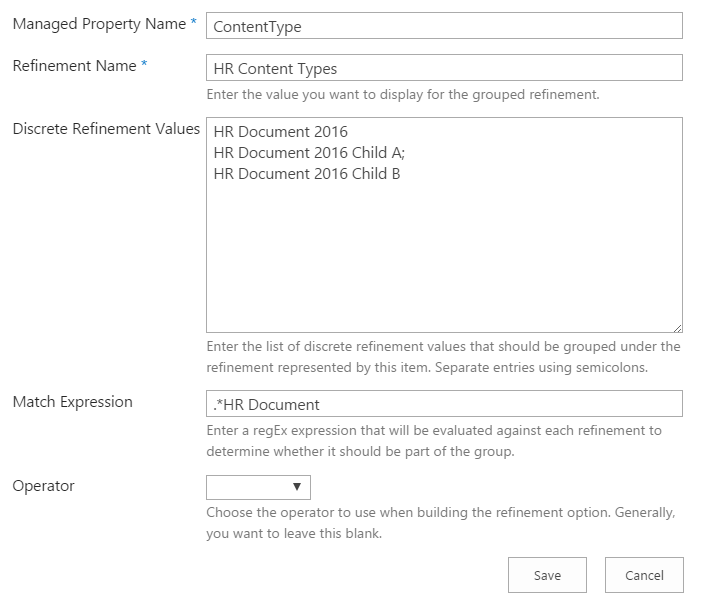
Enter values for the following settings:
-
Managed Property Name: This name must match the name of the managed property you intend to use this template with. You can have multiple list items for the same managed property.
-
Refinement Name: Enter the name you want to display for the grouped refinement.
-
Discrete Refinement Values: Enter the list of discrete refinement values that should be grouped under the refinement represented by this item. Separate entries with semicolons.
-
Match Expression: Enter a regEx expression that will be evaluated against each refinement to determine whether it should be part of the group. The expression must be entered in a regEx format.
-
Operator: Choose the operator to use when building the refinement option. Options are "starts with" and "equals".
When you apply this display template to a selected refiner, it displays in the Refiner panel on the right side of the search results page as shown below:
Enhanced Search Pie Chart
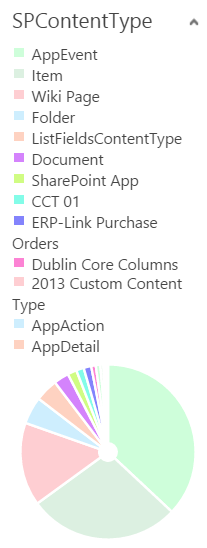
This refiner template can be used with any Text refiner. There are no special setup instructions. See the following figure.
Appendix B: Modifying the Enhanced Search Display Templates
If desired, you can modify the Enhanced Search display templates to change the appearance of the Enhanced Search pages (e.g., to add a company logo or apply corporate branding), or you can use your own custom template(s).
Gimmal strongly recommends that you make copies of the original display templates that were installed with Enhanced Search, and edit these copies as needed. Ensure that your edited copies or custom templates are placed in the correct location, as specified in the table below.
Some procedures in this section are SharePoint OOTB procedures. It is beyond the scope of this guide to include SharePoint documentation. Where possible, links will be provided to Microsoft's SharePoint documentation for information on OOTB procedures.For information on editing custom display templates, see Microsoft's SharePoint documentation.
The OOTB display template locations are listed in the following table:
|
Display Template |
Location |
|
Search Box Display Template |
_catalogs/masterpage/display templates/search/gimmal/enhancedsearch/searchbox |
|
Search Results Display Template |
_catalogs/masterpage/display templates/search/gimmal/enhancedsearch/searchresults |
|
Search Results Grid Item Display Template |
_catalogs/masterpage/display templates/search/gimmal/enhancedsearch/searchresults |
|
Search Refiner Display Template |
_catalogs/masterpage/display templates/search/gimmal/enhancedsearch/refiner |
|
Search Refiner Filter Display Template |
_catalogs/masterpage/display templates/filters/gimmal/enhancedsearch |
Appendix C: Specifying Content Types for Managed Properties
On theSearch Experience Profile page, for the Queryable Managed Properties and the Retrievable Managed Properties settings, Enhanced Search enables you to select from all of the managed properties that are available in your environment. As this can be a lengthy list, these managed properties can be filtered to only display managed properties for specific content types, thus providing you with a more narrowed-down selection of available properties to choose from. To limit the number of managed properties, perform the following steps:
-
Navigate to the desired Search Experience Profile page, as described in Accessing the Search Experience Profiles Page.
-
Under the Search Query Settings section, click Configure Query. The Build Your Query dialog displays.
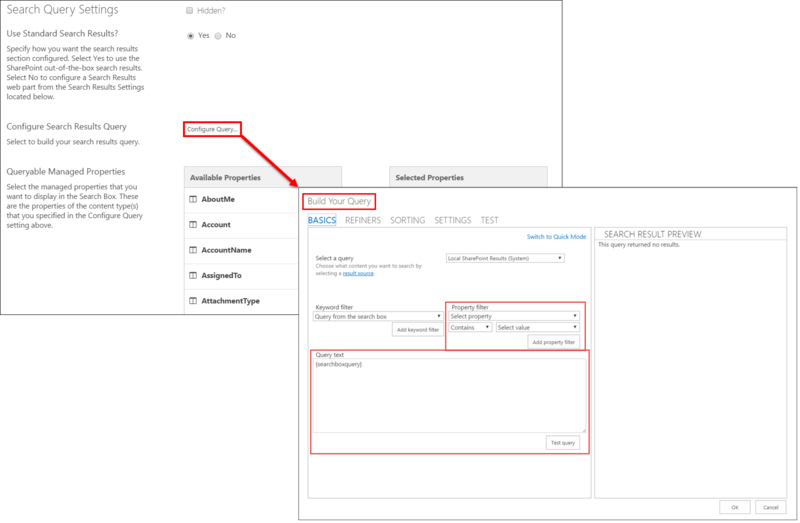
3. In the Property filter section, click the Select property drop-down list and select ContentType.
4. Click the Select value drop-down list, and select a content type value.
5. Leave the Contains option as-is.
6. Click Add property filter. The Query text box now includes the new ContentType ID of the content type you selected above.
For SharePoint 2013 on-premises, when using the ContentType property filter in the Build Your Query dialog, the phrase added to the Query text box incorrectly displays as "ContentType". You must change the name to read "ContentTypeID". To do this, click inside the Query text box and manually change the name, adding "ID" to the end of ContentType. To confirm the name change, click Test query and ensure that you see results listed in the right-hand pane.
7. Repeat steps 4 and 5 to add as many content types as needed.
8. After you add your content types, click Test query to display the results in the Search Result Preview pane on the right-hand side (optional).
9. Click OK.
10. Return to your Search Experience Profile page, to verify that you only see display managed properties for the specific content types you selected in the preceding steps.
Appendix D: Adding a Custom Page Layout to Enhanced Search
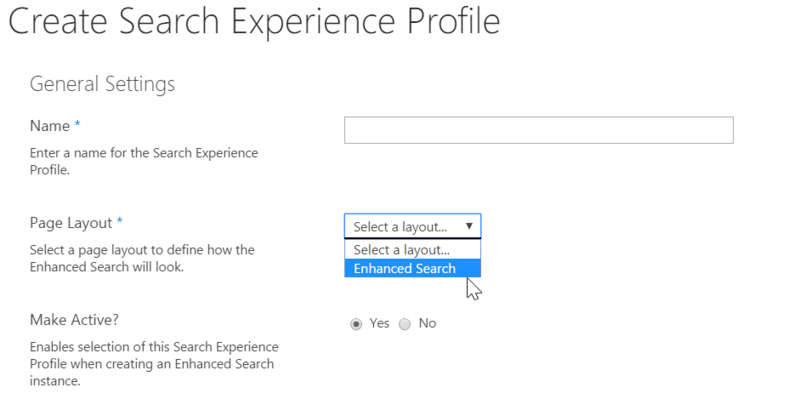
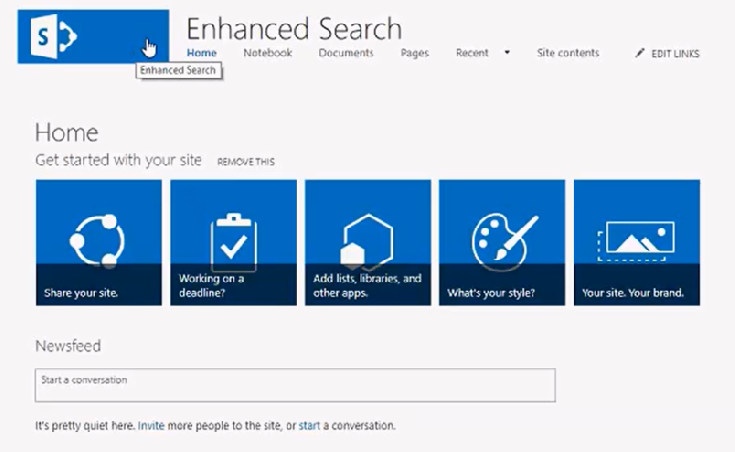
Enhanced Search comes with an OOTB page layout called "Enhanced Search". You can specify this page layout when you create a new Search Experience Profile (SEP), as shown below.
If you want to add your own custom page layout and make it available as an option in the Page Layout drop-down list shown above, perform the following steps as a user with Contribute permission to the Master Page Gallery:
-
From the site where Enhanced Search is deployed, select Settings > Site Settings. The Site Settings page displays.
-
Under the Web Designer Galleries section, click Master pages > Gimmal folder > EnhancedSearch folder > PageLayoutsfolder.
-
Select the Files tab from the SharePoint ribbon, and then click Upload Document. The Add a master page dialog displays.

4. Click Choose File to select a new custom page layout file.
5. Choose the destination folder, if necessary. Make sure the page layout folder is the one listed in step 2 above.
6. Add any version comments, if necessary.
7. Click OK. The Add a master page settings dialog opens.

8. Select Design File from the Content Type drop-down list.
9. Enter a name for the custom page layout file.
10. Enter a name for the custom page layout. This is the name that will display in the Page Layout drop-down list on the Create Search Experience Profile page shown above.
11. Click Save. The new custom page layout will now display in the Page Layouts folder.
Appendix E: Editing & Deleting a Navigation Link
-
On the site where Enhanced Search is deployed, select Settings > Site Settings.
-
Under the Search section, click Search Settings.
-
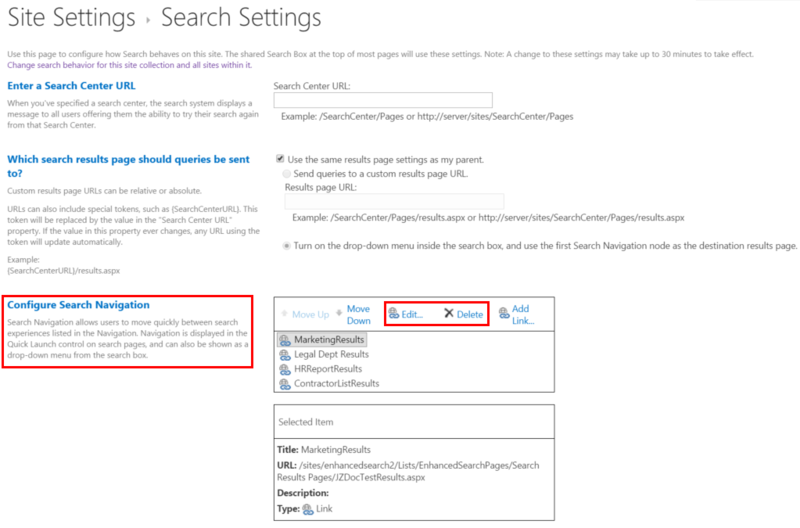
Scroll down to the Configure Search Navigation setting. The navigation links display in a table to the right.
-
Select a link, and then click Edit to edit the link or Delete to delete it.
-
Click OK.
Appendix F: Enhanced Search SharePoint Lists & Libraries
After you activate Enhanced Search in a site and it displays on the Governance Hub Dashboard, several lists and libraries are created for Enhanced Search. One is available on the Governance Hub site, and the others are available on the local site where you added the Enhanced Search app. The following sections describe these lists/libraries.
ES Managed Properties List (Governance Hub Site)
When the Enhanced Search Governance Hub site is created, a list is generated for the Governance Hub called "ES Managed Properties". This list is populated with the SharePoint OOTB managed properties. These managed properties are used in Enhanced Search in the following manner:
-
In the Search Experience Profile (SEP) settings, you can designate which managed properties will be available in the Enhanced Search interface. The interface shows all managed properties available in SharePoint and allows you to select one or more of the managed properties to be configured for use when performing a search. This enables you to obtain more precise search results.
-
On the Enhanced Search Results page grid view, the columns shown within the grid are based on the retrievable managed properties setting for the Search Experience Profile.
To add custom managed properties to this list, make sure that the property settings match those of the SharePoint search application search schema. Changes to this list will not affect the Search Schema in the Search Service Application.
To access this list, follow these steps:
-
Navigate to the site where Governance Hub is installed as a user with "full control" permission.
-
Select Settings > Site Contents to display the Site Contents page.
-
Under the Lists, Libraries, and other Apps section, click ES Managed Properties.
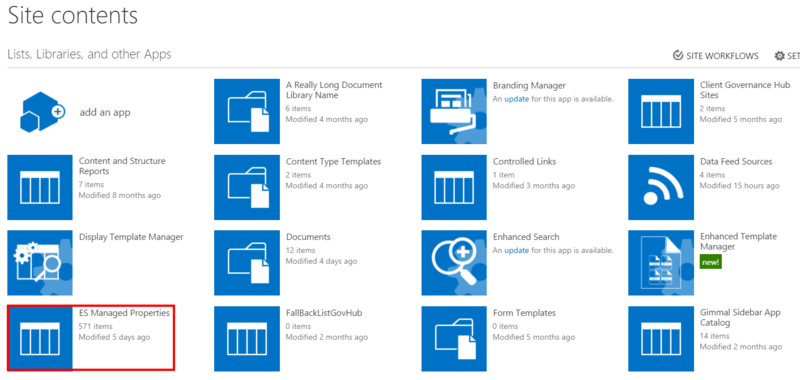
The ES Managed Properties list displays:
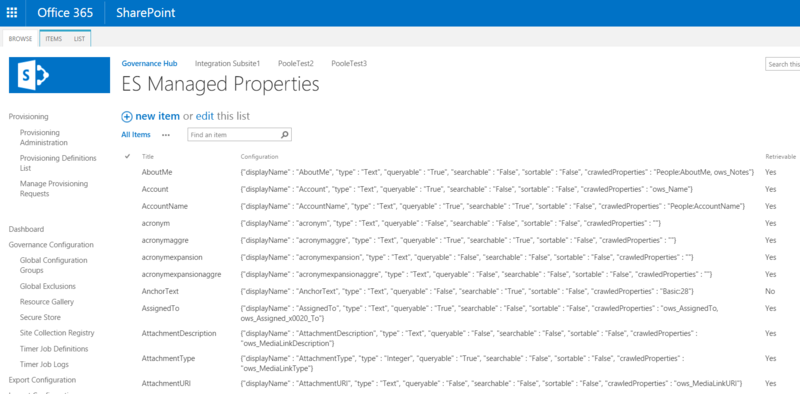
You can update this list by adding additional custom managed properties. A scheduled job will run and create a file based on the associated list. The file will then be put in the master page gallery of each site where Enhanced Search is installed.
Adding a Custom Managed Property to the ES Managed Properties List
To add custom managed properties to this list, make sure that the property settings match those of the SharePoint search application search schema.
To add a custom managed property to the ES Managed Properties list, follow these steps:
-
Navigate to the site where Governance Hub is installed as a user with "full control" permission.
-
Select Settings > Site Contents to display the Site Contents page.
-
Under the Lists, Libraries, and other Apps section, click the ES Managed Properties tile. The ES Managed Properties list displays.
-
Click +new item. The managed property settings page displays.
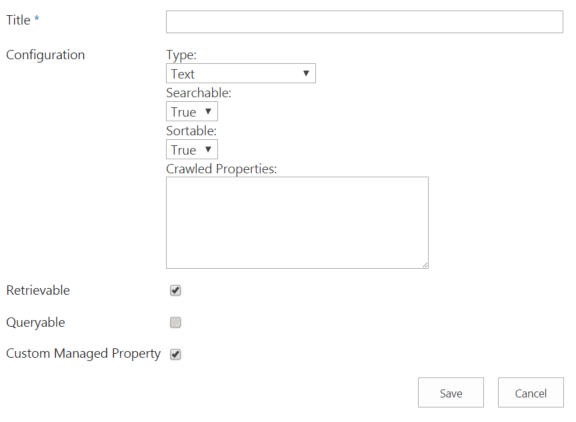
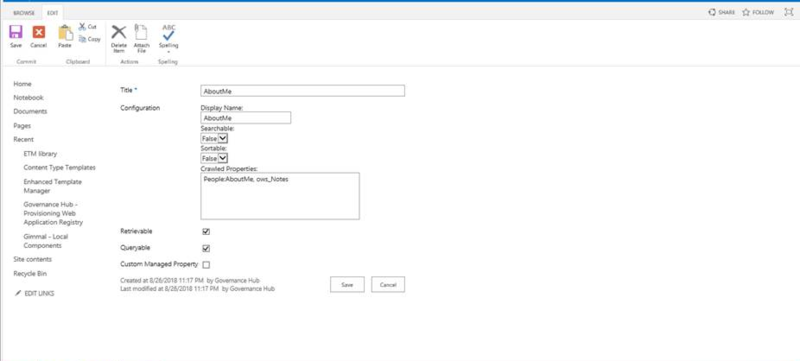
5. Enter/select the properties as needed for the custom managed property. Ensure that the property settings match those of the SharePoint search application search schema.
6. Click Save.
7. Verify that the custom managed property is listed in the ES Managed Properties list.
Changes to this list will not affect the Search Schema in the Search Service Application.
Editing the Display Name for a Managed Property in the ES Managed Properties List
The ES Managed Properties list provides a Display Name field that enables you to set a more user-friendly name for many of the Managed Properties that are used throughout Enhanced Search.
-
Navigate to the site where Governance Hub is installed as a user with "full control" permission.
-
Select Settings > Site Contents to display the Site Contents page.
-
Under the Lists, Libraries, and other Apps section, click the ES Managed Properties tile. The ES Managed Properties list displays.
-
Locate the Managed Property you wish to change the Display Name for.
-
Select the Managed Property and then click Edit in the ribbon at the top. The edit form displays.
-
On the edit form, change the Display Name field to the desired name, and then click Save.
Enhanced Search Pages Library (Local Site)
The Enhanced Search Pages library is a repository for all of the previously-created search instances and search results pages. The library contains two folders – one for Search Pages and one for Search Results pages. From these folders, you can view, edit, and delete the available search pages and search results pages by following the standard SharePoint steps for library items.
Search Experience Profiles List (Local Site)
The Search Experience Profiles list is a repository for all of the previously-created Search Experience Profiles. From this folder, you can view, edit, and delete the available Search Experience Profiles by following the standard SharePoint steps for list items.

Appendix G: About the Enhanced Search Scheduled Jobs
Enhanced Search deploys two scheduled jobs to the Governance Hub. Each job, and its associated tasks, are listed below:
-
Gimmal.EnhancedSearch.ConfigurationJob:
-
Pushes out the managed properties list from the Governance Hub to the sites where Enhanced Search is installed.
-
Obtains a JavaScript file that contains custom callout actions, and pushes this file to the corresponding location in the master page gallery within each Enhanced Search instance.
-
Queries the environment for Compliance Suite installations and pushes this data down to each site where Enhanced Search is installed.
-
-
Gimmal.EnhancedSearch.AddSharedResourcesJob (Disabled by default):
-
Deploys the CrossDomainRestProxy.aspx page across sites within a SharePoint on-premises environment. This page allows Enhanced Search to make cross-domain calls to other sites in your SharePoint environment on behalf of the current user.
-
For information on deploying these scheduled jobs to the Gimmal Job Scheduler location, see the Content Governance Installation section.
Appendix H: Configuring Enhanced Search to work with Search Configuration Manager
If you use Enhanced Search in the same environment as Gimmal's Search Configuration Manager (SCM) product, you may experience an issue if Search Configuration Manager is configured using the All Sites Global Configuration Group. In this case, Enhanced Search and SCM will "fight" for control of the search navigation process.
When you create a new search instance, Enhanced Search will replace the search navigation with configured search pages. Then, when the Gimmal.Search.ReconcileSearchConfigurationJob scheduled job runs (nightly, by default) it will replace the search navigation by copying it from the configured source site in SCM. There are several configuration options available that can enable Enhanced Search and SCM to work together without causing issues with respect to search navigation.
Search Navigation Configuration Options
The following sections describe the configuration options that are available when running Enhanced Search and SCM in tandem. These options are available, depending on which of the following scenarios applies to you:
-
I am using Enhanced Search and I want it to manage the search navigation for all sites (Recommended).
-
I am using Enhanced Search and I want it to manage the search navigation for a single site.
-
I am using Enhanced Search and I want it to manage the search navigation for a specific group of sites.
-
I am using Enhanced Search and I want the search navigation on one site to reflect what comes from SCM.
Using Enhanced Search to Manage Search Navigation for all Sites (Recommended)
To use Enhanced Search to manage search navigation for all sites, you must configure SCM to use the Enhanced Search sites as the source site for search navigation. Follow these steps:
-
On the site where Governance Hub is deployed, as a user with Contribute permission, navigate to Settings > Site Settings. The Site Settings page displays.
-
Under Site Administration, click Governance Hub. The Governance Hub Dashboard displays.
-
Click the Search Configuration Manager tile. The Search Configuration Manager configuration page displays.
-
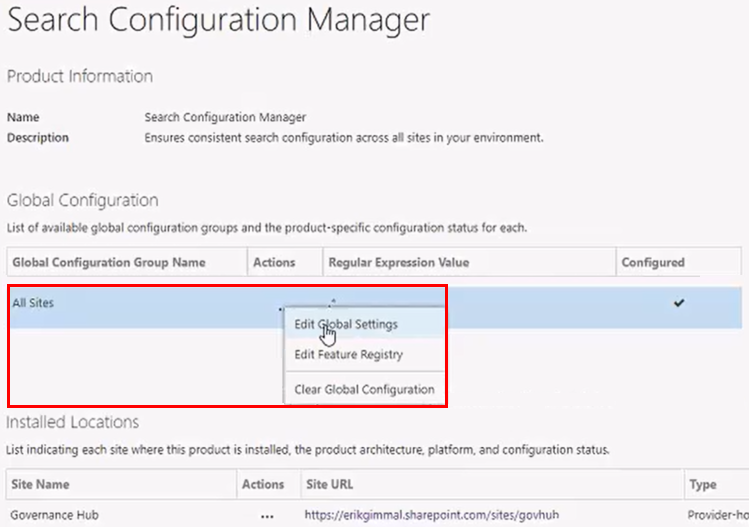
In the Global Configuration section, click the Actions menu (...) next to the All Sites Global Configuration Group, and then select Edit Global Settings.
The All Sites configuration group pulls down the global SCM settings, and applies them to one or more sites associated with this group and where SCM is instantiated. All Sites is created by default when Governance Hub is installed.
5. On the Search Configuration Manager global settings page, enter the URL of your Enhanced Search site in the Source URL field, as shown below:
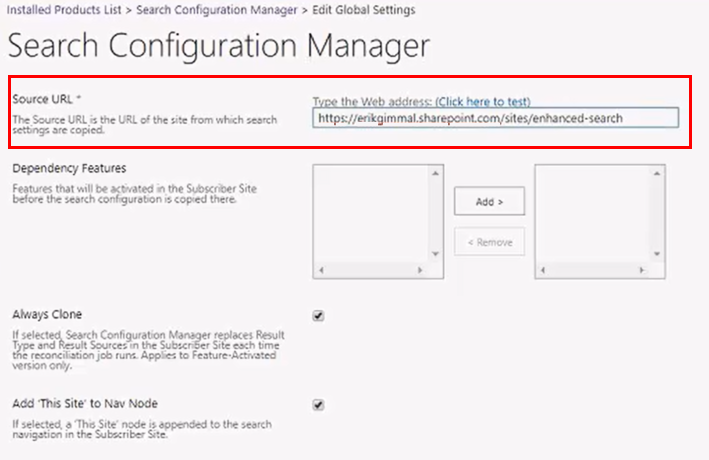
6. Click Save. The All Sites Global Configuration Group, and any sites associated with it, will now use Enhanced Search as its search navigation tool.
Using Enhanced Search to Manage Search Navigation for one Site
You can designate that Enhanced Search is the search navigation tool for one site, while maintaining SCM as the search navigation tool for any remaining sites. This scenario requires that you create an additional Global Configuration Group to specify your Enhanced Search site.
For information on creating a new Global Configuration Group, see Creating a Global Configuration Group in the "Configuring Governance Hub" section.
To designate Enhanced Search as the search navigation tool for one particular site, you must create an additional Global Configuration Group for your Enhanced Search site so it can be excluded from the SCM All Sites Global Configuration Group. The All Sites configuration group pulls down the global SCM settings, and applies them to one or more sites associated with this group and where SCM is instantiated.
You can add another site (e.g., Governance Hub site) as the source site for the All Sites configuration group, thus separating the configuration settings for your Enhanced Search site from any remaining SCM sites. In the following figure, you see a sample Enhanced Search Site Global Configuration Group, along with the All Sites group.
The All Sites Global Configuration Group is created by default when Governance Hub is installed.
To designate Enhanced Search as the search navigation tool for one particular site, follow these steps:
-
On the site where Governance Hub is deployed, as a user with Contribute permission, navigate to Settings > Site Settings. The Site Settings page displays.
-
Under Site Administration, click Governance Hub. The Governance Hub Dashboard displays.
-
Click the Search Configuration Manager tile. The Search Configuration Manager configuration page displays.
-
In the Global Configuration section, click the Actions menu (...) next to the Enhanced Search Site Global Configuration Group, and then select Edit Global Settings.
-
On the Search Configuration Manager global settings page, enter the URL of your Enhanced Search site in the Source URL field.
-
Click Save. The Enhanced Search Site Global Configuration Group, and its associated site, will now use Enhanced Search as its search navigation tool.
Using Enhanced Search to Manage Search Navigation for Multiple Sites
You can designate that Enhanced Search is the search navigation tool for multiple sites, while maintaining SCM as the search navigation tool for any other remaining sites. This scenario requires that you create an additional Global Configuration Group.
For information on creating a new Global Configuration Group, see Creating a Global Configuration Group in the "Configuring Governance Hub" section.When you create your new Global Configuration Group for multiple sites, there is a Site Descriptor field on the new Global Configuration Group dialog that enables you to enter multiple site URLs. This field is explained in the above-referenced chapter.
To designate Enhanced Search as the search navigation tool for multiple sites, you must create an additional Global Configuration Group for your Enhanced Search sites so that these sites can be excluded from the SCM All Sites Global Configuration Group. The All Sites configuration group pulls down the global SCM settings, and applies then to one or more sites associated with this group and where SCM is instantiated.
You can add another site (e.g., Governance Hub site) as the source site for the All Sites configuration group, thus separating the configuration settings for your Enhanced Search sites from any remaining SCM sites. In the following figure, you see a sample Enhanced Search Sites Global Configuration Group (including a sample list of sites that comprise this configuration group, located under the Regular Express Value column), along with the All Sites group and the Enhanced Search Site group.
The All Sites Global Configuration Group is created by default when Governance Hub is installed.
To designate Enhanced Search as the search navigation tool for multiple sites, follow these steps:
-
On the site where Governance Hub is deployed, as a user with Contribute permission, navigate to Settings > Site Settings. The Site Settings page displays.
-
Under Site Administration, click Governance Hub. The Governance Hub Dashboard displays.
-
Click the Search Configuration Manager tile. The Search Configuration Manager configuration page displays.
-
In the Global Configuration section, click the Actions menu (...) next to the Enhanced Search Sites Global Configuration Group, and then select Edit Global Settings.
-
On the Search Configuration Manager global settings page, enter the URL of your Enhanced Search site in the Source URLfield.
-
Click Save. The Enhanced Search Sites Global Configuration Group, and all of its associated sites (listed under the Regular Expression Value column), will now use Enhanced Search as its search navigation tool.
Using SCM's Search Configuration Settings in Enhanced Search
If you opt to use the SCM search navigation from a site that is not an Enhanced Search site, there is an issue where you lose your links to the Enhanced Search Search page or Search Results page. So we need to create a link back to the ES pages. If you don't have an additional Enhanced Search Site(s) global configuration group, and you only configured the All Sites group to have a non-Enhanced Search Source URL site, then you have to go to your Enhanced Search page:
Then you need to add a link to this page by performing the following steps:
-
Navigate to Settings > Site Settings > Navigation (under Look and Feel section).
-
On the Navigation Settings page, scroll to the lower part of the page, and click the Pages folder, and then Add Link at the top of the section.
-
Add a title for the Enhanced Search page. Click Browse and browse to that same page for ES.
-
Click the Enhanced Search Page link below, or on the right side. You'll come to another page that lists a folder for Search Pages and a folder for Search Results Pages.
-
Click either folder, and select the file you want to link to, then click Insert in the lower right corner. You'll be taken back to the Navigation Link dialog.
-
Fill out remaining fields, if desired, and then click Save.
When you return to the ES page and click the Pages link at the top, you will see links to the search/search results pages.
Appendix I: Managed Property Configuration Tips for O 365
In SharePoint Online you are limited on the type of attributes you can enable on new managed properties. For example, you cannot set the Refinable property on new managed properties. To overcome this limitation, O365 comes with pre-built managed properties such as RefinableString00 to RefinableString53, RefinableInt00, etc. You can use these properties to create new Refinable managed properties. The following sections describe several configuration tips that Gimmal recommends when configuring managed properties in O365.
Setting up MMD Managed Properties
MMD fields can end up with three different crawled properties:
-
ows_taxId_[Internal Name]
-
[Internal Name]
-
ows_[Internal Name]
It is important to map your managed property to the correct crawled property in order to receive user-friendly search results. Gimmal recommends that you map your managed property to the crawled property of ows_[Internal Name]. The other options will return values intended for use within your code and not for display. See below.
Recommended:
-
Crawled Property: ows_[Internal Name]
-
Display Value: Facilities

Not Recommended:
-
Crawled Property: ows_PolicyName_[Internal Name]
-
Display Value: GP0|#5c866b13-f0d3-4a08-b3c1-95af811a2cb8;L0|#05c866b13-f0d3-4a08-b3c1-95af811a2cb8|Facilities;GTSet|#081bd27c-2e98-4e4f-86ed-7406c7bd916c
Not Recommended:
-
Crawled Property: [Internal Name]
-
Display Value: 3;#Facilities
Configuring Refinable and/or Sortable Managed Properties
Office365 does not let you create your own custom Refinable or Sortable managed properties. Instead, you must use the currently existing properties with the "Refinable" prefix, such as RefinableString00. Perform the following steps to configure the existing Refinable/Sortable managed properties.
1. Map the "Refinable" managed property to the correct crawled property and assign it an Alias.

2. In the Governance Hub, in the ES Managed Properties list, add a new list item using the Alias as the Display Name instead of the "Refinable" name of the managed property.
3. Wait for the Gimmal.EnhancedSearch.ConfigurationJob scheduled job to run. This scheduled job pushes out the managed properties list from the Governance Hub to the sites where Enhanced Search is installed. By default, it runs nightly. You can edit the schedule to run sooner, if desired.
4. Select the new managed property as a Queryable or Retrievable managed property for your Search Experience Profile, as described in Creating a New Search Experience Profile.