
This section contains instructions for configuring the Feature-Activated and Provider-Hosted versions of Enhanced Search in a SharePoint 2013/2016 and SharePoint Online environment.
Before you configure Enhanced Search, ensure that you have installed the Enhanced Search app, completed the post-installation tasks, and have updated the Gimmal Job Scheduler files (if applicable). See the Content Governance for SharePoint installation section for information on these tasks.
Pre-Configuration Tasks: Enhanced Search
Prior to configuring the Feature-Activated version of Enhanced Search and using it in a site, you must perform the following tasks:
-
Apply the Enhanced Search global or local setting in Governance Hub
-
Create the SPWebURL managed property (SharePoint 2013 on-premises only)
Applying the Enhanced Search App to Site Collections(s)
The Enhanced Search Edit Settings page, accessed from the Governance Hub, permits you to enable or disable the Enhanced Search "Auditing" setting (described below). You can edit this setting using either of the following options:
-
Globally – Edit the setting from a single Global Configuration Group so the setting is pushed down to the local Enhanced Search subscriber sites. (For more information on Global Configuration Groups, see the "Configuring Governance Hub" chapter of this Configuration Guide.)
-
Locally – Edit the setting from either:
-
The local site where Enhanced Search is deployed, using the Governance Hub
-
The local site where Enhanced Search is deployed, using the Gimmal Software Configuration page
-
Applying the "Auditing" Setting Globally
-
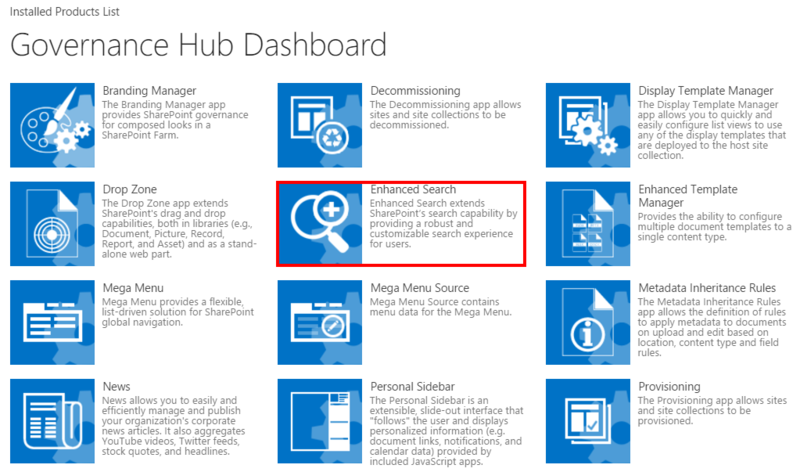
On the site where Governance Hub is deployed, as a user who has full control permissions on the site collection, navigate to Settings > Site Settings > Governance Hub. The Governance Hub Dashboard displays.
-
Click the Enhanced Search tile. The Enhanced Search Configuration page displays.
3. In the Global or Local Configuration section, click the Open menu (…) next to the Global or Local Configuration Group you want to edit, and then select Edit Global Settings or Local Settings. The Edit Global Settings page displays:
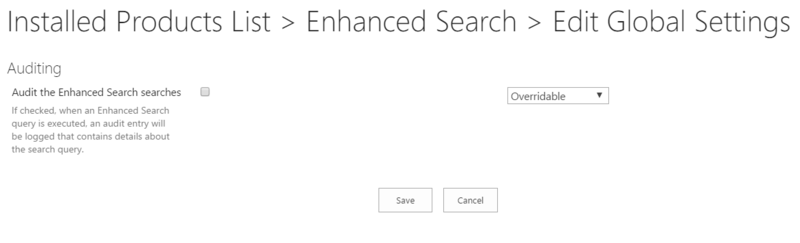
4. Edit the Enhanced Search setting as desired: Auditing
-
Audit the Enhanced Search searches (Defaults to unchecked) – If checked, when an Enhanced Search query is executed, an audit entry will be logged that contains the following information about the search query:
-
The user who executed the search
-
The search query used
-
The number of search results found
-
-
Global: Indicate whether the Audit setting is Overridable or Nonoverridable:
-
Select Overridable to override the Audit setting in a local Enhanced Search site via the Governance Hub local settings.
-
Select Nonoverridable so that the setting cannot be changed in the local site.
-
5. Click Save to save your setting. After you save your settings, the changes will take effect the next time the Governance Hub's "Publish Settings" job runs. If you want the changes to take effect sooner than that, perform the following step:
6. In the Global Configuration section, shown above, click the Open menu (…) next to the Global Configuration Group you just edited, and then select Publish Global Configuration to publish your Enhanced Search settings.
Applying the "Auditing" Setting Locally in Governance Hub
The steps in this section are only applicable if the Audit setting described above is set to Overridable.
-
On the site where Governance Hub is deployed, as a user who has full control permissions on the site collection, navigate to Settings > Site Settings > Governance Hub. The Governance Hub Dashboard displays.
2. Select the Enhanced Search tile. The Enhanced Search Configuration page displays.
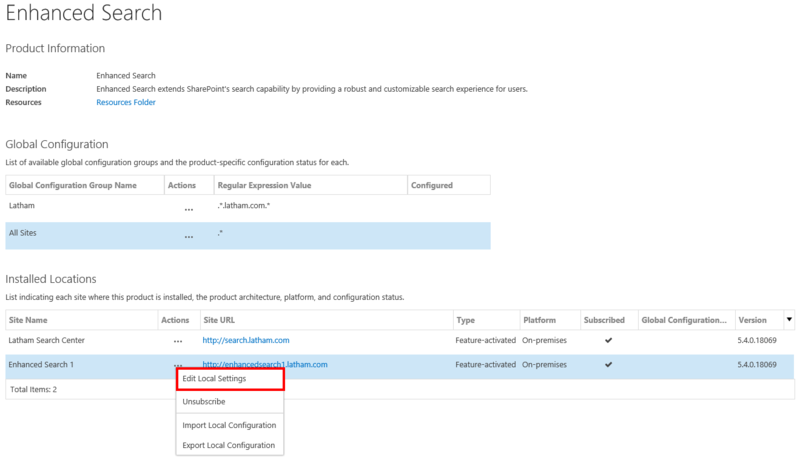
3. In the Installed Locations section, click the Open menu (…) next to the site whose setting you want to edit, and then select Edit Local Settings. The Enhanced Search Edit Local Settings page displays.
4. Edit the Enhanced Search setting as desired:
-
Auditing:
-
Audit the Enhanced Search searches (Defaults to unchecked) – If checked, when an Enhanced Search query is executed, an audit entry will be logged that contains the following information about the search query:
-
The user who executed the search
-
The search query used
-
The number of search results found
-
-
The entry will be logged to the SharePoint Unified Logging System (ULS).
To find the audit entry in the ULS logs, Gimmal recommends that you install the ULS Viewer and use the Filter option to find the audit entry. You can filter on the Field "Category" with the value set to "Audit Logging", or you can filter on the Field "Message" with the Value set to "User executing search".
5. Click Save to save your setting. After you save your settings, the changes will take effect the next time the Governance Hub's "Publish Settings" job runs. If you want the changes to take effect sooner than that, perform the following step:
6. In the Global Configuration section, shown above, click the Open menu (…) next to the Global Configuration Group you just edited, and then select Publish Global Configuration to publish your Enhanced Search settings.
Applying the "Auditing" Setting Locally from Installed Locations
If you do not have access to the Governance Hub, you must configure the Enhanced Search local setting from the Gimmal Software Configuration page. The Gimmal Software Configuration page is a local Dashboard that lists all of the products installed on a local site. Local settings apply only to the current site. If you want to apply settings to multiple sites, apply the settings globally and publish them to the local sites.
-
Navigate to the site where Enhanced Search is deployed as a user with Contribute permission.
-
Select Settings > Site Settings. The Site Settings page displays.
-
Under the Site Administration section, click Gimmal Software Configuration. The Installed Products List page displays, showing the Enhanced Search tile.
-
Click the Enhanced Search tile. The Enhanced Search local configuration page displays.
-
Click Edit Settings. The Enhanced Search Edit Settings page displays.
-
Edit the Enhanced Search setting as desired:
-
Auditing:
-
Audit the Enhanced Search searches (Defaults to unchecked) – If checked, when an Enhanced Search query is executed, an audit entry will be logged that contains the following information about the search query:
-
The user who executed the search
-
The search query used
-
The number of search results found
-
-
-
The entry will be logged to the SharePoint Unified Logging System (ULS).
To find the audit entry in the ULS logs, Gimmal recommends that you install the ULS Viewer and use the Filter option to find the audit entry. You can filter on the Field "Category" with the value set to "Audit Logging", or you can filter on the Field "Message" with the Value set to "User executing search".
7. Click Save to save your setting.
Creating the SPWebURL Managed Property
If you've installed Enhanced Search in the SharePoint 2013 on-premises environment, you must perform the following steps to create the SPWebURL managed property. This managed property is not available with the SharePoint 2013 on-premises environment, and is required so that certain custom callout actions will function correctly for Enhanced Search end users. (For information on custom callout actions, see the Enhanced Search User Guide section (link)).
-
Navigate to Central Administration > Application Management > Manage Service Applications.
-
Locate your Search Service application, and click its link. The Search Administration page opens.
-
Click Search Schema, located under the Queries and Results section on the left navigation pane. The Managed Properties page opens.
-
Click New Managed Property. The New Managed Property page opens.
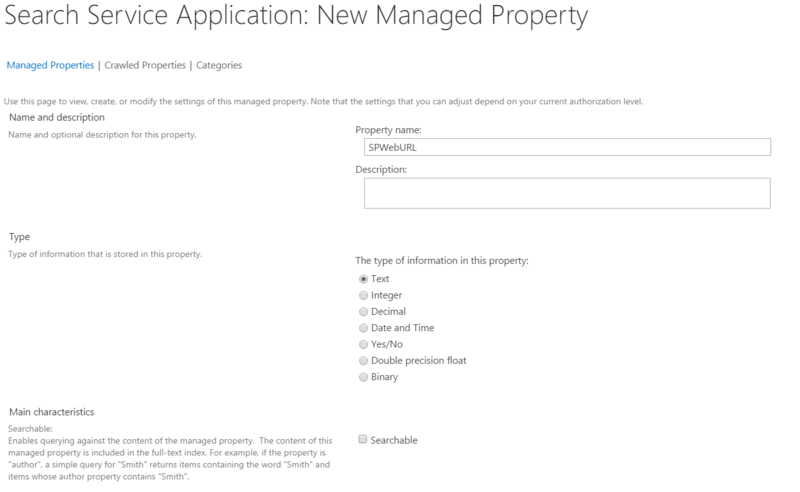
5. In the Property name field, enter SPWebURL. No description is needed.
6. For the Type setting, select Text.
7. Scroll down and check the Retrievable checkbox.
8. Scroll down to the Mappings to crawled properties setting and click Add a Mapping on the right side of the page.
9. In the Crawled property selection dialog that opens, search for a crawled property named ows_taxId_SPLocationSite, and then click Find. This crawled property name displays in the crawled property list below the name field. Select that crawled property, and then click OK. You are returned to the New Managed Property window. Click OK again.
10. Run a full crawl on your content source.
Enhanced Search Configuration
Making Enhanced Search Available to End Users
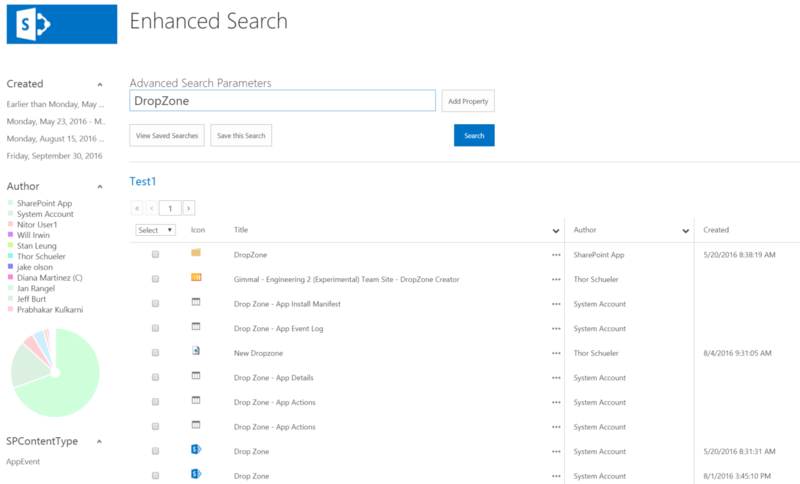
There are several ways your end users can access the Enhanced Search page, all of which depend on how you have configured the application. The default access is via the root (home) page of the site where the Enhanced Search application has been deployed, as shown in the following figure.
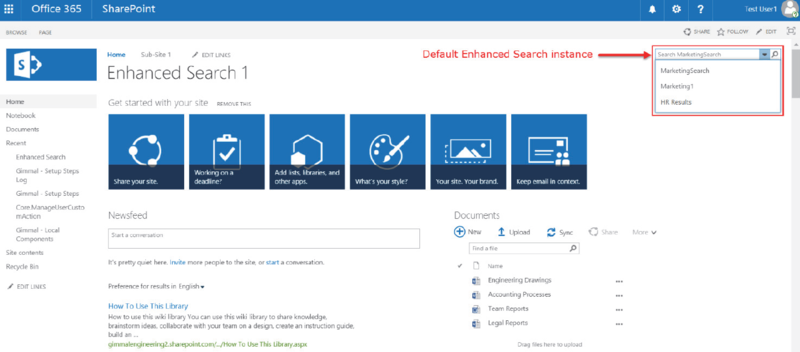
Alternatively, you may provide end users with a link or a configuration that takes them directly to the Enhanced Search page. Regardless of which method you use, ensure that you provide and/or restrict user access to sites and site contents as required.
Search Experience Profile
The Search Experience Profile (SEP) provides a reusable, interactive configuration interface for implementing a custom search experience. The SEP enables you to customize search queries, results, refiners, and navigation elements of the SharePoint search component, enabling end users to more easily narrow down their searches and obtain the results they need. You can create multiple SEPs, but they can only be generated locally to the site in which Enhanced Search has been activated.
You must create at least one SEP in order to create a search instance for your end users.
Accessing & Creating Search Experience Profile
Accessing the Search Experience Profiles Page
Search Experience Profiles (SEPs) are stored within the "Search Experience Profiles" SharePoint list on the Enhanced Search host web. From the SEP list, you can view a list of available SEPs for the site, and you can create, edit, or delete SEPs as desired.
-
On the site where Enhanced Search is enabled, as a user who has Contribute permissions, select Settings > Site Settings. The Site Settings page displays.
-
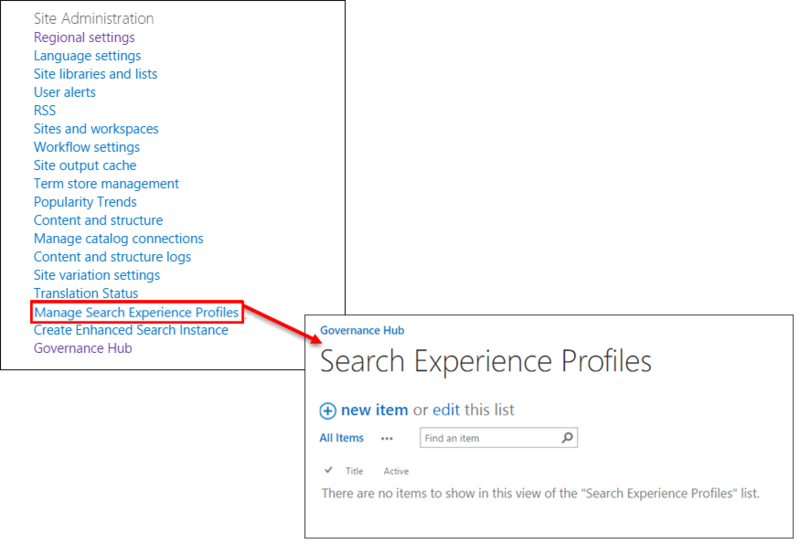
Under the Site Administration section, click Manage Search Experience Profiles. The Search Experience Profiles list page displays:
Creating a New Search Experience Profile
-
On the Search Experience Profiles list page you accessed in the previous section, click +new item. The Create Search Experience Profile page displays.
-
Enter/select your Search Experience Profile (SEP) settings. Your options include:
-
General Settings:
-
Name (Required): Enter a name for the new Search Experience Profile. The name must be unique for the SEP list. The character limit is 255.
-
Page Layout (Required): Select a page layout to define how the Enhanced Search interface will look. There is one OOTB page layout available called "Enhanced Search". For more information on this page layout, and how to add your own custom page layouts, see Appendix D: Adding a Custom Page Layout to Enhanced Search.
-
Make Active? Indicates whether this Search Experience Profile can be used for generating an Enhanced Search instance. This option enables you to deactivate an SEP but still keep the relevant data.
-
-
Search Query Settings: If you click "Hidden?" you cannot override or edit the Search Query Settings on the Create Enhanced Search Instance page.
-
Use Standard Search Results? Indicates which Search Results you want to use. Select "Yes" to use the SharePoint OOTB Search Results web part. Select "No" to use a Search Results web part from the Search Results Settings section located below. (If you select 'Yes', the 'Configure Search Results Query' setting will display underneath this setting.)
-
Configure Search Results Query: Click Configure Query to display the OOTB SharePoint 'Build Your Query' dialog. From this dialog, you can configure what's being searched for and which result sources to use. The settings can also be used to predetermine how to sort and rank the results, and if query rules should be used. Using this feature will affect how information is obtained and presented back to the user within the standard Search Results web part. For more information on this dialog, see Microsoft's SharePoint documentation: How to Build a Query.
-
Queryable Managed Properties: Select the managed properties that you want to display in the Advanced Search box, as shown in the following figure.
-
-
-
-
-
These are the properties of the content type(s) that you specified in the Configure Search Results Query setting above. If you did not select any content types in the Search Results Query, you will be able to select from all managed properties. For more information on specifying the managed properties for this setting, see Appendix C: Specifying Content Types for Managed Properties (link). If you do not see your managed properties in the Available Properties list, see Appendix F: Enhanced Search SharePoint Lists and Libraries (link). For managed properties in SharePoint Online/O365, see Appendix I: Managed Property Configuration Tips for O365 (link).
-
-
Search Box Settings: If you click "Hidden?" you cannot override or edit the Search Box Settings on the Create Enhanced Search Instance page.
-
Use Standard Search Box? Indicates which Search Box you want to use. Select "Yes" to select a Search Box display template below. Select "No" to select a Search Box web part below.
-
Search Box Display Template/Search Box Web Part (Required): Enables you to select a display template or web part to define how the Search Box will look (depends on your selection in the previous setting). For more information on the Search Box display templates, see Appendix A: About Enhanced Search Display Templates (link). For more information on the Search Box web parts, see Editing the Enhanced Search Results Page.
-
-
Search Results Settings: If you click "Hidden?" you cannot override or edit the Search Results Settings on the Create Enhanced Search Instance page.
-
Search Results Web Part (Required): This setting displays if you selected "No" for the Use Standard Search Results? setting located under the Search Query Settings section described above. Select a SharePoint OOTB web part from the dropdown list.
-
Result Size (Required): Enables you to specify how many results will display on the search results page at one time. This field must be a numeric value. The default is 10, the minimum is 1, and the maximum is 50.
-
Retrievable Managed Properties: Enables you to select up to ten managed properties to display in the Search Results if you are using the grid view. These are the properties of the content type(s) that you specified in the Configure Search Results Query setting above. If you did not select any content types in the Search Results Query, you will be able to select from all managed properties.
-
For more information on specifying the managed properties for this setting, see Appendix C: Specifying Content Types for Managed Properties (link). If you do not see your managed properties in the Available Properties list, see Appendix F: Enhanced Search SharePoint Lists and Libraries (link). For managed properties in SharePoint Online/O365, see Appendix I: Managed Property Configuration Tips for O365 (link).
-
-
Search Refiner Settings: If you click "Hidden?" you cannot override or edit the Search Refiner Settings on the Create Enhanced Search Instance page.
-
Refiner Control (Required): Select a display template to control the look of the refiners section on the Enhanced Search Results page, and how the refiners are organized within it. Enhanced Search comes with one OOTB template called Enhanced Search Refiner Control. For more information on the Refiner Control display template, see Appendix A: About Enhanced Search Display Templates (link).
-
Configure Refiners: Select this option to display the 'Configure Search Experience Refiners' dialog and apply selectable refiners to your search results. This dialog is an OOTB SharePoint interface for selecting and configuring which available refiners are used within the refiner web part. Using this dialog will affect what refiners are used, how the refiners display, and how each refiner can be interacted with. For more information on refiners and their associated display templates, see Appendix A: About Enhanced Search Display Templates (link).
-
-
Search Navigation Settings: If you click "Hidden?" you cannot override or edit the Search Navigation Settings on the Create Enhanced Search Instance page.
-
Maximum Links Displayed (Required): Enter the maximum number of Enhanced Search instances links ("Navigation links") that display above the results on the Enhanced Search Results page. The default is 5.
-
Link to Search Settings: Select this option to display the Site Collection 'Search Settings' in a new tab. This page is equivalent to going to Settings > Site Settings > Site Collection Administration > Search Settings. The information found within this page will not be stored within the Search Experience Profile. Requires full control permission.
-
-
3. Click Finish to save your settings. The Review Search Experience Profile page displays.
4. Review your settings. If the settings are correct, click OK. If you need to make revisions, click Edit. The new profile displays in the Search Experience Profiles list.
Editing & Deleting Search Experience Profile
-
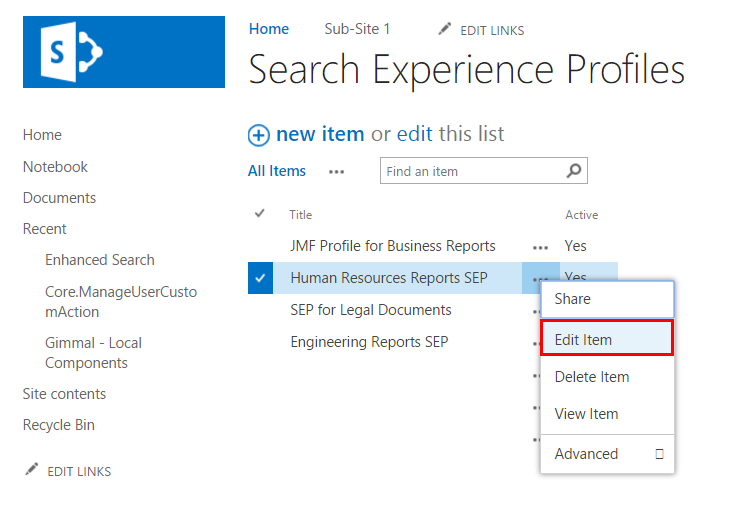
On the Search Experience Profiles page, click the ellipsis (...) next to the SEP you want to edit or delete, and then click Edit or Delete Item.
-
The Search Experience Profile Displays:
-
Edit: Make any desired changes to the SEP settings, and then click Finish. The Review Search Experience Profile page displays.
-
Delete: Click OK. The SEP is deleted, and removed from the list of SEPs.
Existing Enhanced Search instances are not removed/affected by the deletion of a corresponding Search Experience Profile.
3. If you chose to edit, review the settings, and then click Edit to make additional changes, or OK to close the page.
Enhanced Search Instance
Once you create and save at least one Search Experience Profile (SEP), you can then create an Enhanced Search instance. An Enhanced Search instance is an interface that you create for end users so that they can perform an enterprise-wide search. It uses a locally-created SEP as the basis for the search settings that you configured for the instance. An Enhanced Search instance can be implemented on any site that has the Enhanced Search feature activated. Upon creating the Enhanced Search instance, the following items will be added to the site collection:
-
SEP-based Search Page – Enables an end user to perform a keyword search and (if configured) to search from a list of predefined managed properties. The predefined managed properties are configured on the Search Experience Profile settings page.
-
SEP-based Search Results Page – Displays the results from the search in a list or grid format.
See the following topics for information on how to access the Create Enhanced Search page, and how to create a new Enhanced Search instance.
Accessing & Creating Enhanced Search Instance
To create an Enhanced Search instance, an administrative user (site owner) can access the Create Enhanced Search Instance page from the Site Settings page by performing the following steps:
-
On the site where Enhanced Search is enabled, as a user who has edit permissions, select Settings > Site Settings. The Site Settings page displays.
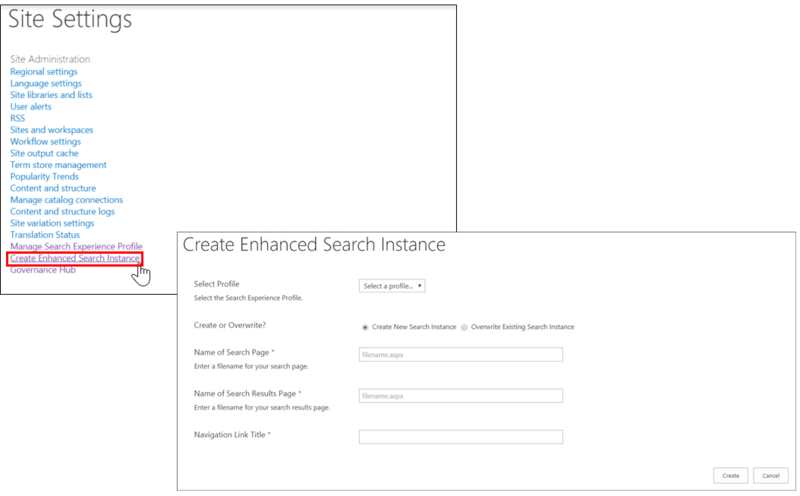
2. Under the Site Administration section, click Create Enhanced Search Instance. The Create Enhanced Search Instance page displays.
Creating a New Enhanced Search Instance
-
On the Create Enhanced Search Instance page you accessed in the previous section, enter/select your Search Instance settings. Your options include:
-
Select Profile: Select the desired profile from the drop-down list. This list contains all of the pre-configured and active SEPs. Based on the profile you select, the previously-configured SEP settings will load onto the 'Create Enhanced Search Instance' page below the Search Instance settings. Only those sections (i.e. Search Query Settings, Search Box Settings, etc.) that were not marked as "hidden" on the Create SEP page will display on the page.
After the profile settings are loaded, you can modify them if desired. The modifications will only be used for generating the current Enhanced Search instance. The revised settings will not be saved in the original SEP on the Search Experience Profile list page.
-
Create or Overwrite? Indicate whether you want to create a new search instance, or overwrite an existing one. Select Create New Search Instance to create a new instance, or select Overwrite Existing Search Instance to overwrite an existing search instance.
Depending on which option you choose above (Create or Overwrite), the next two settings will display as either a text box or a drop-down list. Overwriting an existing search instance is a destructive action! The previous search instance will be deleted and replaced.
-
Name of Search Page (Required): If you are creating a new search instance, enter the name of the generated search page in the Name of Search Page field. The search page name must be unique for the site collection. If you are overwriting an existing search instance, select the name of the existing search page you want to overwrite from the Name of Search Page drop-down list. *If you enter a page name that contains multiple dots (e.g. search.page.name) the system will remove the extra dots so that the page name format is <searchpagename.aspx>, permitting only one dot to precede "aspx". In SharePoint 2013, names can have up to 128 characters. In SharePoint Online, names can have up to 256 characters. Special characters are not supported.
-
Name of Search Results Page (Required): If you're creating a new search instance, enter the name of the generated search results page in the Name of Search Results Page field. The search results page name must be unique for the site collection. If you're overwriting an existing search instance, select the name of the existing search results page you want to overwrite from the Name of Search Results Page drop-down list. *If you enter a page name that contains multiple dots (e.g. search.results.page.name) the system will remove the extra dots so that the page name format is <searchresultpagename.aspx>, permitting only one dot to precede "aspx". In SharePoint 2013, names can have up to 128 characters. In SharePoint Online, names can have up to 256 characters. Special characters are not supported.
-
Navigation Link Title (Required): Enter a navigation link title. Navigation links display above the search results on the Search Results page, providing easy access to your other search results pages. For information on how to edit/delete a navigation link, see Appendix E: Editing/Deleting a Navigation Link (link).
-
Modify remaining SEP Settings: If desired, you can modify the SEP settings for this Enhanced Search instance. These modifications will only be used for generating the current Enhanced Search instance. The revised settings will not be saved in the original SEP on the Search Experience Profile list page.
-
-
Click Create. The new search instance is generated. When the process is complete, a "success" message displays at the top of the page in a green banner.
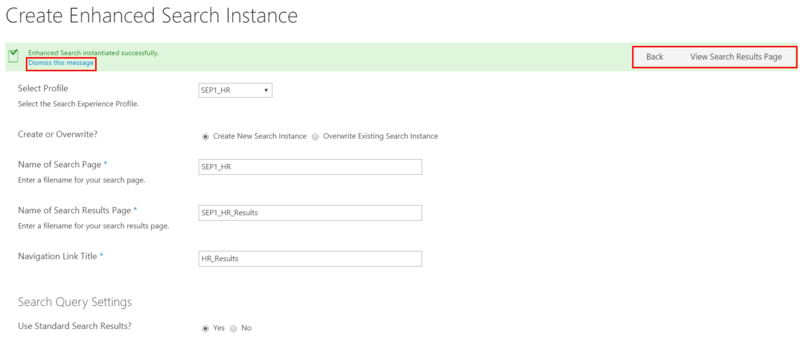
3. Click Dismiss this message to close the message bar, click Back to return to the previous page, or click View Search Results Page to be taken to the Enhanced Search Results page.
Editing Enhanced Search Results Page
-
Advanced Search Parameters – Enables end users to achieve more precise search results.
-
Search results display – Displays search results to the end user in a list or grid view.
-
Search refiners – Enables end users to further narrow down their search results.
-
Search navigation links – Enables end users to navigate to other search instances on the same site.
You can control how this page appears to the Enhanced Search end user by editing the following web parts:
-
Search box
-
Search results
-
Search navigation
-
Refinement
-
Selected Managed Properties
If you make any changes to the managed properties for a specific search instance, the Search Experience Profile (SEP) that was used to create the search instance will not be updated automatically to reflect this change. You must edit the SEP manually to reflect any changes, or create a new one. Additionally, you can use your own custom web parts to control how the Enhanced Search Results page looks. For information on editing SharePoint web parts, see Microsoft's SharePoint documentation.
Modifying Managed Properties for a Search Instance
As a convenience, Enhanced Search enables you to edit the Selected Managed Properties web part so that you can modify the Queryable and Retrievable managed properties for a search instance. Initially, these managed properties were designated on the Search Experience Profile settings page. The Selected Managed Properties web part provides a quick "one-off" way to edit the managed properties for an instance, preventing you from having to go back and modify the Search Experience Profile.
-
From the Enhanced Search Results page, click Page > Edit Page on the SharePoint ribbon. The Search Results web part page opens.
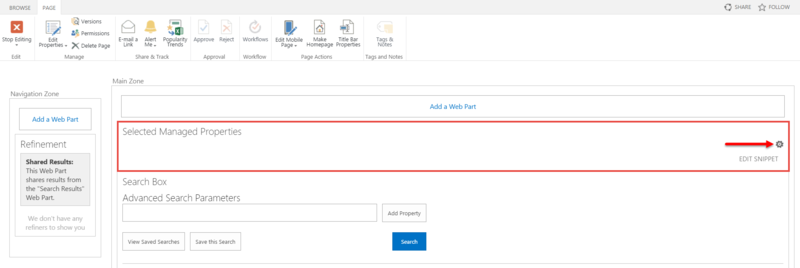
2. Click the Edit Settings icon () on the far right of the Selected Managed Properties web part. The Selected Managed Properties panel opens up on the right side of the screen.
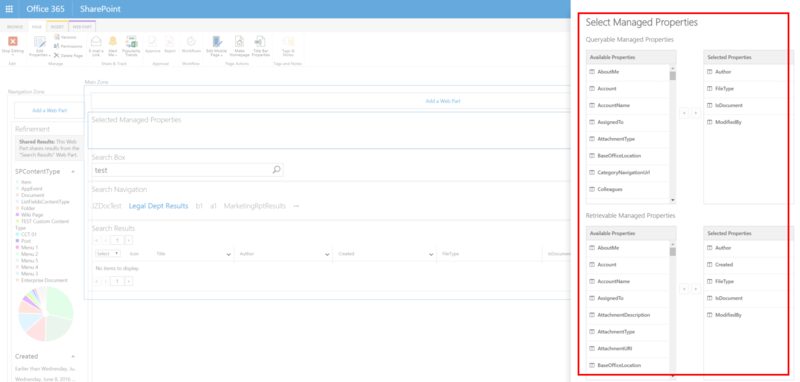
3. Select which Queryable and Retrievable managed properties you want to use for this search instance. The properties that you select here apply only to the current search instance that you're editing.
4. Click Save.
5. Click Stop Editing on the SharePoint ribbon.
For additional information on configuring managed properties, see Appendix I: Managed Property Configuration Tips for O365 (link).
User Guide: Enhanced Search
Gimmal's Enhanced Search extends SharePoint Enterprise Search by replacing the Enterprise Search results page with an Enhanced Search results page in a site collection. Enhanced Search is configured using a Search Experience Profile (SEP) within a site collection (described below), along with some minor configuration performed in Gimmal's Governance Hub.
-
Provides out-of-the-box (OOTB) display templates and web parts to control the appearance of search and search results pages
-
Enables end users to execute complex searches based on specific managed properties
-
Sorts and filters results easily and saves results as a .CSV (comma separate value) file
-
Enables you to customize the returned managed properties that display in *grid view
-
Supports managed metadata fields as selectable search criteria
-
Allows for content type searching, with support for result sources and refiners
-
Provides extensible context menu actions for search results
-
Provides integration with Gimmal's Physical Information Management (PIM) and Compliance Suite (CS) applications
When you initiate a search, you interact with the Enhanced Search page, which enables you to perform a keyword search and (if configured) search from a list of predefined managed properties. The Enhanced Search Results page also enables you to display the results of a search in either a *grid view or a list view and allows you to customize the display of these results. These pages and their individual features and functions are described in this User Guide section.
End users of Enhanced Search who use grid view must have read access to the Governance Hub. The Enhanced Search administrator has pre-configured the search experience and may have included filtering, specific search scopes, and refiners. If the search results are not what you expect, contact your administrator.
Who Should Use this Guide
The intended audience for this document consists of end users of Gimmal's Enhanced Search and Provisioning products, where the products have previously been installed and configured. The SharePoint Administrator must have performed the following tasks before end users can use these products to perform searches and provision sites or site collections:
-
Configure Enhanced Search according to the steps in the Enhanced Search Configuration section of this Help
-
Configure the Provisioning definitions according to the steps in the Provisioning Configuration section of this HelpProvisioning Configuration
Accessing Enhanced Search Page & Performing Basic Search Query
To access the Enhanced Search Page follow this link: Accessing the Enhanced Search Page
Performing a Basic Search Query
Enhanced Search provides a centralized and highly customizable user interface in which you can perform search queries. Depending on how the administrator has configured the Enhanced Search page, it can consist of either a simple search box for entering key words, or it can provide additional parameters that enable you to construct more advanced search queries. This chapter describes how to initiate a simple search query using the key word/search field on the site's root page. Once you initiate the query, you will arrive on the Enhanced Search Results page, where you can view your search results, and if desired, continue to build and refine your query using additional parameters.
-
In the top right corner of the root site where Enhanced Search is deployed, locate the search field/search drop-down list, as shown in the preceding figure.
-
The drop-down list displays all of the available Enhanced Search instances for your site. An Enhanced Search instance is a pre-configured page set up by the SharePoint administrator that contains the settings for your search and search results pages. The last-created search instance name displays in the search field. Additionally, the Enhanced Search instances in the list display as navigation links across the top of the Search Results page.
-
2. Enter a key word, or multiple key words separated by a space, and then perform one of the following steps:
-
If you want to perform your search within the default search instance that displays in the search field, click the Search icon or press Enter on your keyboard.
-
If you want to select a search instance that is not the default, click the list drop-down arrow and select a search instance from the list (if available). (There is no need to click the Search icon.)
The Enhanced Search Results page opens, displaying a list of search results with this keyword(s) in its content, its name, or its properties for that search instance. See the following sections for information on refining your search and viewing/manipulating your search results.
Performing Advanced Search Query
The functions described in this chapter are only available if the Enhanced Search administrator selected the Enhanced Search Box Advanced Control display template during the Enhanced Search instance creation process. If the administrator opted to apply the Enhanced Search Box Control display template, the Advanced Search Parameter controls will not be available to you.
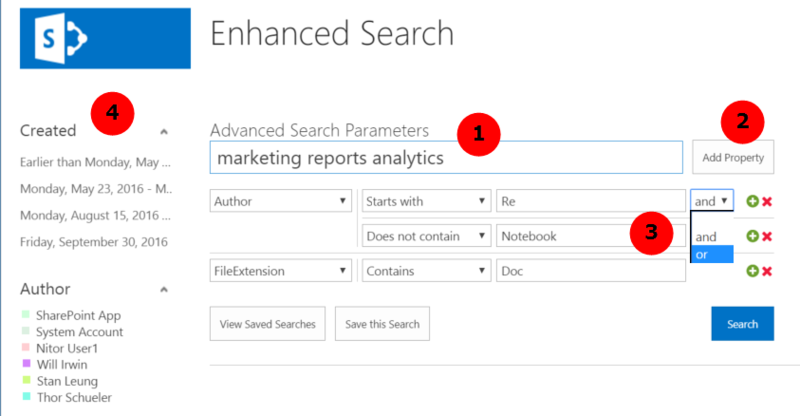
If your initial search yields numerous search results or does not return the results you were expecting, then your search query may be too broad. Rather than skim over many pages of search results, you can use the Advanced Search Parameters section of the Enhanced Search page (shown in the following figure) to attain more focused results. The Advanced Search Parameters enable you to refine your results by:
-
Adding additional key words to your key word search
-
Adding additional managed properties
-
Using additional search operators
-
Applying various search refiners
When you create a search query that provides you with the results you seek, you can save this query and its parameters so that you can use it again later.
Adding Multiple Words to your Key Word Search
The first key to refining a search is to use a multiple-word query. A one-word search query may not give you a targeted search result. Start with the shortest relevant search query, see what results you get, and then refine it by adding more words after that if the results are too broad. To use a multiple-word query, perform the following steps:
1. Enter multiple key words in the Search field by typing a word and then separating it with a space.
When entering multiple key words, you can use standard Boolean operators such as "AND" and "OR" to filter your results. For more information, see Microsoft's documentation on Keyword Query Language (KQL).
2. Click Search. The results display in the table below the Advanced Search Parameters section.
3. If the results are too broad, continue to add additional key words until your results are narrowed down to a more practical amount, or refer to the following sections to apply additional search criteria.
For more information on search results, see Microsoft's SharePoint documentation.
Adding Additional Managed Properties to your Search Query
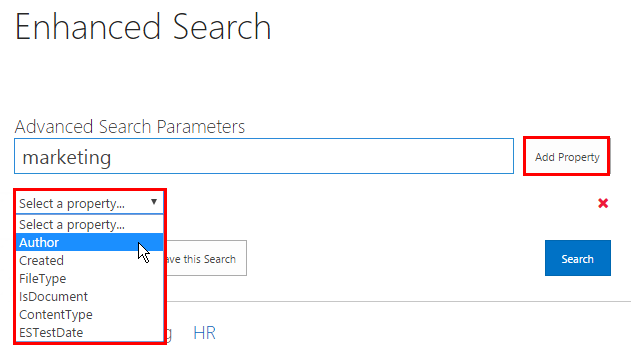
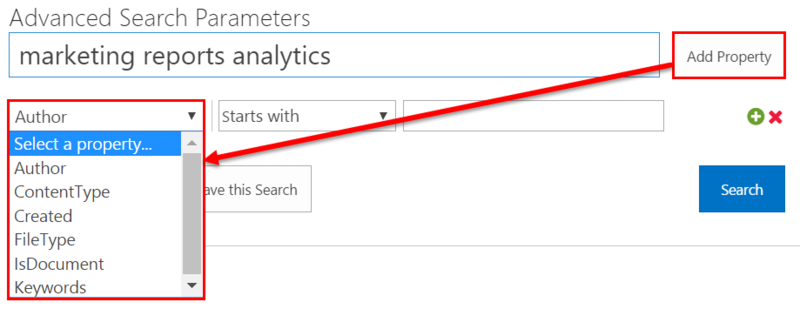
When the Enhanced Search administrator initially configured Enhanced Search, a number of queryable managed properties were specified to help you refine your search query. You can select one or more of these managed properties in the Advanced Search Parameters section so that you can apply additional parameters and operators to these properties to further refine your search. The managed properties are available from the "Add Property" drop-down list, as shown in the following figure. Depending on which property/properties you select, additional search parameters will display to the right of the property drop-down list.
-
In the Advanced Search Parameters section, click Add Property. The "Select a property" drop-down list displays below the search field.
-
Click the "Select a property" drop-down arrow and select a property from the list. The property name displays, and an additional operators drop-down list displays to the right of the property name.
The list of additional operators will vary, depending on the managed property you selected in the previous step. If you're using a queryable managed property that contains an MMD or a Choice field, that field must exist on the same site where you've installed Enhanced Search for the drop-down list to work properly.
3. Select the desired operator from the drop-down list and enter the required data in the field to the right.
4. Click the green plus sign icon to add a Boolean ("and/or") operator to the query, and to add another row of operators, as shown in the following figure.
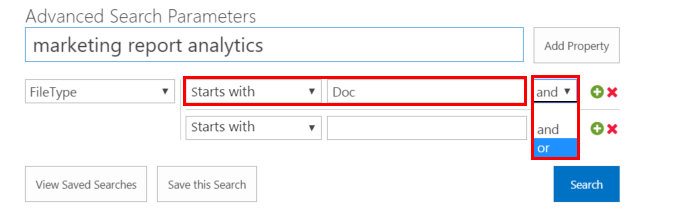
5. Configure the operators as desired, and then click Search. The results display below the Advanced Search Parameters section.
6. If the results are too broad, continue to add additional properties and operators until your results are narrowed down to a more practical amount, or continue the following sections to apply additional search criteria.
Applying Search Refiners
Once you have obtained a useful set of search results by following the steps in the previous sections, you can still narrow down your final results by applying the search refiners that are available on the left side of the Enhanced Search page.
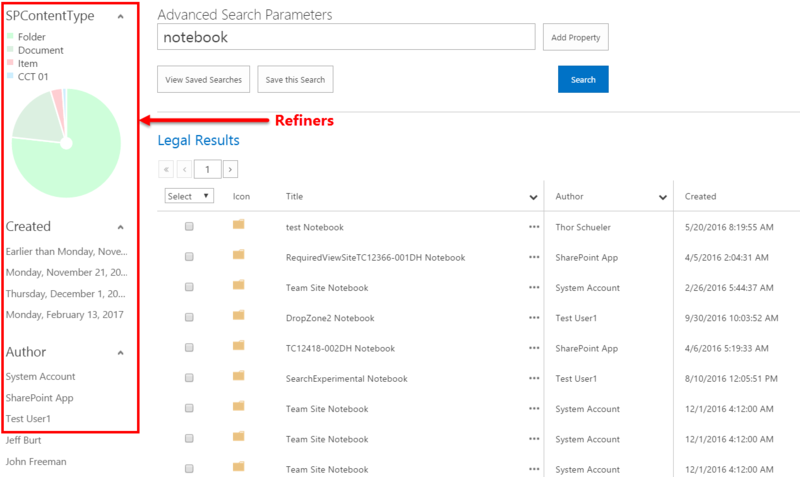
The SharePoint refiners are designated when the SharePoint administrator initially configures the Enhanced Search application. Although there are many refiners available, your administrator may have chosen only a specific amount for your search results view. Clicking on a refiner refreshes the view and only shows results that apply to the refiner in question. To change a refiner, make another selection. To remove all of the refiners, click on All or Show All (depending on which refiner you want to remove).
Saving a Search
When you create a search query that provides you with the results you seek, you can save this query and its parameters so that you can use it again later. Saving searches is especially useful if you often perform advanced searches, using multiple operators and parameters.
Saved searches are shared per Enhanced Search instance. For example, if user A creates a saved search, user B will have access to see and execute that search (if they have access to that instance of the search). Saved searches are not done on an individual basis, but for an Enhanced Search instance.
-
Enter your desired search criteria in the Advanced Search Parameters section (if the Enhanced Search Box Advanced Control display template has been applied by the administrator), and click Search. Confirm that the results you're presented with are satisfactory.
-
Click Save this Search. The New Saved Search panel opens on the right side of the screen.
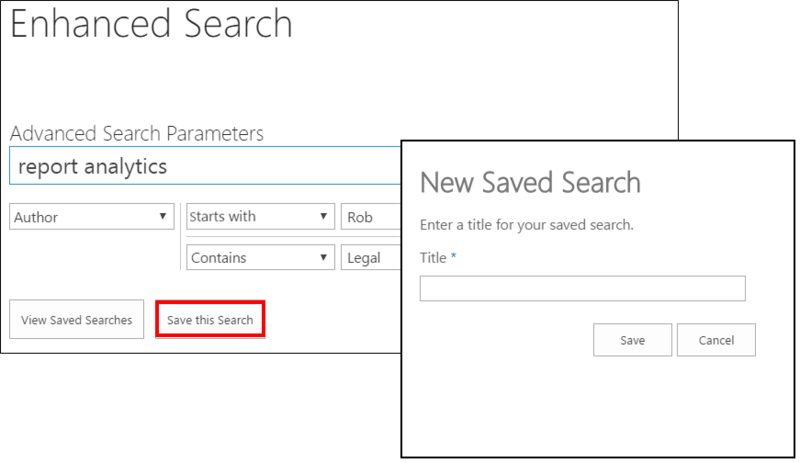
3. Enter a title for your saved search. Click Save.
When naming a new search, make the name as intuitive as possible so that you can easily identify it for future searches. Under most conditions, you should be able to save approximately 20 searches per search page, depending on the length of the query and the title that was given.
Viewing/Executing Saved Searches
It is possible to get different results when running a saved search. If new content is added/deleted (and indexed) that matches the query, the result set will change. You cannot edit the saved search. However, you can delete the existing saved search and add a new saved search.
-
In the Advanced Search Parameters section, click View Saved Searches. The Saved Searches panel opens on the right side of the screen.
-
Click the link for the saved search query you want to run. The search immediately executes, and the new search results page displays. Once you have obtained a set of search results you're satisfied with, continue with the next chapter for information on what you can do with your search results, from changing how the results display on the page to exporting the results to a .CSV file.
Working with Search Results
The functions described in this section are only available if the Enhanced Search administrator opted to use SharePoint's standard search results from the Search Experience Profile settings. If the administrator opted not to use SharePoint's standard search results, and instead opted to configure a third-party/custom Search Results web part, your search results will differ. The Enhanced Search Results page enables you to view search results based upon search criteria that you entered. You can view your search results in either a grid view or a list view.
The default view is the grid view. However, it is possible for List view to become the default view if you select it and do not clear your browser cache. End users of Enhanced Search who use grid view must have read access to the Governance Hub.
Understanding Grid View Components
The following table lists the components on the Grid view that enable you to change the display of your search results, and to navigate, sort, filter, and export your search results.
|
Task |
Heading |
|
Select Grid view or List view |
Click the Switch to View & Switch to Grid View buttons to switch between Grid view and List view for your search results. The functionality described in this section takes place in Grid view.
|
|
Reording the columns |
Change the order of the columns in the grid view table by clicking the column header, and dragging it to the desired position. Note that the first 3 columns (the Select checkbox column, Icon, and Title) are locked, and can't be moved). If you mouse over a column header and see the 4-arrow cursor, this column can be moved. |
|
Resize the columns |
To resize columns, follow these steps:
|
|
Sort search results |
Click the column name, OR click once to sort from A to Z (ascending); click a second time to sort from Z to A (descending); click a third time to turn off the sorting. Note that columns are only sortable if the managed property is indexed as "sortable". Contact your Enhanced Search administrator for more information. |
|
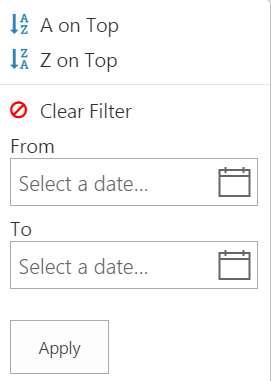
Filter search results |
Click the drop-down arrow to the right of a column name. A filter dialog box displays (filter options will vary, depending on which column you choose to filter). Apply the filters as desired, and then click Apply. For a brief description of the above filters, see the following:
Note that columns are only filterable if the managed property is indexed as "searchable". Contact your Enhanced Search administrator for more information. |
|
Navigate search results |
If multiple search results display in the grid view, you can page through them by clicking the pagination control that is located above and below the results list. Click the right and left arrows to move forward and backward in the list.You can also go directly to a specific page by entering a number in the page number field. Tip: If you do not know the last page of your search results, you can enter a large number in the page number field (e.g., 200) and press Enter. Enhanced Search will display the actual last page in the search series (e.g., if page 8 is the last page and you enter 200, page 8 will display automatically.) |
|
Selecting search results |
Click the Select drop-down list to select All or None of your search results or All or None of your search results on the current page. |
|
Export search results |
You can save selected search results to a .CSV file. This file includes information such as the name of the user who executed the search, the date and time of the export, and the search query that was used. For each selected search item, the following information is provided:
To export search results, follow these steps:
Note: Steps 4 and 5 may differ, depending on which Internet browser you are using. |
Executing Custom Callout Actions & Available Callout Actions
Executing Custom Callout Actions for Selected Search Results
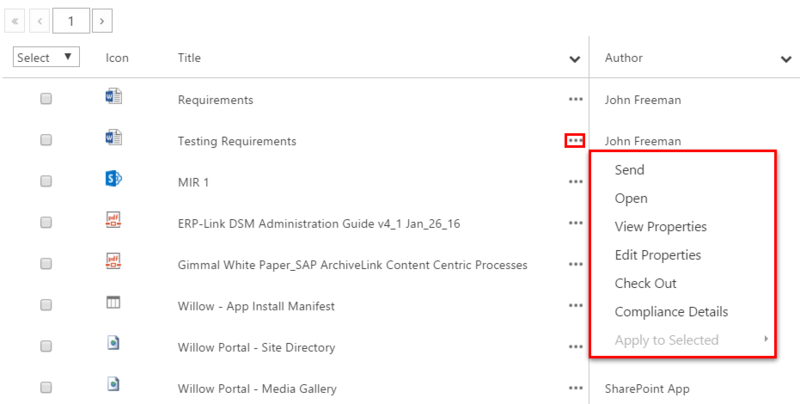
Once you have generated a list of search results on the Enhanced Search page, an associated context menu is available that enables you to perform a variety of actions for each result. The available actions depend on the type of search result(s) you select (e.g., document, list item, folder, etc.). These actions, referred to as custom callout actions, are only available on the search results page using the Grid view. The custom callout actions will not be available if the Enhanced Search results page was set up to use a different search results web part by the administrator (for example, a third-party web part).
Selecting your Search Results
-
Single Select:
-
Click the Open menu (...) for a single result that you want to perform an action for, as shown below in Figure 10. (It is not necessary to select a result item's checkbox when performing an action on a single result.)
-
Select the desired action for that result.
-
2. Multiple Select:
-
Select two or more search result items by clicking each item's checkbox under the Select column.
-
Click the Open menu (...) for any of the selected results.
-
Click Apply to Selected on the context menu. Any actions that are common to each result you select will display on a secondary menu, as shown below in Figure 11.
-
Select the desired action for those results.
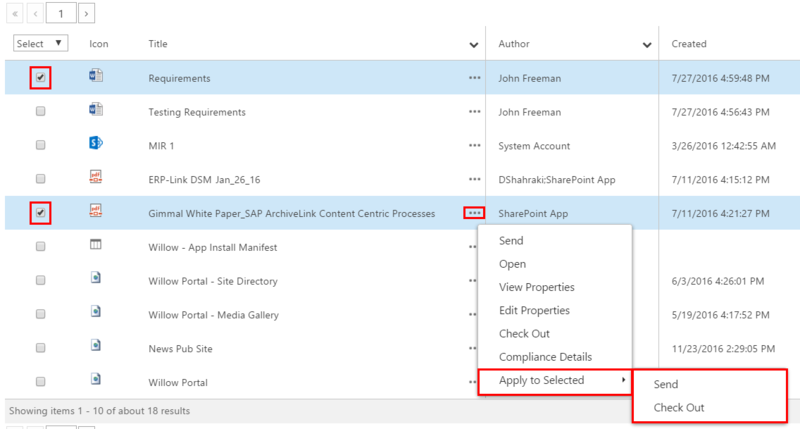
If you select multiple items and you click on one action in the main callout menu (e.g., Send, Open, View Properties, etc., as shown in the figure above) you will be performing a single action and you will be performing it on the single item whose ellipsis was clicked to open the callout menu (in the figure above, the action will be performed on the PDF item).
Available Custom Callout Actions
The following table lists the available custom callout actions based on the type of search result(s) you select on the search results grid view page (e.g., document, list item, folder, etc.). The actions associated with the list, list item, folder, and document result types are out-of-thebox SharePoint actions, which you can refer to in Microsoft's SharePoint documentation. For a description of the Physical Information Management and Compliance Suite custom callout actions listed in the table, refer to the latest version of each product's user guide, available on the Gimmal product download site.
|
Type |
Action(s) |
Selection Type |
Note |
|
List |
Single:
|
Single & Multiple Select |
|
|
List Item |
Single:
|
Single & Multiple Select |
|
|
Folder |
Single:
|
Single & Multiple Select |
|
|
Document |
Multiple:
|
Multiple Select |
|
|
RMA Record |
Single:
|
Single & Multiple Select |
Compliance Suite Installed |
|
Physical Information Management (PIM) |
Single:
|
Single & Multiple Select |
PIM installed |