
The most powerful capability in Gimmal eDiscovery is the ability to search a wide variety of electronically stored information. Searches may be created and managed through the Search screen in eDiscovery. Each search is associated with a matter, so prior to creating a search, you will need to create a matter.
Viewing Searches
You can access the Search screen in one of two ways: selecting a matter in the Matter screen and clicking the Searches button found in the More toolbar to view a list of the searches defined for the selected matter, or by clicking the Search option in the left-hand pane of the eDiscovery. Notice there is a drop-down box for matter. To see searches related to a specific matter, select it from the list, or choose ‘all matters' to see a list of all searches that you have access to.
The details displayed for each of the searches are:
-
Name – The user-assigned name for the search
-
Matter – The name of the matter that the search is associated with. Click the matter name to view a few matter details
-
Status – information on the last time the search was performed
-
Collections - The number of collections that the search has been used in
-
Search Results - The number of results returned the last time the search was executed. Clicking this number opens the view to review the search results
-
Data Source - The targeted data source that this search is configured to run against
-
Last Update - The date that the search criteria were last updated
The Action toolbar menu has the following actions:
-
Add Search – Click to add a new search
-
Add Quick Search – for a content area that supports indexing, perform a search using that index
-
Copy Search – copy the parameters of an existing search to create a new version
-
Edit Search – Select a search and click this button to modify the search configuration. The search configuration can no longer be changed if it has been used in a collection; the Edit button will be disabled in this case.
-
Schedule Search - Select a search and click this button to automate the execution of the search on a schedule. There are three types of scheduling options available: a one-time schedule, a periodic schedule configuration that executes the search every x minutes, and a weekly schedule configuration that allows for the execution of the search on certain days/weeks of the month
-
Delete Search - Deleting a search will delete the search configuration, the details of all the times the search was executed, and all the stored result details
-
Start Search – Select one or more searches and click this button to initiate the search(es). This button will be disabled if the selected search is currently running
-
Stop Search – This button is enabled only when the selected search is in progress. Click it to initiate the cancellation of the execution. Because of the distributed nature of the search process, it may take a few minutes before the process is completely canceled at the client(s) where the search is running.
-
Pause Search – temporarily place an in-process search on hold
-
Request Logs – Obtain a copy of the logs for a search that is currently processing
The More toolbar menu has the following actions:
-
Search History - Select a search and click this button to view a list of each time the search has been executed
-
Search Results - Click to review the results returned for the last time the search was executed
-
Search Summary Details - Select a search and click to view the details of the search. Details include the criteria entered when the search was created, the status of targets that were searched, and if the search has executed, it includes the count and size of results for each of the targets that were searched
Viewing Search History
Selecting a search and clicking the Search History option found under the More category opens a screen listing the details of each previous execution of the search.
The details displayed on the screen are:
-
Name – The user-assigned name for the search
-
Started – The date/time of when the execution of the search was initiated
-
Elapsed - The duration of the search process; for a currently running search, the real-time duration will be displayed
-
Status - The status of the search, either one that is running or the completed status of a search that has completed
-
Search Results - For a completed search, this number indicates the count of results that were identified as matching the search criteria for the execution of the search. The count is a hyperlink that will display results from that previous run in a review window
The Action toolbar menu has the following options:
-
Restart Search for All Failed Targets – This option will attempt to retry the search for any data target that failed during the selected search execution
-
Cancel Search – For currently running searches, click to cancel the search. It may take a few minutes before the cancellation is recorded and the console is updated
-
Delete Search - Delete the details of a search execution, along with all the logs and search result details
-
Delete Search Cache – If the cache option was selected when performing the search, this option will remove any of the cached content that had been stored
-
Download the Exception Log – generates a report of any exceptions that were noted when the search was performed
-
Download the Search Results – Generates a CSV file of the search results
The More toolbar menu has the following options:
-
Search Execution – Select an execution in the list and click this button to view the individual details for each of the data targets/custodians that were searched. For completed searches, you can view the log details for the search. For currently running searches, you can cancel the searches being performed on individual targets
-
Search Results - For a completed search, click to review the results that matched the search criteria for the selected search execution
-
Search Summary Details - Click to view the search configuration details as well as search result details for each of the data targets that were searched
Creating a Search
Click the Create Search button to launch the wizard; the General Information page is opened.
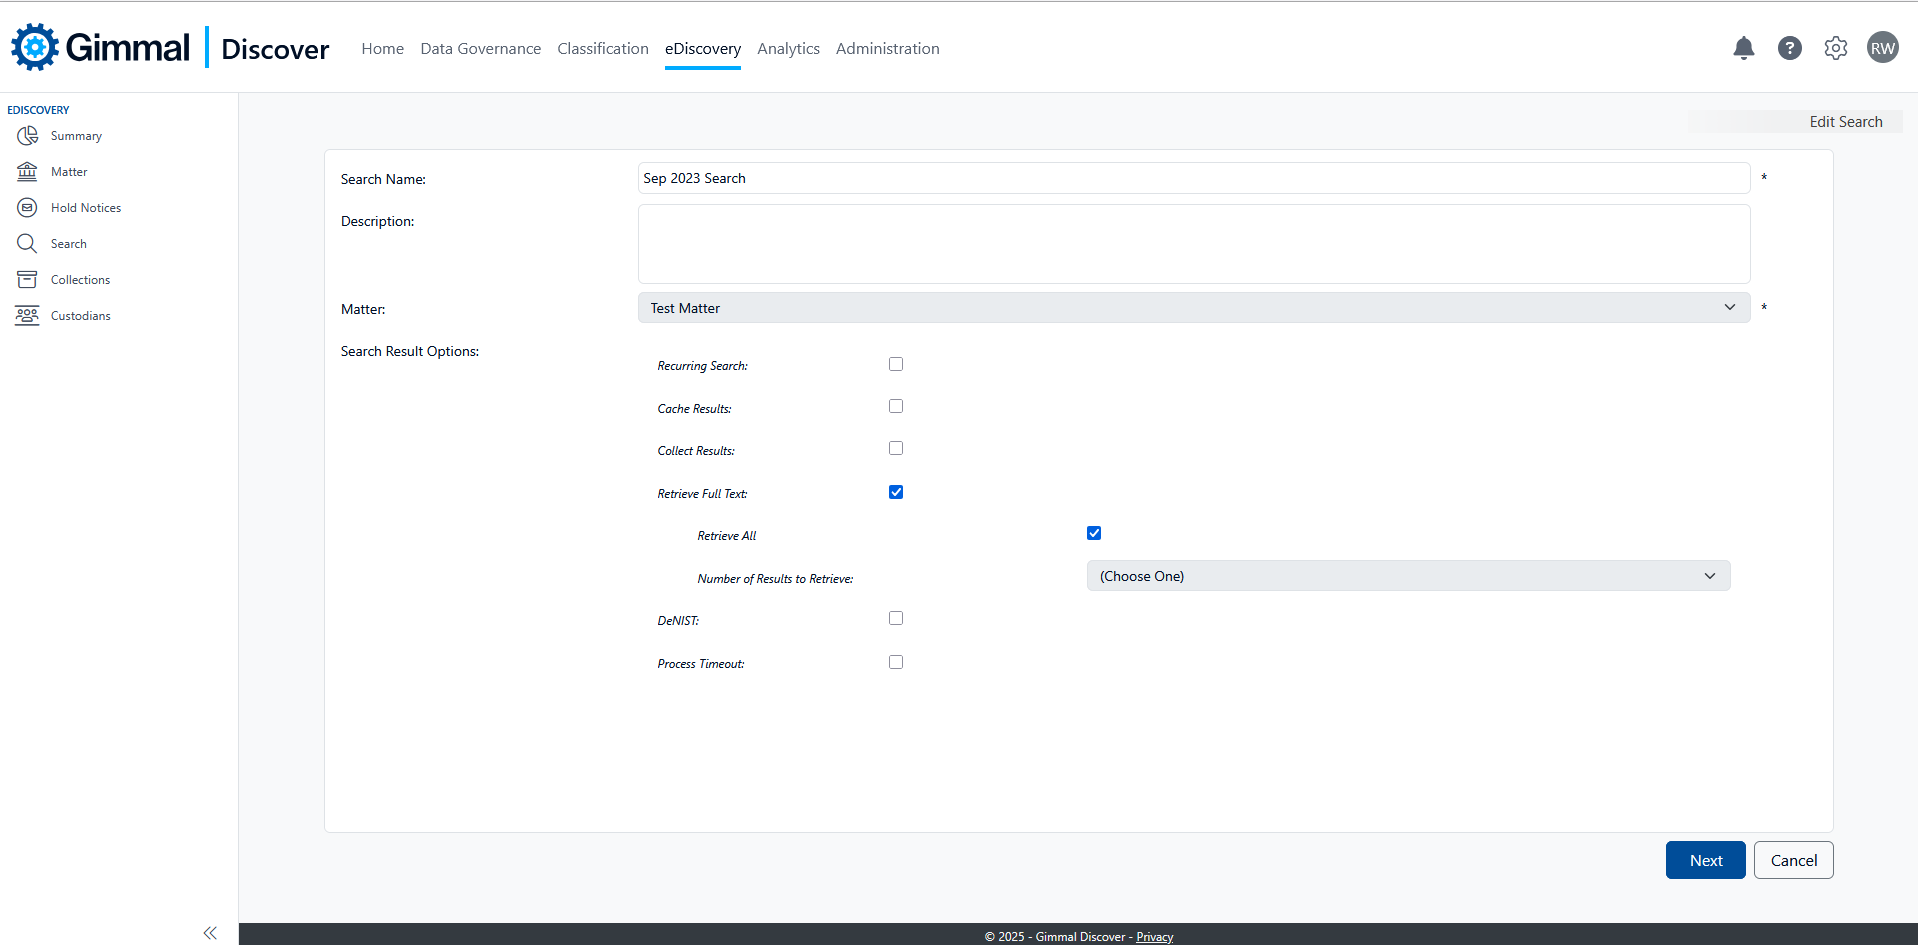
Fill in a name and a description, if necessary. From the Matter list, select the matter that this search is associated with. A matter is required to save the search. Specify any of the result options listed below, then click Next.
Result Options
-
Recurring Search – this is a search that will be performed multiple times; selecting this option will generate a cumulative result set of those multiple searches
-
Cache Results – make a local copy of any item returned as a search result. Checking this box will open another dialog where the cache location may be specified
-
Collect Results – makes an immediate collection of the search results; this option is used when no review of the results will be performed. Checking this box will open another dialog where the collection location may be specified
-
Retrieve Full Text – store an extracted copy of the text for each search result. Selecting this option will open another dialog where you may choose to return results for a sample (i.e., retrieve full text for 100 results) or all items
-
DeNist – automatically excludes items deemed non-discoverable by the National Institute of Standards and Technology
-
Process Timeout – specify a timeout period for the search. Helpful when searching desktop computers that may not be connected for an extended period
On the Data Source page, choose the source(s) you would like to target. The criteria and action options that appear in subsequent pages depend on your data source choice.
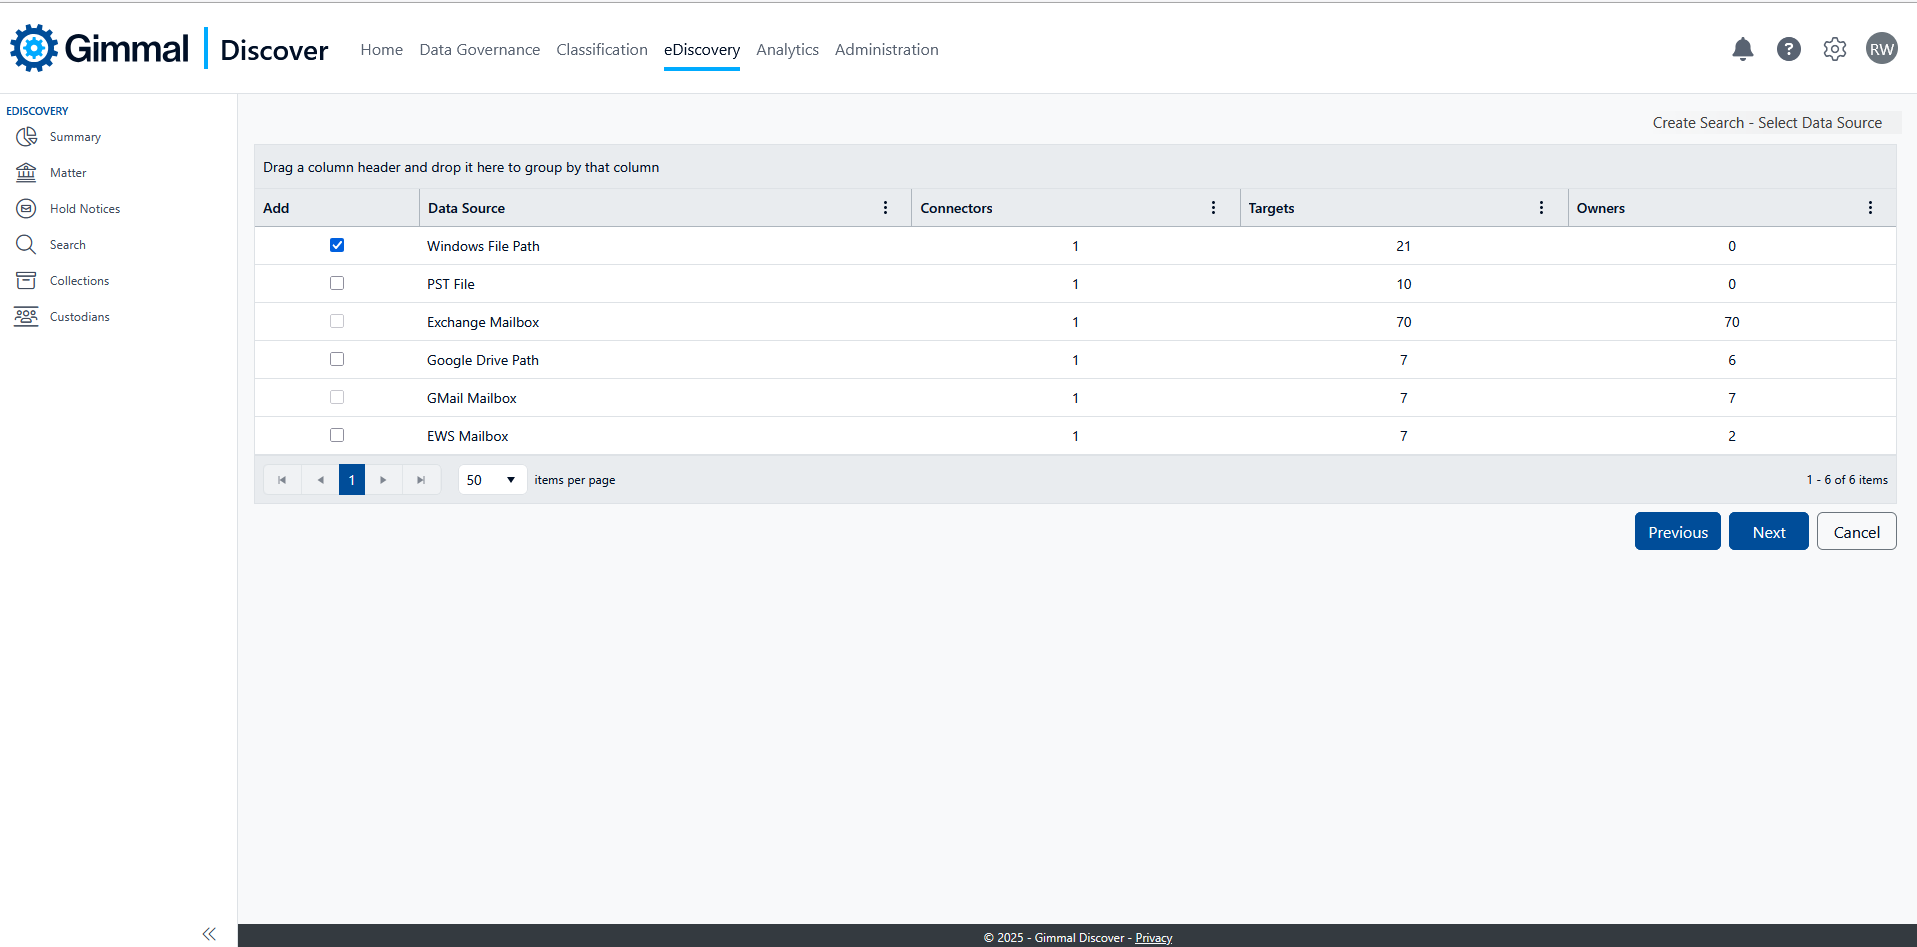
Discover permits the creation of an unlimited number of searches for a single matter to accommodate the searching of multiple data sources. Click Next.
On the Custodian page, click the Add Custodian button to select one or more custodians, whose data you would like to search, from the list of custodians assigned to the matter you selected on the previous screen. Click Next.
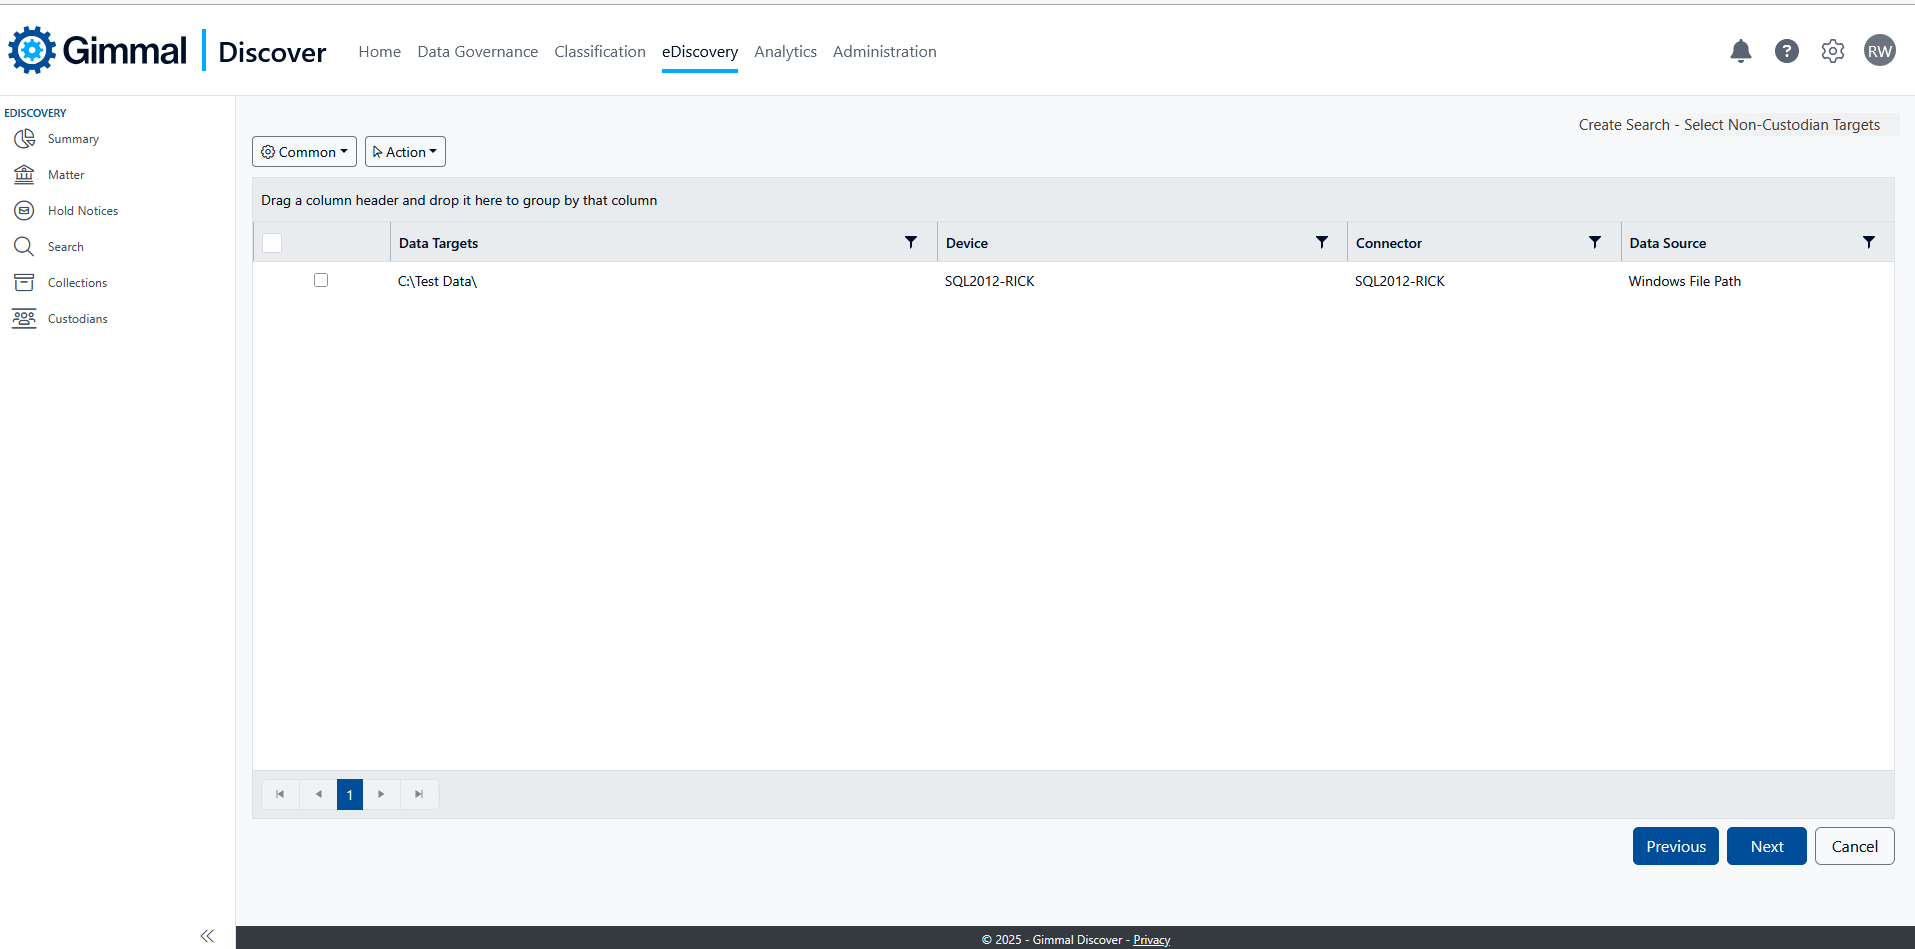
The Non-custodial Targets screen is displayed. This page displays a list of target types supported by Discover for your environment. Non-custodial targets are typically items not associated with a specific data owner (aka custodian). For example, a network file share that an entire department has access to. Select any targets in this list that you would like to include in the search. Then click Next.
The Criteria page is displayed. The criteria available for messages in email-based data sources include:
-
Size of the Messages
-
Message Type
-
Message Class
-
Message Category
-
Age of the Messages
-
Date of the Messages
-
Address Criteria (senders or recipients)
-
Address Criteria (domains)
-
Classification (Discover Classification label)
The criteria for files include:
-
Size of the files
-
Age of files
-
File Dates
-
Names of files
-
File Type
-
Classification (Discover Classification label)
To configure a criterion, click the checkbox next to the criteria; this will expand the accordion panel so you can supply the specific parameters.
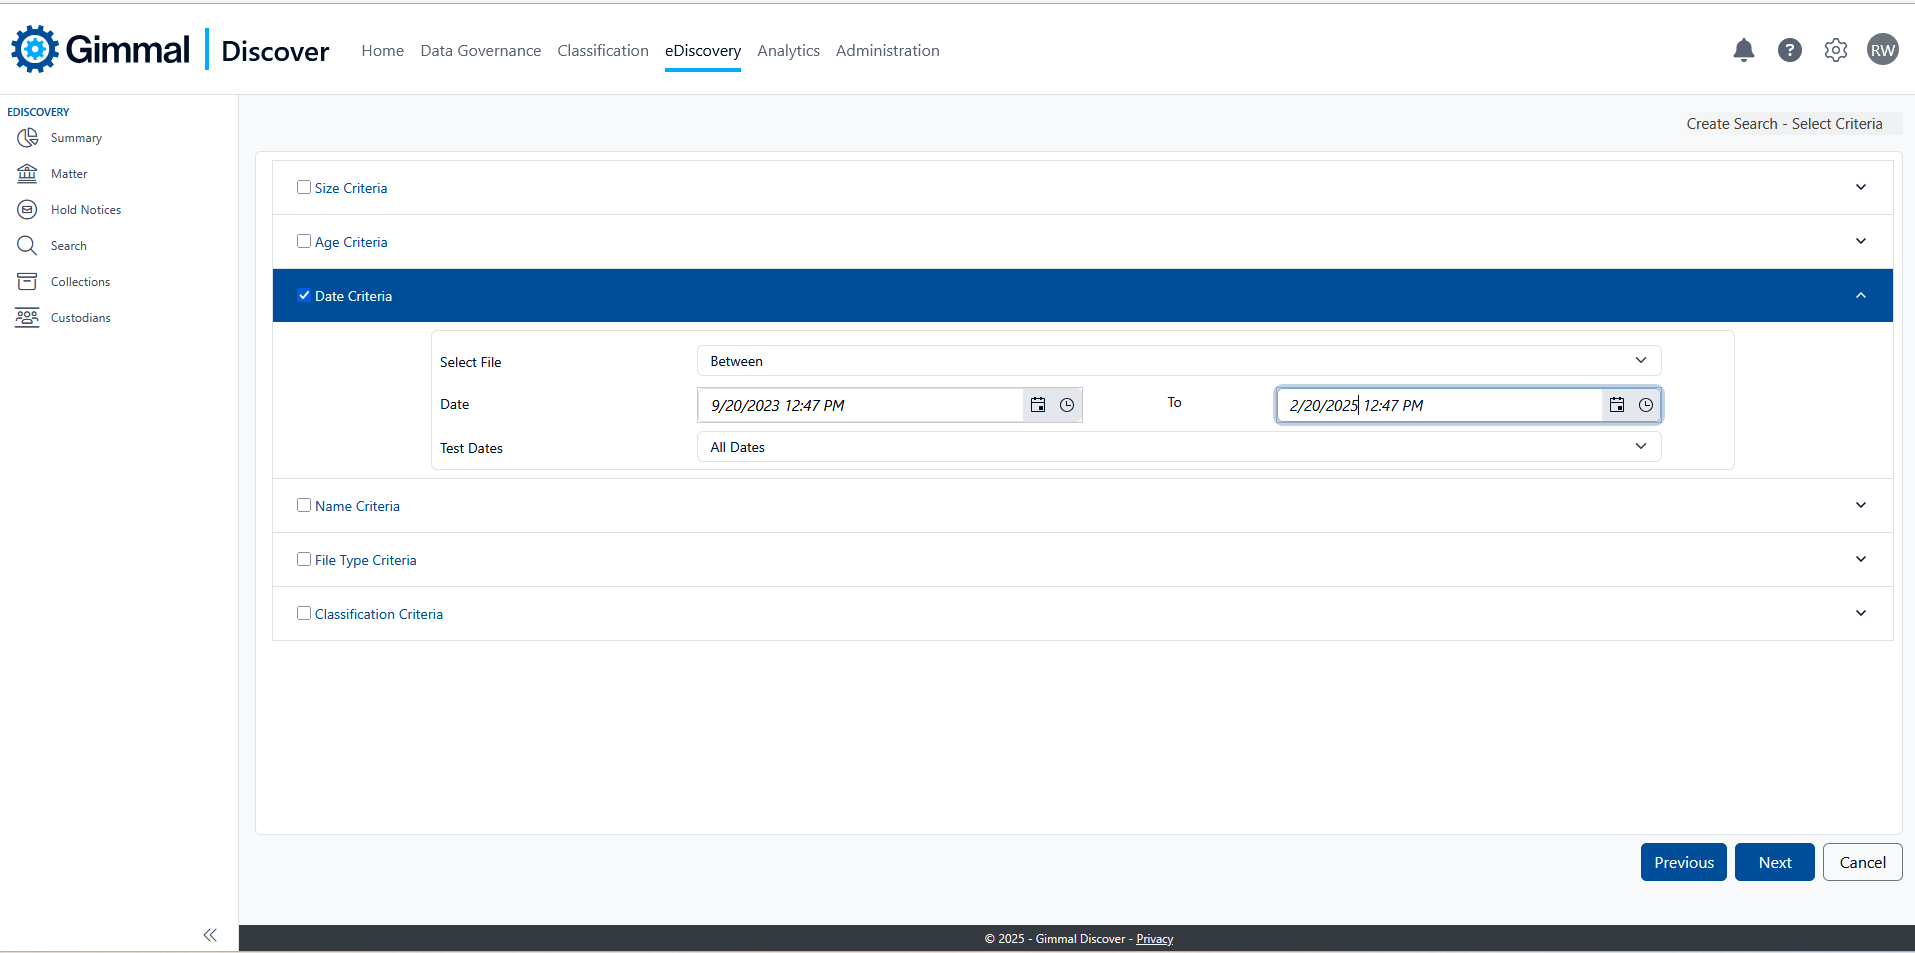
You may configure multiple criteria options. Please note that if you do, all the selected criteria parameters will have to be met for an item to be included as a search result. Click Next after you have configured the necessary criteria.
The Keyword wizard page is displayed.

If you wish to search on keywords, check the Use Keyword option. Select the appropriate type of keyword search you would like to perform:
-
Word List (Any) - Fill in a list of keywords, one per line. If an item being searched contains any of the listed keywords, the item will be considered a hit.
-
Word List (All) - Fill in a list of keywords, again one per line. All the listed keywords must be found in the items being searched for the item to be considered a hit.
-
Search Expression - Discover keyword searching supports a wide variety of keyword expressions, including Boolean, regular expressions, proximity, etc. For more information on the search syntax options supported in Discover, please refer to the Keyword Search Syntax document.
When using search expressions with the “Fast/Quick Search” option to create a search, there is a limitation of 62 ‘OR’ operators supported in a keyword expression. Exceeding this limit will trigger an error in the search execution.
Search Continuity
-
Simple – the search stops after finding the first matching keyword
Complete – all keyword criteria will be recorded in the search results (note, this will extend the time required to perform the search)
Exhaustive – used in conjunction with proximity search (i.e. find Term_a NEAR(5) Term_b) to apply all keyword criteria either before or after the proximity specified
Snippet Keyword Length – determines how much text around the matching search term will be returned as part of the snippet shown in the search results grid.
Mask Patterns – if the search expression uses one of the built-in Pattern(CC) or Pattern(SSN) options, mask this sensitive text in the search result to protect personally identifiable information.
Luhn Verification – when using a regular expression to identify credit card numbers, the Luhn algorithm check may be helpful in eliminating false positives.
Evaluate Image File Content with OCR - if your Gimmal Discover tenant supports it, OCR checking this box will instruct the File Agent to attempt extracting text from common image file types (JPG, BMP, GIF, etc.) and apply the search criteria. If the OCR option is selected, a Minimum OCR Confidence Percentage may also be specified. When the OCR component parses the image file, it will return a minimum confidence level value for each file. Gimmal recommends specifying a value of 60% or higher for the processing OCR supplied content.
After entering your search terms or expression, there is a Test button located on the right-hand side of the page. This button will open a logic test panel. The logic tester will validate the accuracy of your search expression and allow you to enter some sample text to help determine if the search terms are being evaluated properly.
Click Save to store the search configuration. Please note, searches do not start automatically. They must be selected and initiated using the ‘Start’ option found in the Action menu or attached to a schedule for unattended initiation.
Viewing Search Results
There are several ways to view the results of an executed search. In the Search screen, you either click on the value in the Results column or select the search, then click the Search Results option shown under the More button in the toolbar. To view the results of a prior execution of the search, select the search, click the Search History button in the toolbar, and click on the results of the execution you would like to view.
The columns of information displayed in the Search Results screen vary depending on the data type of the target information that was searched. Filters on the left of the screen allow you to drill down on the results; click on one or more filters and click the Apply button to refresh the results list with results that match the selected filters. Click the Clear Filters button to clear all selected filters and reload the full list of search results.
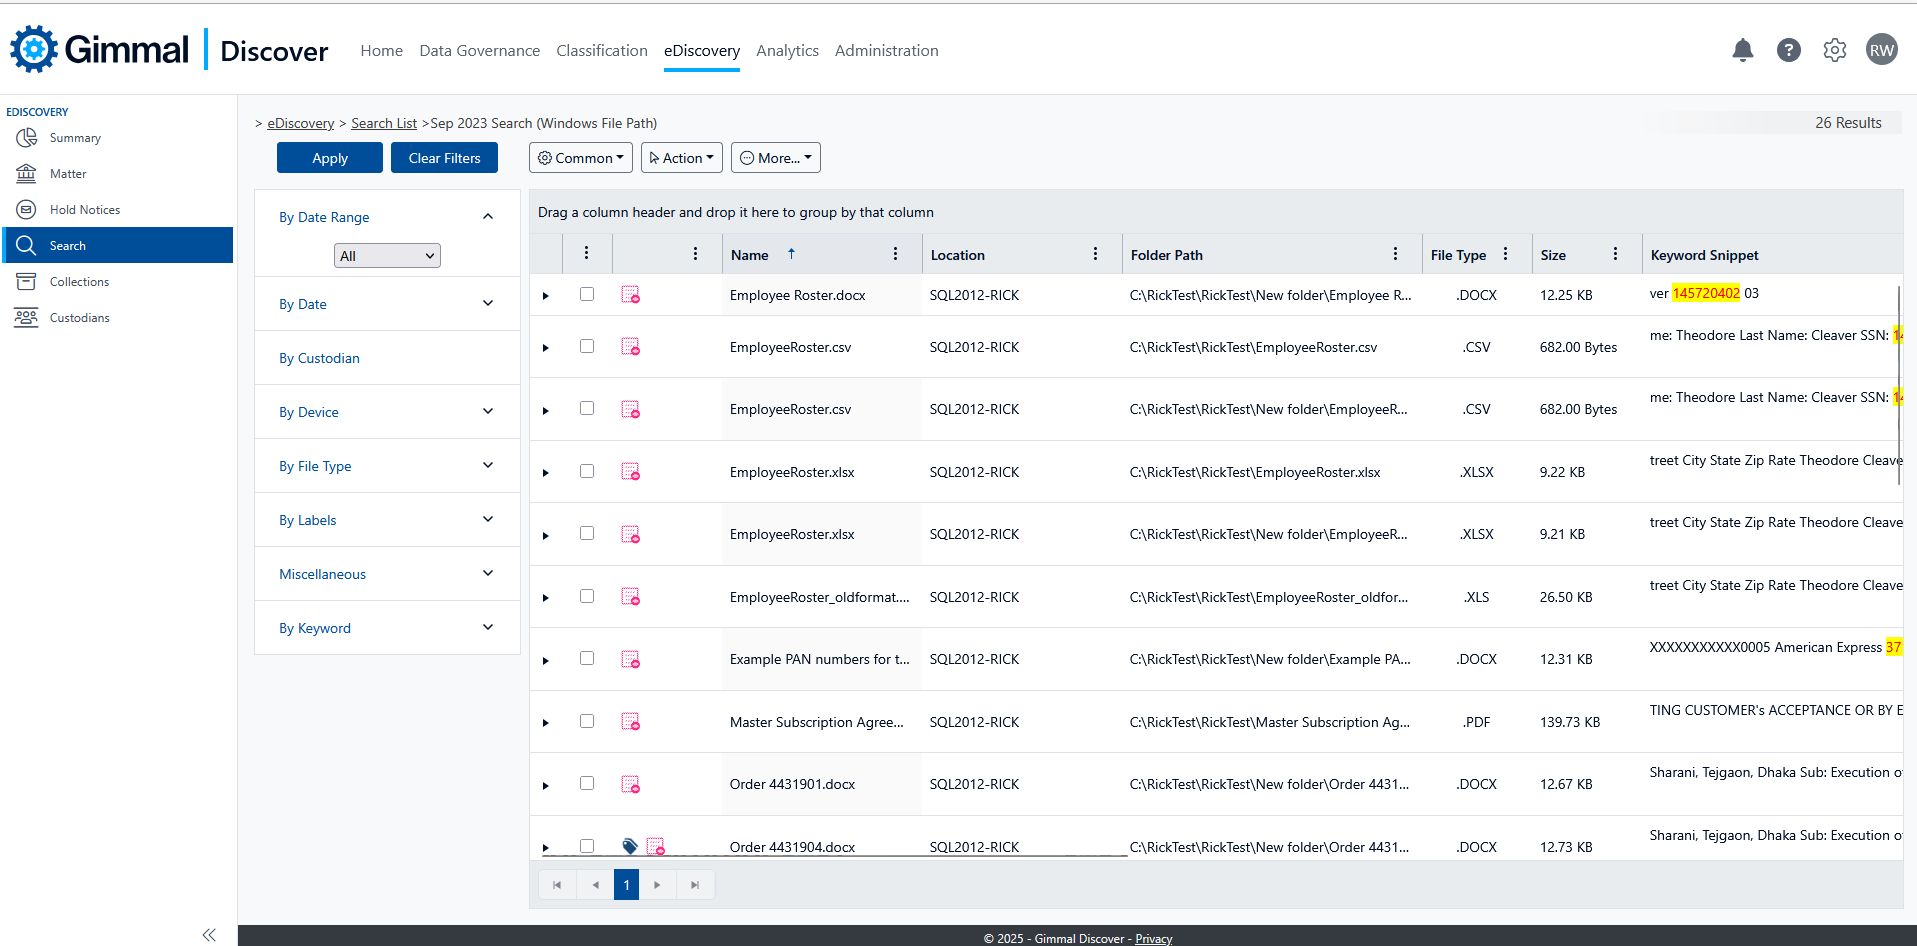
Clicking the checkbox on the header line of the results table selects/deselects all the results displayed on the current page. Clicking the Select All/Clear All buttons on the toolbar will select/deselect all the results across all the pages of the results.
Labeling Results
Discover offers a mechanism to tag results for further processing by applying text labels. For example, items may be marked with a ‘responsive’ label if they are to be included in a collection, or perhaps as privileged if you want to exclude them from additional processing. Labels are defined for each customer and are normally specific to the review process used with their organization.
.png?cb=973ab040ad4286057cecad38579533ca)
To tag results, select the results, then select the Assign Label option found under the Action button on the toolbar. The dialog that is opened displays a list of pre-defined labels; you could also add a label if you don't see one that meets your tagging needs. A result item can be assigned multiple tags. In addition to categorizing your search results, labels are used to target the result items that will be collected for more advanced review. See the section on Collections for more details on setting up a collection.
To clear the labels from a tagged result, select the result item(s) and click the Clear Label button from the toolbar.