
Before you configure Metadata Inheritance Rules, ensure that you have installed the Metadata Inheritance Rules app, completed the post-installation tasks, and have updated the Gimmal Job Scheduler files (if applicable). See the Content Governance for SharePoint installation section for information on these tasks.
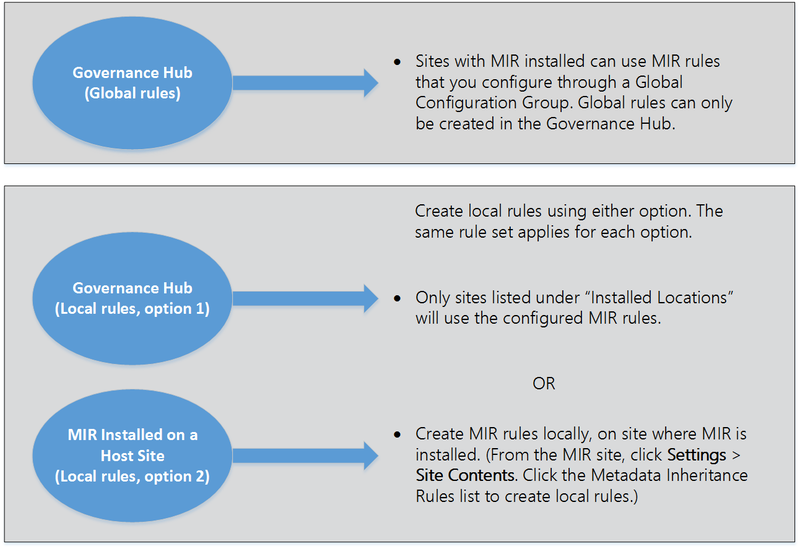
Metadata Inheritance Rules (MIR) is integrated with Gimmal's Governance Hub. Governance Hub is a configuration management application that provides a single location to configure and manage installed Gimmal software. Using the Governance Hub, you can manage global and local configuration for MIR in any site where it is deployed. There are several configuration options available for MIR, as illustrated below:
-
Configure MIR globally from the Governance Hub
-
Configure MIR locally from the Governance Hub, or optionally, from the host site
If you configure MIR globally, any sites with MIR can use the globally configured rules. If you configure MIR locally, only that site will have that particular rule. You can have unique rules per site, or you can have rules that apply to all sites. You can also set a precedence to the rules where a global rule cannot be overridden by a local one. See the following diagram for information on how each option differs:
Pre-Configuration Tasks: Feature-Activated
Editing the Metadata Inheritance Rules Global Settings
Prior to configuring Metadata Inheritance Rules (MIR) and using it in a site, you can edit the MIR global settings. The MIR Global Settings page, located in the Governance Hub, enables you to set the properties for various MIR settings. To edit the Metadata Inheritance Rules (MIR) global settings, perform the following steps:
-
On the site where Governance Hub is deployed, navigate to Settings > Site Settings > Governance Hub as a user with Contribute permission. The Governance Hub dashboard displays.
-
Click the Metadata Inheritance Rules tile. The Metadata Inheritance Rules configuration page displays.
-
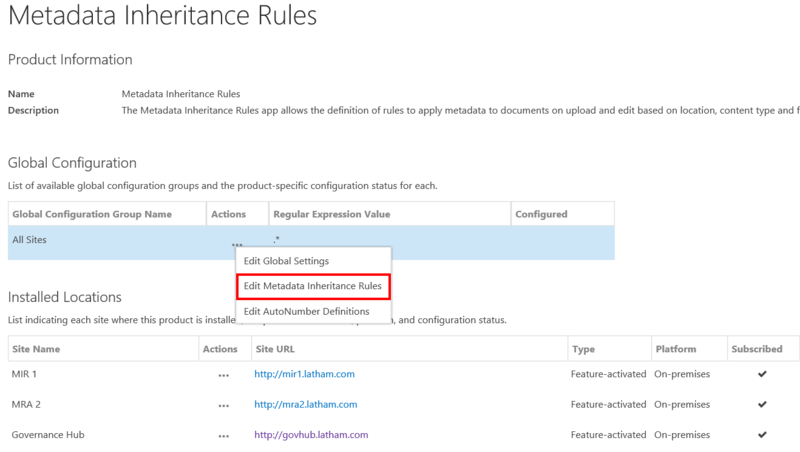
Under Global Configuration, click the Actions menu (…) next to the Global Configuration Group you want to configure, and then select Edit Global Settings. The Metadata Inheritance Rules Global Settings page displays. (Click to enlarge.)
-
On the Edit Global Settings page, edit the values for the following properties:
-
AutoNumber Queue Increment: The amount of autonumbers that are generated at a time and then held in memory until they are needed. The minimum value is '1'. If you enter a number that is less than '1', the value will be treated as '1'. The default value is "20". Setting this to "1" will disable the queue. If the Queue Increment is "1", the Queue Floor is not used. This is recommended for low-volume environments. Higher values are recommended in high-volume environments. AutoNumbers must be generated sequentially so that duplicate numbers are not generated. In a high-volume environment, the queue reduces the performance impact of this sequential generation by reducing the number of calls to SharePoint. As an example, a Queue Increment value of "20" will only call SharePoint for a new AutoNumber value once for every 20 AutoNumbers.
-
AutoNumber Queue Floor: The minimum number of autonumbers in the queue before the queue is repopulated. The minimum value is '1'. If you enter a number that is less than '1', the value will be treated as '1'. The default value is "5". Setting this to "1" is recommended for low-volume environments. In high-volume environments, it is recommended that you set this to the largest expected batch of new AutoNumber items that could be added at the same time. As an example, a Queue Floor value of "5" will ensure that there are always at least 5 AutoNumber values in memory and available to be assigned without additional calls to SharePoint to get new AutoNumbers.
-
Activating Rules when Moving List Items: Click this checkbox to enable this setting. MIR rules will activate when a list item is moved between folders within the same document or records library. This setting is unchecked by default; meaning that if you move a list item from one folder in a library to another folder in the same library, MIR rules will not activate. Note the following implications of enabling this feature:
-
Any event receiver processing that is linked to a list item update will be executed upon a move.
-
If versioning is enabled for the library:
-
The last "Modified By" user will be the respective app user (e.g., "SharePoint App").
-
The version type will be retained (e.g., major/minor) but the version number may increment from 1.0 to 2.0 (if major) or 0.1 to 0.2 (if minor).
-
-
If content approval is enabled, the approval type will be retained after the move. For example, an item that is "pending" approval will retain the "pending" approval state after the item is moved.
-
Check-in, publish, and approval comments will display "Item checked in by the MIR app per activation of MIR global setting Activating Rules when Moving List Items{*}.
-
-
For more information, see Item File Moved Scenarios.
5. Click Save to save your settings.
Pre-Configuration Tasks: Provider-Hosted
Prior to configuring Metadata Inheritance Rules (MIR) and using it in a site, you must add the MIR app to a host site and, optionally, you can edit the MIR global settings. The MIR Global Settings page, located in the Governance Hub, enables you to set the properties for various MIR settings.
Adding Metadata Inheritance Rules to a Host Site
Before you can configure Metadata Inheritance Rules (MIR) and use it in a site, you must add the MIR app to the Governance Hub as well any site where you wish to use it. Note that you can add the MIR app to only the root web of the host sites. For MIR to work in a subsite, install the app on the root web of the site collection. Ensure that you successfully install the MIR app to your SharePoint environment before continuing with this section.
The MIR app must be added to the target sites and must also be added in the site where the Governance Hub resides. To add the MIR app to a newly created site, you can use Gimmal's Provisioning product.
Microsoft does not permit you to use the System Account to add apps! Use a non-system account with appropriate permissions to perform these steps.
-
Navigate to the host site as a user who has "full control"' permissions on the site collection to add the app.
-
Select Settings > Site Contents. The Site Contents page displays.
-
Select + add an app from the top of the page. A Metadata Inheritance Rules tile displays under Apps you can add.
-
Click the Metadata Inheritance Rules tile. A window displays: Do you trust Metadata Inheritance Rules?
-
Click Trust It on the following screen. The page refreshes when the app is installed. Depending on your system, this can take several minutes.
-
Click on the newly installed Metadata Inheritance Rules app tile to provision the app.
7. Ensure that the App Provisioned successfully message displays under Event Log, and the green checkmark displays next to Status. This could take several minutes.
8. Verify that the Metadata Inheritance Rules app displays on the Governance Hub Dashboard by following these steps:
-
Navigate to the site where Governance Hub is installed.
-
Select Settings > Site Settings to display the Site Settings page.
-
Under the Site Administration section, click Governance Hub. The Governance Hub Dashboard displays.
-
Verify the Metadata Inheritance Rules tile displays on this page, as shown in the following figure.
Editing the Metadata Inheritance Rules Global Settings
Prior to configuring Metadata Inheritance Rules (MIR) and using it in a site, you can edit the MIR global settings. The MIR Global Settings page, located in the Governance Hub, enables you to set the properties for various MIR settings. To edit the Metadata Inheritance Rules (MIR) global settings, perform the following steps:
-
On the site where Governance Hub is deployed, navigate to Settings > Site Settings > Governance Hub as a user with Contribute permission. The Governance Hub dashboard displays.
-
Click the Metadata Inheritance Rules tile. The Metadata Inheritance Rules configuration page displays.
-
Under Global Configuration, click the Actions menu (…) next to the Global Configuration Group you want to configure, and then select Edit Global Settings. The Metadata Inheritance Rules Global Settings page displays. (Click to enlarge.)
-
On the Edit Global Settings page, edit the values for the following properties:
-
AutoNumber Queue Increment: The amount of autonumbers that are generated at a time and then held in memory until they are needed. The minimum value is '1'. If you enter a number that is less than '1', the value will be treated as '1'. The default value is "20". Setting this to "1" will disable the queue. If the Queue Increment is "1", the Queue Floor is not used. This is recommended for low-volume environments. Higher values are recommended in high-volume environments. AutoNumbers must be generated sequentially so that duplicate numbers are not generated. In a high-volume environment, the queue reduces the performance impact of this sequential generation by reducing the number of calls to SharePoint. As an example, a Queue Increment value of "20" will only call SharePoint for a new AutoNumber value once for every 20 AutoNumbers.
-
AutoNumber Queue Floor: The minimum number of autonumbers in the queue before the queue is repopulated. The minimum value is '1'. If you enter a number that is less than '1', the value will be treated as '1'. The default value is "5". Setting this to "1" is recommended for low-volume environments. In high-volume environments, it is recommended that you set this to the largest expected batch of new AutoNumber items that could be added at the same time. As an example, a Queue Floor value of "5" will ensure that there are always at least 5 AutoNumber values in memory and available to be assigned without additional calls to SharePoint to get new AutoNumbers.
-
Activating Rules when Moving List Items: Click this checkbox to enable this setting. MIR rules will activate when a list item is moved between folders within the same document or records library. This setting is unchecked by default; meaning that if you move a list item from one folder in a library to another folder in the same library, MIR rules will not activate. Note the following implications of enabling this feature:
-
Any event receiver processing that is linked to a list item update will be executed upon a move.
-
If versioning is enabled for the library:
-
The last "Modified By" user will be the respective app user (e.g., "SharePoint App").
-
The version type will be retained (e.g., major/minor) but the version number may increment from 1.0 to 2.0 (if major) or 0.1 to 0.2 (if minor).
-
-
If content approval is enabled, the approval type will be retained after the move. For example, an item that is "pending" approval will retain the "pending" approval state after the item is moved.
-
Check-in, publish, and approval comments will display "Item checked in by the MIR app per activation of MIR global setting Activating Rules when Moving List Items{*}.
For more information, see Item File Moved Scenarios.
-
-
-
Click Save to save your settings.
Configure MIR Globally from Governance Hub
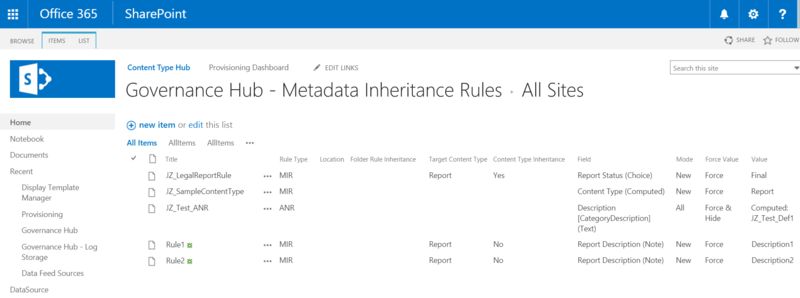
You can use Governance Hub to configure MIR for a Global Configuration Group. A Global Configuration Group is a unique set of product configuration settings that Governance Hub applies to one or more sites associated with this Global Configuration Group and on which a specific product is instantiated. Governance Hub automatically publishes the configuration data to the sites listed under the Installed Locations section, as shown below.
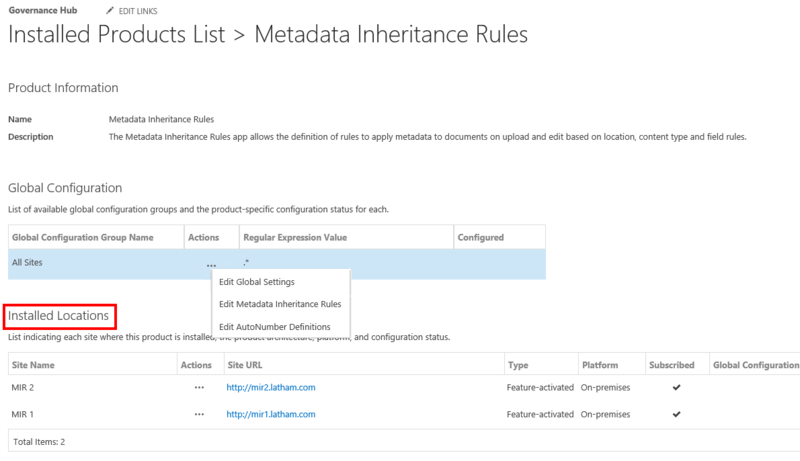
The sites listed under the Installed Locations section are sites where the MIR app has been added. If a site doesn't have the MIR app added, it won't display under Installed Locations. For more information on Global Configuration Groups, see the Governance Hub section in this Help.
Metadata Inheritance Rules are only triggered on document libraries and records libraries.
Accessing MIR List Page
Follow these steps to access the Metadata Inheritance Rules (MIR) list page for a given Global Configuration Group. This page enables you to create, edit, and delete your MIR rules. You must have Contribute permissions to perform these steps.
-
On the site where Governance Hub is enabled, click Settings > Site Settings > Site Administration, and then click Governance Hub. The Governance Hub dashboard displays.
-
Click the Metadata Inheritance Rules tile. The Metadata Inheritance Rules configuration page displays.
-
Under the Global Configuration section, click the Actions menu (…) next to the Global Configuration Group you want to create rules for, and then select Edit Metadata Inheritance Rules.
The Metadata Inheritance Rules list displays for the selected Global Configuration Group.
Continue with the following sections to create, edit, and delete MIR rules.
Creating Rules
Creating a Rule for Setting a Field Value
-
On the site where Governance Hub is enabled, click Settings > Site Settings > Site Administration, and then click Governance Hub. The Governance Hub Dashboard displays.
-
Click the Metadata Inheritance Rules tile. The Metadata Inheritance Rules configuration page displays.
-
Under the Global Configuration section, click the Actions menu (…) next to the Global Configuration Group you want to create rules for, and then select Edit Metadata Inheritance Rules. The Metadata Inheritance Rules list page displays.
-
Click + new item on the Metadata Inheritance Rules list page to add a new rule. The MIR Rule Editor displays.
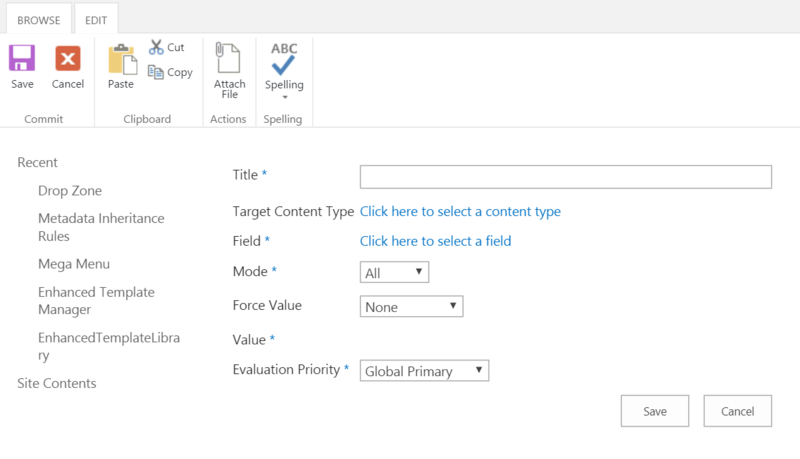
5. On the MIR Rule Editor, perform the following steps:
-
Enter a rule name in the Title field.
-
Select a Target Content Type to restrict the rule's scope to only the selected content type. This step is optional. If you leave this field blank, it is ignored. To select a Target Content Type, follow these steps:
-
Click the Click here to select a content type link. A list of content types displays.
-
Select a content type from the list.
-
Click OK.
-
Upon selecting a Target Content Type, a Content Type Inheritance checkbox displays below the Content Type field. Select this checkbox if you want your new rule to apply not only to the Target Content Type you selected above, but also to any "child" content types that fall under this Target Content Type. There are several advantages to using this option: it reduces the amount of new rules you have to create, because multiple content types can be encompassed by this one rule, and a new rule does not have to be created if a new child content type is created in the future.
-
Select a Field to specify the target column on the document that this rule will populate. The value this rule uses to populate the column is specified in the rule's Value field. (If a content type was selected previously, the fields that display will be those associated to the content type.) To select a Field, follow these steps:
-
Click the Click here to select a field link. A list of site columns displays by group.
-
Select a column from the list. The field must be a Single Line of Text column field type.
-
Click OK.
-
-
Select a Mode to determine what triggers the rule. The choices are:
-
All – The rule applies to both new and updated items.
-
New – The rule applies only to new items.
-
Update – The rule applies only to updated items.
-
-
Select a Force Value to determine how the rule behaves if the target field contains data. The choices are:
-
None – If the target field contains data, then the value specified in the rule will apply.
-
Force – The value specified in the rule is applied in all cases. You cannot change the value set by the rule.
-
Force & Hide – The value specified by the rule is applied in all cases. You cannot change the value set by the rule, and the field does not display when you edit the document's properties.
-
If you select "Content Type" as a Field Value, the options for Force Value do not apply.
-
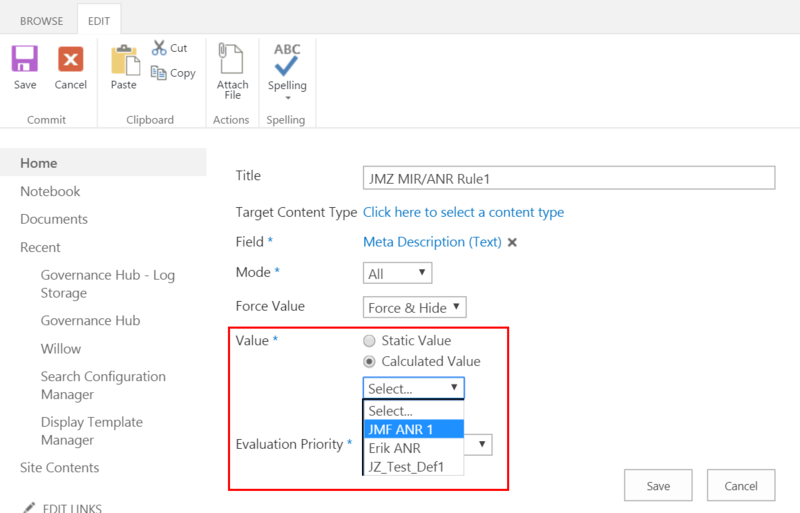
By default, Value is set to Static Value and a text box appears. If you select the radio button that says Calculated Value, the text box disappears and is replaced with a drop-down list that displays all of the AutoNumbering definitions that were created in the previous section. Click the drop-down arrow in the box and select an AutoNumbering definition from the list. A preview of the definition displays below the one you select. (If neither option appears, i.e. Static Value/Calculated Value, then you did not select the appropriate field type.)
-
Select an Evaluation Priority to determine which rule is applied if more than one rule is defined to set a value for a given column. The choices are:
-
Global Primary – This option has priority over rules you create locally and Global Secondary rules.
-
Global Secondary – This option has the lowest priority. Both Global Primary and any rules you create locally have higher priority.
-
For more information on rule priority, see Determining Rule Priority for MIR.
6. Click Save. The new rule displays on the Metadata Inheritance Rules list page.
7. Publish the new rule by selecting the appropriate Global Configuration Group from the MIR configuration page in the Governance Hub. Under the Actions column, click the ellipsis menu (…), and then select Publish Global Configuration.
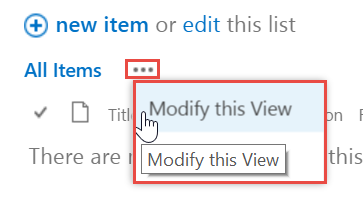
When you create a global MIR rule, the Location and Folder Rule Inheritance columns on the Metadata Inheritance Rules list page will be blank because these options don't exist for global rules. You can modify the list view and remove the Location and Folder Rule Inheritance columns by clicking ... on the list page, selecting Modify this View, and clearing the check boxes next to the Location and Folder Rule Inheritance column names.
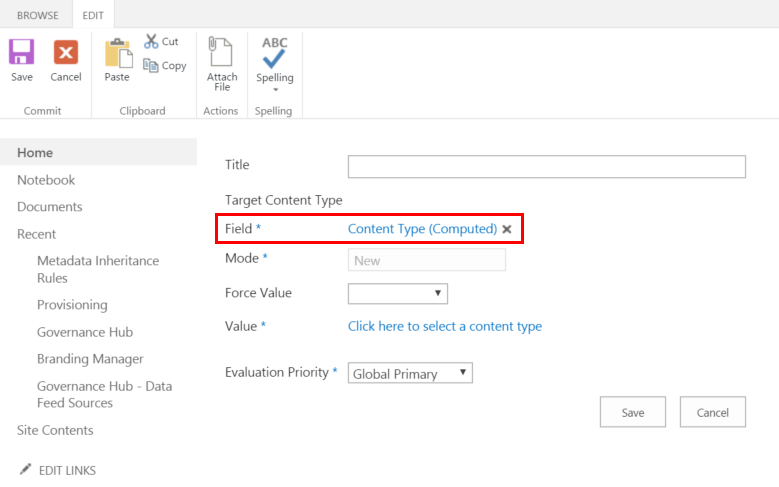
Creating a Rule for Setting the Content Type on a Document
-
On the site where Governance Hub is enabled, click Settings > Site Settings > Site Administration, and then click Governance Hub. The Governance Hub Dashboard displays.
-
Click the Metadata Inheritance Rules tile. The Metadata Inheritance Rules configuration page displays.
-
Under the Global Configuration section, click the Actions menu (…) next to the Global Configuration Group you want to configure, and then select Edit Metadata Inheritance Rules. The Metadata Inheritance Rules list page displays.
-
Click + new item on the Metadata Inheritance Rules list page to add a new rule. The MIR Rule Editor displays.
5. On the MIR Rule Editor, perform the following steps:
-
Enter a rule name in the Title field.
-
Do not select a Target Content Type for this step.
-
You must select a specific value for Field. To select the correct Field value, follow these steps:
-
Click the Click here to select a field link. A list of fields displays.
-
Under Fields, select Special > Content Type.
-
Click OK. The Field value is set to Content Type (Computed), the Content Type field is disabled, and the Mode field is set to New.
-
-
For Force Value, these options do not apply here.
-
Select a Value to specify which content type to apply to the document. To specify a content type, follow these steps:
-
Click the Click here to select a content type link. A list of content types displays.
-
Select a content type from the list.
-
Click OK.
-
-
Select an Evaluation Priority to determine the precedence for local versus global rules. The choices are:
-
Global Primary – This option has priority over rules you create locally and Global Secondary rules.
-
Global Secondary – This option has the lowest priority. Both Global Primary and any rules you create locally have higher priority.
-
6. Click Save. The new rule displays on the Metadata Inheritance Rules list page.
7. Publish the new rule by selecting the appropriate Global Configuration Group from the MIR configuration page in the Governance Hub. Under the Actions column, click the ellipsis menu (…), and then select Publish Global Configuration.
When you create a global MIR rule, the Location and Folder Rule Inheritance columns on the Metadata Inheritance Rules list page will be blank because these options don't exist for global rules. You can modify the list view and remove the Location and Folder Rule Inheritance columns by clicking ... on the list page, selecting Modify this View, and clearing the check boxes next to the Location and Folder Rule Inheritance column names.
For Governance Hub global configuration, content types/columns are derived from the Governance Hub, which is subscribed to the Content Type Hub.
Creating AutoNumbering Definition
-
On the site where Governance Hub is enabled, click Settings > Site Settings > Site Administration, and then click Governance Hub. The Governance Hub Dashboard displays.
-
Click the Metadata Inheritance Rules tile. The Metadata Inheritance Rules configuration page displays.
-
Under the Global Configuration section, click the Actions menu (…) next to the Global Configuration Group you want to create a definition for, and then select Edit AutoNumber Definitions. The AutoNumber Definitions page displays.

4. Click + new item on the AutoNumber Definitions page to add a new definition. The AutoNumber Definition Editor displays.
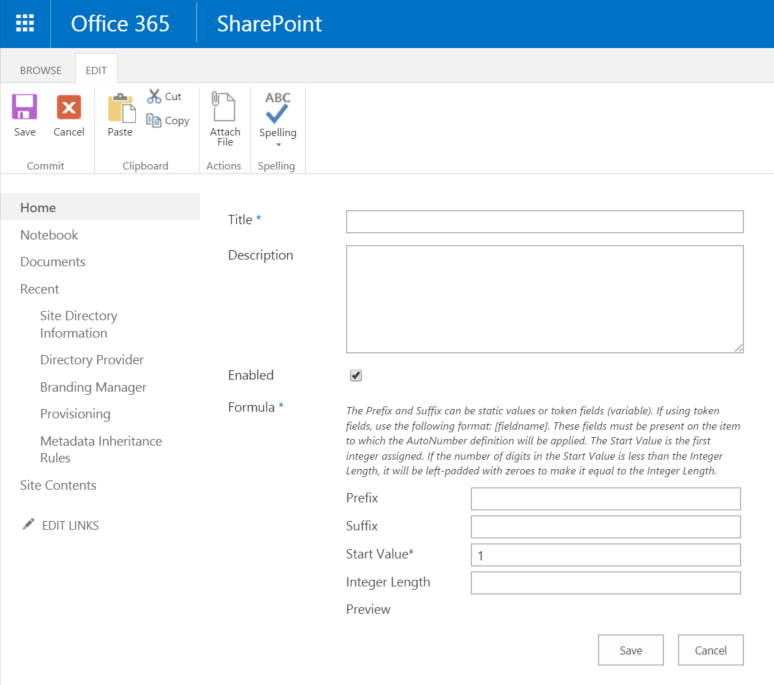
5. On the AutoNumber Definitions Editor, perform the following steps:
-
Enter a definition name in the Title field (required). The definition must have a unique name.
-
Enter a Description for the definition.
-
Check Enabled to enable the definition or uncheck it to disable the definition. (Checked by default.)
-
Under Formula, enter the following:
-
Enter a Prefix for this definition. The Prefix is a portion of the definition that is located before the sequential number. It consists of a static value (static value is typed in) and/or a field value from other fields on the same item; e.g., \[FieldInterWorkplacenalName\] (optional). There is a maximum length of 50 characters, including any field values.
-
Enter a Suffix for this definition. The Suffix is a portion of the definition that is located after the sequential number. It consists of a static value (static value is typed in) and/or a field value from other fields on the same item; e.g., \[FieldInternalName\] (optional). There is a maximum length of 50 characters, including any field values.
-
Enter a Start Value for this definition (required). The Start Value is the number the sequential value will start with (for the first item). Must be an integer greater than or equal to 0 (zero).
-
If you edit the Start Value for a created definition, make sure that you enter a new value that is higher than the next available number. MIR will not permit you to enter a value that is less than the value specified in the original ANR definition. For example, if your Start Value is 4, and you create two documents (Start Values 4 and 5 are used up), you cannot set the Start Value equal to or lower than 5.
-
-
Enter an Integer Length for this definition. The Integer Length is the minimum length of the generated sequential number. If the number's length is less than the value specified in the field, the number will be left-padded with zeros until the number matches the specified Integer Length. The maximum Integer Length value is 99.
-
For example:
Prefix: none
Suffix: none
Start value: 99
Integer Length: 3
The first number is 099. The next number is 100 (no zeros added, as we are now at three integers).
6. Click Save. The saved definition displays on the AutoNumber Definitions page.
The Formula column, shown above in the AutoNumber Definitions List, displays the "building blocks" of the AutoNumber definition. The formula ("Prefix{Sequential:X:X}Suffix") consists of the following:
-
Prefix – a static value and/or field names (in the format "\[InternalFieldName\]")
-
"Sequential" – The type of calculation done in the AutoNumbering definition.
-
"X:X" – The number to the left of the colon is the start value. It can be anything from 0 (zero) and up. The number to the right of the colon is the integer length, and represents the minimum length of the generated AutoNumber. Numbers less than this length are left-padded with zeros. Allowed values are 1-99.
-
Suffix – a static value and/or field names (in the format "\[InternalFieldName\]")
Your AutoNumbering definitions can be used against multiple content types that use the same string field. You can create multiple MIR ANR rules where each rules uses a different definition and a different string field to store the data that can be applied to a single content type as well (yielding multiple AutoNumber fields on an item).
Creating an AutoNumbering Rule
-
On the site where Governance Hub is enabled, click Settings > Site Settings > Site Administration, and then click Governance Hub. The Governance Hub Dashboard displays.
-
Click the Metadata Inheritance Rules tile. The Metadata Inheritance Rules configuration page displays.
-
Under the Global Configuration section, click the Actions menu (…) next to the Global Configuration Group you want to create rules for, and then select Edit Metadata Inheritance Rules. The Metadata Inheritance Rules list page displays.
-
Click + new item on the Metadata Inheritance Rules list page to add a new rule. The MIR Rule Editor displays.
5. On the MIR Rule Editor, perform the following steps:
-
Enter a rule name in the Title field.
-
Select a Target Content Type to restrict the rule's scope to only the selected content type. This step is optional. If you leave this field blank, it is ignored. To select a Target Content Type, follow these steps:
-
Click the Click here to select a content type link. A list of content types displays.
-
Select a content type from the list.
-
Click OK.
-
Upon selecting a Target Content Type, a Content Type Inheritance checkbox displays below the Content Type field. Select this checkbox if you want your new rule to apply not only to the Target Content Type you selected above, but also to any "child" content types that fall under this Target Content Type. There are several advantages to using this option: it reduces the amount of new rules you have to create, because multiple content types can be encompassed by this one rule, and a new rule does not have to be created if a new child content type is created in the future.
-
Select a Field to specify the target column on the document that this rule will populate. The value this rule uses to populate the column is specified in the rule's Value field. (If a content type was selected previously, the fields that display will be those associated to the content type.) To select a Field, follow these steps:
-
Click the Click here to select a field link. A list of site columns displays by group.
-
Select a column from the list. The field must be a Single Line of Text column field type.
-
Click OK.
-
-
Select a Mode to determine what triggers the rule. The choices are:
-
All – The rule applies to both new and updated items.
-
New – The rule applies only to new items.
-
Update – The rule applies only to updated items.
-
-
Select a Force Value to determine how the rule behaves if the target field contains data. The choices are:
-
Force & Hide – The value specified by the rule is applied in all cases. You cannot change the value set by the rule, and the field does not display when you edit the document's properties.
-
-
By default, Value is set to Static Value and a text box appears. If you select the radio button that says Calculated Value, the text box disappears and is replaced with a drop-down list that displays all of the AutoNumbering definitions that were created in the previous section. Click the drop-down arrow in the box and select an AutoNumbering definition from the list. A preview of the definition displays below the one you select. (If neither option appears, i.e. Static Value/Calculated Value, then you did not select the appropriate field type.)
When you select an AutoNumbering definition, the Mode value automatically defaults to "All" and Force Value defaults to "Force & Hide". You can change the Mode value if you want.
-
Select an Evaluation Priority to determine which rule is applied if more than one rule is defined to set a value for a given column. The choices are:
-
Global Primary – This option has priority over rules you create locally and Global Secondary rules.
-
Global Secondary – This option has the lowest priority. Both Global Primary and any rules you create locally have higher priority.
-
For more information on rule priority, see Determining Rule Priority for MIR.
6. Click Save. The new rule displays on the Metadata Inheritance Rules list page.
7. Publish the new rule by selecting the appropriate Global Configuration Group from the MIR configuration page in the Governance Hub. Under the Actions column, click the ellipsis menu (…), and then select Publish Global Configuration.
When you create a global MIR rule, the Location and Folder Rule Inheritance columns on the Metadata Inheritance Rules list page will be blank because these options don't exist for global rules. You can modify the list view and remove the Location and Folder Rule Inheritance columns by clicking ... on the list page, selecting Modify this View, and clearing the check boxes next to the Location and Folder Rule Inheritance column names.
Editing & Deleting Rules
-
On the site where Governance Hub is enabled, click Settings > Site Settings > Site Administration, and then click Governance Hub. The Governance Hub Dashboard displays.
-
Click the Metadata Inheritance Rules tile. The Metadata Inheritance Rules configuration page displays.
-
Under the Global Configuration section, click the Actions menu (…) next to the Global Configuration Group whose rules you want to edit or delete, and then select Edit Metadata Inheritance Rules. The Metadata Inheritance Rules list page displays.
-
Click the ellipsis (...) next to the rule you want to edit on the Metadata Inheritance Rules list page.
-
Next Step:
-
Edit: Select Edit Item and the MIR Rule Editor displays. Edit the values as desired then click Save.
-
Delete: Select Delete Item and a confirmation message displays. Click OK and the rule is deleted
-
Deleting an AutoNumbering rule will remove the force/hide restrictions on an item. If you wish to preserve this, disable the AutoNumbering definition instead.
6. If you chose to edit, publish the edited rule by selecting the appropriate Global Configuration Group from the MIR configuration page in the Governance Hub. Under the Actions column, click the ellipsis menu (…), and then select Publish Global Configuration.
Deleting Multiple Rules
-
On the Metadata Inheritance Rules list page, click the checkmark next to each rule you want to delete, or click the checkmark in the column heading to select all rules.
-
Press the Delete key on your keyboard. You are asked to confirm the deletion.
-
Click OK. The rules are deleted.
Configure MIR Locally from Governance Hub
You can use Governance Hub to configure rules that are local to the site where you installed MIR. Alternatively, you can create local rules without using the Governance Hub on a local site where MIR is installed. In either case, all of the rules can be accessed in the Governance Hub interface.
MIR AutoNumbering rules can only be created globally, using the Governance Hub and Global Configuration Groups. You cannot create AutoNumbering rules locally. For local configuration, content types/columns are derived from the site where MIR has been installed. Managing the rules for this instance does not affect the rules for any other instances; each must be independently managed.
Accessing MIR List Page
Follow these steps to access the Metadata Inheritance Rules (MIR) list page for a given site from the Governance Hub. This page enables you to create, edit, and delete local MIR rules.
-
On the site where Governance Hub is enabled, click Settings > Site Settings > Site Administration, and then click Governance Hub. The Governance Hub Dashboard displays.
-
Click the Metadata Inheritance Rules tile. The MIR configuration page displays.
-
Under the Installed Locations section, click the Actions menu (…) next to the site you want to configure rules for, and select Edit Metadata Inheritance Rules.

The Metadata Inheritance Rules list page displays, showing the rules defined for that site.
The Installed Locations section lists all the sites where the MIR app has been added The Metadata Inheritance Rules page displays, showing the metadata inheritance rules defined for the site.
Creating Rules
Creating a Rule for Setting a Field Value
1. On the Metadata Inheritance Rules list page that you accessed in the previous topic, click +new item to add new a rule. The MIR Rule Editor displays.
2. On the MIR Rule Editor, perform the following steps:
-
Enter a Title for this rule.
-
Select a Location to restrict the rule's scope to only within the selected location. Location can be a site, sub-site, library, or folder. This step is optional. If you leave this field blank, the rule will apply to the content type and/or field selected. If the selected location is a sub-site, the rule only applies to that sub-site.
You can only configure a location-based rule locally. You cannot configure this rule globally using the Governance Hub because sites will have varying locations.
Upon selecting a location from the Libraries folder or subfolder, a Folder Rule Inheritance checkbox displays below the Location field. Select this checkbox if you want your new rule to apply not only to a location within a root folder, but also to subfolders under this location. If you create a rule for a subfolder under the location, the rule applies to everything under this location. If you do not check this box, the rule applies only to the root items in the location specified. The Folder Rule Inheritance checkbox will not display if you select a location under Sites or Subsites.
-
Select a Target Content Type to restrict the rule's scope to only the selected content type. This step is optional. If you leave this field blank, it is ignored. To select a Content Type, follow these steps:
-
Click the Click here to select a content type link. A list of content types displays.
-
Select a content type from the list.
-
Click OK.
-
Upon selecting a Target Content Type, a Content Type Inheritance checkbox displays below the Content Type field. Select this checkbox if you want your new rule to apply not only to the Target Content Type you selected above, but also to any "child" content types that fall under this Target Content Type. There are several advantages to using this option: it reduces the amount of new rules you have to create, because multiple content types can be encompassed by this one rule, and a new rule does not have to be created if a new child content type is created in the future.
-
Select a Field to specify the target column on the document that this rule will populate. The value this rule uses to populate the column is specified in the rule's Value field. To select a Field, follow these steps:
-
Click the Click here to select a field link. A list of columns displays.
-
Select a column from the list.
-
Click OK.
-
-
Select a Mode to determine which document states trigger the rule. The choices are:
-
All – The rule applies to both new and updated items.
-
New – The rule applies only to new items.
-
Update – The rule applies only to updated items.
-
-
Select a Force Value to determine how the rule behaves if the target field contains data. The choices are:
-
None – If the target field contains data, then the value specified in the rule will apply.
-
Force – The value specified in the rule is applied in all cases. You cannot change the value set by the rule.
-
Force & Hide – The value specified by the rule is applied in all cases. You cannot change the value set by the rule, and the field does not display when you edit the document's properties.
-
-
Enter a Value to specify the value this rule populates. The field that this rule populates is specified by the Field value.
3. Click Save.
Creating a Rule for Setting the Content Type on a Document
1. On the Metadata Inheritance Rules list page that you accessed in the previous topic, click +new item to add new a rule. The MIR Rule Editor displays.
2. On the MIR Rule Editor, perform the following steps:
-
Enter a Title for this rule.
-
Select a Location to restrict the rule's scope to only within the selected location. Location can be a site, sub-site, library, or folder. This step is optional. If you leave this field blank, then the rule applies to the host site and all sub-sites. If the selected location is a sub-site, the rule only applies to that sub-site.
You can only configure a location-based rule locally. You cannot configure this rule globally using the Governance Hub because sites will have varying locations.
Upon selecting a location from the Libraries folder or subfolder, a Folder Rule Inheritance checkbox displays below the Location field. Select this checkbox if you want your new rule to apply not only to a location within a root folder, but also to subfolders under this location. If you create a rule for a subfolder under the location, the rule applies to everything under this location. If you do not check this box, the rule applies only to the root items in the location specified. The Folder Rule Inheritance checkbox will not display if you select a location under Sites or Subsites.
-
Do not select a Target Content Type for this step.
-
You must select a specific value for Field. To select the correct Field value, follow these steps:
-
Click the Click here to select a field link. A list of fields displays.
-
Under Field, select Special > Content Type.
-
Click OK. The Field value is set to Content Type (Computed), the Content Type field is disabled, and the Mode field is set to New.
-
-
Select a Force Value. The choices are:
-
None – If a value exists, then the default value specified by the rule is not applied. In any case, you can override the default value. Select None for this step.
-
Force – The default value specified by the rule is applied in all cases. You cannot override the default value.
-
Force & Hide – The default value specified by the rule is applied in all cases. You cannot override the default value, and the field does not display on the Edit page. When setting the content type on a document, this value is ignored.
-
-
Select a Value to specify which content type to apply to the document. To specify a content type, follow these steps:
-
Click the Click here to select a content type link. A list of content types displays.
-
Select a content type from the list.
-
Click OK.
-
3. Click Save.
Editing & Deleting Rules
-
On the site where Governance Hub is enabled, click Settings > Site Settings > Site Administration, and then click Governance Hub. The Governance Hub Dashboard displays.
-
Click the Metadata Inheritance Rules tile. The Metadata Inheritance Rules configuration page displays.
-
Under the Installed Locations section, click the Actions menu (…) next to the site whose rules you want to edit or delete and select Edit Metadata Inheritance Rules. The Metadata Inheritance Rules list page displays.
-
Click the ellipsis (...) next to the rule you want to edit or delete on the Metadata Inheritance Rules list page.
-
Edit: Select Edit Item and the MIR Rule Editor displays. On the MIR Rule Editor, change the values as desired then click Save.
-
Delete: Select Delete Item and a confirmation message displays. Click OK. and the rule is deleted.
-
Deleting Multiple Rules
-
On the Metadata Inheritance Rules list page, click the checkmark next to each rule you want to delete, or click the checkmark in the column heading to select all rules.
-
Press the Delete key on your keyboard. You are asked to confirm the deletion.
-
Click OK. The rules are deleted.
Configure MIR Locally from Host Site
You can use Governance Hub to configure rules that are local to the site where you installed MIR. Alternatively, you can create local rules without using the Governance Hub on a local site where MIR is installed. In either case, all of the rules can be accessed in the Governance Hub interface.
MIR AutoNumbering rules can only be created globally, using the Governance Hub and Global Configuration Groups. You cannot create AutoNumbering rules locally. For local configuration, content types/columns are derived from the site where MIR has been installed. Managing the rules for this instance does not affect the rules for any other instances; each must be independently managed.
Creating Rules from Host Site
You can create two types of local Metadata Inheritance Rules, both of which are described in the topics below:
-
A rule that sets a document metadata field value when you create or update a document
-
A rule that assigns a content type to a document when you initially upload the document
Creating a Rule for Setting a Field Value
1. Navigate to the host site where MIR is deployed.
2. Select Settings > Site Contents. The Site Contents page displays.
3. Click the Metadata Inheritance Rules tile. The Metadata Inheritance Rules list page displays.
4. Click +new item to add new a rule. The MIR Rule Editor displays.
5. On the MIR Rule Editor, perform the following steps:
-
Enter a Title for this rule.
-
Select a Location to restrict the rule's scope to only within the selected location. Location can be a site, sub-site, library, or folder. This step is optional. If you leave this field blank, the rule will apply to the content type and/or field selected. If the selected location is a sub-site, the rule only applies to that sub-site.
You can only configure a location-based rule locally. You cannot configure this rule globally using the Governance Hub because sites will have varying locations.
Upon selecting a location from the Libraries folder or subfolder, a Folder Rule Inheritance checkbox displays below the Location field. Select this checkbox if you want your new rule to apply not only to a location within a root folder, but also to subfolders under this location. If you create a rule for a subfolder under the location, the rule applies to everything under this location. If you do not check this box, the rule applies only to the root items in the location specified. The Folder Rule Inheritance checkbox will not display if you select a location under Sites or Subsites.
-
Select a Target Content Type to restrict the rule's scope to only the selected content type. This step is optional. If you leave this field blank, it is ignored. To select a Content Type, follow these steps:
-
Select the Click here to select a content type link. A list of content types displays.
-
Select a content type from the list.
-
Click OK.
-
Upon selecting a Target Content Type, a Content Type Inheritance checkbox displays below the Content Type field. Select this checkbox if you want your new rule to apply not only to the Target Content Type you selected above, but also to any "child" content types that fall under this Target Content Type. There are several advantages to using this option: it reduces the amount of new rules you have to create, because multiple content types can be encompassed by this one rule, and a new rule does not have to be created if a new child content type is created in the future.
-
Select a Field to specify the target column on the document that this rule will populate. The value this rule uses to populate the column is specified in the rule's Value field. To select a Field, follow these steps:
-
Select the Click here to select a field link. A list of columns displays.
-
Select a column from the list.
-
Click OK.
-
-
Select a Mode to determine which document states trigger the rule. The choices are:
-
All – The rule applies to both new and updated items.
-
New – The rule applies only to new items.
-
Update – The rule applies only to updated items.
-
-
Select a Force Value to determine how the rule behaves if the target field contains data. The choices are:
-
None – If the target field contains data, then the value specified in the rule will apply.
-
Force – The value specified in the rule is applied in all cases. You cannot change the value set by the rule.
-
Force & Hide – The value specified by the rule is applied in all cases. You cannot change the value set by the rule, and the field does not display when you edit the document's properties.
-
-
Enter a Value to specify the value this rule populates. The field that this rule populates is specified by the Field value.
6. Click Save.
Creating a Rule for Setting the Content Type on a Document
-
Navigate to the host site where MIR is deployed.
-
Select Settings > Site Contents. The Site Contents page displays.
-
Click the Metadata Inheritance Rules tile. The Metadata Inheritance Rules list page displays.
-
On the Metadata Inheritance Rules list page, click + new item to add new a rule. The MIR Rule Editor displays.
-
On the MIR Rule Editor, perform the following steps:
-
Enter a Title for this rule.
-
Select a Location to restrict the rule's scope to only within the selected location. Location can be a site, sub-site, library, or folder. This step is optional. If you leave this field blank, then the rule applies to the host site and all sub-sites. If the selected location is a sub-site, the rule only applies to that sub-site.
-
You can only configure a location-based rule locally. You cannot configure this rule globally using the Governance Hub because sites will have varying locations.
Upon selecting a location from the Libraries folder or subfolder, a Folder Rule Inheritance checkbox displays below the Location field. Select this checkbox if you want your new rule to apply not only to a location within a root folder, but also to subfolders under this location. If you create a rule for a subfolder under the location, the rule applies to everything under this location. If you do not check this box, the rule applies only to the root items in the location specified. The Folder Rule Inheritance checkbox will not display if you select a location under Sites or Subsites.
-
-
Do not select a Target Content Type for this step.
-
You must select a specific value for Field. To select the correct Field value, follow these steps:
-
Select the Click here to select a field link. A list of fields displays.
-
Under Field, select Special > Content Type.
-
Click OK. The Field value is set to Content Type (Computed), the Content Type field is disabled, and the Mode field is set to New.
-
-
Select a Force Value. The choices are:
-
None – If a value exists, then the default value specified by the rule is not applied. In any case, you can override the default value. Select None for this step.
-
Force – The default value specified by the rule is applied in all cases. You cannot override the default value.
-
Force & Hide – The default value specified by the rule is applied in all cases. You cannot override the default value, and the field does not display on the Edit page. When setting the content type on a document, this value is ignored.
-
-
Select a Value to specify which content type to apply to the document. To specify a content type, follow these steps:
-
Select the Click here to select a content type link. A list of content types displays.
-
Select a content type from the list.
-
Click OK.
-
-
6. Click Save.
Editing & Deleting Rules
-
Navigate to the host site where MIR is deployed.
-
Select Settings > Site Contents. The Site Contents page displays.
-
Click the Metadata Inheritance Rules tile. The Metadata Inheritance Rules list page displays.
-
Click the ellipsis (...) next to the rule you want to edit or delete.
-
Next Step:
-
Edit: Select Edit Item and MIR Rule Editor displays. Change the values of the settings as desired then Click Save.
-
Delete: Select Delete item then click OK on the confirmation message. The rule is deleted
-
To delete multiple rules, follow these steps:
-
Click the checkmark next to each rule you want to delete, or click the checkmark in the column heading to select all rules.
-
Press the Delete key on your keyboard. You are asked to confirm the deletion.
-
Click OK. The rules are deleted.
Supplementary MIR Information
Configuring MIR iGs Transfer
Gimmal's Metadata Inheritance Rules iGs Transfer application gives you the ability to transfer existing iGs MIR configuration information directly from iGs into the MIR (PH) global configuration area in the Governance Hub. Perform the steps in the following sections to configure and use MIR iGs Transfer. Before you can transfer your iGs MIR rules to the Governance Hub-enabled MIR application, you must activate the Metadata Inheritance Rules iGs Transfer application on the Governance Hub site.
-
Navigate to the Governance Hub site.
-
Select Settings > Site Settings to display the Site Settings page.
-
Under Site Collection Administration, click Site Collection Features.
-
Locate the Metadata Inheritance Rules iGs Transfer application in the Site Collection Features list.
-
Click Activate.
The Metadata Inheritance Rules iGs Transfer tile now displays on the Governance Hub dashboard:
Transferring iGs Metadata Inheritance Rules
After you activate Metadata Inheritance Rules (MIR) iGs Transfer on the Governance Hub site, the Transfer MIR Rules menu option is available on the MIR configuration page under the Global Configuration section. You can now transfer your iGs MIR rules over to the Governance Hub-enabled MIR app.
1. Navigate to Governance Hub dashboard.
2. Select the Metadata Inheritance Rules tile.
You must use the Metadata Inheritance Rules application to transfer rules; there are no Global Configuration options available in the Metadata Inheritance Rules iGs Transfer application.
3. Under Global Configuration, click the Actions menu (…) next to the Global Configuration Group you want the rules to be transferred into, and then select Transfer MIR Rules.
4. Select the Global Configuration Group(s) that you want to transfer your iGs MIR rules into, and then click Transfer. You may select additional Global Configuration Groups if any are available. A confirmation message displays.
When you transfer iGs MIR rules, the transfer process will overwrite any existing rules in the selected Global Configuration Group.
5. Click OK. A transfer completion message displays, as well as a detailed log of the changes that occurred.
Any iGs MIR rules that reference a Content Type will not transfer successfully if that Content Type does not exist in the Governance Hub site. You can only transfer iGs MIR rules into a Global Configuration Group.
The following conversion table documents several functional differences between iGs MIR and MIR. In some cases, rules that were configured in iGs MIR do not map precisely to rules configured in MIR.
|
If the iGs MIR selected actions is... |
And the iGs MIR Force Value checkbox is... |
Then the MIR Force Value is set to... |
|
No Action |
Unchecked |
None |
|
Force Hide |
Unchecked |
None |
|
Force Unhide |
Unchecked |
None |
|
No Action |
Checked |
Force |
|
Force Hide |
Checked |
Force & Hide |
|
Force Unhide |
Checked |
Force |
Determining Rule Priority
Metadata Inheritance Rules provides several weight calculations to determine the priority by which a rule should be applied to a particular content item. These calculations vary, depending on whether your rules are identical or overlapping. Identical rules are weighted by chronological order, and overlapping rules are weighted by how specific they are. See the following sections for more information on each weight calculation.
Order of Priority for Global Rules v.s. Local Rules
Multiple Metadata Inheritance Rules can match the rule criteria for a single list item. Therefore, it's important that only the most applicable rule be executed on the matching list item. To determine which rule should be executed on the list item, a hierarchy of rule priority will be applied. One particular aspect of determining the rule importance is where and how the rule resides within the existing SharePoint infrastructure.
Rules can either be applied from a global (from the Governance Hub) or a local (from the host web) scope, and also can have scopes that are either overridable or not. MIR will evaluate the list of rules. It will look at Global Primary rules first. If it finds a single match, it looks no further. If it does not find a match, MIR will then look at local rules. If there is no match, it will look at Global Secondary rules for a match.
Identical Rules
When creating either global or local Metadata Inheritance Rules, it's possible to have two identical rules that tell MIR to perform different tasks. For example, two identical local rules are created with the same location and content type, but with different values to be applied to a field. The first rule created applies a value of 100 to a field. The second rule created applies 200 to that same field. The rule that was created first is applied, and the field will have a value of 100. In order to determine which rule should be executed first, MIR prioritizes the rules in chronological order. Simply, the rule that was created first is the rule that will be executed.
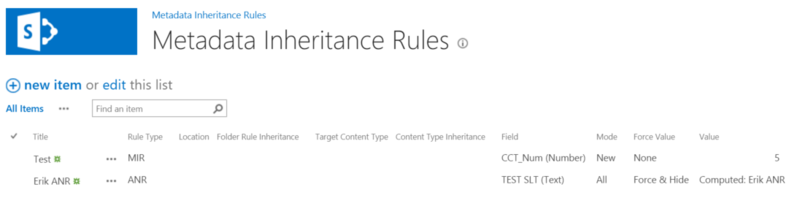
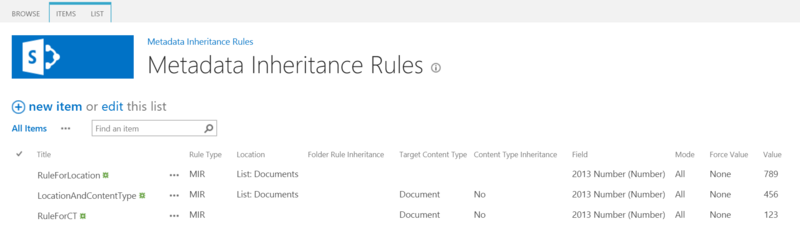
Overlapping Rules
Overlapping rules are defined as two or more rules that specify the same column, but are not identical, as shown in the following figure. For overlapping rules, the more details that a rule has, the higher it is weighted (prioritized). For example, the most specific rule in this case will be evaluated and will set the data.
Order of Priority for Rules with Content Type Inheritance or Folder Inheritance
A Metadata Inheritance Rule can also use folder rule inheritance and/or content type inheritance in determining the prioritization. The weight calculation will not be changed, since the weight is calculated when the rule is constructed. However, whether a rule applies directly to an item's folder or content type, or whether the rule is inherited, will change the prioritization of the MIR rule. The following list shows all of the possible scenarios for folder and content type inheritance rules. The scenarios are listed in order from highest priority to lowest priority for deciding which rule to apply for a specific field:
-
The rule matches exactly with the folder location and the content type.
-
The rule matches exactly with the folder location, and the item's content type has the closest proximity to the rule's content type going up the content type chain (with Content Type Inheritance used on the rule).
-
The rule matches exactly with the content type, and item's location has the closest proximity to the folder going up the folder chain (with Folder Rule Inheritance used on the rule).
-
With Folder Rule Inheritance and Content Type Inheritance used on the rule, the item has the closest proximity to the rule's folder, then closest proximity to the rule's content type.
-
The rule matches exactly with the folder location.
-
The item's location has the closest proximity to the folder going up the folder chain (with Folder Rule Inheritance used on the rule).
-
The rule matches exactly with the content type.
-
The item's content type has the closest proximity to the rule's content type going up the content type chain (with Content Type Inheritance used on the rule).
-
The rule matches the field.
Impact on MIR AutoNumbering Rules when Copying & Moving Documents
When copying or moving documents between sites and/or libraries in SharePoint, if MIR is installed on the destination site, all applicable rules with a Mode of "New" or "All" will be triggered. This applies to all MIR rules, not just AutoNumbering rules. However, in the case of AutoNumbering rules, copying/moving documents causes MIR to generate a new sequential value for the affected field. This is true of any method of moving or copying, except for moves performed using the Explorer view within a single document library (i.e. organizing documents into subfolders). To avoid this behavior, consider one of the following workarounds:
-
Only move/copy documents to sites that do not have MIR installed
-
Disable the Autonumber rules prior to performing the copy/move (and publish settings)
-
Change the Autonumber rule to a Mode of "Update" (and publish settings)
For information on creating AutoNumbering Definitions and applying them to MIR rules, see Creating an AutoNumbering Definition (link) and Creating an AutoNumbering Rule (link).
Item File Moved Scenarios
When moving content within a library, the list item does not initiate an adding or updating event. MIR rules are applied to either of those events, and therefore, moving content does not trigger the MIR rule. However, the item file moved event is triggered, but this event does not have the capability of altering the list item properties (system or custom). In order for the MIR rules to apply to moved items, the ItemFileMoved event must trigger an update event. This causes further repercussions, as listed by the scenarios below.
Scenarios
The following table lists the scenarios that may occur during the ItemFileMoved event, which is triggered on an item being moved within a document library or a records library. A related Governance Hub global setting ("Activating Rules when Moving List Items") must also be enabled. The list settings must be changed accordingly for each scenario. In each scenario, the rule will be applied to the item. The Modified By column varies, depending on the list settings.
|
Require Check Out? |
Require Content Approval? |
Versioning |
Approval Status |
Expected Result |
|
No |
No |
No Versioning |
N/A |
|
|
No |
No |
Major |
N/A |
|
|
No |
No |
Major and Minor |
N/A |
|
|
No |
Yes |
No Versioning |
Pending |
|
|
No |
Yes |
No Versioning |
Approved |
|
|
No |
Yes |
No Versioning |
Rejected |
|
|
No |
Yes |
No Versioning |
Pending |
|
|
No |
Yes |
Major |
Approved |
|
|
No |
Yes |
Major |
Rejected |
|
|
No |
Yes |
Major and Minor |
Draft |
|
|
No |
Yes |
Major and Minor |
Pending |
|
|
No |
Yes |
Major and Minor |
Approved |
|
|
No |
Yes |
Major and Minor |
Rejected |
|
|
Yes |
No |
No Versioning |
N/A |
|
|
Yes |
No |
Major |
N/A |
|
|
Yes |
No |
Major and Minor |
N/A |
|
|
Yes |
Yes |
No Versioning |
Pending |
|
|
Yes |
Yes |
No Versioning |
Approved |
|
|
Yes |
Yes |
No Versioning |
Rejected |
|
|
Yes |
Yes |
Major |
Pending |
|
|
Yes |
Yes |
Major |
Approved |
|
|
Yes |
Yes |
Major |
Rejected |
|
|
Yes |
Yes |
Major and Minor |
Draft |
|
|
Yes |
Yes |
Major and Minor |
Pending |
|
|
Yes |
Yes |
Major and Minor |
Approved |
|
|
Yes |
Yes |
Major and Minor |
Rejected |
|