
This section contains instructions for configuring the Feature-Activated and Provider-Hosted versions of Document Center in a SharePoint 2013/2016 and SharePoint Online environment.
Before you configure Document Center, ensure that you have installed the Document Center app, completed the post-installation tasks, and have updated the Gimmal Job Scheduler files (if applicable). See the Content Governance for SharePoint installation section for information on these tasks.
Pre-Configuration Tasks: Document Center
Adding Document Center to a Host Site
Prior to configuring Document Center and using it in a site, you must add Document Center to a host site.
Microsoft does not allow you to use the System Account to add apps! Use a non-system account with appropriate permissions to perform these steps.
-
Navigate to the host site and select Settings > Site Contents. The Site Contents page displays.
-
Select + add an app from the top of the page. A Document Center tile displays under Apps you can add.
-
Click the Document Center tile. A window displays: Do you trust Document Center?
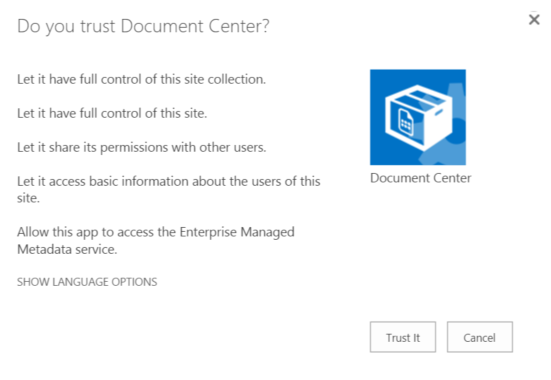
4. Click Trust It on the following screen. The page refreshes when the app is installed. Depending on your system, this can take several minutes.
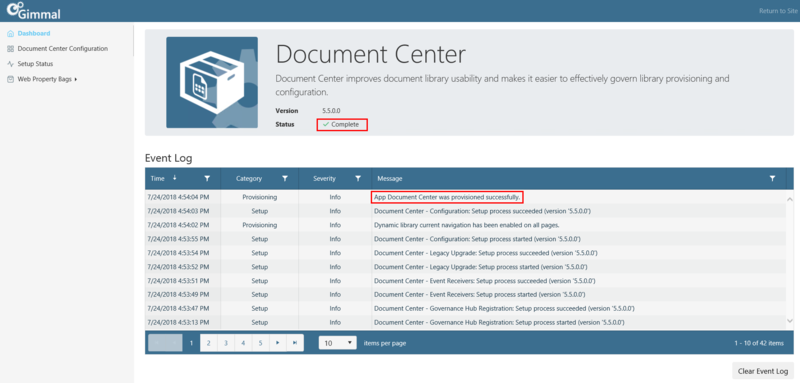
5. Click on the newly installed Document Center app tile to provision the app.
6. Ensure that the App Provisioned successfully message displays under Event Log, and the green checkmark displays next to Status. This could take several minutes.
7. Verify that the Document Center app displays on the Governance Hub Dashboard by following these steps:
-
Navigate to the site where Governance Hub is installed.
-
Select Settings > Site Settings to display the Site Settings page.
-
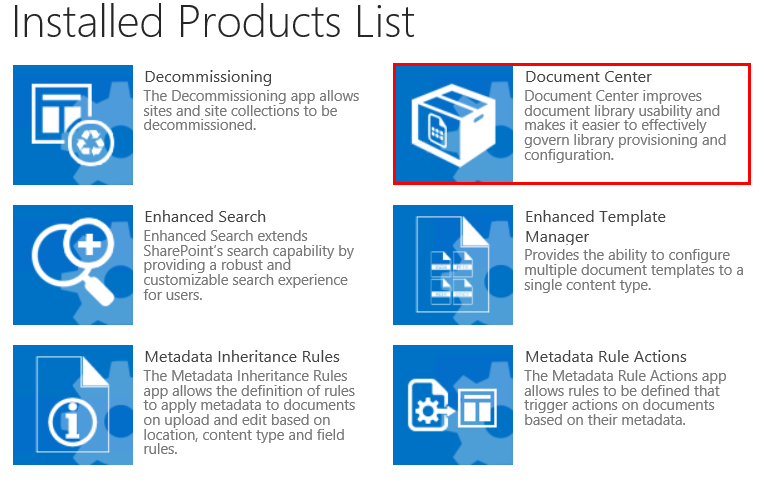
Under the Site Administration section, click Governance Hub. The Governance Hub Dashboard displays.
-
Verify the Document Center tile displays on this page, as shown in the following figure.
Document Center Configuration
This section provides information about how to configure Document Center in a SharePoint 2013/2016 environment. Each task is described in the topics located in this Help section.
Applying, Configuring, & Understanding Document Center
Applying Document Center Global Settings in Governance Hub
When you configure Document Center's global settings in Governance Hub, these settings will be inherited automatically by any site where you add Document Center. To configure Document Center settings for local sites, see Configuring Settings for Local Sites below on this page. To configure Document Center global settings in Governance Hub, follow these steps:
-
On the site where Governance Hub is deployed, navigate to Settings > Site Settings > Governance Hub. The Governance Hub Dashboard displays.
-
On the Dashboard, select the Document Center tile. The Document Center configuration page displays.

3. In the Global Configuration section, click the Open menu (…) next to the Global Configuration Group* you want to edit, and then click Edit Global Settings. The Document Center Settings page displays (click image to enlarge).
For more information on Global Configuration Groups, see the Governance Hub section in this Help.
4. Edit your Document Center settings as desired. The available options are described below.
Document Center
This section enables you to set configurable behavior for Document Center. The configurable items include:
-
Use Library Navigation on all pages (default is checked) – Determines whether the Library Navigation web part is displayed in the Quick Launch area of each page in the site.
-
Library Creation URL (default is blank) – The host-site-relative URL for a subsite of the host site. If a value is entered, Document Center restricts library creation to the specified subsite only. (Also see Restricted Mode (Link).)
The Library Creation URL value must be a relative URL from the host site. If Document Center was installed in /sites/DocumentCenterand you have a subsite at /sites/DocumentCenter/Subsite, this Library Creation URL value should be /Subsite.
Library View Web Parts
This section enables you to set the configurable behavior for the Library Tile View web part. The configurable items include:
-
Max Content Type Display (default is 5) – Enables you to set the maximum number of Content Types that display in the Library Tile View. If you select zero, no content types will display.
-
Enable Drop Zone Integration – When checked, the library tile becomes a configurable Drop Zone. Note: This requires Gimmal's Drop Zone* to be added to the site.
Gimmal's Drop Zone application extends SharePoint's drag-and-drop file upload capabilities by providing a configurable Drop Zone web part that converts a normal page into a drag-and-drop conduit to upload documents to a library. To enable a Drop Zone hotspot, click the Settings icon on a Library View web part. Only users with full control permissions are able to configure Drop Zone settings. For more information on Drop Zone, see Configuring Drop Zone (link) in this Help.
Library Configuration
This section outlines the settings that are used for persistent and global library governance.
-
Allow Management of Content Types – If checked, libraries will be configured to allow management of content types.
-
Associated Content Types – Specify which content types are associated with a library by using the Add and Remove buttons.
To select content types here, "Allow Management of Content Types" must be checked.
-
Allow Additional Content Types – If checked, users with appropriate permission can add additional content types to libraries in the host site. If unchecked, only content types specified in the Associated Content Types field are allowed in the library; users may not add additional content types to the library, and all other content types are removed.
-
Content Approval – If checked, new items or changes to existing items will remain in a draft state until they have been approved.
-
Document Version History – Specify whether a version is created each time a document is edited in this document library.
-
Draft Item Security – Specify which users should be able to view drafts (minor versions or items awaiting content approval) in this document library.
-
Folders – If checked, the New Folder command will be available in this library. Existing folders are not affected.
-
Navigation – Specify whether a link to this document library appears in the Quick Launch navigation menu. The link only appears if Quick Launch is enabled for navigation on this site.
Document Center settings configured in the Governance Hub are applied to the Document Center app in each host site. If you want to allow users to change Document Center settings locally in the host site, choose "Overrideable" next to the desired configuration setting. If you do not want users to change a setting locally, choose "Non-Overrideable" next to the setting.
5. Click Save to save your settings.
Changes made to the Document Center global settings will not be reflected automatically in the existing document libraries. There is a back-end job that will implement the settings, but it may take several minutes before those changes are made.
6. To publish the settings immediately, select the appropriate Global Configuration Group from the Document Center configuration page in the Governance Hub. Under the Actions column, click the ellipsis menu (…), and then select Publish Global Configuration.
Configure Document Center Settings for Local Sites
You can configure Document Center settings individually for local sites so that they don't inherit the global settings described in the previous section.To configure these settings locally, you can access them via the Governance Hub, if you have access to it, or you can access the local settings from the Gimmal Software Configuration page, which is available from each site where Document Center is installed. The following sections provide steps for configuring the local settings from both locations.
Configuring Local Settings from the Governance Hub
-
On the site where Governance Hub is deployed, navigate to Settings > Site Settings > Governance Hub. The Governance Hub Dashboard displays.
-
On the Dashboard, select the Document Center tile. The Document Center configuration page displays.
-
In the Installed Locations section, click the Open menu (...) next to the site where Document Center is installed, and then select Edit Local Settings. The Edit Local Settings page displays.
-
Edit your Document Center settings as desired, and then click Save. For descriptions of each setting, see the previous section.
Configuring Local Settings from the Installed Location(s)
If you do not have access to the Governance Hub, you must configure your local settings from the Gimmal Software Configuration page. The Gimmal Software Configuration page is a local dashboard that lists all of the products installed on a local site. Local settings apply only to the current site. If you want to apply settings to multiple sites, apply the settings globally and publish them to the local sites.
-
Navigate to the site where Document Center is deployed.
-
Select Settings > Site Settings. The Site Settings page displays.
-
Under the Site Administration section, click Gimmal Software Configuration. The Installed Products List page displays, showing a Document Center tile.
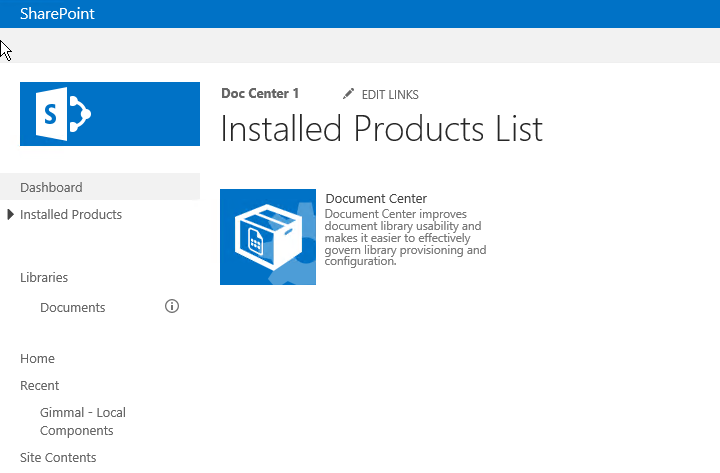
4. Click the Document Center tile. The Document Center local configuration page displays.
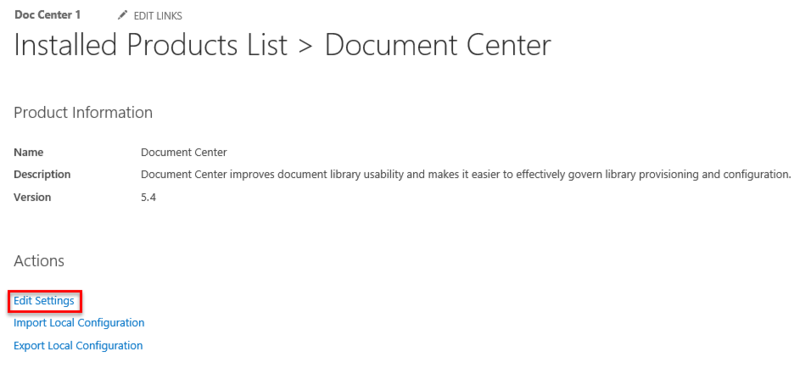
5. Click Edit Settings. The Document Center Edit Settings page displays.
6. Edit your Document Center settings as desired, and then click Save. For descriptions of each setting, see the previous section.
Understanding Document Center Operational Modes
Document Center has two operational modes that dictate certain behaviors. The two modes are "Open" and "Restricted". The operational mode is determined by whether the Library Creation URL is blank (Open mode) or contains a URL (Restricted mode) to a subsite of the Document Center's host site. By default, Document Center operates in Open mode. The table below describe Document Center's behavior in each mode.
|
Mode |
Library Creation Behavior |
Web Part Behavior |
|
Open (default) |
Libraries can be created in the root site and any subsite. |
Displays information about libraries that are in the same site as the page that web parts are on. |
|
Restricted |
Libraries can be created only in the subsite specified in the Library Creation URL property, located on the Document Center Global Settings dialog. |
Displays information about libraries that are in the subsite specified in the Library Creation URL property, regardless of what site the page is in. |
Configuring Web Parts
You can use the Library Tile View and the Library List Navigation web parts in conjunction with each other on a given page. These web parts can be added to a page anywhere in the host site or any of its subsites. The two web parts each retrieve and display library information from the same location. However, the location from which the web parts get that information depends on the Document Center's operational mode. See the table above for information on operational modes. To configure the Document Center Web Parts, perform the following tasks:
-
Add Document Center Web Parts to a page
-
Edit the Library Tiles View Web Part
-
Edit the Library List Navigation Web Part
You can only add a library to the left navigation pane once.Document Center only supports a single Document Center Tile web part per page.
Adding Document Center Web Parts to a Page
Document Center only supports a single Document Center Tile web part per page.
-
Navigate to the desired page.
-
Edit the page.
-
Select the Insert tab from the ribbon bar menu.
-
Click Web Part.
-
Select the Gimmal folder from the Categories list.
-
Select the Document Center – Library Tiles web part from the Parts list.
-
Click Add.
-
Repeat steps 6 and 7 for the Document Center - Library List Navigation web part only if the Use Library Navigation on App Pages field is not checked in Global Settings.
If the Use Library Navigation on App Pages field is checked on the Global Settings page, then it is not necessary to add the Document Center - Library List Navigation web part manually.
-
Save the changes to the page.
Editing the Library Tiles View Web Part
Document Center only supports a single Document Center Tile web part per page.
-
Navigate to the page that contains the web parts.
-
Edit the page.
-
Perform the following actions, as needed:
-
Reorder the library list – Drag a library to a different position in the list. This also reorders the library's tile position in the Library Tile View web part.
-
Move a library to the Excluded Libraries list – Click Hide Library Tile to hide a library tile. This hides the library from the Library List Navigation web part and Library Tile View web part when saved. Click Unhide Library Tile to unhide the tile.
The Drop Off Library is now part of the Document Center Excluded Libraries list and no longer receives Document Center settings.
-
-
Click the Save icon in the upper right corner of the Library List Navigation tile to save changes to the web part.
-
Click Save on the ribbon bar menu to save changes to the page.
Editing the Library List Navigation Web Part
-
Navigate to the page that contains the web parts.
-
Edit the page.
-
Click the edit icon (). The web part is in edit mode.
-
Perform the following actions, as needed:
-
Reorder the library list – Drag a library to a different position in the list. This also reorders the library's tile position in the Library Tile View web part.
-
Move a library to the Excluded Libraries list – Click the exclude icon next to the library name. This hides the library from the Library List Navigation web part and Library Tile View web part when saved.
-
The Drop Off Library is now part of the Document Center Excluded Libraries list and no longer receives Document Center settings.
-
-
Add a library to the Libraries list – Click the include icon next to the library name. This shows the library in the Library List Navigation web part and Library Tile View web part when saved.
-
-
Click the save icon in the upper right corner of the Library List Navigation web part to save changes to the web part.
-
Click Save on the ribbon bar menu to save changes to the page.