
Overview
This guide provides step-by-step instructions for configuring SharePoint Online sites and document libraries to work with the SharePoint Online Connector (SPOC) for records management. After completing the installation and Azure AD setup from the previous guides, you’ll configure which sites and libraries the connector monitors and how documents are classified and managed.
Prerequisites: Before proceeding, ensure you have completed:
-
SharePoint Online Connector Installation (on-premise installation only)
Site Registration Overview
What is Site Registration?
Site registration is the process of configuring SPOC to manage SharePoint Online sites for use with Gimmal Records. Once a site is registered, Gimmal Records can do the following for the site:
-
Monitor document libraries for new and modified content
-
Classify documents based on configured rules
-
Apply retention policies and lifecycle management
-
Transfer records between libraries as needed
Register SharePoint Sites
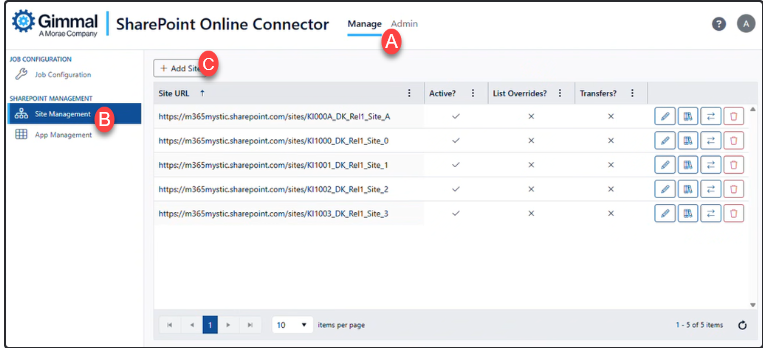
Step 1: Access the Site Management Page
-
Log in to the SharePoint Online Connector Web application
-
URL format: https://<your-spoc-server>/
-
Use your Azure AD credentials or the administrator account
-
-
Navigate to the Sites management page
-
Click the Manage page in the top navigation menu (A)
-
Click the Site Management tab in the left navigation menu (B)
-
Currently registered sites (if any) are listed
-
Step 2: Add Sites
The next step in registering sites is to add the sites you wish to manage to the Site Management page.
Please note: 6.1.1 and 6.2 have different methods of adding sites. If you have a large volume of SharePoint sites, we strongly encourage you to update to 6.2 to add sites for registration via the multi-line text box.
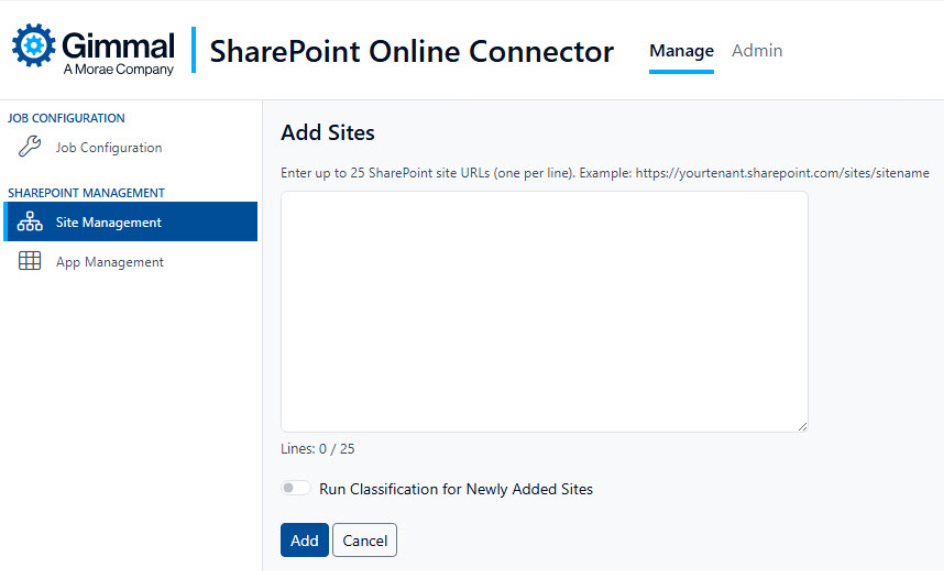
6.2
-
Click the ‘Add Site’ button (C). This opens the ‘Add Sites’ view to register additional sites.
-
Add up to 25 valid unique SharePoint URLs at a time into the text box, one per line. If you have more than 25 URLs to add at a given time, split the list and register sides 25 URLs at a time.
-
Configure registration options:
-
Run Classification for Newly Added Sites: (Optional) Enable this option to begin the full crawl of the site contents once it is added for registration
-
Click ‘Add’ to complete the process. A spinner will appear while registration is in progress. This can take some time.
-
-
Once the registration is complete, the interface will be updated with a message listing the count of successful items.
Note: If there are are any issues registering a sites, error messages will be listed.
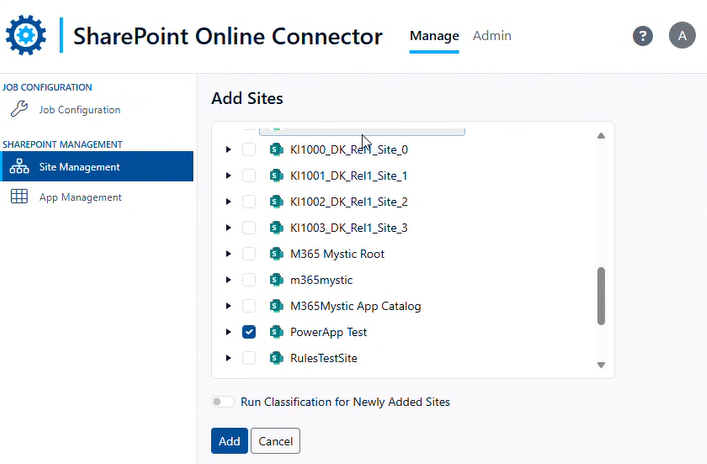
6.1.1
-
Click the ‘Add Site’ button (C). This opens the ‘Add Sites’ view to register additional sites.
-
Browse the SharePoint site hierarchy listed on the page
-
Sites are displayed in a tree structure
-
Expand nodes to see subsites
-
-
Select sites or subsites that should be registered
-
Check the boxes next to sites you want to register
-
You can register multiple sites at once
-
-
Configure registration options:
-
Run Classification for Newly Added Sites: Enable this option to begin the full crawl of the site contents once it is added for registration
-
-
Click ‘Add’ to complete the process
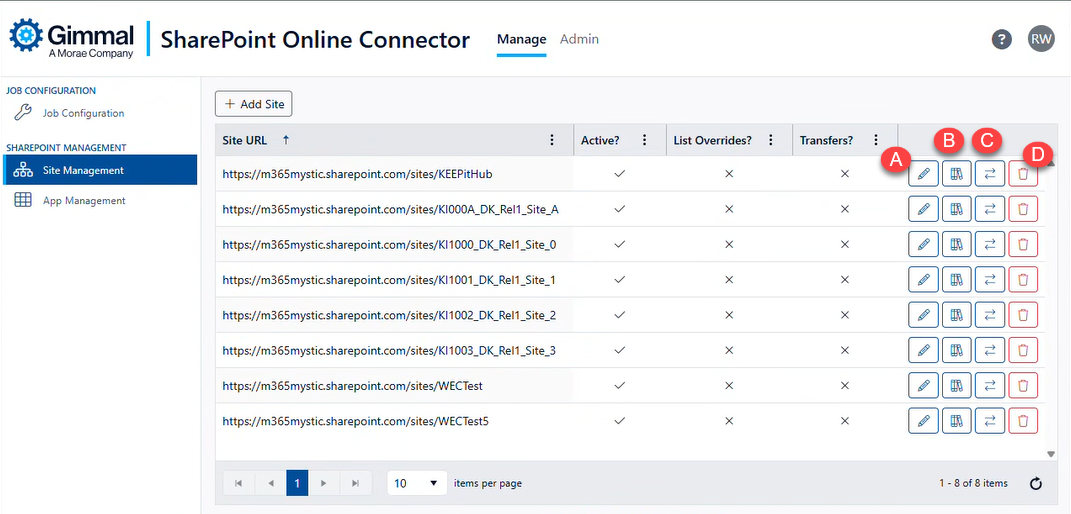
Step 3: Verify Registration
After registration, the site appears in the Site Management list with the following information:
|
Column |
Description |
|
Site URL |
The SharePoint site URL |
|
Active? |
Whether the site is currently being monitored |
|
List Overrides? |
Indicates if library-specific configurations exist |
|
Transfers? |
Shows if transfer configurations are defined |
Note: A checkmark indicates the option is enabled, an X indicates it is disabled.
Site Option Action Buttons
-
Edit: Allows changes to the activation state of the current site registration (A)
-
Crawled Libraries: Configure and edit crawled libraries for the listed site (B)
-
Transfers: Edit transfer configurations for the listed site (C)
-
Delete - Unregisters the listed site (D)