
Gimmal Physical supports the creation and management of an overall Retention Schedule (also known as a File Plan) consisting of an unlimited number of time or event-based records series. When associated to records, these record series determine the eligible disposition date.
Reminder
The actual field, tab and action button names can be configured per organization and may vary from those shown in the examples. Common names include Record Schedule, Record Series or Retention Schedule.
Our example uses the name ‘Records Schedule’.
Creating a Record Schedule
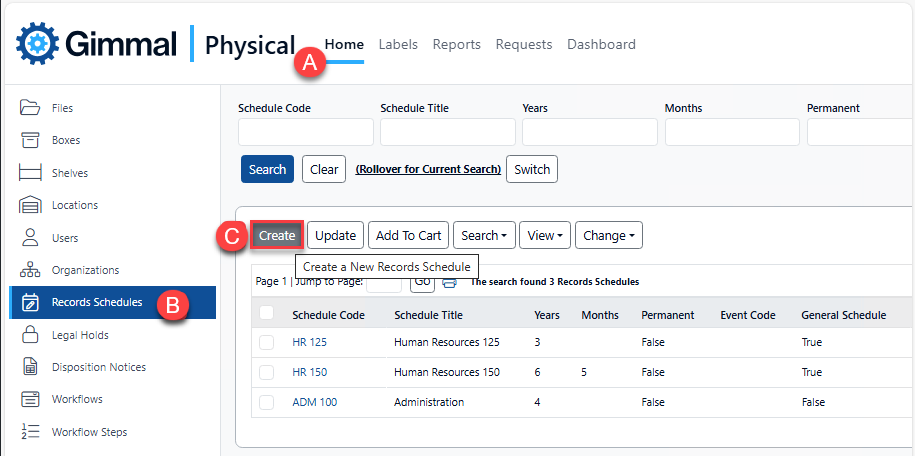
To create a new Record Schedule in Gimmal Physical,
-
Choose Home on the Navigation Menu (A)
-
Click on the Records Schedule item type tab (B)
-
Select the ‘Create' Action button (C).
In this example, the application has been configured to call this tab 'Records Schedule’.
The Create Records Schedule screen opens, allowing for the entry of various metadata defining the schedule.
-
Cancel closes the form without saving any changes.
-
Set Defaults saves the currently entered values as defaults for any new record.
-
Save & Close will save all fields and close the form, returning to the home page.
-
Save & View will save all fields and go to the View page for the item.
-
Save & New will save all fields for this item and remain on the page to create a new item.
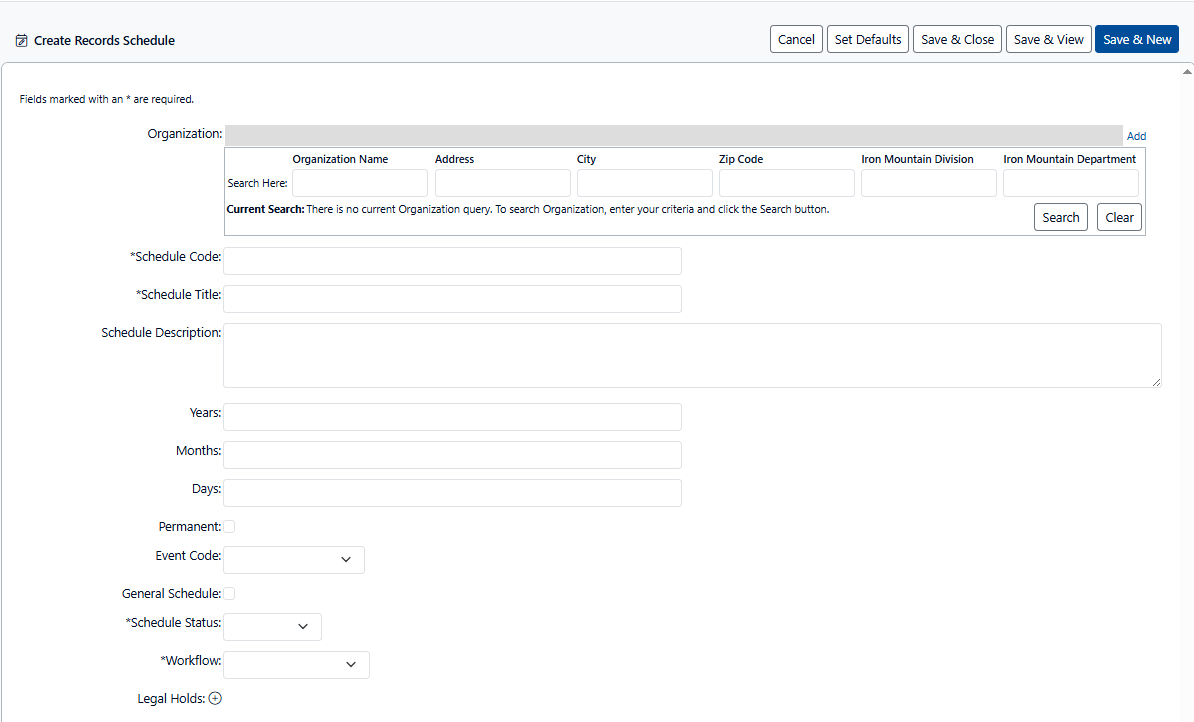
The fields which are shown reflect the specific configuration of your organization and the types of retention schedules enabled in your organization. However, some general notes:
-
The fields marked with an asterisk (*) are required.
-
For disposition approval of records associated to a specific schedule, a workflow must be created for that schedule.
-
Records must be associated with an active retention schedule for automated disposition calculations to take place. See Schedule Disposition Guide for more details.
-
Similar to all item types, an unlimited number of Retention Schedules may be created.
After entering the data to define the schedule, save the Retention Schedule.
Updating a Records Schedule
To update an existing retention schedule:
-
Select the retention schedule you wish to update using the selection box in the first column of the screen.
-
Click the ‘Update’ button. The update screen will open allowing you to edit existing values if your permissions allow.
Applying a Records Schedule
To apply a retention schedule to a record via the user interface:
-
Select the desired data item tab (e.g. Boxes).
-
Query the record that should have the schedule applied
-
Select ‘Update’ to open the update screen for the record..
-
Search for and select the appropriate record schedule
-
Click the radio button to apply
-
Click the Update button to save the changes to the record.