
Gimmal Physical supports both the deletion (flagging a record as deleted in the application) and expunging (removing it from the application completely) of a data record. Deleting a record removes the record from processing, viewing, and retention, but keeps the record in the application, in a ‘deleted’ state. It provides for the future reinstatement of the same record if necessary. Additionally, depending upon the security configuration for a given role, deleted records may still be queried (they appear italicized in the Home Page Grid) and viewed.
Expunging completely removes the record from the application and will no longer be available for any additional action.
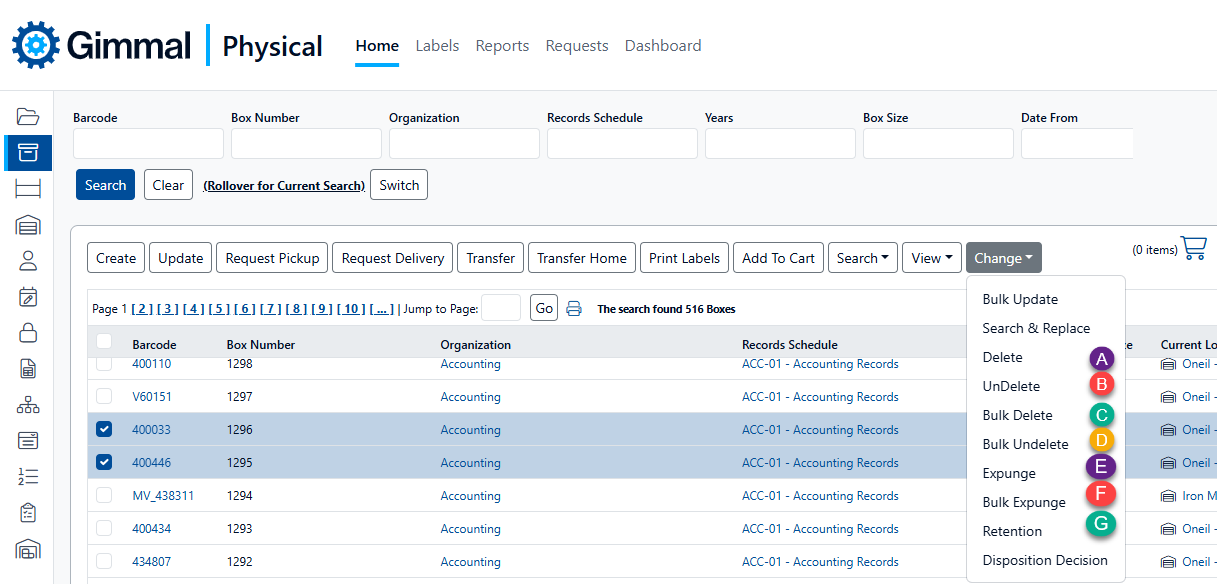
The location of the Delete options is configurable by the system administrator. They may appear as their own button or under another Action Button.
Deleting Records
Delete a Single Record
Only one record at a time can be deleted using the Delete option. Bulk Delete can be used for deleting multiple records.
To delete a single item in Gimmal Physical:
-
Find the desired items by using one of the search options.
-
Select the item you wish to delete.
-
Choose the Delete option from the ‘Change’ action button (A).
-
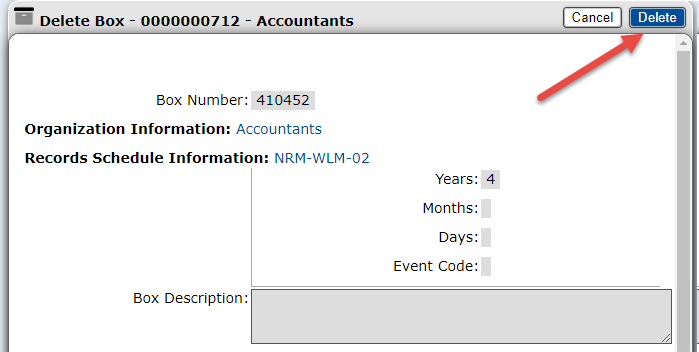
The Delete screen will open for review of the item to be deleted.
-
Click the ‘Delete’ button on the Delete screen to complete the deletion.
Bulk Delete
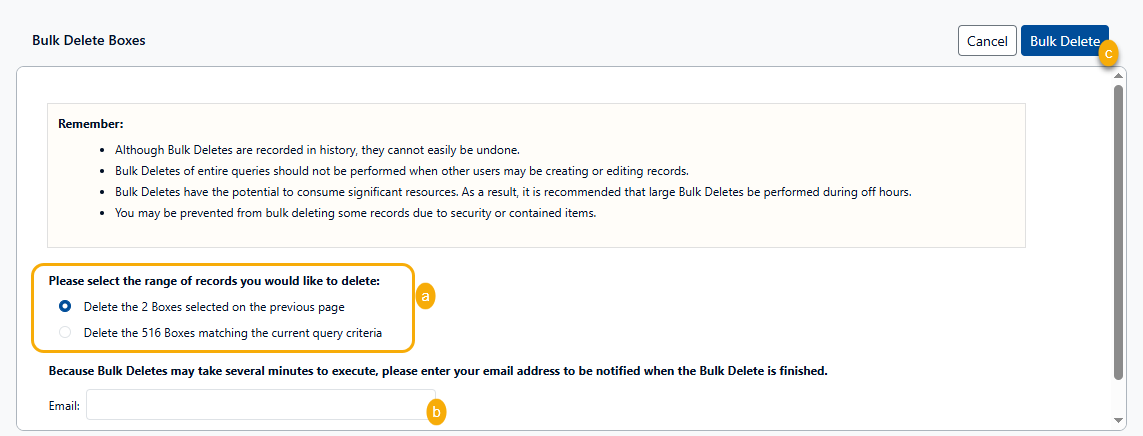
The Bulk Delete action is designed to delete multiple records at once. (C)
-
Find the desired items by using one of the search options.
-
Select the items you wish to delete.
-
Select Bulk Delete from the menu (C). This opens the Bulk Delete screen (see screenshot below)
-
Choose whether to delete all the items in the current query or just the ones that were selected. (a)
-
Optionally, enter an email address to receive a notification that the bulk delete has completed. (b)
-
Click the ‘Bulk Delete’ button to begin the bulk delete process. (c)
Use ‘Bulk Delete’ with care. Although items can be restored, it is a many-step process.
Restoring Deleted Records
Deleted records are still viewable in the application (displayed in red, italicized text), and can be restored. Users with the appropriate permissions for the item type can Undelete and Bulk Undelete deleted records.
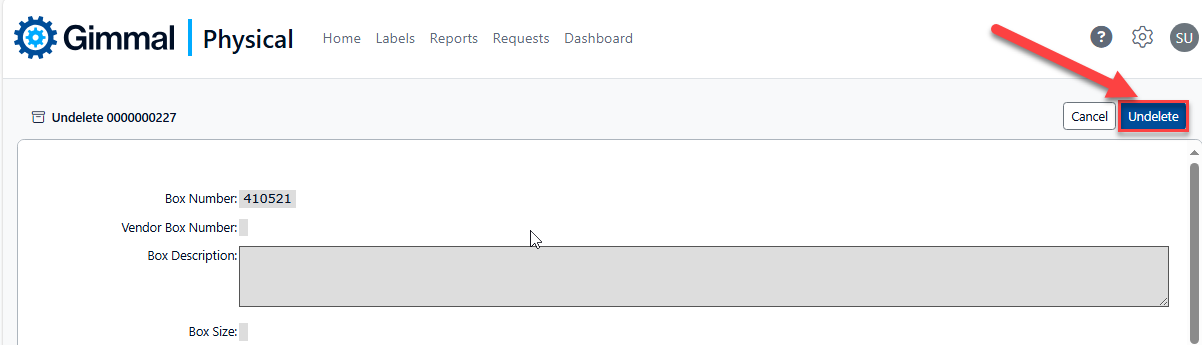
Undelete a Single Record
-
Find the desired item by using one of the search options.
-
Select the item you wish to undelete.
-
Choose the UnDelete option from the ‘Change’ action button (B).
-
The UnDelete screen will open for review of the item to be deleted.
-
Click the ‘Undelete’ button on the Undelete screen to complete the reversal of the deletion.
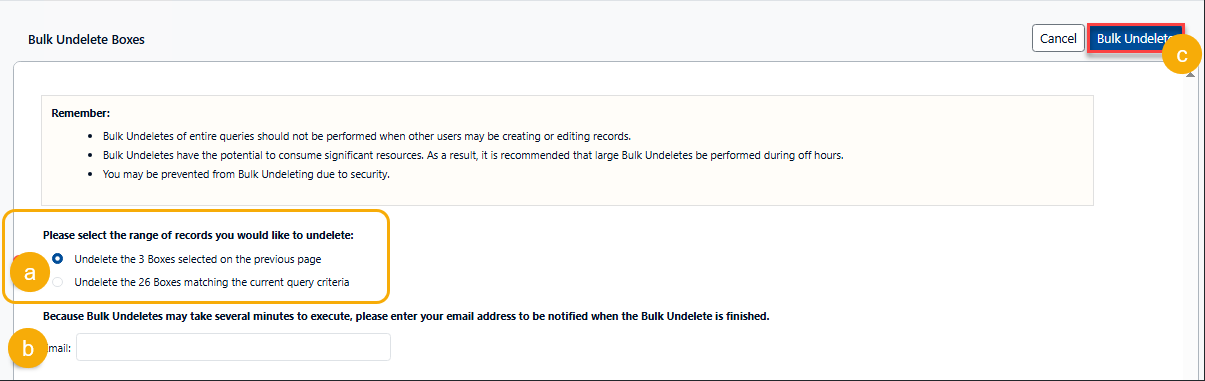
Bulk Undelete
The Bulk Undelete action is designed to delete multiple records at once. (D)
-
Find the desired items by using one of the search options.
-
Select the items you wish to delete.
-
Select Bulk Delete from the menu (D). This opens the Bulk Delete screen (see screenshot below)
-
Choose whether to delete all the items in the current query or just the ones that were selected. (a)
-
Optionally, enter an email address to receive a notification that the bulk delete has completed. (b)
-
Click the ‘Bulk Delete’ button to begin the bulk delete process. (c)
Expunge
Deleted records can still be viewed in the application (displayed in red, italicized text) and can be undeleted. However, expunged records are removed from the application permanently. There is no undo capability once a record has been expunged. Only users with the appropriate permissions for the item type can Expunge and Bulk Expunge records.
Use the Expunge option with care. Once the expunge has been completed, these records cannot be restored from within Gimmal Physical.
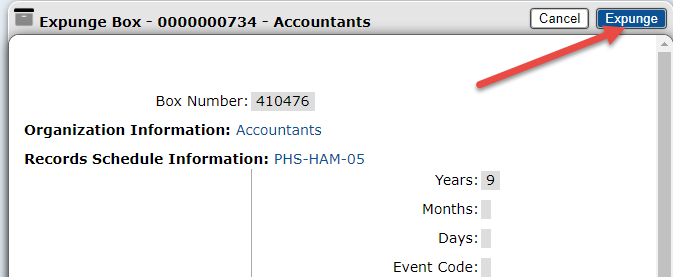
Expunge a Single Item
-
Find the desired item by using one of the search options.
-
Choose the Expunge option from the ‘Change’ action button (E).
-
The Expunge Item screen will open for review of the item to be deleted.
-
Click the ‘Expunge ’ button on the Expunge Item screen to complete the deletion.
Only one record at a time can be deleted using the Expunge option. Bulk Expunge (see below) can be used for expunging multiple records.
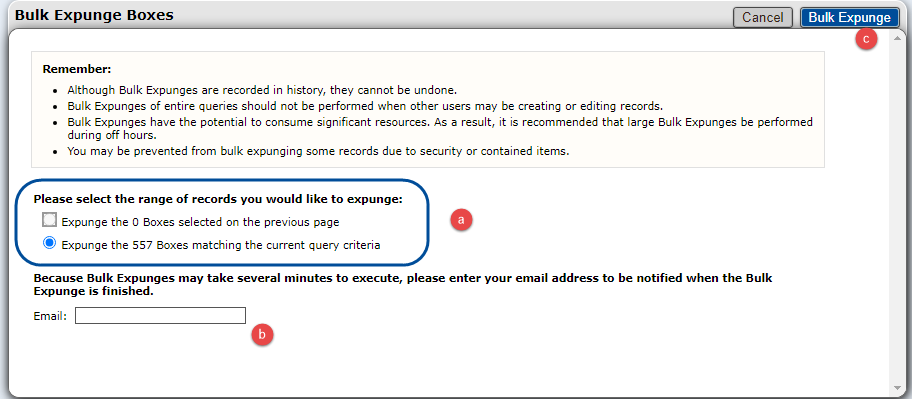
Bulk Expunge
Bulk expunge allows users with the appropriate permissions to permanently remove multiple records at once. To expunge an item in Gimmal Physical:
-
Find the desired items by using one of the search options.
-
Select Bulk Expunge from the menu (F). This opens the Bulk Expunge screen (see screenshot below).
-
Choose whether to Bulk Expunge all the items in the current query, or just the ones that were selected. (a)
-
Enter an email address where to receive a notification that the bulk expunge has completed. (b)
-
Click the ‘Bulk Expunge’ button to begin the bulk expunge process. (c)
Please review the Disposition in Gimmal Physical for information related to retention, disposition, and automated deletions. (G)