
This document describes what settings and permissions the Discover EWS Agent requires to successfully communicate with and manage mailboxes and archives in Exchange Online or On-Premises. If you are connecting to Microsoft 365 using Modern Authentication (OAuth), please refer to the configuration steps outlined in the guide: OAuth Configuration Guide
Before getting started, you will need to obtain the following information:
-
The URL to the PowerShell interface on the Exchange Service it should look something like one of the examples below:
For Exchange Online: https://outlook.office365.com/EWS/Exchange.asmx
For Exchange 2016/2019 On-Premises: https://[Exchange Server]/powershell| (where [Exchange Server] is the fully qualified domain name of the Exchange Server machine)
-
The Entra Client & Tenant ID
-
An Entra certificate file and the associated password
Supply these settings when you install the Discover EWS Agent.
Note: Please use the steps outlined below if you would like to verify the Agent configuration before entering it into the Discover EWS Agent or if you run into any errors with the Agent accessing mailboxes.
Section 1: PowerShell Setup/Access
The steps in this section are optional, but can be useful in determining if the Agent server is able to communicate with Microsoft Exchange successfully.
Begin by logging into the machine where the Discover Connector and EWS Agent are installed. We recommend logging in using the same account credentials that the EWS Agent service is registered with. After logging in, launch a Windows PowerShell session (note that this process may need to be performed with both 32 and 64-bit versions of PowerShell). Then enter the command that permits this server to issue remote PowerShell calls:
Set-ExecutionPolicy Unrestricted
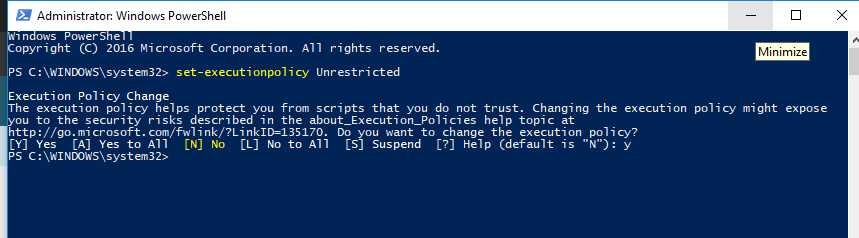
After entering the command, PowerShell prompts you to confirm the setting. Type the letter Y to complete the command. This server now has permission to issue PowerShell commands to a remote server – in this case, either the Exchange 2016/2019 on-premise or Office 365.
Manually Validating A PowerShell Connection
The Discover EWS Agent is designed to query Exchange via PowerShell in order to obtain a list of valid mailbox Data Targets. For troubleshooting purposes, it is sometimes helpful to issue the appropriate PowerShell commands manually in order to identify any permissions-related issues.
The steps for performing a manual query are listed below for the oAuth (Modern) authentication method.
Note: The PowerShell commands listed below have been tested with the native 64 Bit PowerShell version included with Microsoft Windows. Downloading a newer standalone PowerShell version may not provide the same results.
Using oAuth (Modern) Authentication
The three PowerShell commands shown below are issued by the EWS Agent when it attempts to obtain a list of Microsoft 365 mailboxes using oAuth (Modern) authentication. To manually run these commands in a PowerShell session, replace the values in { } with the appropriate values for your environment:
When entering the environment specific information shown with { } below, be sure to use single quotes as shown.
$Secure_String_Pwd = ConvertTo-SecureString ‘{CERTIFICATE PASSWORD}’ -AsPlainText -Force
Connect-ExchangeOnline -CertificateFilePath ‘{FULL PATH TO APP REGISTRATION CERTIFICATE}’ -CertificatePassword $Secure_String_Pwd -AppID ‘{Entra APPLICATION (CLIENT) ID}’ -Organization ‘{Entra TENANT ID}’
get-mailbox -ResultSize unlimited | fl UserPrincipalName,PrimarySmtpAddress,ServerName,Database
Section 2: Exchange Online and Entra AD Permissions:
Credential Configuration
To access and enable the Agent authentication fields, perform the following steps on the server where the EWS Agent Service is running:
-
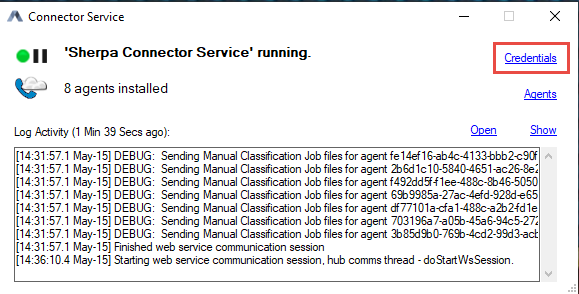
Double-click on the Connector Status Tool application shortcut on the desktop. If the shortcut does not exist, this utility may be found here:
C:\Program Files (x86)\Sherpa Software\Sherpa Connector\ SherpaConnectorStatus.exe

Once the application is open, click on the 'Credentials' link in the status tool window:
Configure the EWS tab for oAuth:
-
Check the 'Use Azure Registration Credentials' box, this will disable the Basic Authentication fields and enable OAuth Authentication. The fields listed in the screenshots below will need to be filled out with the IDs obtained during the App Registration process.
-
For the tenant ID you will need to input the company domain from Entra (e.g. gimmal.onmicrosoft.com), then copy/paste the client ID into their respective fields.
-
Click on the browse button to navigate to the folder path where the certificate file is stored. Please note that this cert file has an extension of (.pfx), NOT (.cer).
-
Lastly please enter the password which was assigned to the certificate at the time of creation and click SAVE to exit the window.

The EWS agent may also be used to obtain a list of Data Owners from Entra AD. If you plan to use this feature, please complete the additional configuration steps described in Entra AD Certificate Installation
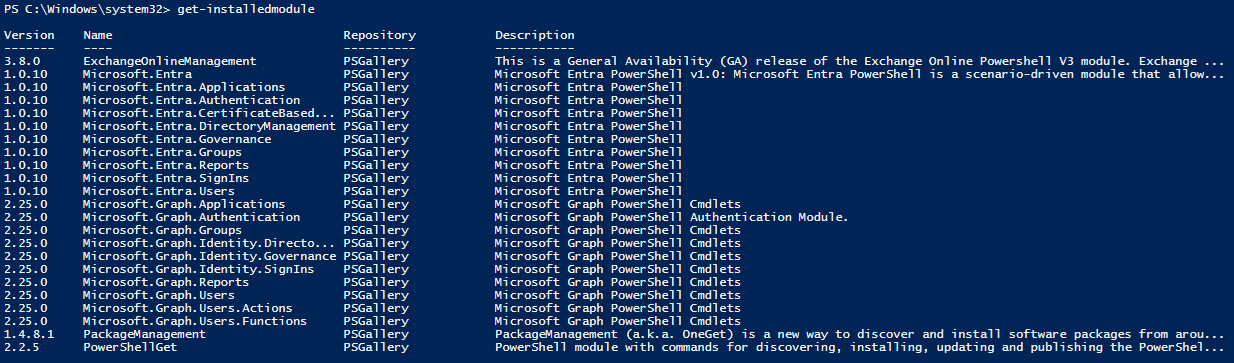
Verify that the Required PowerShell Modules are Installed
The remote PowerShell commands issued by Discover require these modules to be installed on the Agent server:
-
Microsoft.Entra
-
PowerShellGet
-
ExchangeOnlineManagement (version 3.4.0 or above required)
-
PackageManagement
You can determine what modules are installed by launching a PowerShell session and issuing the command get-installedmodule as shown below:
If you do not have all of the required modules, they can be installed by issuing the commands listed below in a PowerShell session. If you encounter an error, please verify the version of TLS as described in Appendix A.
-
Install-Module -Name Microsoft.Entra -AllowClobber
-
Install-Module -Name PowerShellGet -allowclobber
-
Install-Module -Name ExchangeOnlineManagement
-
Install-Module -Name PackageManagement (note: this module may be installed automatically)
Appendix A: TLS Configuration
If the connector server is running an older version of Microsoft Windows (2010 R2 or lower) it may not have the required support for TLS1.2. This Microsoft link provides more details on TLS dependencies and adding TLS support to older versions of Microsoft Windows:
https://docs.microsoft.com/en-us/security/engineering/solving-tls1-problem
The versions of TLS currently installed on the server can be verified using this PowerShell command:
[Net.ServicePointManager]::SecurityProtocol
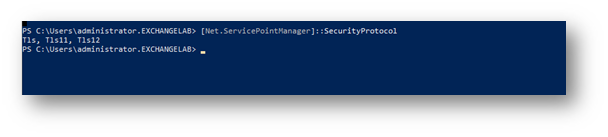
If TLs12 is not shown in the list, it will need to be installed on this server using one of these Microsoft methods. Option 2 (below) is the preferred method since it adds Tls12 to the whole system, where option 1 only persists for the current PS session.
-
Modify the script in question to include the following: [System.Net.ServicePointManager]::SecurityProtocol = [System.Net.SecurityProtocolType]::Tls12;
-
Add a system-wide registry key (e.g. via group policy) to any machine that needs to make TLS 1.2 connections from a .NET app. This will cause .NET to use the "System Default" TLS versions which adds TLS 1.2 as an available protocol AND it will allow the scripts to use future TLS Versions when the OS supports them. (e.g. TLS 1.3). Registry keys are shown for both 64 and 32 bit systems:
reg add HKLM\SOFTWARE\Microsoft\.NETFramework\v4.0.30319 /v SystemDefaultTlsVersions /t REG_DWORD /d 1 /f /reg:64
reg add HKLM\SOFTWARE\Microsoft\.NETFramework\v4.0.30319 /v SystemDefaultTlsVersions /t REG_DWORD /d 1 /f /reg:32