
Introduction
OAuth authentication, or what Microsoft calls 'Modern Authentication,' is a method of identity management that offers more secure authentication and authorization for users and applications. It is replacing 'Basic Authentication,' an authentication method that Discover Agents utilized to connect to the Microsoft 365 email, SharePoint, Teams and OneDrive. This guide provides configuration details for Discover customers planning to switch to modern authentication.
oAuth Configuration
Step 1, Self-Signed Certificate Creation
-
Create a Self-Signed Certificate using the attached PowerShell script (or ask Gimmal support to provide the PowerShell script)
-
Run PowerShell or PowerShell ISE as an Administrator, then navigate and open the provided script file
-
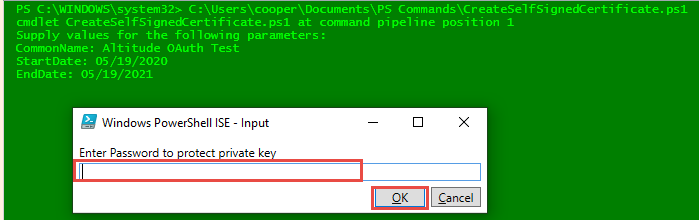
Execute the script; the first prompt will be the Common Name (CN) of the certificate

-
Press Enter to continue; the second and third prompts will be the Start and End (expiration) dates of the certificate

-
Then press Enter again to continue; the fourth prompt will be to assign a password to this certificate, and click OK
-
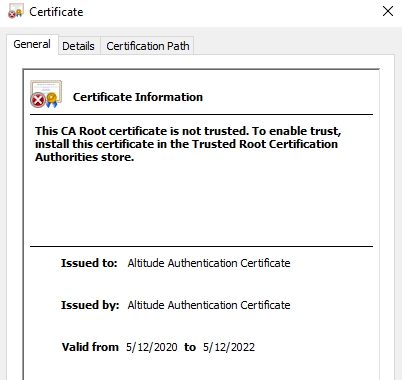
Verify that the certificate has been created and exported to the C:\WINDOWS\SYSTEM32 folder
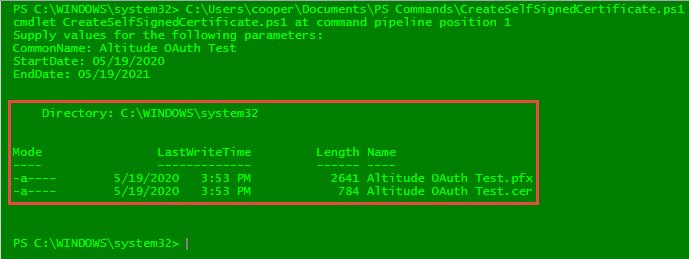
Copy both certificate files to a safe location and make sure you remember the password assigned during their creation. This information will be used during the Entra API registration process in Step 3.
Step 2, App Registration in Microsoft Entra
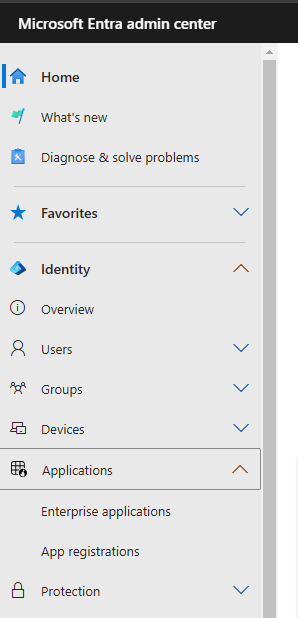
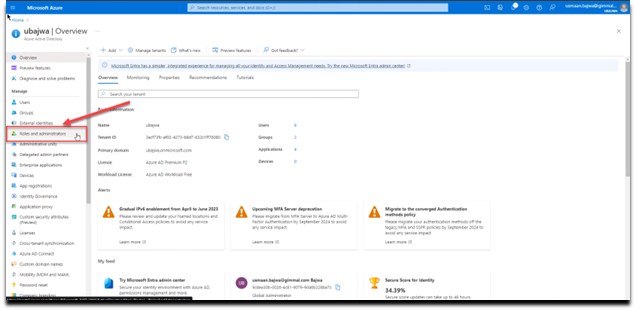
Log in to the Microsoft Entra administration center: https://admin.microsoft.com/#/alladmincenters, and select Microsoft Entra
-
In the left-hand navigation, open Applications and select 'App registrations':
-
Click on the 'New registration' button:

-
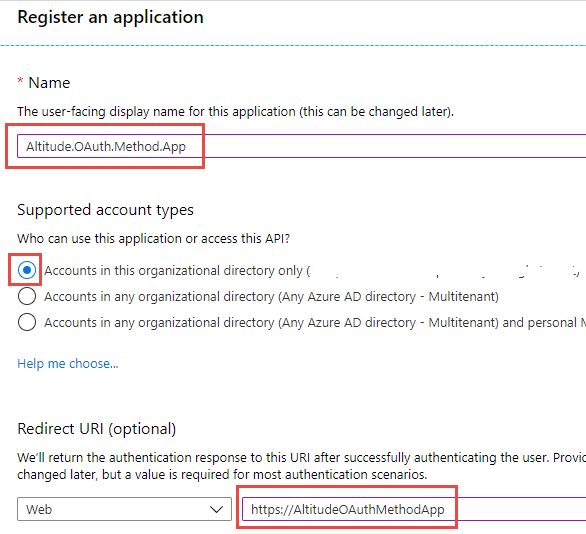
Fill out the Name and Redirect URI fields as shown in the example below (the user-facing display name Altitude.OAuth.Method.App shown below is an example)
-
Click the 'Register' button when finished.
Please make sure to make note of the 'Application (client) ID' and 'Directory (tenant) ID'. The value for the Application (tenant) ID will vary from SharePoint/OneDrive to EWS.
Step 3, OAuth Permissions Setup
The section details the steps that must be taken in the Microsoft Entra administration portal to register the OAuth service, make it available, and assign the appropriate application permissions. Return to App Registrations in the Entra left-hand navigation panel, then click on the name of the application you created in the previous step (i.e., AltitudeOAuthMethod.app)
-
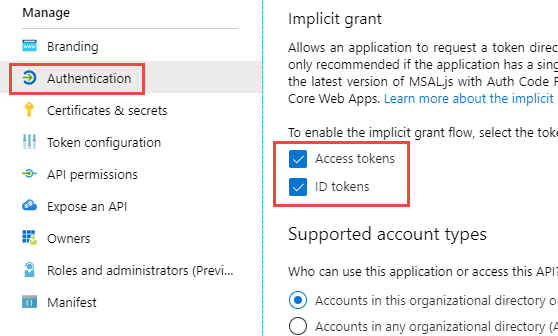
Select 'Authentication' - then checkmark both boxes under the Implicit grant and hybrid flows section:
-
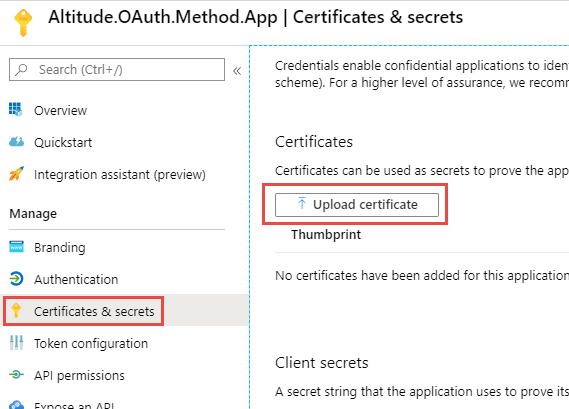
Certificates & secrets - click the 'Upload certificate' button, then navigate to the folder path where the certificate created in Step 1 of this document is stored (look for the file with a .cer extension). Click the Add button to continue:

Step 3.1, Adding SharePoint or OneDrive permissions
-
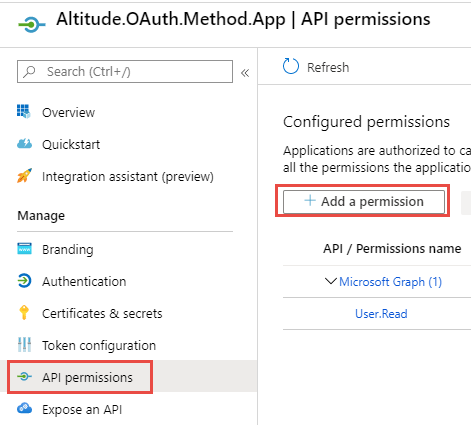
Click on the 'Add a permission' button
-
Scroll down and select 'SharePoint':
-
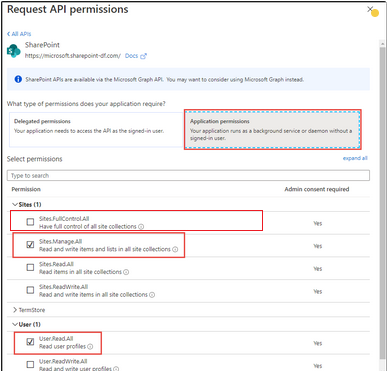
Select the 'Application permissions' option. Then click the down arrows to expand both the 'Sites' and 'User' sections, and select the 'Sites.FullControl.All, 'Sites.Manage.All' and 'User.Read.All' checkboxes.
-
Click the 'Add permissions' button to finish
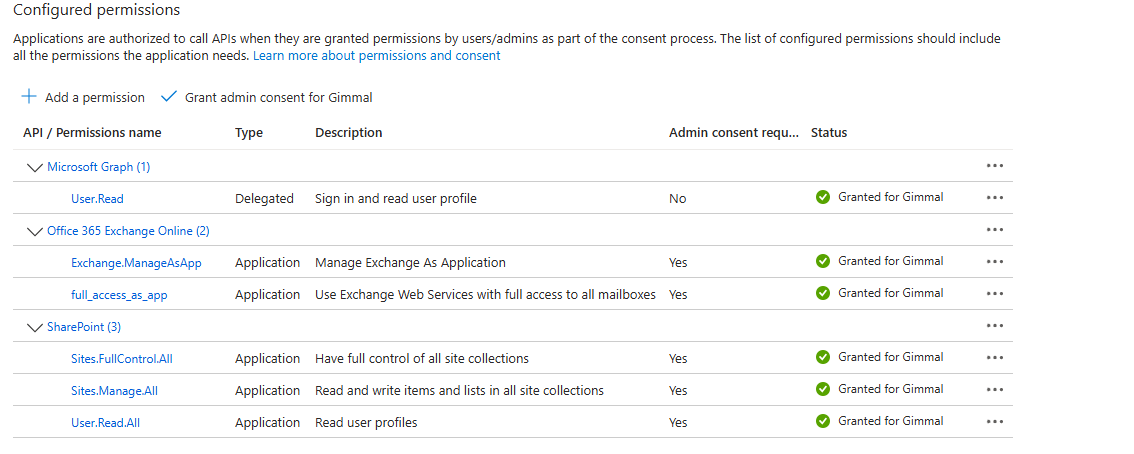
The SharePoint/OneDrive permissions should resemble those shown in the screenshot below:
Step 3.2, Adding Exchange permissions
-
Click on the 'Add a permission' button
-
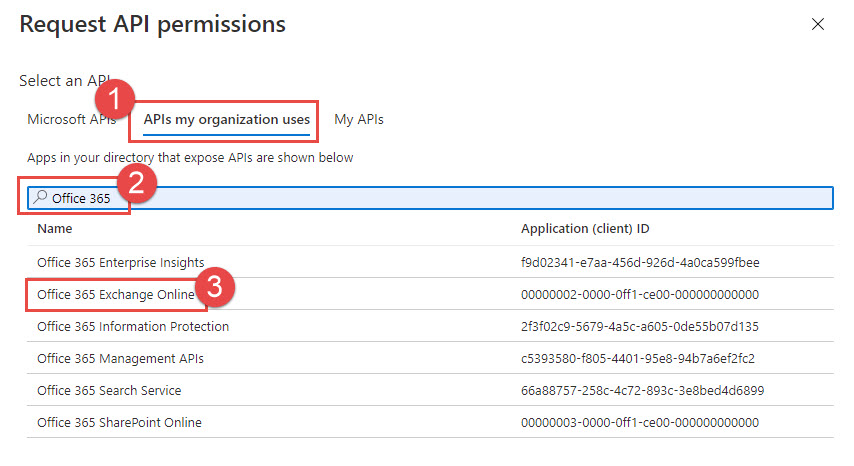
Follow the three steps outlined in red on the diagram below:
1. 'Click on 'APIs my organization uses.
2. Type 'Office 365' in the search bar and hit Enter.
3. Click on the 'Office 365 Exchange Online' option.
-
Select the 'Application permissions' option and select the 'full_access_as_app' and 'Exchange.ManageAsApp' checkboxes.
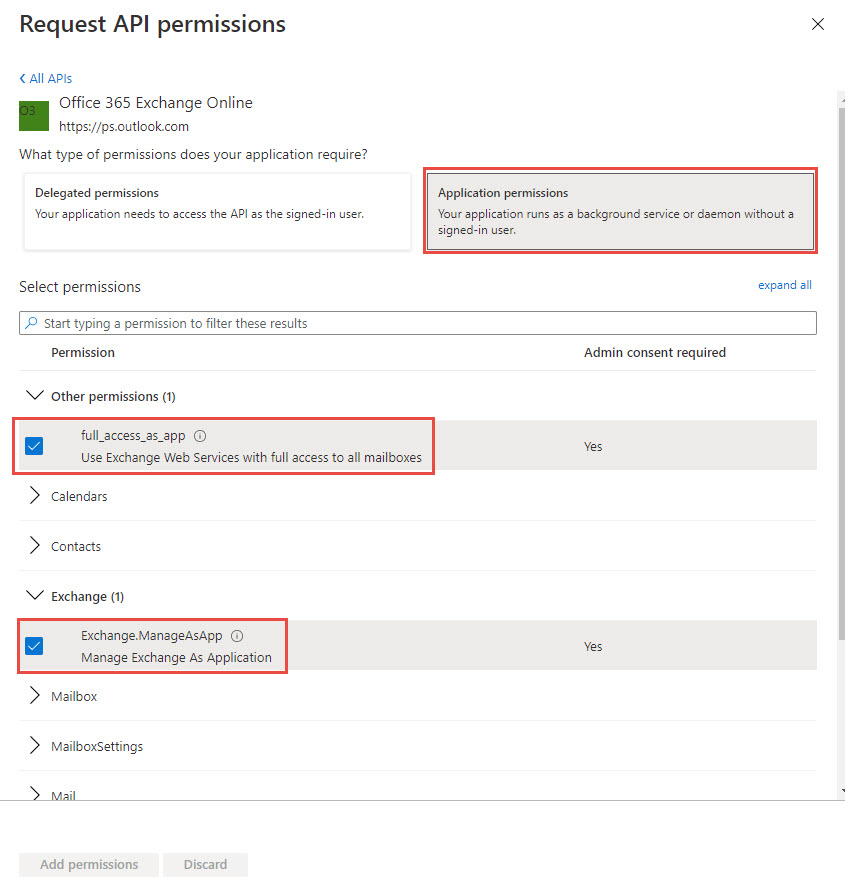
-
Click the 'Add permissions' button

The Exchange permissions should resemble this:
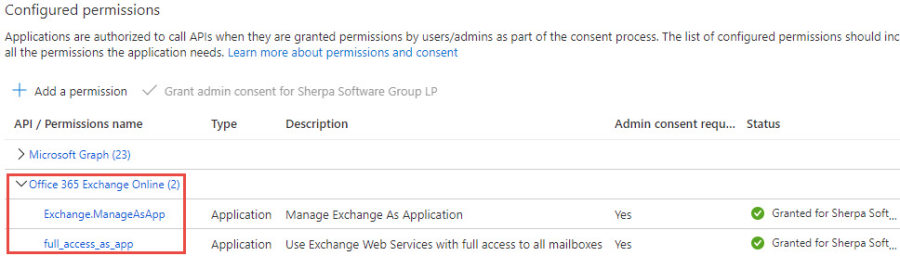
Note, it is possible to restrict which mailboxes the registered application will have access to. Please refer to this article for more information.
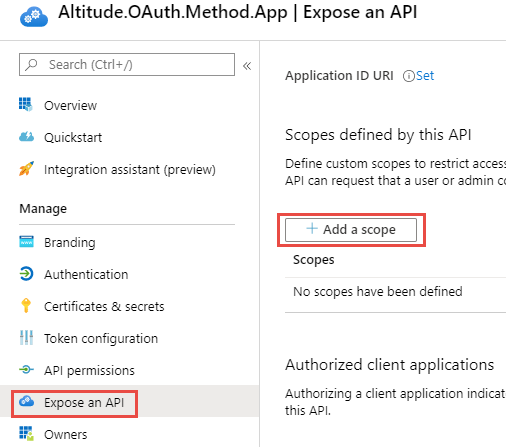
Step 3.3, Expose the API
Click on the 'Add a scope' button
-
The 'Application ID URI' window will pre-fill with the application ID, click Save and Continue to proceed
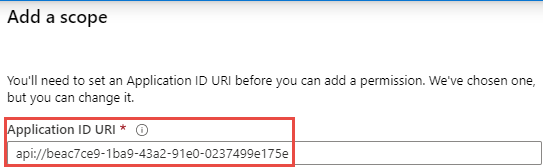
-
Fill out the highlighted fields in the 'Add a scope' window, then click the Add scope to proceed

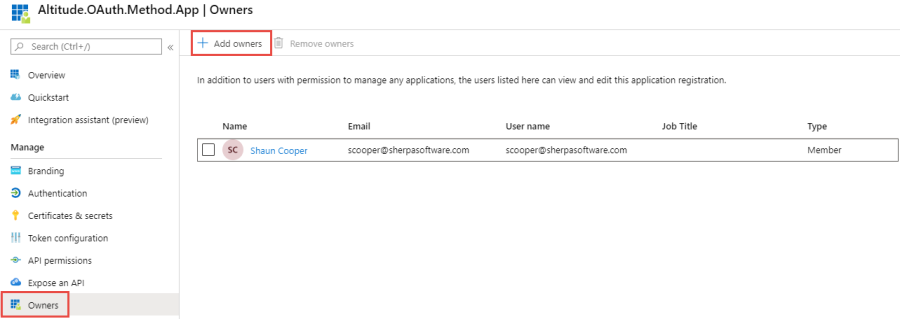
Step 3.4, Adding Additional Owners
Click the 'Add owners' button if additional users need to have access to manage applications and edit application registration
Step 3.5, Configuring Roles and Administrators
For this step, you will need to open the Roles and Admins section in the left-hand navigation pane of Entra admin center
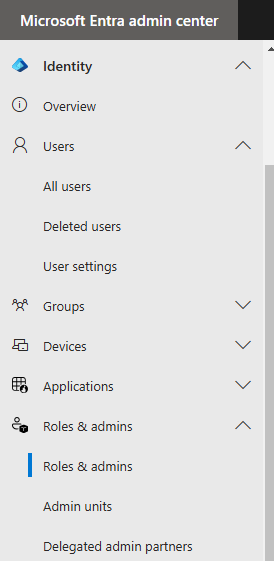
Click on the “Roles and Administrator” link.
In the search box near the middle of the page, enter “Exchange Administrator” to bring it to the top, and then click on the line to the right of the role’s name, as shown below to display the “Assignments” screen.

Click the “Add Assignments” button.
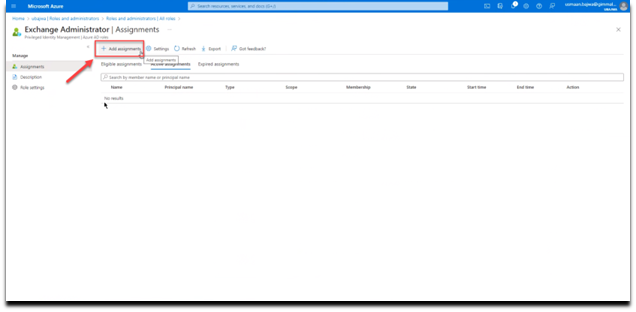
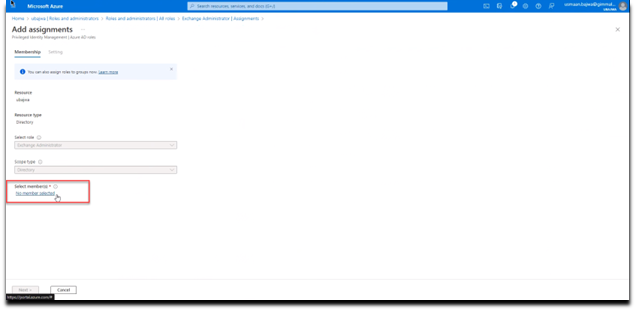
Next, near the bottom of the screen, choose the “No member selected” link under “Select members”.
-
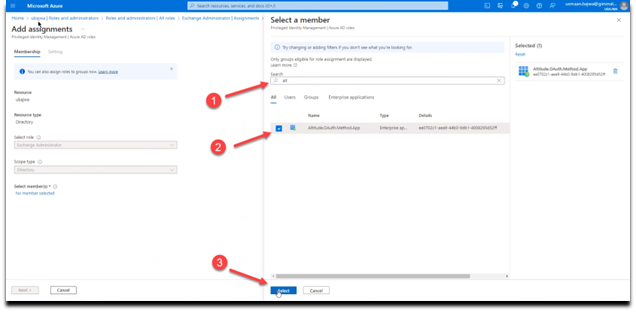
Then, in the “Select a member” window, start typing the name of the registered application that you created until it can be selected.
-
Check the box to the left of the application.
-
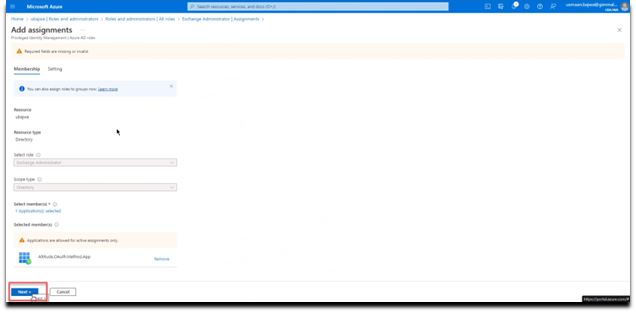
Finally, choose the “Select” button to save the change.
Click on the “Next” button to continue.
-
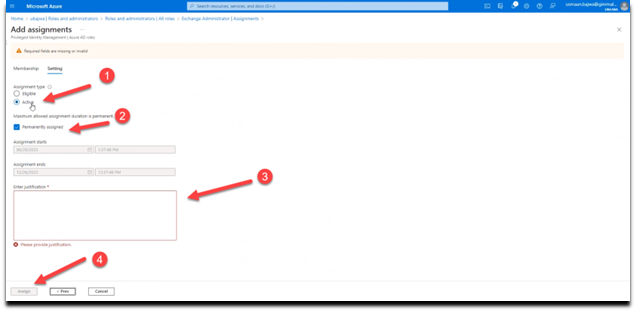
Set the “Assignment type” to “Active”
-
Check the box next to “Permanently assigned”
-
Enter the justification for the assignment
-
Select the “Assign” button to save all updates.
If you added the assignments to the “Global Administrator” role in step 3.5 above, you are done with adding assignments. If you add the assignments to the “Exchange Administrator” role, then you will need to repeat the sequence above for the “Directory Readers” role as well
For more information on modern authentication role permissions, please refer to this Microsoft post:
https://docs.microsoft.com/en-us/powershell/exchange/app-only-auth-powershell-v2?view=exchange-ps#step-5-assign-azure-ad-roles-to-the-application
Discover Agent Setup
Verify Required PowerShell Modules are Installed
The remote PowerShell commands issued by Discover require these modules to be installed on the Agent server:
Note: Some of these modules (i.e., AzureAD) are only supported on 64-bit operating systems
-
PowerShellGet
-
ExchangeOnlineManagement
-
Microsoft.Entra
-
PackageManagement
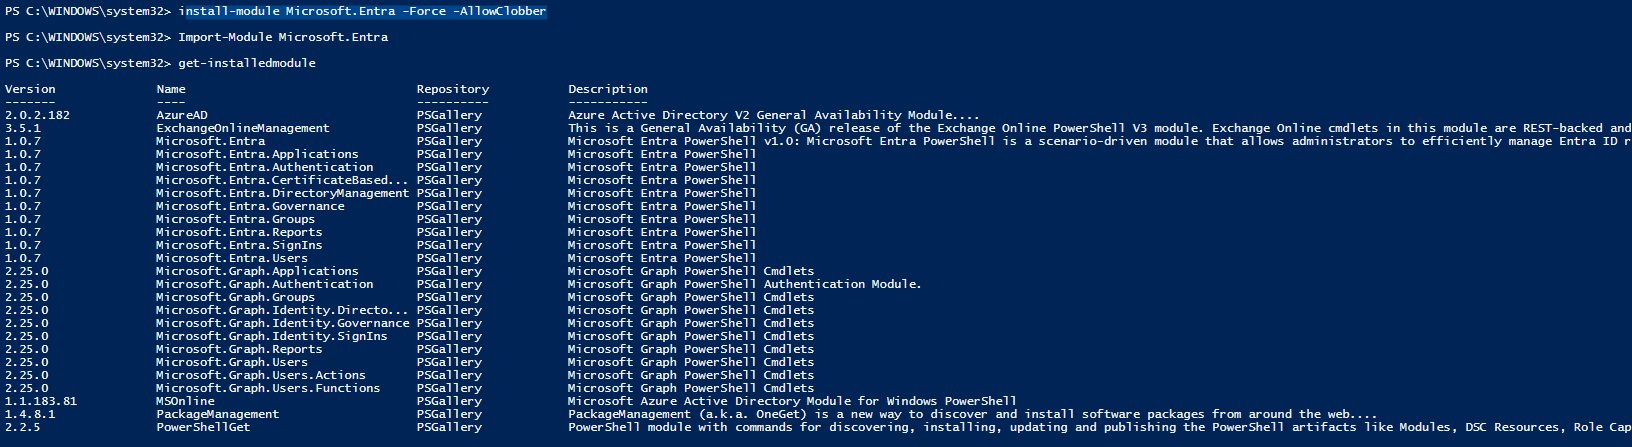
You can determine what modules are installed by launching a PowerShell session and issuing the command get-installedmodule as shown below:
If you do not have all of the required modules, they can be installed by issuing the following commands in an administrative PowerShell session:
-
Install-Module -Name PowerShellGet -RequiredVersion 2.2.5 -Force -allowclobber
-
Install-Module -Name PackageManagement (note: this module may be installed automatically)
-
Install-Module -Name Microsoft.Entra -Force -AllowClobber
-
Install-Module -force ExchangeOnlineManagement (we recommend verifying that version 3.2 or above was installed)
If you receive errors when attempting to install the PowerShell modules, please check the TLS configuration as described in Appendix B of this guide
Updating Credentials
To access and enable the OAuth authentication fields, you will need to do the following:
-
Double-click on the Connector Status Tool application shortcut on the Desktop of any server where the EWS Agent is installed:
-
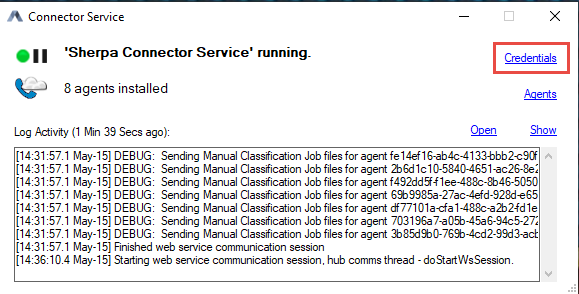
Once the application is open, click on the 'Credentials' link in the status tool window:
-
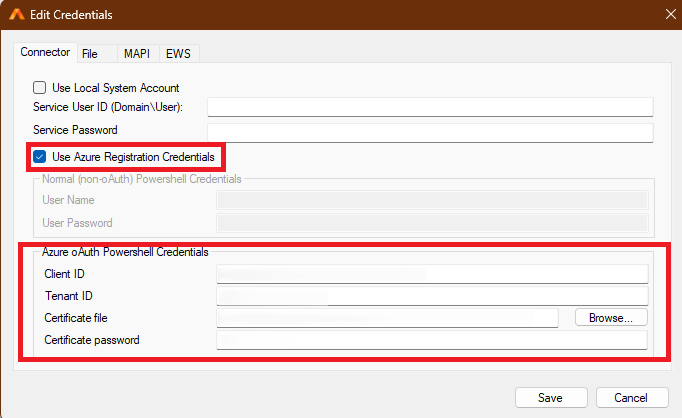
Check the ‘Use Azure Registration Credentials' box; this will gray out the Basic Authentication fields and enable OAuth Authentication. The fields listed in the screenshots below will need to be filled out with the IDs and Certificate information obtained during the App Registration process.
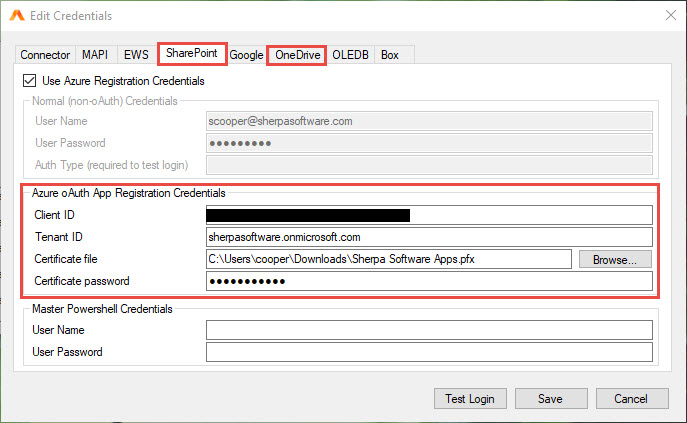
SharePoint/OneDrive tabs:
For the tenant ID, you will need to input the company domain from AZURE (e.g., sherpasoftware.onmicrosoft.com), then copy/paste the client ID into their respective fields. Click on the browse button to navigate to the folder path where the certification file is stored. Please note that this cert file has an extension of (.pfx), NOT (.cer). Lastly, please enter the password that was assigned to the certificate at the time of creation and click SAVE to exit the window.
You can verify the oAuth Agent settings by using the Test Login button. For both SharePoint and OneDrive you will be asked for a URL. The format of those URLs varies slightly as follows:
SharePoint - https://tenant-sharepoint.com
OneDrive - https://tenant-my.sharepoint.com
These are the same URLs that should be entered when creating a Data Target search for SharePoint or OneDrive sites.
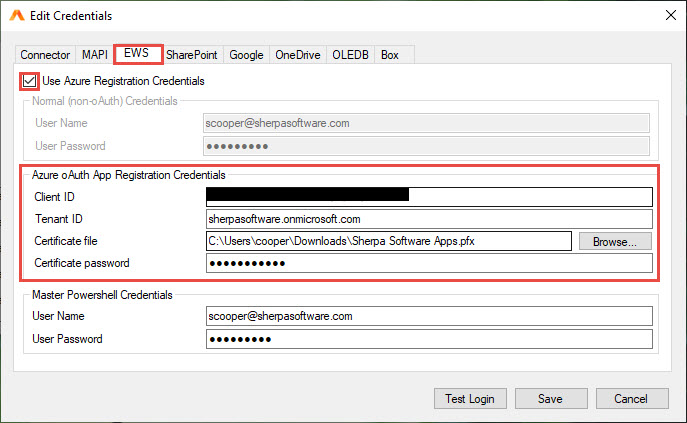
EWS tab:
For the tenant ID, you will need to input the company domain from AZURE (e.g., sherpasoftware.onmicrosoft.com), then copy/paste the client ID into their respective fields. Click on the browse button to navigate to the folder path where the certificate file is stored. Please note that this cert file has an extension of (.pfx), NOT (.cer). Lastly, please enter the password that was assigned to the certificate at the time of creation and click SAVE to exit the window.
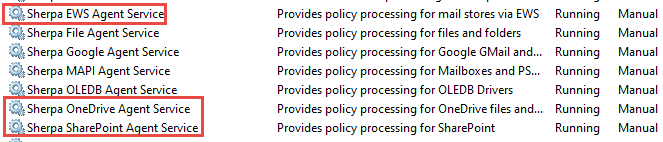
Reminder oAuth authentication is only available in the Discover SharePoint, OneDrive, Graph, and EWS Agents. Repeat the above steps to supply authentication credentials for the OneDrive and EWS Agents as well
-
To apply the newly configured agent permissions, the SharePoint, OneDrive, and/or EWS Agent services will need to be shut down and restarted.
Appendix A – PowerShell Script Example
The following PowerShell script example details the commands necessary for creating a self-signed certificate.
#Requires -RunAsAdministrator
<#
.SYNOPSIS
Creates a Self Signed Certificate for use in server to server authentication
.DESCRIPTION
.EXAMPLE
.\Create-SelfSignedCertificate.ps1 -CommonName "MyCert" -StartDate 2015-11-21 -EndDate 2017-11-21
This will create a new self signed certificate with the common name "CN=MyCert". During creation you will be asked to provide a password to protect the private key.
.EXAMPLE
.\Create-SelfSignedCertificate.ps1 -CommonName "MyCert" -StartDate 2015-11-21 -EndDate 2017-11-21 -Password (ConvertTo-SecureString -String "MyPassword" -AsPlainText -Force)
This will create a new self signed certificate with the common name "CN=MyCert". The password as specified in the Password parameter will be used to protect the private key
.EXAMPLE
.\Create-SelfSignedCertificate.ps1 -CommonName "MyCert" -StartDate 2015-11-21 -EndDate 2017-11-21 -Force
This will create a new self signed certificate with the common name "CN=MyCert". During creation you will be asked to provide a password to protect the private key. If there is already a certificate with the common name you specified, it will be removed first.
#>
Param(
[Parameter(Mandatory=$true)]
[string]$CommonName,
[Parameter(Mandatory=$true)]
[DateTime]$StartDate,
[Parameter(Mandatory=$true)]
[DateTime]$EndDate,
[Parameter(Mandatory=$false, HelpMessage="Will overwrite existing certificates")]
[Switch]$Force,
[Parameter(Mandatory=$false)]
[SecureString]$Password
)
-
DO NOT MODIFY BELOW
function CreateSelfSignedCertificate(){
#Remove and existing certificates with the same common name from personal and root stores
#Need to be very wary of this as could break something
if($CommonName.ToLower().StartsWith("cn="))
{ -
Remove CN from common name
$CommonName = $CommonName.Substring(3)
}
$certs = Get-ChildItem -Path Cert:\LocalMachine\my | Where-Object{$_.Subject -eq "CN=$CommonName"}
if($certs -ne $null -and $certs.Length -gt 0)
{
if($Force)
{
foreach($c in $certs)
{
remove-item $c.PSPath
}
} else {
Write-Host -ForegroundColor Red "One or more certificates with the same common name (CN=$CommonName) are already located in the local certificate store. Use -Force to remove them";
return $false
}
}
$name = new-object -com "X509Enrollment.CX500DistinguishedName.1"
$name.Encode("CN=$CommonName", 0)
$key = new-object -com "X509Enrollment.CX509PrivateKey.1"
$key.ProviderName = "Microsoft RSA SChannel Cryptographic Provider"
$key.KeySpec = 1
$key.Length = 2048
$key.SecurityDescriptor = "D:PAI(A;;0xd01f01ff;;;SY)(A;;0xd01f01ff;;;BA)(A;;0x80120089;;;NS)"
$key.MachineContext = 1
$key.ExportPolicy = 1 # This is required to allow the private key to be exported
$key.Create()
$serverauthoid = new-object -com "X509Enrollment.CObjectId.1"
$serverauthoid.InitializeFromValue("1.3.6.1.5.5.7.3.1") # Server Authentication
$ekuoids = new-object -com "X509Enrollment.CObjectIds.1"
$ekuoids.add($serverauthoid)
$ekuext = new-object -com "X509Enrollment.CX509ExtensionEnhancedKeyUsage.1"
$ekuext.InitializeEncode($ekuoids)
$cert = new-object -com "X509Enrollment.CX509CertificateRequestCertificate.1"
$cert.InitializeFromPrivateKey(2, $key, "")
$cert.Subject = $name
$cert.Issuer = $cert.Subject
$cert.NotBefore = $StartDate
$cert.NotAfter = $EndDate
$cert.X509Extensions.Add($ekuext)
$cert.Encode()
$enrollment = new-object -com "X509Enrollment.CX509Enrollment.1"
$enrollment.InitializeFromRequest($cert)
$certdata = $enrollment.CreateRequest(0)
$enrollment.InstallResponse(2, $certdata, 0, "")
return $true
}
function ExportPFXFile()
{
if($CommonName.ToLower().StartsWith("cn="))
{ -
Remove CN from common name
$CommonName = $CommonName.Substring(3)
}
if($Password -eq $null)
{
$Password = Read-Host -Prompt "Enter Password to protect private key" -AsSecureString
}
$cert = Get-ChildItem -Path Cert:\LocalMachine\my | where-object{$_.Subject -eq "CN=$CommonName"}
Export-PfxCertificate -Cert $cert -Password $Password -FilePath "$($CommonName).pfx"
Export-Certificate -Cert $cert -Type CERT -FilePath "$CommonName.cer"
}
function RemoveCertsFromStore()
{ -
Once the certificates have been been exported we can safely remove them from the store
if($CommonName.ToLower().StartsWith("cn="))
{ -
Remove CN from common name
$CommonName = $CommonName.Substring(3)
}
$certs = Get-ChildItem -Path Cert:\LocalMachine\my | Where-Object{$_.Subject -eq "CN=$CommonName"}
foreach($c in $certs)
{
remove-item $c.PSPath
}
}
if(CreateSelfSignedCertificate)
{
ExportPFXFile
RemoveCertsFromStore
}
APPENDIX B – TLS TROUBLESHOOTING
If the connector server is running an older version of Microsoft Windows (2010 R2 or lower) it may not have the required support for TLS1.2. This Microsoft link provides more details on TLS dependencies and adding TLS support to older versions of Microsoft Windows:
https://docs.microsoft.com/en-us/security/engineering/solving-tls1-problem
The versions of TLS currently installed on the server can be verified using this PowerShell command:
[Net.ServicePointManager]::SecurityProtocol
-

If Tls12 is not shown in the list, it will need to be installed on this server using one of these Microsoft methods. Option 2 (below) is the preferred method since it adds Tls12 to the whole system, where option 1 only persists for the current PS session.
1. Modify the script in question to include the following:
[System.Net.ServicePointManager]::SecurityProtocol = [System.Net.SecurityProtocolType]::Tls12;
2. Add a system-wide registry key (e.g. via group policy) to any machine that needs to make TLS 1.2 connections from a .NET app. This will cause .NET to use the "System Default" TLS versions which adds TLS 1.2 as an available protocol AND it will allow the scripts to use future TLS Versions when the OS supports them. (e.g. TLS 1.3)
reg add HKLM\SOFTWARE\Microsoft\.NETFramework\v4.0.30319 /v SystemDefaultTlsVersions /t REG_DWORD /d 1 /f /reg:64
reg add HKLM\SOFTWARE\Microsoft\.NETFramework\v4.0.30319 /v SystemDefaultTlsVersions /t REG_DWORD /d 1 /f /reg:32