
After you install the Universal File Share Connector, you must configure it using the Universal File Share Connector Configuration application, using the following steps.
The Gimmal Universal File Share Connector Classification Service will not start unless the connector is configured.
Starting the Connector Configuration Application
To start the configuration, find the ‘Gimmal Universal File Share Connector Configuration’ in your Start menu.
Configuring the Connector
Once the configuration of all servers is complete (see details below), make sure the services have been started on all Universal File Share Connector servers.
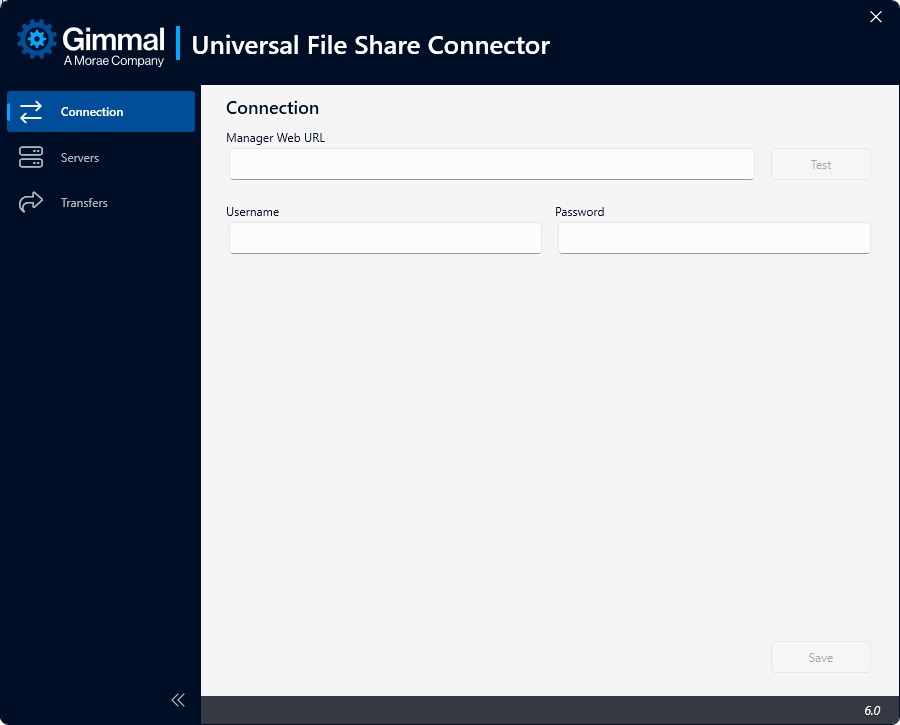
Connection
Connections must be established before ‘Servers’ or ‘Transfers’ can be configured.
-
Enter the URL to the Gimmal Records Manager Web in the ‘Manager Web URL’.
-
Enter the Username of the Universal File Share Connector Service Account created in Gimmal Records Manager Web.
-
Enter the Password of the Universal File Share Connector Service Account created in Gimmal Records Manager Web.
Servers

-
Register the Servers where the Universal File Share Connectors are installed.
-
The value in the Cluster field is automatically generated.
-
Select the Provider: File Share or Discover (aka Altitude). If you need to manage both the File System and Discover (aka Altitude), you will need to install separate Universal File Share Connectors.
Note: To configure for Gimmal Discover (aka Altitude) :
-
Browse to the location of the Gimmal Discover index file.
-
Click Add to populate the selection into the Directory Path field.
-
-
Enter the UNC path to file shares to be managed by Gimmal Records (one per line) in the Managed Locations field.
Note: The account running the Universal File Share Connector needs to have full control access to the managed paths.
-
Crawl on Service's Startup provides the option of whether to initiate a Full Crawl of managed paths on service startup.
-
Crawl on Interval Startup provides the option for if (and when) to perform a Full Crawl of managed paths on a specified interval.
-
Continue on Failure provides the option to continue a Full Crawl when an error/failure occurs (e.g., a permissions issue).
Note: If the Continue on Failure box is checked, the Full Crawl will complete even if there are errors during the crawl. You would need to examine the log file to discover these errors. -
Click Save.
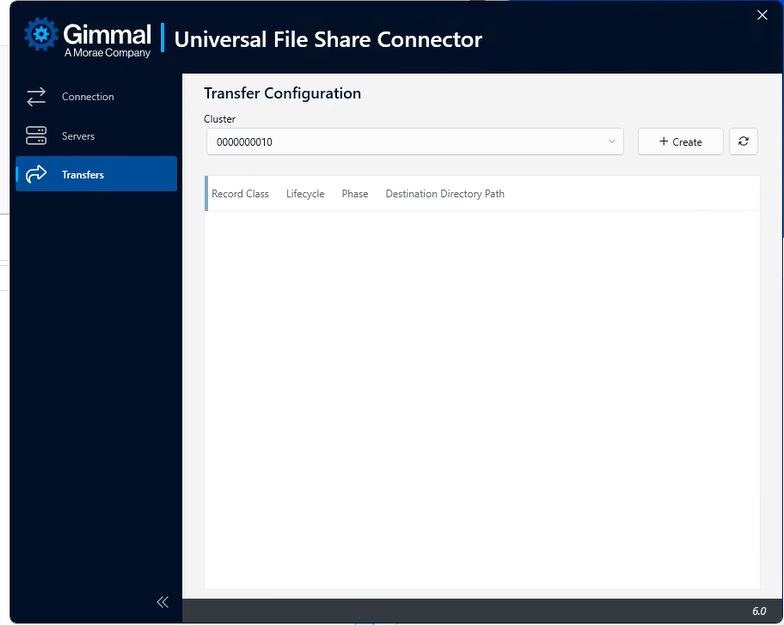
Transfers
-
Create a Transfer Configuration by selecting a cluster from the drop-down list.
-
Click +Create to assign a Record Class, select a Lifecycle Phase, enter the Destination Directory Path, and indicate if you want to retain the directory structure.
-
Click Save.
Transfers using the Gimmal Discover Connector
If records from Gimmal Discover (aka Altitude) are to be managed by Gimmal Records after they have been transferred, the index must be regenerated in Gimmal Discover .
For a successful transfer, the destination path must be entered in the Managed Locations of the Universal File Share Configuration application.
Enabling a Failover Server
The Cluster field specifies a unique set of configuration options. If two Universal File Share Connector servers share the same Cluster ID, they will form a failover cluster. A failover cluster works in an active/passive failover model. One of the servers in the cluster will be designated automatically as the active service (aka Primary). If something happens to the primary machine that prevents it from processing, one of the passive machines (Failover) will be selected automatically as the active server and will take over the processing.
Perform the following steps:
-
All machines that need to be part of a failover cluster must first be configured and registered.
-
On the Servers tab for any failover server, select the cluster ID from the Cluster drop-down list that matches the primary server. Do not make a new Cluster.
-
The managed locations need to be the same for Primary and Failover servers.
-
Click Save.
-
Start the Services on all failover servers once the configuration is complete.
Configuring the Failover Cluster for the Gimmal Discover Connector
When configuring a failover cluster for use with Gimmal Discover, a new index must be created for the failover server. Afterward, the Universal File Share Configuration application must be re-configured to point to the new index.
Windows Services
When you install the Universal File Share Connector, there are three Windows Services that are set up in Windows to perform the actions necessary to enable Gimmal Records to manage the lifecycle of records and information stored on network file shares.
Whether File System or Discover (aka Altitude) is selected as the Provider, the same Windows services are used.
|
Service Type |
Description |
|
Gimmal Universal File Share Classification Service |
This service is responsible for discovering the content that exists in the configured file shares and notifying Gimmal Records of its existence and any updates and removals of this content. |
|
Gimmal Universal File Share Reconciliation Service |
This service is responsible for performing reconciliation actions for records in Gimmal Records. |
|
Gimmal Universal File Share Retention Service |
This service is responsible for executing the lifecycle actions as indicated by Gimmal Records at various points in time according to the specified File Plan. |
The time is saved to the database in UTC format. The next crawl time is calculated based on the time that the "Save" button is pressed. For example, the interval is set to be every 1 day at 7:00 AM. At the time "Save" is pressed, the local time is 6:05 PM CST Wednesday, which is 12:05 UTC Thursday. The connector calculates that the next crawl will be on Friday.