
Introduction
This document outlines the process for using Gimmal’s Migration API Tool (MAPIT) for Microsoft 365 to migrate documents from OpenText Content Server or Livelink into SharePoint Online. It also provides tips on the accurate usage of the tool and a general understanding of how MAPIT works.
Product Description
MAPIT is a Microsoft Windows-based application that provides migration functionality to SharePoint Online from the following sources:
-
Documents exported from Content Server using Gimmal Content Server Migration Tool to Network Drive
-
Documents directly from a file share location
-
Documents exported from Documentum using the Gimmal Documentum Migration Tool to Network Drives
Analysis, validation, and full logging of the migration are also provided.
Registering MAPIT
Prior to use, MAPIT must be registered with a License Key obtained from Gimmal. To register MAPIT, enter the key on the About tab area of the user interface (as shown below). This process requires external internet access.

If a license is purchased for multiple users, each user will need to register MAPIT the first time they use it. Make sure to click the save button after performing a successful registration. Registration may be prevented due to:
-
No external internet access
-
Entering an expired license key – common causes are that the key may have been incorrectly entered or its validity period has expired.
Database Tab
Using a SQL Server database (recommended) allows for multiple migration sessions (profiles) and better performance. To configure database access, click on the Database tab in the user interface and follow these steps:
Note: A blank database should be created in SQL Server before starting the MAPIT database configuration process.
-
Check the Use Database box
-
Enter one of the user ID and password options shown below:
-
SQL account (make sure to select SQL Server Auth for the Authentication Mode)
-
Currently logged-in user (select Windows Auth)
-
Db_owner role credentials are required to create the tables that the tool needs
-
-
Enter the name of the SQL server instance in the Server field
-
Enter the name of the empty database that you created in the Database Name field
-
Click the Test Connection button to confirm access to the database
-
Click the Create Database Tables button to build the database schema.
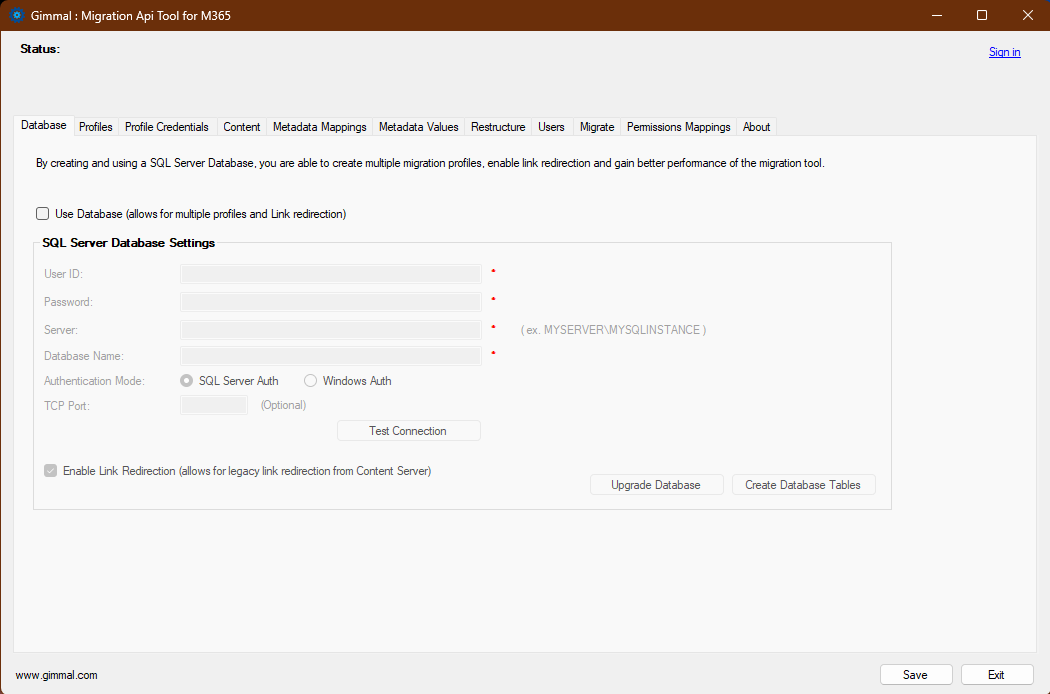
After entering all of the settings, make sure to click the Save button to retain the database configuration information.
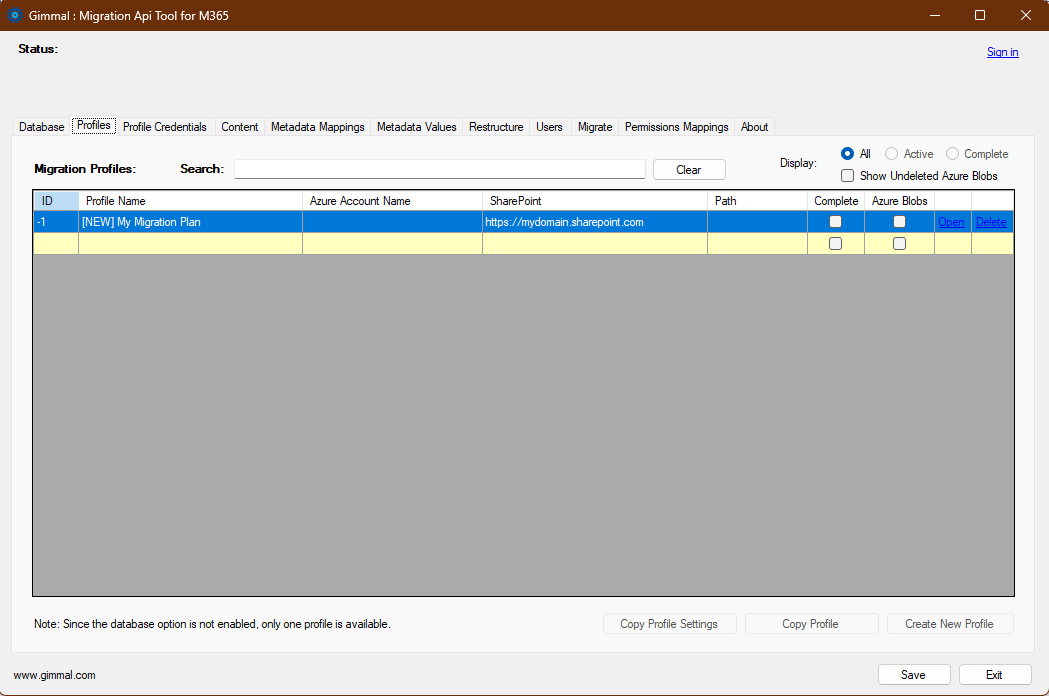
Profiles Tab
In MAPIT, a Profile is the collection of settings and saved information for a specific migration session. This allows for easier testing and comparison of different Profile settings, as well as scheduling multiple sessions to execute sequentially. Through the use of different Profiles, other users can create and schedule additional sessions that do not conflict with each other.
On the Profiles tab, you can create a new profile, copy the settings of an existing profile (Copy Profile Settings), or copy a complete profile (Copy Profile), which includes any information already ingested by the original. It is usually more convenient to use the Copy Profile Settings option
The Profiles shown can be filtered using the Display options radio buttons in the top right corner (All, Active, or Complete).
Whether you create a new Profile or copy an existing one, you will need to open the Profile to change any of its settings, including the Profile Name. Click the Open link to access the profile settings.
To perform any migration, you will need at least one Profile configured.
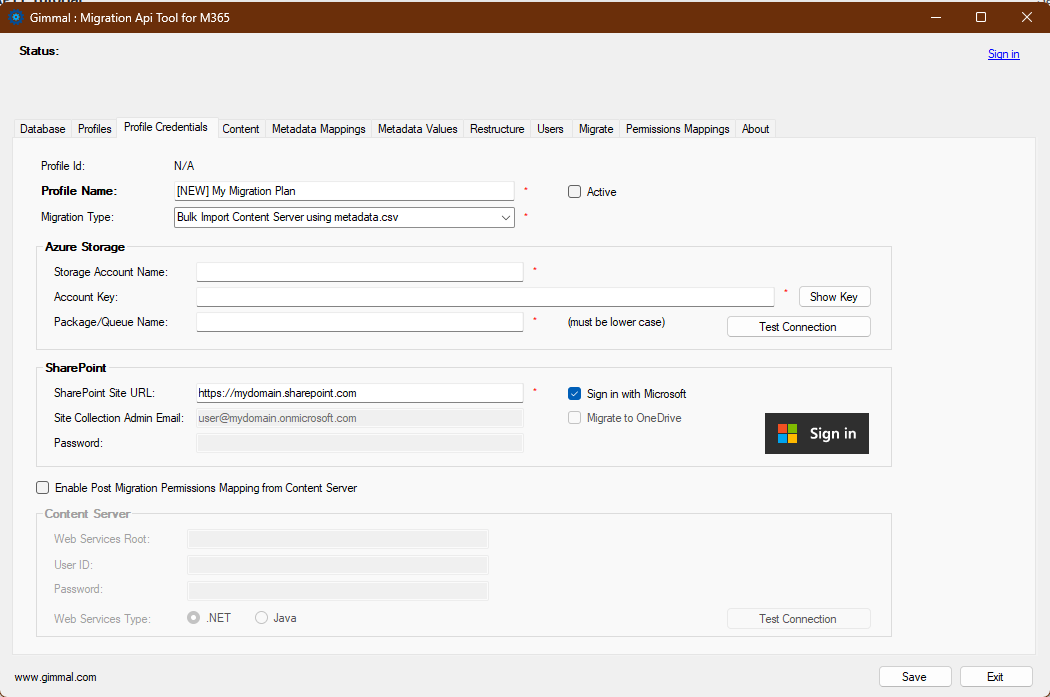
Profile Credentials Tab
The Profile Credentials tab allows the entry, testing, and updating of the credentials used with a specific Profile. You must open a Profile to access its Credentials; there is no general credential setting that applies to all Profiles.
-
Profile ID: Unique for each Profile; each new Profile ID is incremented by one. Cannot be changed.
-
Profile Name: Name of the specific Profile. You can enter anything you want here, but make it descriptive. Since some migration projects may involve multiple migration technicians, it is recommended to use each user’s initials in the Profiles they are working with.
-
Migration Type: Choose the appropriate selection based on where the source documents come from:
-
Bulk Import Content Server using metadata.csv – (most common) Use to migrate documents that were exported from Content Server using Gimmal’s Content Server Migration Tool to Network Drives.
-
Bulk Import Documentum using metadata.csv – Use to migrate documents that were previously exported from Documentum using the Gimmal Documentum Migration Tool to Network Drivers.
-
Bulk Import from File Share – Used to migrate documents directly from a file share. Not for use with documents that were exported from either Content Server or Documentum.
-
-
Azure Storage – MAPIT uses Azure BLOB Storage as an interim location while migrating documents to SharePoint Online. In production, this requires a client Azure Storage account. Use these fields to enter the correct credentials to connect to Azure Storage
-
Storage Account Name – Name of the Azure storage account
-
Account Key – this is the access key to the Azure storage account
-
Package/Queue Name: This should be unique for each Profile and all lowercase with no spaces. A minimum recommendation is to use your initials or name, followed by the Profile ID.
-
Test Connection – Use this button to confirm access to Azure Storage using the provided credentials
-
-
SharePoint
-
SharePoint Site URL: URL of the target SharePoint Online site, where documents will be migrated to. The document libraries of this site will be displayed for the selection of a target on the next tab.
-
There are two methods for authentication: Modern Authentication and Legacy Authentication. Microsoft recommends the use of Modern Authentication rather than Legacy Authentication. For a more detailed explanation, refer to our online documentation.
-
Modern Authentication – This is the recommended method. Click the Sign in with Microsoft option, then click the Microsoft Sign In button. You are presented with a modern authentication dialog that supports O365 modern authentication with multi-factor authentication (MFA).
-
Legacy Authentication – If you do not click Sign in with Microsoft, MAPIT uses the Site Collection Admin Email and password. This method is NOT recommended by Microsoft and does not support MFA accounts. The benefit of Legacy Authentication is that anyone can use this method if the user credentials provided have Site Collection Admin access to the destination Site Collection. You do not need to use App ID if you do not have the authority to grant the delegated access.
-
-
-
Enable Post Migration Permissions Mapping from Content Server – Leave this box unchecked. We recommend using SharePoint security and not mapping permissions. Refer to the documentation for more details on permission mapping.
IMPORTANT MIGRATION NOTES
-
When using Modern Authentication, the first time you run MAPIT, your Microsoft 365 Global Administrator must grant delegated access to the Gimmal App ID to conduct the migrations on behalf of your organization. This is only required once.
-
When using Legacy Authentication, once a User’s migration quota is reached, their migrations will be throttled by Microsoft. Consequently, this method is slower than using Modern Authentication
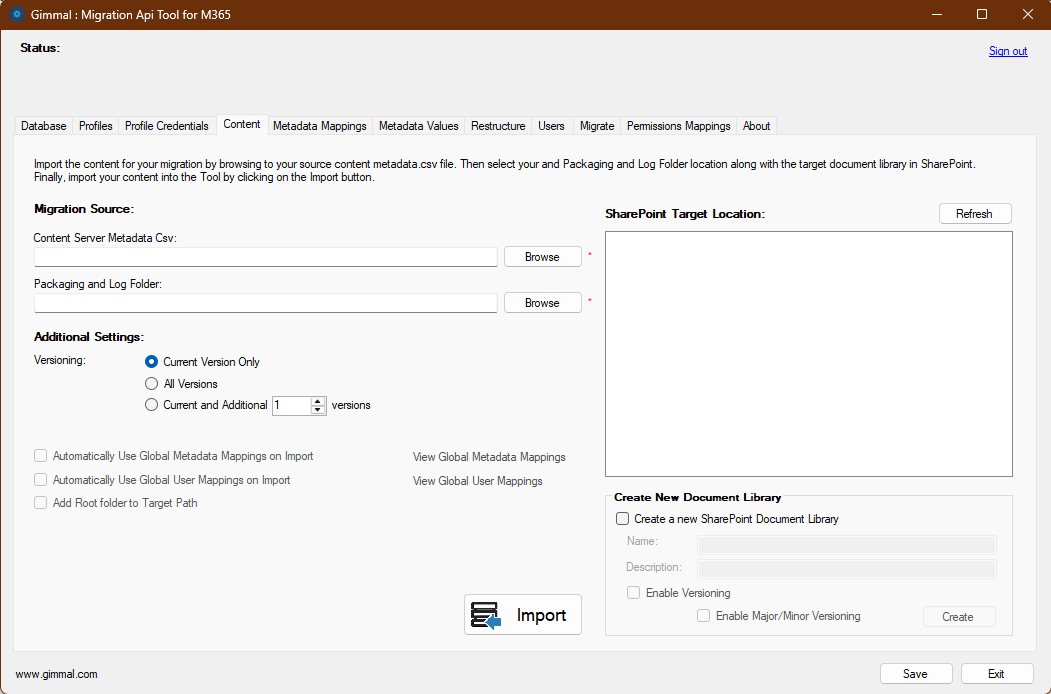
Content Tab
The Content tab includes settings that specify where the source content is stored, where to create any logs, and which document library the content should be migrated to. This is also where the metadata for the content is imported into the MAPIT database before being migrated.
-
Note: This document only addresses migrations from Content Server to SharePoint Online. For other migration options, refer to the documentation.
-
Migration Source
-
Content Server Metadata CSV: Use the browse button to select the metadata CSV file generated during the export from Content Server.
-
Packaging and Log Folder: This location will be used for any log files created during this migration session
-
-
Additional Settings
-
Versioning: Versioning may have been used in Content Server. This setting specifies how many versions, if any, should be migrated.
-
-
Automatically Use Global Metadata Mappings on Import: Metadata mappings may be identical across all migration Profiles. If so, using Global Metadata Mappings can be more efficient since the mappings don’t need to be configured each time. Leave this unchecked until you’ve configured and stored mappings for at least one migration.
-
Automatically Use Global User Mappings on Import: User mappings may be identical across all migration Profiles. If so, using Global User Mappings can be more efficient since the mappings don’t need to be configured each time. Leave this unchecked until you’ve configured and stored mappings for at least one migration.
-
SharePoint Target Location: Select the document library or subfolder into which the content should be migrated. If you need to create a new library, do the following:
-
Create New Document Library: New SharePoint document libraries can be created using this section. They can then be selected as the target locations.
-
Import: Click the Import button to read the contents of the metadata.csv file, or directly from files in a file share migration.
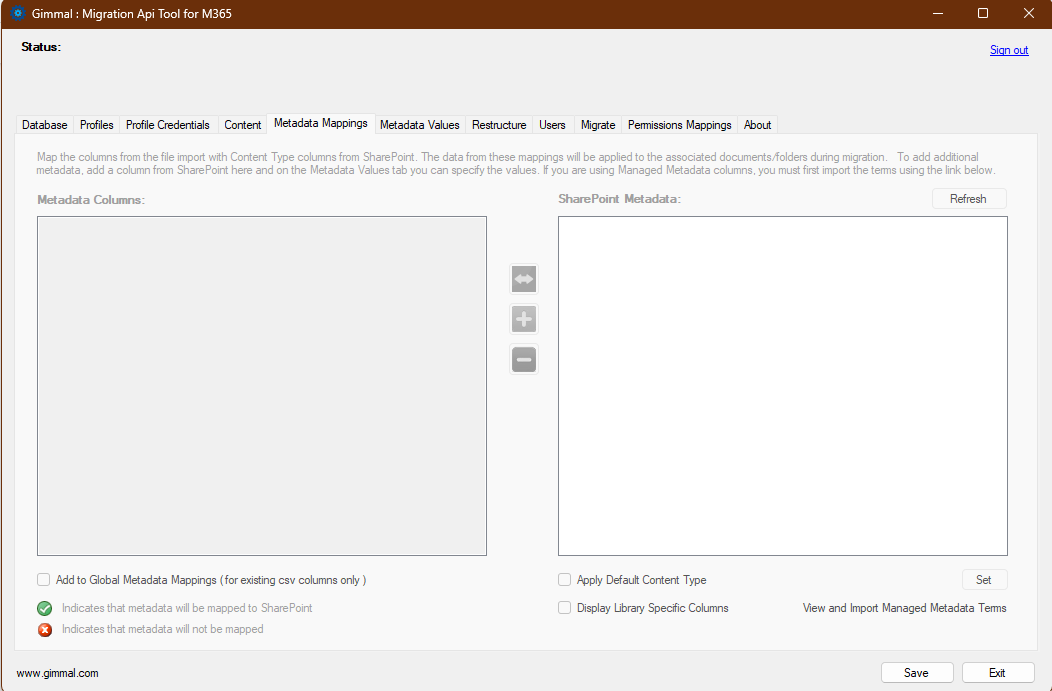
Metadata Mappings Tab
The Metadata Mappings tab allows you to map properties from the metadata.csv to a specific property in the SharePoint target location.
-
Metadata Columns: This pane shows the metadata properties that were exported from Content Server. These properties can be (optionally) mapped to SharePoint properties in the target location. We’ll discuss this below. Some properties are mapped by default.
-
SharePoint Metadata – the target SharePoint library is scanned, and all available metadata columns, content types, and labels are displayed.
-
Refresh – Use this button to reload the SharePoint Metadata. This may be necessary if new columns/content types have been added to the target location or updated in SharePoint.
-
-
Mapping Metadata – to map metadata between Content Server and SharePoint, do the following:
-
Select a metadata column on the left side. Select a corresponding metadata column on the SharePoint side. Click the blue <-> icon to map the metadata columns to one another.
-
To unmap, select the two column names and click the – icon.
-
It’s recommended to map columns under the content type metadata.
-
Refer to the documentation if you want to map Microsoft retention labels. This is an advanced topic.
-
-
Add to Global Metadata Mappings (for existing CSV columns only) – Use this setting to add your new mappings to the Global Metadata Mappings for use in other migration Profiles.
-
Apply Default Content Type: Use this option to specify a content type to use for migrated content. If this option is not set or not used, migrated content will all be uploaded as the default content type of the target SharePoint library.
-
Set – Use this option to set the content type to be used for content being migrated.
-
-
Display Library Specific Columns: Use this setting, with the Refresh button, to show columns that are specific to the target library.
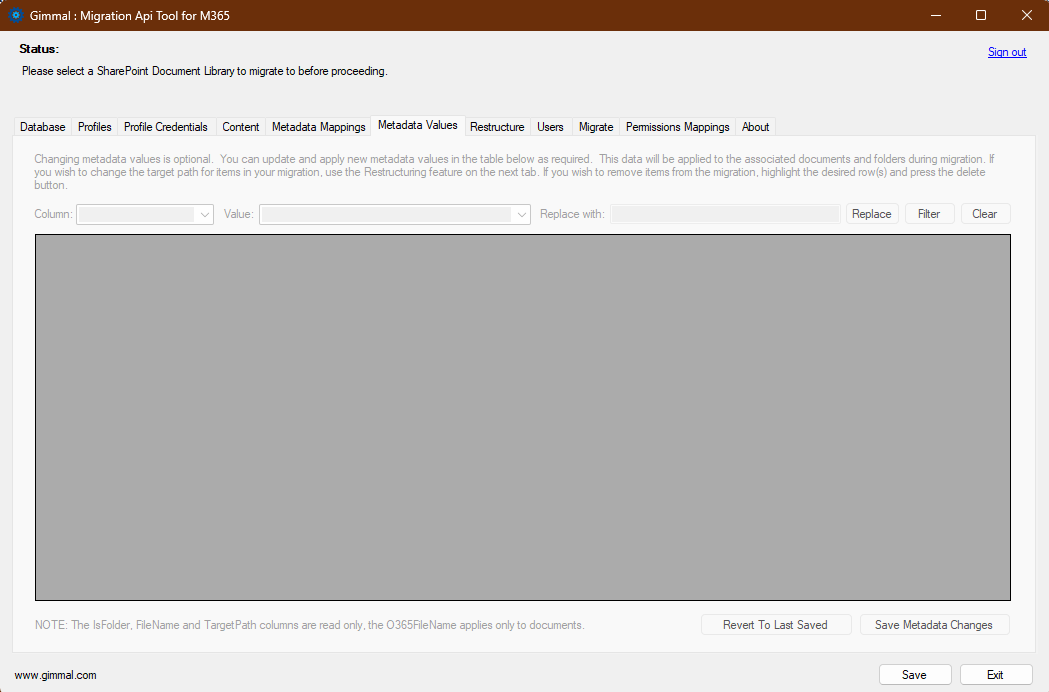
Metadata Values
The Metadata Values tab displays the results of your mapping. It is used to view and update metadata values for the content to be migrated. Note that some fields are read-only and cannot be updated on this tab. Make sure to save any changes made by clicking “Save Metadata Changes” on the bottom right.
To make changes to a single piece of metadata, click the field and type your change directly into that field. To make bulk changes:
-
Click the Column pull-down and select a column
-
Click Value and select Replace All or Replace Empty. They do exactly what they say for the selected column.
-
To do a bulk replacement of a single value, select that value from the pull-down
-
-
Enter your new value in the Replace With field. Make sure the characters are numbers and text, not special characters.
-
Click Replace
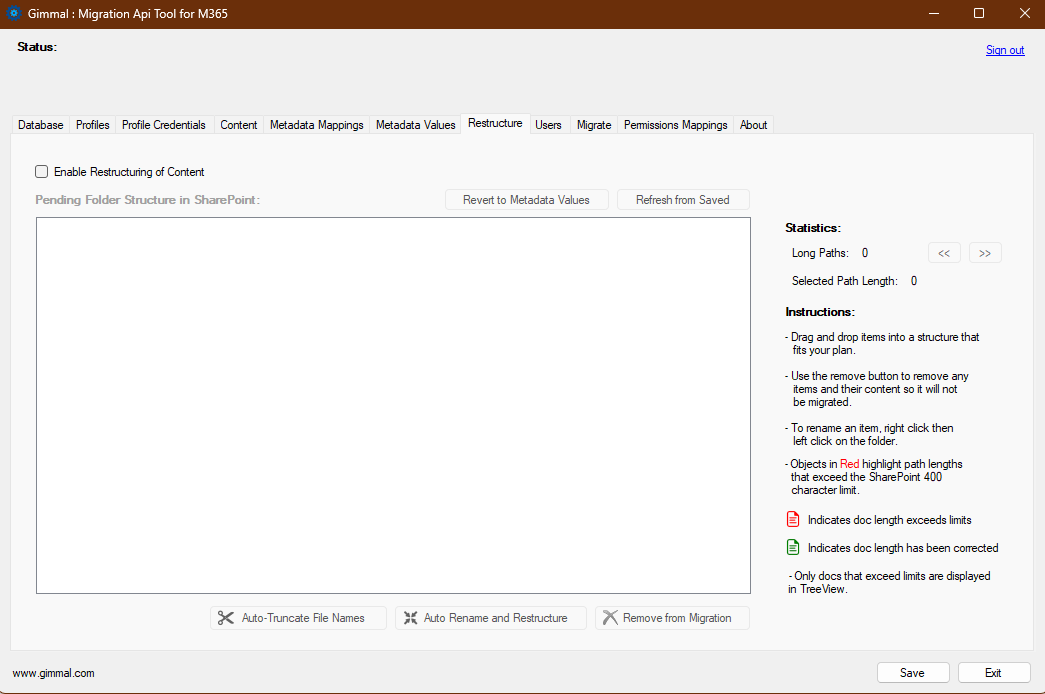
Restructure Tab
The Restructure tab is used primarily to locate any folder paths longer than the SharePoint 400-character limit and change their names to reduce the overall path length. You can also optionally rename folders on this tab as desired. Any folders that exceed the path limit will display in red.
We’d recommend clicking on a folder, or folders, to change a long path name. Simply click and type the new value. Repeat until all your path lengths are under 400 characters.
You can use the Auto-Truncate or Auto-Rename buttons to do this automatically. Auto-Truncate will only truncate file names, never folder names. It will truncate file names until a path length of under 400 is reached. Conflicts will be resolved with increasing numbers of "(n)" at the end of the file name. Any path where truncation of the file wouldn't result in a total length under 400 characters will not be truncated.
If you want to remove a folder (or sub-folder), select the folder and click Remove from Migration.
To undo all your changes, click Revert to Metadata Values.
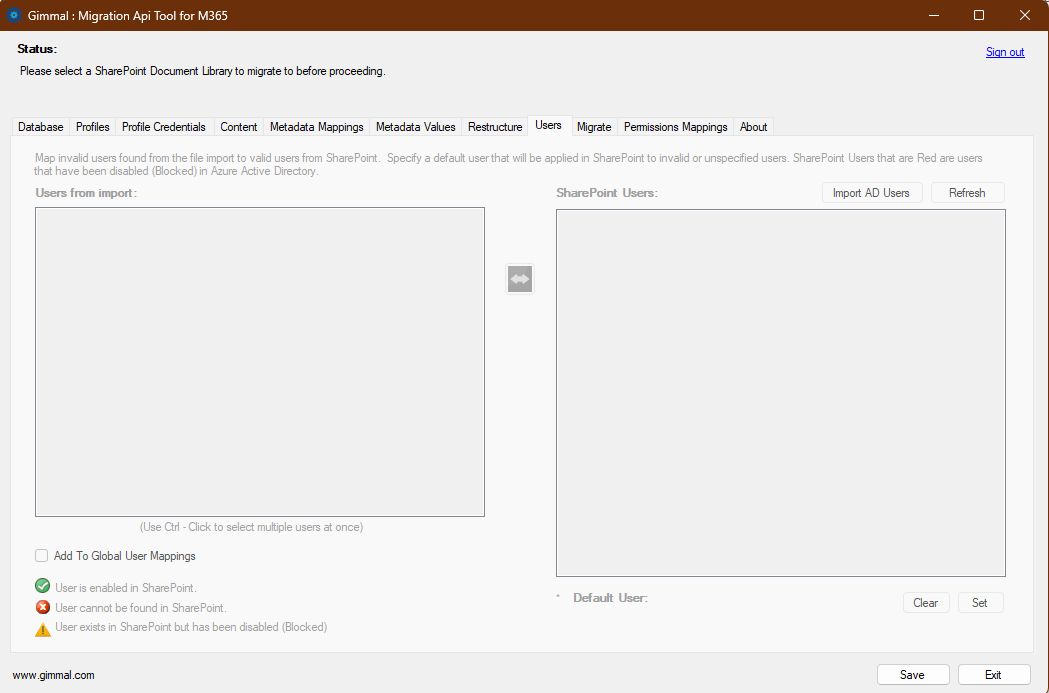
Users Tab
Like Metadata Mapping, user accounts from the source content can be mapped to specified accounts in SharePoint. A default user account can be set for non-mapped accounts. As with the Metadata Mappings, these mappings can be added to the Global User Mappings for use in other Profiles.
-
Users from import: These are the Content Server users from the exported content.
-
SharePoint Users: These are your Microsoft 365 Azure AD users. To import them, select Import AD Users. To refresh the list, click Refresh. Mapping users works just like mapping metadata. Select a user on the left, then the corresponding user on the right, and click the ↔︎ button.
-
You do not need to map every user. Select a SharePoint user and click Set to create a default user. Any Content Server users not mapped will be set to this default user.
-
To reuse your user mappings in the future, check the box labeled “Add to Global User Mappings.”
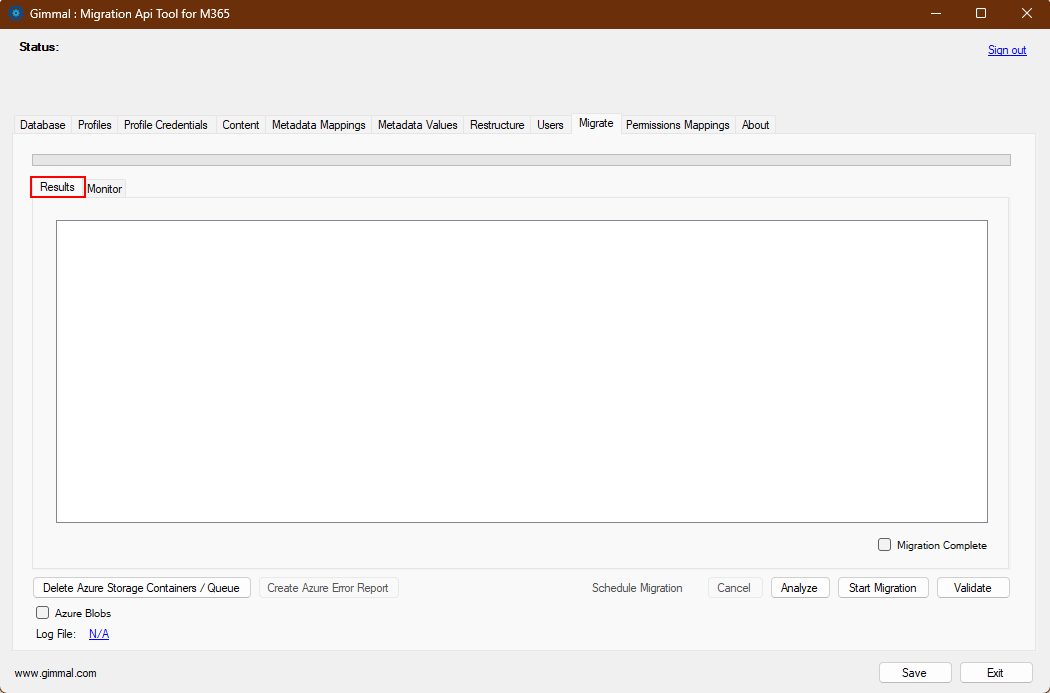
Migrate Tab
The Migration tab shows the results of logging and the migration itself as it is running or after completion on the Results subtab.
Before migration:
-
Analyze: The Analyze button should be used before starting the migration. This analysis can be used to ensure there are no errors that could prevent the migration from completing. One common example, when working with multiple Profiles, is inadvertently re-using an Azure Storage Queue from another Profile (due to not changing the queue name on the Profile Credentials tab).
-
Delete Azure Storage Containers/Queue: If a Profile is being re-run, or if the Package/Queue Name on the Profile Credentials tab was not updated for this profile, the Azure Storage Containers will have content that will prevent a successful migration. The Analyze step will report an error and this will be reported by the Analysis log. If the Profile is being re-run, click this button to delete the containers/queue. Otherwise, update the queue name on the Profile Credentials tab, then return to the Migrate tab and run the Analyze step again.
After the analysis is complete, click the Start Migration button:
The current activity will be displayed on the Monitor subtab:

The body of content to be migrated is separated into one or more packages, and these are processed individually. The packages are uploaded to the specified Azure BLOB Storage account. After the upload is complete, MAPIT automatically notifies the Microsoft migration APIs that there are migration packages to move to SharePoint Online.
Once a migration is in process, a link to the migration log file is provided for reference.
If there are any errors, individual packages can be retried by checking the box in the Retry column, then clicking the Retry Jobs button. Once the migration is complete, use the Validate button to confirm that all imported content was successfully migrated and is in SharePoint.
Scheduling Migrations
Migrations can be scheduled (using the Schedule Migration option) to start automatically at a later time. This can be done to allow multiple migrations to execute unattended, or run after normal work hours for improved performance. For each scheduled migration, open another instance of MAPIT, set the schedule, and leave it open. Make sure to select the option to run the validation after the migration is complete.
Permissions Mappings
Mapping permissions is an advanced MAPIT topic and not part of this tutorial. Refer to the product documentation for more details on permission mapping.