
Requirements
This section provides information about usage requirements for running the Migration API Tool (MAPIT) for Microsoft 365 version 4. x.
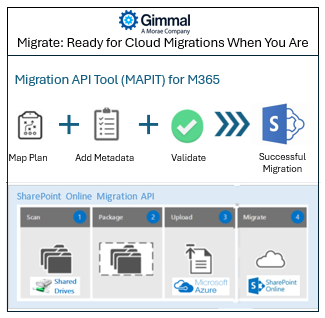
Follow along with the User Guide and you will learn how you can easily and quickly map and migrate your network or share drive files into SharePoint Online.
Compatibility
The MAPIT Microsoft 365 tool currently supports the following source and destination environments.
Supported Sources:
|
Source Name |
|
Local Disk Drive |
|
Network File / Share Drive |
|
Livelink 9.0 – 9.7.1 Exported Control Files and Content |
|
Content Server 10 – 24.X Exported Control Files and Content |
|
Documentum 5.2 – 16. X Exporter Control Files and Content |
Supported Destinations:
|
Destination Name |
|
Office 365 (SharePoint Online) |
Optional Source Permissions Re-mapping and Link Redirection Support in SharePoint Online
|
Source Name |
Permissions Re-mapping Support |
Link Redirection |
|
Local or network drive |
Not supported – inherits from SharePoint |
N/A |
|
Livelink 9.0 – 9.7.0 |
Not supported – inherits from SharePoint |
Yes |
|
Livelink 9.7.1 |
Supported |
Yes |
|
Content Server 10 – 24.X |
Supported |
Yes |
|
Documentum 5.2 – 16.X |
Not supported |
N/A |
Client Software Pre-requisites
Please note that there are no server-side installs required for this solution.
This solution is purely Client access directly from source to destination.
The pre-requisite installers and documentation are included in the install folder.
Client Migration PC / VM Hardware Recommendations:
-
CPU Intel i7 or equivalent
-
Windows 10 or 11, 64-bit OS (or equivalent Windows Server OS)
-
Minimum 8+ GB of RAM
Installation Notes
The following Client/Host PC configuration must be satisfied:
-
Must have .NET Framework 4.7.2 or 4.8 installed on the host where the tools will be run
-
TLS 1.2 must be enabled (refer to Appendix A)
-
Must be installed on either Windows 7 or 10, a 64-bit Operating System
-
If using Legacy Authentication mode, refer to Appendix B for pre-requisite steps. If you are using Modern Authentication in Microsoft 365, continue
-
Install MAPIT for Microsoft 365 (please confirm pre-requisites are installed before installing MAPIT)
Notes for Installing on Windows 7 or Windows 2008 R2
The Microsoft PowerShell Gallery is used to retrieve the Azure AD module using the PowerShell Get function. This is available out of the box with Windows 10.
For older versions of Windows, you must ensure the requirements are met for accessing the Microsoft PowerShell Gallery (see https://docs.microsoft.com/en-ca/powershell/gallery/readme for links to downloads) including:
-
Get and install WMF 5.0
-
Get and install MSI Installer
-
Reboot as prompted
-
Open a PowerShell session as an administrator
-
Run the command > Register-PSRepository Name "PSGallery" –SourceLocation
-
"https://www.powershellgallery.com/api/v2/" -InstallationPolicy Trusted
Continue from the previous paragraph above for the remaining Installation Instructions.
Permissions and Account Access
MAPIT for Microsoft 365 requires:
-
A user account or service account with appropriate read access rights to the areas on the source network or local drives desired for importing.
-
A SharePoint Online account (service account) is provided for tool access with full privileges (Site Collection Admin) to the specific destination location in SharePoint.
-
A Login account with either Legacy Authentication enabled or Microsoft Authentication with App ID. If using Microsoft Modern Authentication – MAPIT for Microsoft 365 will attempt to use an AppID to delegate access to conduct the migrations on behalf of the user-specified (See benefits of using AppID for migrations)
-
An Azure Storage account for blob storage.
Please work with your local IT Administrator to obtain the proper access rights/permissions, respectively.
Overview and Optimizations
About
This quick start user guide is intended to provide a quick reference for Users and/or Administrators.
The MAPIT for Microsoft 365 tool is a standalone client-side tool that allows a correctly permissioned user has the ability to access a local drive or network share and migrate content and, optionally, metadata to SharePoint Online.
MAPIT for Microsoft 365 uses the Microsoft Migration API method for the migration of content into SharePoint Online and is appropriate for small to large-scale migrations while achieving best-in-class performance migration speeds as recommended by Microsoft.
Traditionally, the legacy mode of migration was via CSOM. It is important to note that the SharePoint Online Migration API method is not throttled, whereas CSOM is throttled. The legacy CSOM is throttled to keep the service healthy for everyone. For large-scale migrations, it is recommended by Microsoft to use the new SharePoint Online Migration API to conduct your migrations.
This tool specifically performs read-only imports of documents and metadata from local or network drives.
Documents and metadata from local or network drives are not modified in any way. Generally, upon successful validation of the migration to SharePoint Online – an administrator would archive or delete the local/network drive content that was migrated.
Summary of Features of the MAPIT for Microsoft 365 Tool:
-
Import files – flexible, easy, and fast from local & network drives into SharePoint Online
-
The migration method is not throttled unlike the CSOM method
-
Supports:
-
Use of metadata control file
-
Migration profiles – track in progress or completed migrations, Optional loading of document versions (based on naming convention)
-
Mapping of
-
Destination Document Library
-
Destination folders (target paths)
-
Add Content Type / Column values to documents
-
Add Content Type / Column values to folders
-
Global metadata mappings
-
Support for managed metadata (term store)
-
Created and Modified dates (automatic files + folders)
-
Created and Modified By (automatic from files)
-
Map and add new metadata and values to Content Type / Columns
-
Users to SPO Users
-
Global user mappings
-
Default user (if no matching user found)
-
-
Pre-analysis functionality available before packaging + migration
-
Identify errors and warnings ex.) long paths and no known user mapped
-
-
Packaging
-
Control partition sizes for smart packaging
-
One step - automatic scanning, packaging, uploading to Azure, and entering migration queue
-
Metadata
-
Target Paths
-
Document Versions
-
-
Migration Profile Scheduling for off-hour migrations, Post migration – validation
-
Check Azure for migration error logs
-
Validate folder and documents exist as planned in destination SharePoint
-
Log validation
-
-
Post migration - mapping of folder level permissions from Content Server to SharePoint
-
Display where inheritance is broken
-
Create groups in SharePoint
-
Add users to groups in SharePoint
-
Apply groups with corresponding access rights according to the Content Server source.
-
-
-
Support parallel migrations
-
Support for delta migrations
-
Perform unlimited/unmetered migration sizes (optional)
-
Auto-correct for invalid characters
Performance Optimization Considerations and Tips
The speed and performance of MAPIT for Microsoft 365 is dependent on many factors.
Gimmal - does not warrant or guarantee the performance of this tool in any way.
We outline general tips and considerations for the optimization of performance below.
The implementation of optimization considerations and tips is out of the scope of this tool and document.
Once the MAPIT for Microsoft 365 uploads the migration package to Azure Storage, the speed/performance falls directly to Microsoft Migration Queue Timer Job Threads.
The performance of the imports depends on many factors such as:
-
Network latency or performance of disk type for local processing
-
Internet (WAN) upload speed for entire package contents
-
Cloud server locations (network distance of tenant locations)
-
Performance is dependent on specific:
-
Number of metadata fields to be imported
-
Factors such as versioning, if enabled (how many versions for a document on average)
-
Size and number of documents
-
Number of parallel jobs running
-
-
Network traffic and internet speed about the time of day the imports and migration are run.
-
As of January 2020, if you are not using App ID to run the delegated migration authority, you will be throttled by Microsoft. Using a legacy User ID alone will result in Microsoft throttling your migrations once the user limit is reached. We recommend that you work with your local IT and Cloud team to review the considerations outlined above and to ensure performance optimizations are realized.
Performance Tip 1:
Split your migrations into parallel jobs to ensure that there are as many migration jobs running in parallel to maximize throughput. Microsoft notes that the number of migration jobs to the same Microsoft 365 tenant can vary depending on traffic, but to expect 8 to 16 Migration Jobs on average.
Performance Tip 2:
Run parallel jobs against different site collections to avoid bottlenecks against the same site collection in SharePoint Online.
Performance Tip 3:
Please ensure the client/host has an adequate amount of RAM (minimum 8 GB) for the scan, package, and upload steps.
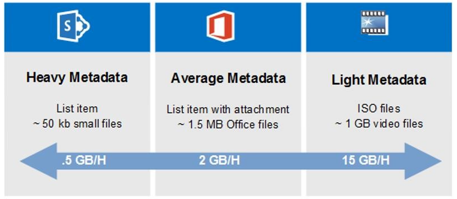
The diagram above provided by Microsoft highlights the typically expected speed for migrations once the migration packages are fully uploaded into Azure.
Performance Tip 4:
For best performance, you should run MAPIT for Microsoft 365 on a machine with at least 4 processor threads. Using 4-8 processor threads allows for maximum stacked upload performance and threads its performance. If you notice the migration performance – upload speeds to be slow or the migration PC speed to be slow, this means likely your upload bandwidth is being maxed out by the thread use. In this case, for best performance, you should adjust the number of processors being utilized by MAPIT for Microsoft 365. You may adjust the processor threads used and test to see what the maximum number of threads works best for your network bandwidth and PC performance.
To modify the number of processor threads used:
-
Locate the mapit.exe.config file, under appsettings
-
Look for the entry <add key="NumOfProcessors" value="-1"/>
-
By default, this is set to -1, meaning use recommended available threads
-
If you are experiencing bandwidth slowness or PC performance issues, you may set the value to something lower than your current maximum threads available. Ex.) If you have 16 threads, set this value to 8
-
The setting maximum value is 64, this would be the max number of parallel thread operations.
-
Save your changes, you must close the application and re-open for the change to take effect.
As each Client environment and network performance is different, it is up to the migration analyst to determine the optimal setting for your migration scenarios.
Miscellaneous Performance Best Practices:
Here are some additional best practices that we would recommend for your consideration:
-
Ensure you have maximum bandwidth (reduced latency) for uploads to Azure – either fast public internet or a dedicated Azure Express Route circuit
-
We do recommend a >= 100 Mbps connection. The faster connection reduces latency and offers faster uploads to Azure
-
If not, consider using Azure Express Route, where available and applicable to your organization
-
-
Minimize the use of metadata transfer where applicable to speed up your migrations – heavy metadata transfer affects overall migration speeds.
-
Use a new unique package name for each migration you conduct to avoid package name reuse, migration collisions, and confusion for validation purposes.
-
Plan your migration sizes for optimal upload size and speed
-
For example, avoid doing a big chunk migration of, say > 10 GB, instead do migrations of the 10 subfolders in sizes of 1 GB. Doing 10 smaller migrations as individual profiles will be far more optimal in terms of migration speeds and performance in comparison to doing a single 10 GB profile migration.
-
-
Furthermore, every migration analyst using MAPIT for Microsoft 365 should be using a unique SharePoint Online account as their migration service account to ensure the best organization and speed.
-
SharePoint migration service account should follow the requirements outlined in this document
-
-
Each parallel migration instance should target a different Site Collection to ensure resources are not in contention where possible.
-
Run parallel migration instances on a separate VM (PC or Server) where possible, as uploads from disparate migration VMs should be more optimal
-
-
Utilize migrations off core business hours to take advantage of the fastest speeds – this would be using our scheduling feature to schedule your migration profiles to occur during off-peak hours
-
If you are re-migrating content to the same site collection and/or document library, please use care and caution
-
If you need to re-migrate content for whatever reason, please:
-
Ensure all previously migrated content that was deleted is expunged completely from both the primary and secondary recycle bins
-
It is a recommendation to delete the document library and re-create it if there is no content to preserve as part of that cleanup.
-
-
Login / Authentication Mechanism
The login mechanism for migrations recommended by Microsoft is to use Modern Authentication with App ID. This will allow migrations to achieve the fastest possible speeds with less throttling versus the old mechanism. If you use the Legacy Authentication mechanism (described in Appendix B ), your migrations will be throttled much more heavily.
How to Configure Modern Authentication with App ID
This section describes in detail how to enable Modern Authentication with App ID to achieve the fastest migration speeds and to reduce migration throttling by Microsoft. Please ensure you follow the steps below to avoid any issues or errors with granting this access.
On first log in using MAPIT for Microsoft 365 – you must grant a one-time authorization to Gimmal’s Application ID access to your Microsoft 365 SharePoint Online environment on your behalf to run migrations in delegated mode.
-
Please ensure you have access to login as a Microsoft 365 Global Admin – if not, you would have to ensure that the Global Admin can be on hand to approve the one-time authorization.
Start MAPIT for Microsoft 365
-
We assume you have already specified your license key and configured your migration profiles database.
Step 1: Setup your first migration profile
Step 2: On the Profile Credentials tab – specify your SharePoint username and enable the option “Sign in with Microsoft”
Step 3: Click on the “Sign In” icon

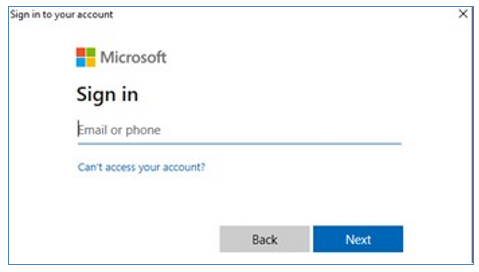
Step 4: You will be prompted to log in using Modern Authentication – please log in as a user with Site Collection Administrator access to the specified SharePoint Site Collection. This would be the standard Microsoft 365 login screen.
Step 5: Once logged in, if you are not the Microsoft 365 Global Admin you will be prompted to login one time using a Microsoft 365 Global Admin and grant access for the App ID to run migrations in delegated mode for your organization.
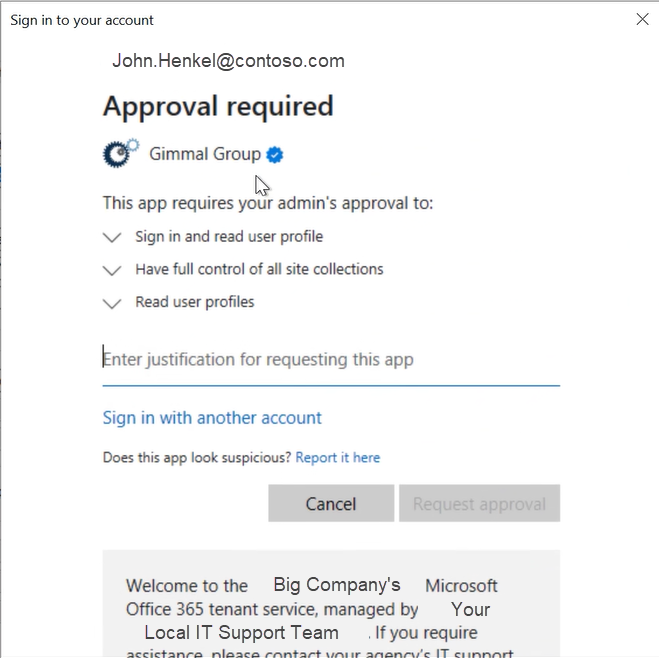
Click on the link “Have an admin account? Sign in with that account”.
Once you are signed in as the Microsoft 365 Global Admin – the “Permissions requested” screen will be displayed as shown below:
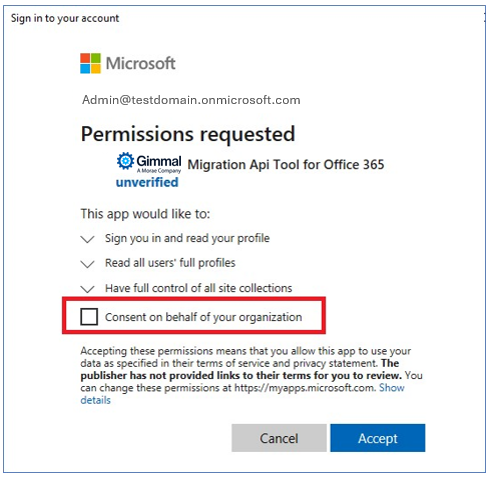
Please be sure to check off “Consent on behalf of your organization” and then click “Accept”.
Once you have consented and accepted as a Microsoft 365 Global Admin, the Gimmal App ID will now have access to run your migrations by delegation when a migration analyst is ready to conduct a migration. Delegating and granting access to Gimmal MAPIT for Microsoft 365 App ID (formerly ECM Wise) will ensure your migrations are optimized from a performance perspective and is the recommended approach from Microsoft for delegating access for migrations to SharePoint Online to ensure the fastest possible migration speeds and reduce throttling for your organization.
If you are unable to grant such access, then you must use the Legacy Authentication mode (with performance implications and drawbacks – see previous section).
For credentials, you can log in using any Microsoft 365 account, but they must have Site Collection Administration access to the site(s) you are migrating to.
Correcting Incorrectly Specified Consent
In the above section - if you did not check the option to “Consent on behalf of your organization” and clicked “Accept” – you will need to enable/correct this manually in Microsoft 365.
If that is the case, your migrations will not be able to proceed successfully using Modern Authentication with App ID.
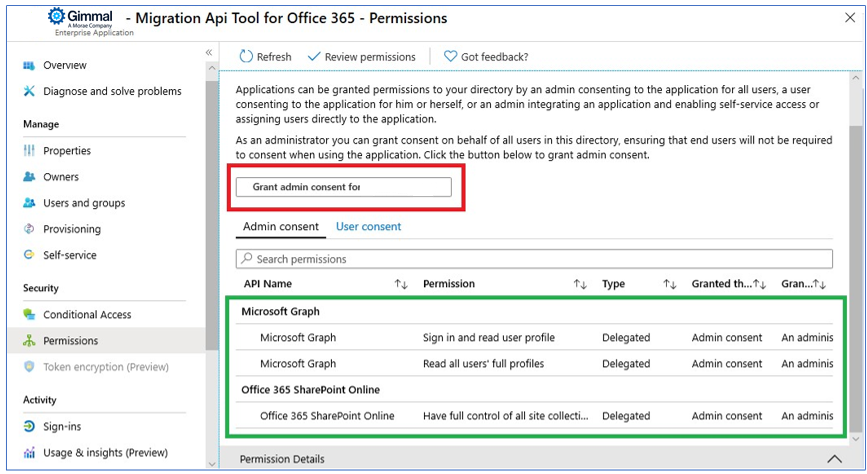
To resolve this, you would need to log in as a Microsoft 365 Global Admin and navigate to Microsoft 365 Admin Center > Azure Active Directory > Migration API Tool for Microsoft 365 > Security > Permissions.
If you had indeed not provided the correct consent - under the Admin Consent tab – you would need to click the option to “Grant admin consent for Gimmal LLC. (formerly ECM Wise Corp.)”. Once accepted, the entries in green would appear, which allows for user delegation privileges. If the entries in green already appear then you do not need to grant further consent since it is already configured and ready for use.
Using MAPIT for Microsoft 365
Process for Successful Migrations
Before you start your production migration, we recommend you review our best practice process steps below.
Gimmal recommends the following high-level process steps before deeming your migration as completed:
-
Plan: Identify migration areas with your customer and perform any pre-migration cleanup as required (not covered in this document)
-
If this is your first time migrating, please choose a smaller area to test, to ensure the behavior is as expected
-
If you are migrating from Content Server – you may wish to leverage the Gimmal Content Server Discovery, Analytics, and Deduplication Tool to enable your content discovery and analysis activities.
-
-
Plan: Create a new migration profile (optional)
-
Choose a unique Azure package name for your new migration as well as your migration-related credentials.
-
-
Plan: Specify the target location in SharePoint along with desired versioning settings
-
Metadata: Map your source metadata to your destination metadata
-
Metadata: Review, correct, and optionally add metadata to your migration plan
-
Restructure: If you need to identify and clean up long folder paths or long document names
-
Users: Review default and specific user mappings identified in the source to the destination
-
Analysis: Analyze your migration using the “Analyze” function
-
Correct any issues that may exist, such as unmapped users
-
-
Migrate: Schedule your migration or start your migration immediately - Package and Migrate using the “Start Migration” functionality
-
Migrate: Monitor Microsoft 365 via Azure Storage and SharePoint Online for migration progress
-
Validate: Review logs and perform validation (UAT) to ensure that your migration was successful
-
In Microsoft 365, validate that the contents, structure, and metadata are migrated as expected
-
Utilize the “Validate” function post migration – this will check the document and folder counts and let you know if all docs and folders were migrated as expected
-
For a document, spot check examine the tenant time zone settings to ensure that the modified and created dates match
-
If they are in different time zones, you may need to use the time zone offset setting to correct for differences
-
-
Validate: Optionally Save your logs as proof of migration
-
Apply Permissions (applicable for Content Server Source only): The mapping and application of source permissions is an optional step.
-
Most organizations would implement a new Information Architecture for security in SharePoint and inherit those permissions. In the case that you wish to preserve your source permissions it is possible by using the Permissions mapping functionality post migration to map and apply the permissions from Content Server.
-
We do not usually recommend re-using your Content Server permissions due to out-of-date and overly complex source permissions that likely exist from the source system.
-
Store your permission creation and permission application logs along with your regular migration logs.
-
-
Link Redirection: If you are migrating from a Content Server source - you may now choose to enable the Gimmal Legacy Link Redirector application to automatically redirect your legacy links contained in emails, documents, and web pages to the new destination SharePoint Online migration locations.
-
Closure: Clean up any Azure Storage packages that are no longer required
-
Closure: Your migration is completed!
Common Migration Metadata
When using Content Server as a source, there are several commonly mapped metadata fields – if you have a requirement to maintain this core metadata, we recommend creating the Content Type below if you wish to capture such metadata. The following is a recommendation to be created for metadata mapping and is entirely optional.

Capturing this metadata enables your users to search on and reference the original Content Server core metadata in SharePoint. Mapping the original CreatedBy and LastModifiedBy user information as text allows you to keep a string value of the original username/email to ensure this is captured regardless if the user exists in Azure Active Directory (user left company etc).
If you are globally mapping this metadata – please note that if you also have global user mappings, the global metadata mapping will take precedence over global user mappings. This would allow you to preserve the original username / email even in the case that you are remapping invalid users to new users.
Activation
Please note a valid activation code is required on the first use of MAPIT for Microsoft 365, required for every Client PC that it is run on.
Upon purchase of the tool, you would have been provided details on how to obtain the necessary activation codes for your requisite Client PC use.
When first running the Import Tool you will be required to specify a unique license key to register the product for use. You can enter the provided License Key in the “About” tab and by clicking the “Register” button. The registration will occur one time and will activate the software for use, no further activation will be required. Once the registration reports success, please click the “Save” button to save the license key to be used.
If you require assistance or would like to obtain additional activation codes for additional Client PC use within your environment, please contact your Gimmal support contact.
Database (for Migration Profiles)
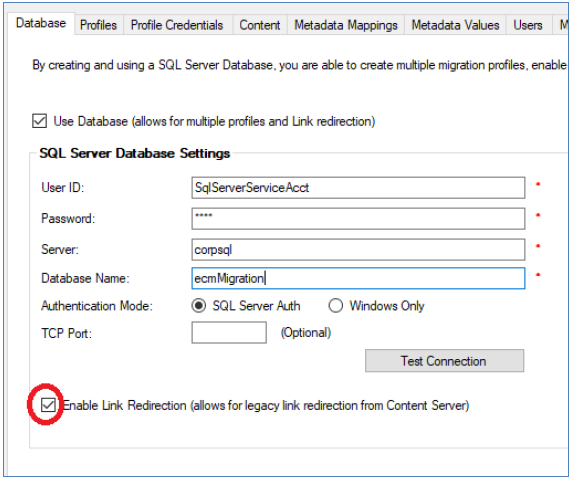
The database tab allows you to specify the SQL Server database credentials. The use of a SQL Server database is optional.
If you do not use the migration profiles, there will only be 1 migration profile available at a time, and the settings are generally not saved upon closing and re-opening the application.
If you wish to use migration profiles to simplify tracking and planning your migrations, then you will need to use this database option. You can come back and work on your migration profiles, share profiles amongst your team, or save your profiles as a template.
Please provide the necessary database access credentials if you intend to:
-
Save your migration profiles for each migration that you wish to perform
-
Enable legacy link redirection for migrated documents or folders
From the database tab, you can enable database use for Migration Profiles.
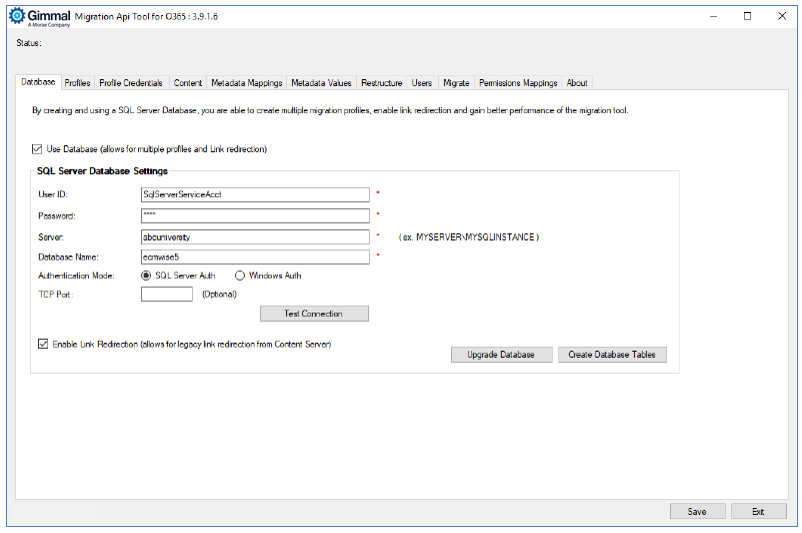
If you wish to enable this functionality, please provide the SQL Server credentials and connection information.
-
You can test your connection from this screen before saving by clicking “Test Connection”.
-
To create the tables on first-run, click the “Create Database Tables” – it will create the necessary tables for use.
-
Please ensure you use an IT approved location for database files (usually SAN storage database files).
Supported SQL Server Authentication Modes
For Migration Profiles with MAPIT for Microsoft 365 the default authentication for SQL Server is mixed mode. If you require the use of Windows Authentication mode for SQL Server please select Windows Only for the Authentication Mode option.
Upgrading Your Database Schema
For MAPIT for Microsoft 365, if you are on version 3.9.0.3 and up, if there are database schema updates in new versions of MAPIT for Microsoft 365 – you can now click the “Upgrade Database” button to automatically apply the schema updates if any exist.
If you are running an older version of MAPIT for Microsoft 365, you will still need to manually upgrade the database via the provided database SQL update scripts until you reach the minimum version # of 3.9.0.3 migration profile database schema.
You would only need to run the upgrade database function one time for your migration profiles.
We assume the database account you are using has the appropriate access to modify the migration profile schema. If the account does not have the appropriate access, you will still need to run the provided manual SQL update scripts.
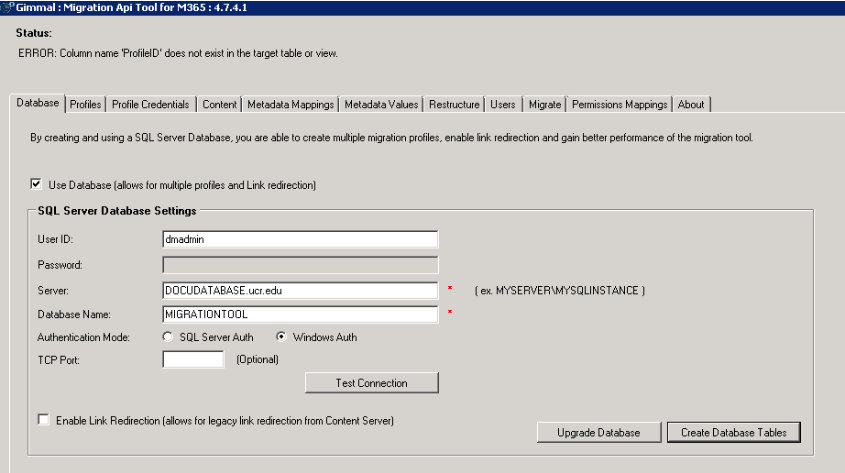
Database Collation Setting
It’s important to make sure the SQL Server database collation setting is configured for case insensitivity ‘CI’. If the collation sequence is set to ‘CS’ you may encounter the column name error shown below:
Migration Profiles
Multiple Migration Profiles are enabled when you specify a database for use with the Gimmal Migration Tool Suite. Otherwise, only 1 single profile is available if the database option is not enabled.
If multiple Migration Profiles are enabled, you would see a list of profiles in a list as shown below.
A Migration Profile represents your Migration Plan which includes all the settings for credentials, content, metadata, and additional options for your specific migration.
-
Whenever you click “Save Settings”, the settings are saved for the Migration Profile.
-
To open or work on a Migration Profile simply double-click on the line item, or click the corresponding Open button.
-
To delete a Migration Profile simply click on the corresponding Delete button.
-
Migration Profiles are accessible from any MAPIT for Microsoft 365 interface, which is configured to use the same database connection.
-
Please use care to avoid running a Migration Profile that has already been migrated (as you could overwrite information that has already been migrated).
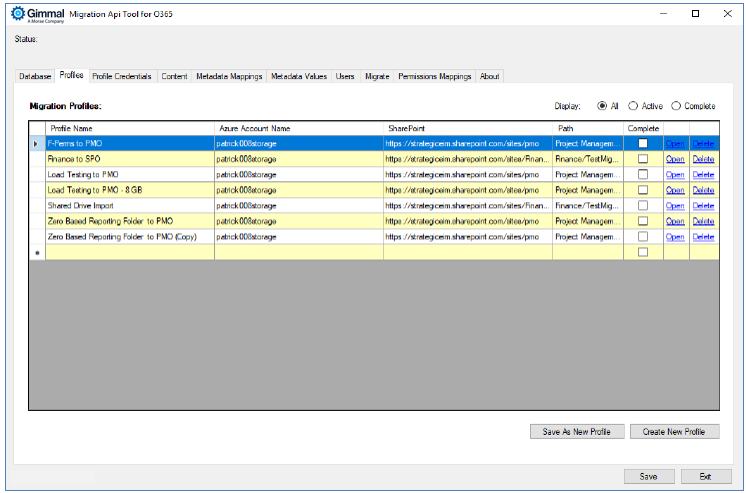
You can now take an existing migration profile and perform a Save-As on the profile itself. To use this function, highlight the profile you wish to copy and click “Save As New Profile”.
This feature allows you to take a common set of values and save it as a new profile within the same environment for re-use. An example of where you could use the Save-As New Profile functionality is if you wish to split up several folders in the same area for migration purposes, and the settings will be largely the same. Using the Save-As New Profile functionality allows you to avoid the need to replicate the entire set of settings for each folder area. One would just need to update the Content tab with the source and destination location and re-import the metadata specific to that area.
When your migration is completed, you can mark a migration profile as “completed” so the profiles can be sorted and grouped according to status. You can mark a profile completed from the Migrate tab.
Best Practice: Please note the use of Save-As New Profile as best practice, you must Re-Import the file information to ensure the values shown in the metadata and user tabs are updated with the correct values.
Best Practice: As a Recommendation – splitting out areas to be migrated is recommended, as doing so will minimize the potential for error conditions and allows for parallel processing and generally makes migrations/exports more manageable as they are in smaller chunks to process by the Microsoft Migration API jobs. An example could be to keep migrations to 5-20 GB per migration area.
Profile Credentials
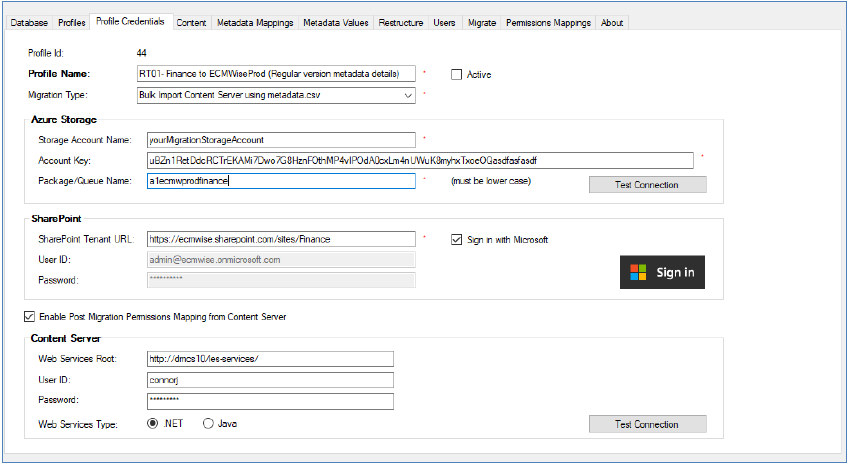
Profile Details
Give your profile a name.
Please ensure you specify the migration type:
-
Bulk Import from File Share
-
Intended for loading file share contents (source) into SharePoint Online (destination)
-
-
Bulk Import from Content Server
-
Intended for loading OpenText Content Server content (source) into SharePoint Online (destination)
-
Azure Storage Credentials
You are required to provide the destination Azure Storage credentials for use with the SharePoint Online Migration API.
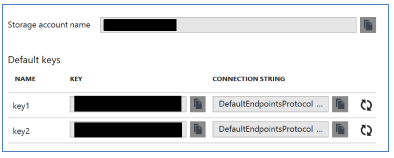
Please ensure you locate your appropriate Azure Storage credentials from the Microsoft Azure Portal – this includes the correct Storage Account Name and the Account Key (from Azure Portal > Storage account > Access Keys – shown below).
Define your queue name as desired and include the package container name to be used locally and in Azure.
SharePoint Online Credentials
The SharePoint Online credentials are used for read-only access to list the SharePoint site contents, including Document Library, Content Type / Column, and User information. You must provide a User or Service account credentials with the Site Collection Administration access to have the ability to access the full site contents to ensure the correct information is displayed for mapping purposes.
We recommend that each separate migration PC use unique SharePoint Online Credentials with equivalent access rights to maximize resource availability for migration processing.
See the section on Login Mechanism for information on your migration profiles. As previously mentioned, we recommend the use of Modern Authentication with App ID delegation.
Please click “Test Connection” to verify that you can connect to Azure Storage and SharePoint Online respectively.
Clicking “Save” will save your log in values for future use.
Steps to Provision and Configure your Office 365 Migration Service Account
You will want your SharePoint Online user account provided to have the ability to have Site Collection Admin access to the destination Site Collection.
You can use either an existing AD Account from Azure or create a new service account for migration purposes.
Create New Service Account
If you are creating a new service account, please ensure the account is configured as per the steps below to prevent issues with package creation and submission.
Below are the steps to provision and configure a Cloud-managed service account for your migration needs.
-
From Azure – create a new user (we want to create an Azure Active Directory – cloud-managed account)
-
Specify name: ex.) migrationserviceacct@yourDomain.com
-
Ensure block sign-in is not enabled (the account needs to be able to log in)
-
By default, the service accounts password is assigned as temporary, which is meant to be “reset on next login”
-
If you try to test the connection, it will result in the error message - “The sign-in name or password does not match one in the Microsoft account system.”
-
-
To fix the temporary password issue – you can log in to SPO using the service account and set a new password.
-
Browse to the destination SPO Site Collection > Site Settings > configure the Site Collection Administrators.
-
You must add the service account as a Site Collection Administrator
-
Use an Existing Account
If you are using an existing account, please ensure the account has the necessary destination Site Collection Administrator access as noted above.
You can now use this service account as the SharePoint UserID and Password on the Credentials Tab if using Legacy Authentication or SharePoint UserID if using Modern Authentication with App ID.
Content
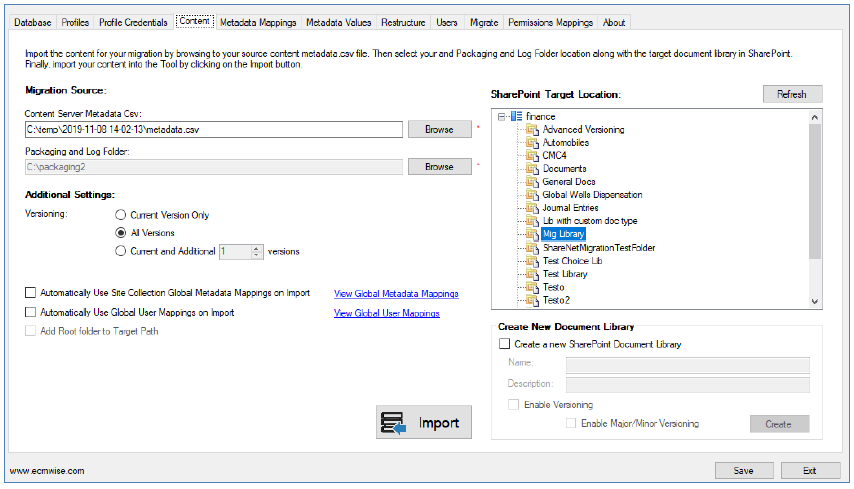
From the Content tab, you may:
Specify the Migration Source
Specify the migration source
-
From the previous Profile Credentials tab if you had specified:
-
Bulk Import from File Share (migrations from file share/network share to Microsoft 365)
-
Now browse to the root folder from which you wish to bulk import files from
-
-
Bulk Import from Content Server (migrations from OpenText Content Server to Microsoft 365)
-
Now browse to the metadata.csv (control file) you wish to use as the source.
-
-
Bulk Import from Documentum (migrations from Documentum to Microsoft 365)
-
Now browse to the metadata.csv (control file) you wish to use as the source
-
-
Specify the Packaging and Log Folder
Specify the Packaging and Log Folder – the local temporary and final package construction locations.
-
If you are running multiple instances of MAPIT on the same PC and one migration is in progress (uploading)
-
You cannot analyze or conduct another migration if you are using the same package location, this is because there is a lock on the packaging folder until the first process is done uploading.
-
Recommendation: If you wish to run multiple uploads using multiple instances of MAPIT, you must use a separate package location or do the migration uploads in sequence (one after another), or use another migration PC that is not using the same packaging folder.
For the folder specified, the logs will also reside in this folder - migration, analysis, and validation logs will be created here.
Specify Versioning Setting
Versioning – if specified, will support loading all versions or N versions
-
Versions are implicitly supported if the versioning is enabled – you do not have to have a row for each document version in the CSV. As long as the Gimmal version naming format is followed
-
Using _v# naming convention for incremental major versioning
-
-
For example, a Service Level Agreement is a document with 2 versions
-
Service Level Agreement -> Effectively version #2 (represents the latest version)
-
Service Level Agreement_v1 -> Is version #1 (uses _v# naming convention for subsequent versions)
-
-
If in Content Server – versions are not sequential, there is an option to check for missing versions on import.
-
The default setting is configured to check for 10 versions (ex. If the oldest version is version 1 and the next version is version 9, the tool will catch the version difference. If the oldest version is version 1 and the next version is version 12, the tool will not catch the version difference based on the MissingVerCountLimit setting.
-
If you enable a large value for this setting, it will impact the performance of the import function, please use care before altering this value.
-
Versions check setting, edit and save the config file, and locate the entry below
-
Locate the mapit.exe.config file
-
<add key="MissingVerCountLimit" value="10" />
-
Set the value according to the limit you wish to set
-
You must close the application and re-open it for the change to take effect
-
-
Content Server as Source – Version Notes
Advanced Versioning
It is possible to migrate with major/minor version numbers preserved in SharePoint.
If you do not enable version metadata in your source metadata.csv – major/minor versions from Content Server will be transferred into SharePoint as major versions only.
Content Server source ver#: 1.0, 1.1, 1.2, 2.0 will be in destination SharePoint as corresponding ver#: 1.0, 2.0, 3.0, 4.0
If you do enable version metadata in your source metadata.csv – major/minor versions from Content Server are transferred into SharePoint as major/minor versions.
Content Server source ver#: 1.0, 1.1, 1.2, 2.0 will be in destination SharePoint as corresponding ver#: 1.0, 1.1, 1.2, 2.0
Version Created By
By default, the version created by the comment is not preserved. It is possible to preserve your version created by metadata for all your versions in SharePoint. This would automatically add the Created By comment to the SharePoint version history comments. If you wanted to preserve this, you would need to enable version metadata in your source metadata.csv.

Recommendation
In the cases that you wanted to either preserve your exact version #’s for major/minor versioning or preserve the version CreatedBy comment – you would want to enable the version metadata setting for your metadata.csv file.
In all other cases, if the above use cases are not required, then proceed with your source with no version metadata values specified.
Specify the Azure Package Size
In version 4.X, the Azure Package size is no longer editable, the packages will default to 100 MB in size.
-
By default, this is set to 100 MB as recommended by Microsoft to achieve optimal migration job processing.
Delete Existing Packages
Delete existing Packaging Files – on a re-run of a migration, analysis, or validation operation, any existing package in the package folder location will be deleted and replaced with the latest assembled package contents (in case of re-migration).
Content Server File Name
Use the Content Server File Name from the Csv during import
-
This is only available if you are importing content from Content Server as a source
-
MAPIT will automatically use and replace the Microsoft 365FileName column with the original Content Server File Name
Use Global Metadata Mappings on Import
On Import, if you enable this setting it will use the defined Global Metadata Mappings to automatically apply the pre-defined metadata mappings from source to destination Content Type columns. Please use care when using this option as it may have unintended consequences to your metadata by inadvertently applying metadata mappings that were unexpected or unplanned.
From this control, you may view and delete Global Metadata Mappings by clicking the “View Global Metadata Mappings” link.
Use Global User Mappings on Import
On Import, if you enable this setting, it will use the defined Global User Mappings to automatically apply the pre-defined User mappings from source to destination User values (ex. Created By fields). Please use care when using this option as it may have unintended consequences to your User values by inadvertently applying User mappings that are unexpected or unplanned.
From this control you may view and delete Global User Mappings by clicking the “View Global User Mappings” link.
Root Folder to Target Path
Add Root folder to Target Path
-
This is only available if you are importing content from Shared Drives as a source
-
If you do not enable this option, only the contents of the source root folder would be migrated to the destination location
-
If you do enable this option, the source root folder and the contents of the root folder would be migrated to the destination location
-
Example:
-
“Add Root folder to Target Path column” option – it will include or exclude the Root Folder
-
ex.) Source files located at, c:\loads\InfoServices plan migration to Finance \ Test Migrations (Document Library)
-
If you enable “Add Root folder to Target Path column” the destination location will contain
-
Contents of InfoServices (source) including the folder itself will be found within Finance \ Test Migrations \ InfoServices
-
-
If you do not enable “Add Root folder to Target Path column” the destination location will contain
-
The Contents of InfoServices (source) will be found within Finance \ Test Migrations
-
-
SharePoint Target Location
SharePoint Target Location – the destination Document Library, folder OR
-
Create New Document Library
-
If you wish to dynamically create a new Document Library for which to migrate into as the destination, you can choose this option and specify:
-
Library Name
-
Description
-
Whether to enable versioning or not (if your source has versioning enabled, you would want to match that setting here for the destination location)
-
-
Reminder – Remember to Import File Information + Metadata: It is important to remember to click the “Import” icon before leaving the Content tab. The Import function will load the file share document metadata or the Content Server metadata for the files specified in the metadata.csv control file.
To import the file information + Metadata, please click the button labeled Import
If there is a high volume of documents in the source area to be imported, this function may take some time to complete. Please be patient, once the operation is completed, the full metadata will be available in subsequent tabs.
If you had enabled and specified Global Metadata or Global User mappings, these will also be applied as part of this function.
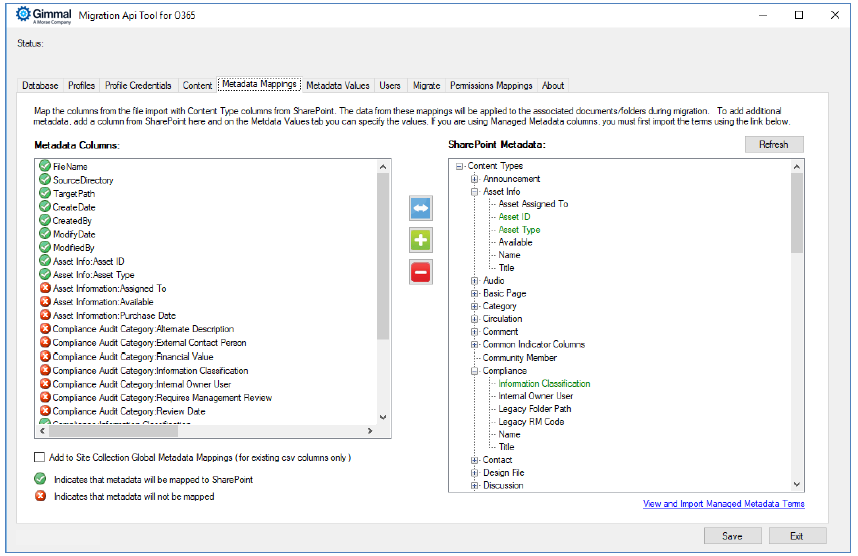
Metadata Mappings
Please note that for your existing metadata mappings, you can add Global Metadata mappings (available to be used in other profiles automatically) if you enable the “Add to Global Metadata Mappings” checkbox when you add a mapping. You can disable the setting if you do not wish to add a mapping to the Global Metadata mappings.
-
Add Global Metadata mappings is applicable only for existing source columns, value (you cannot add a new metadata mapping that doesn’t exist in the source)
From the metadata mappings tab, you may:
-
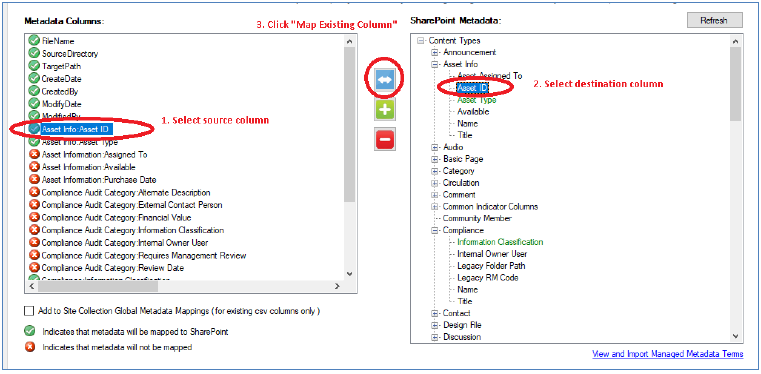
Map an existing Source Metadata Column to a SharePoint Column (migrate existing metadata to SPO)
-
Map an existing column of data from the source to a SharePoint Content Type column
-
You would select the source column (values are from the source Metadata Columns), select the available SharePoint metadata column, and then click the “Map an Existing Metadata Column to a Column in SharePoint” button.
-
The existing column in the Metadata Columns would be renamed to target the SharePoint column.
-
Is now ready to be populated or modified with additional metadata if required
-
-
-
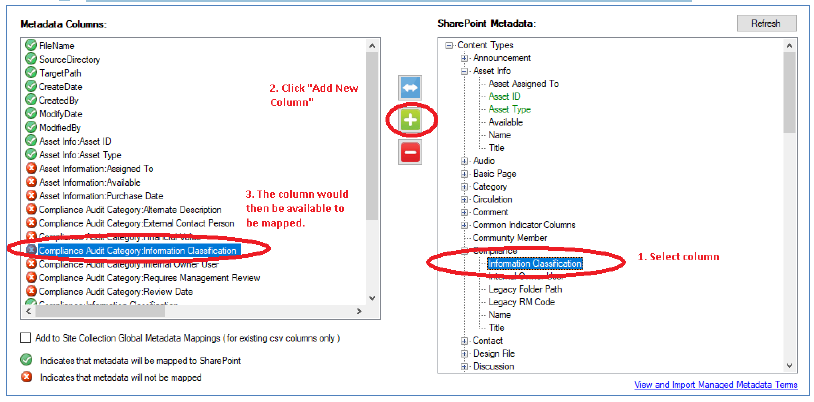
Add New Column to be Mapped (allows you to dynamically add metadata to SPO)
-
Select an existing SharePoint Column from the SharePoint Metadata list, and then click the “Add New Column to be Mapped” button.
-
A new column is created in the source Metadata Columns
-
It is now available to be populated with metadata – where each row represents a file or folder
-
-
-
Un-map a Source Metadata Column (will not be migrated to SPO)
-
Select the source Metadata Column you wish to unmap and click the button
-
Please note, the base source Metadata Columns cannot be unmapped as that is the default behavior, only custom mappings can be unmapped.
-
The most common metadata use case would be for a user to add the columns that they wish to populate with metadata in SharePoint upon migration (by choosing “Add New Column to Csv”). This way the columns are added to the Source Metadata Column mappings for the user to manually input and/or specify the values in the column corresponding to each document or folder in the rows.
Map existing metadata to be migrated.
To summarize the steps for mapping existing metadata from source to destination:
-
Map the Source Metadata Column to the SharePoint Content Type Column via MAPIT for Microsoft 365
-
For example: To add Asset Information: Asset ID from source (OpenText Content Server attribute value) to a corresponding Column in SharePoint – select the source column and destination column and click “Map an Existing Metadata Column to a Column in SharePoint”
-
The column from SharePoint will now appear as a green checkmark in the Source Metadata Columns list and in the Metadata Values Tab in MAPIT for Microsoft 365 for review/editing.
-
To add/edit the new values for your migration plan, please click the Metadata Values Tab.
-
-
Source Metadata Column Name: When you select an existing column to map to a SharePoint column, the original column name in the source metadata columns will be replaced with the SharePoint column name. When you hover over the source metadata column name – the original column name will be shown for reference.
Add new metadata to be migrated
To summarize the steps for adding metadata for your migration (dynamic metadata addition – injects new metadata that didn’t exist at the source location):
-
Map the SharePoint Content Type columns to the Source Metadata Column via MAPIT for Microsoft 365
-
To add Client Name and Security Classification from the Contracts Content Type to our Source Metadata Column mapping settings – for each item select the column you wish to add and click “Add New Column to be Mapped”
-
The column from SharePoint will appear in the Source Metadata Columns list and in the Metadata Values Tab in MAPIT for Microsoft 365 for population
-
To add/edit the new values for your migration plan please click the Metadata Values Tab
-
-
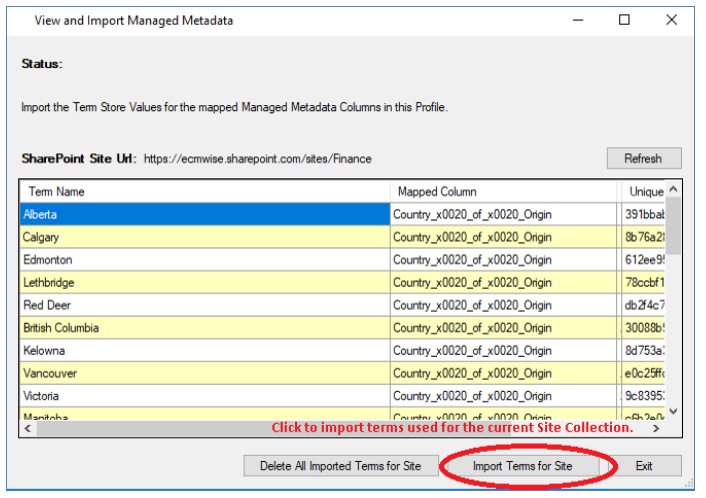
Mapping to Managed Metadata Values
When mapping to a SharePoint Managed Metadata column it is recommend to import your Managed Metadata Terms for the current Site Collection first, using the View and Import Managed Metadata Terms link interface from the Metadata Mappings tab.
Failing to import the term store values for the Site Collection can result in only the referenced Terms for your migration being automatically imported during the Analysis step.
Notes about Imported/Importing Terms
-
If your term store term contains many values (ex. thousands) – the import function could take a long time to import the values. Please be patient for this operation to complete.
-
Once imported, the Managed Metadata Terms will be available for every target destination within the same Site Collection. In other words, any subsequent migration profile targeting the same Site Collection or a subsite of that Site Collection, will have the Terms available.
-
If Terms are renamed in SharePoint, you should Delete All Imported Terms for Site then Import Terms for Site. Choosing to import without first deleting them results in only missing or new terms being imported.
Duplicate Terms in a Term Set are not supported by MAPIT (although they are supported in SharePoint), they must be uniquely named. Consider a SharePoint column called “City Name” which uses a term set of the same name. The terms (and child terms) are as shown below. Note the duplicated term, Vancouver.
-
Washington State
-
Seattle
-
Spokane
-
Vancouver
-
-
British Columbia
-
Victoria
-
Vancouver
-
In this case, after mapping your source metadata column to the SharePoint column, when executing the migration – MAPIT will assign the first value of Vancouver available in the Term Set.
If unique names are not a viable option, a possible workaround could be temporarily renaming the duplicates, then revert the name back post-migration. For instance, in SharePoint you could rename the second instance of Vancouver above to Vancouver BC. The source metadata column values would need to be similarly updated to match.
Retention Labels
If an organization needs to map Microsoft 365 Retention Labels to their content this is supported and available for use in MAPIT for Microsoft 365. Our tools support the common application of “create date” based retention codes or “event-driven” retention.
It is possible to map existing classification codes to retention labels or to inject retention label values as part of the migration automatically. We assume the reader has experience with using Microsoft 365 Security and Compliance Center and retention labels and policies.
Specify a Retention Label Value and Retention Label Setting value pair. The Retention Label Value spelling must match exactly. If using an “event-driven” retention schedule you may also specify corresponding Compliance Asset Id values.

Metadata Values
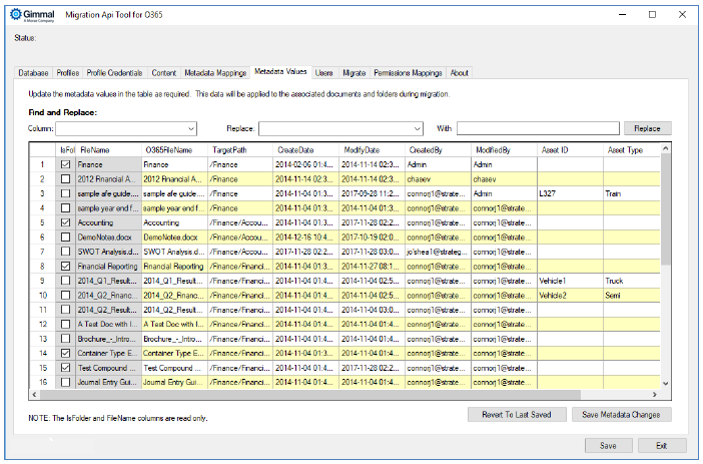
About
This tab is optional for review and entry. The Metadata Values tab allows one to review and edit/manipulate content and metadata for migration. In effect, one can visualize the full data set and specific metadata that will be included as part of the migration.
Each row in the table represents a folder or document and the corresponding metadata for migration.
The columns are sortable and the total count of the objects to be migrated is reflected in the row count.
By default, the target path, created date, modified date, created by, and modified by fields will be populated based on the metadata loaded from File Share or Content Server (depending on the migration source option chosen).
Large data set: Please use caution if you are reviewing/editing a large dataset (>100,000 items) as this table may take some time to load and render or save (in certain cases). Please use common sense to optimize the use of this functionality.
If you do not need to edit or change values, you may skip this step to avoid this page from loading if you do not require it.
From the metadata values tab, you may:
-
Delete rows (will be skipped for migration)
-
Commonly modify values by changing the text in a cell for
-
Microsoft 365FileName – allows you to change the destination file name
-
Note: The Microsoft 365FileName for a folder name is not used and is ignored
-
-
CreatedBy / ModifiedBy usernames
-
Custom metadata mappings
-
-
Add metadata values for newly mapped columns
-
Add metadata values that will be imported into the destination SharePoint column
-
-
Bulk “Find and Replace” of values for any of the modifiable columns
-
Ex.) if you were adding new metadata to the SharePoint column of Security Classification
-
You could perform a find and replace of Security Classification – blank value via REPLACE ALL value of Public
-
-
Save changes to your metadata values
-
Revert to the last saved changes of your metadata values
Field validation: Please ensure you have specified valid metadata column values, MAPIT for Microsoft 365 does not currently validate the values to check for the accuracy of input.
Using Managed Metadata Term Values: If you need to add Term Values in a cell, you can type in the Term you wish to apply on the document or folder. The Term value must match the mapping you specified for the metadata column and the value must be a valid Term value for the SharePoint column. If an invalid Term Value is inputted it will be noted on the Analysis function.
Using multiple Column values: If your SharePoint column definition supports multiple values you can use the “|” to specify multiple values in the metadata values row column cell. Ex.) Applicable Countries Column: Canada|UK|China
Supported SharePoint Column Definitions: Please note – columns for use in MAPIT must be defined at either the Content Type level which is applied to the Site Collection or Site Collection Column. Library columns are also supported but you must enable this to be shown from the Metadata Mappings tab.
As a best practice, the definition of columns should be done at Site Collection or site-wide basis versus at a library column level to avoid confusion and promote reuse.
Using Find and Replace
Below is an example of how one can use the Find and Replace functionality.
We have selected the column Asset ID, to replace all values with “123456”. Once the “Replace” button is clicked all matching values (in this case replace all) would allow us to replace the value for migration.
Common uses would be to specify default values for new metadata mappings where there is no value in the source but there is a desire to have default values in the SharePoint column post-migration.

Using Row Filtering
You may use the filter function to filter on the core metadata columns.
The filterable core metadata columns include:
-
Microsoft 365FileName, TargetPath, CreateDate, ModifyDate, CreatedBy, ModifiedBy
Filtering allows you to choose to display a smaller subset of information according to the column value you wish to filter your results on.
Restructuring
About Restructuring
The Restructuring tab functionality is optional.
-
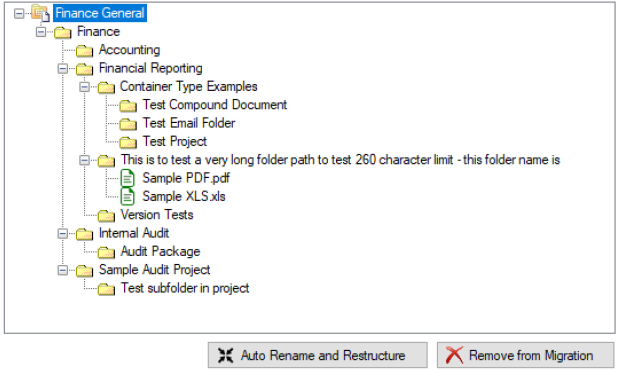
If the restructuring of content flag is enabled, it allows the migration analyst to restructure the folders dynamically in the migration tool profile. This interface will display all folders and it will also display any document that may violate the name length or path length restrictions in SharePoint.
-
If the restructuring of content flag is disabled, the migration will use the existing folder structure from the source destination.
In the cases where the migration analyst needs to restructure the folders for the target destination – this tab provides the functionality to move, rename and exclude folder content within the profile without changing the Content Server or file share source.
Revert to Source (Revert to Metadata Values)
When enabling this function – at any time you can revert to the original source paths by clicking “Revert to Metadata Values”. When you save your restructuring changes they are saved locally to the migration profile, they are not saved in Content Server or File Share - nor are the changes (moves, renames) made in Content Server or File Share. There are no modifications stored, the restructuring is applied only to the destination migration area upon migration.
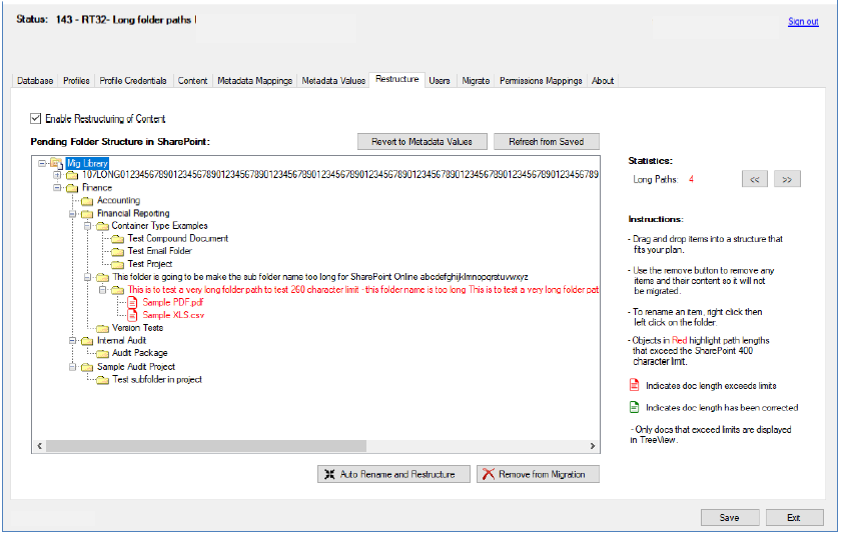
Restructure Folders or Documents
If a folder or document name is shown in red that means it exceeds the SharePoint folder name length limitations. You should rename the item to fix this issue.
It is possible to rename a folder or document dynamically in the migration profile by right-clicking, then left-clicking on an object name and typing in the new name.
It is possible to move folders by dragging and dropping them within the tree view interface.
It is possible to exclude a folder and its content by clicking the “Remove from Migration” button. This will remove the item from the migration profile’s restructuring tree view.
If at any time you need to revert your planned restructuring changes during the planning phase – just click the “Revert to Metadata Values” button. This will revert your migration profile restructuring view back to the original source folder structure. You will lose all of the in-migration profile restructuring changes.
At any time when you are satisfied with your changes, you can click “Save Settings” which saves your changes to the migration profile.
Best Practices
As best practice, we recommend migration of “like” for “like” and avoid restructuring content on the fly to keep things simpler for migrations. If you absolutely must restructure – it is often best practice to do so in the source system prior to migration. This functionality supports restructuring on the fly without changes to the source structure.
Please use care when restructuring. You should never restructure and perform a re-migration once the migration has already run and completed - because if you restructure post-migration and attempt to perform a delta migration that could break things since the document is going to a different location it may duplicate those items since you are choosing a new folder structure.
Restructuring should be done very close to when a group is ready to migrate to avoid missing any changes in the folder structure. If new folders are added after the restructuring has taken place - they will not be captured since there were new additions since you did the restructuring - so if you must use restructuring you would do so when you are almost ready to migrate to minimize/prevent late changes.
Auto Rename and Restructure Feature
Common use cases for this feature:
-
A migration area contains folders or documents that are still too long, and such cannot be migrated to SharePoint
-
There may be times when users have been given the opportunity to clean up their folder structures and file names but the lengths may still be too long
-
Users are unable to find time to clean up their folder structures, so the migration analyst has been given the mandate to automatically clean up the folder and document names and accepts the risk of doing so
We recommend where possible that the migration analyst first use the Restructure Treeview (Pending Folder Structure) interface. This interface will automatically display all items that are too long. This interface allows the migration analyst to manually rename folders and documents to fit under the SharePoint naming length limits. As you rename folders and documents the interface will automatically be updated to show what items are still over the SharePoint path length or name limits. Although a tad more work this is the safest way to ensure all folders and documents fit the limits of SharePoint while ensuring the renaming and restructuring is going to make the most sense for the migration stakeholders and that context in the naming of the objects is maintained.
Please note the “Auto rename and restructure feature” should only be used as a last resort to force the source Content Server folders or document names to fit under the SharePoint naming length limits.
When the migration analyst is given the mandate to use the auto rename and restructure feature of this tool the operation is done accepting the risks below:
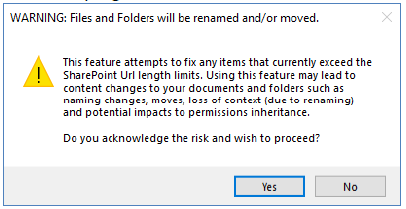
This feature will automatically change the structure so that the items all fit the SharePoint name and URL length limits such that the following may occur (risks):
-
Documents may be renamed (shortened)
-
Folders may be renamed (shortened)
-
Folders and Documents may be moved up to parent folder level(s)
-
Permissions inheritance may be lost due to folder and document moves (only when using the Permissions Tab)
-
Context may be lost for documents and folders since the naming may be changed/shortened
WARNING: Gimmal does not warrant this function - any potential changes made by this feature are done at the risk of the migration user and Client Stakeholders.
Once the auto-renaming and restructuring are completed the pending folder structure interface is updated and there should no longer be any red or orange entries. At any time the migration user can revert the changes by clicking “Revert to Content Server” structure. Only when the “Start Migration” process is started will the proposed changes here be implemented as part of the migration.
Auto Rename and Restructure Example
This is before the “Auto Rename and Restructure” is clicked
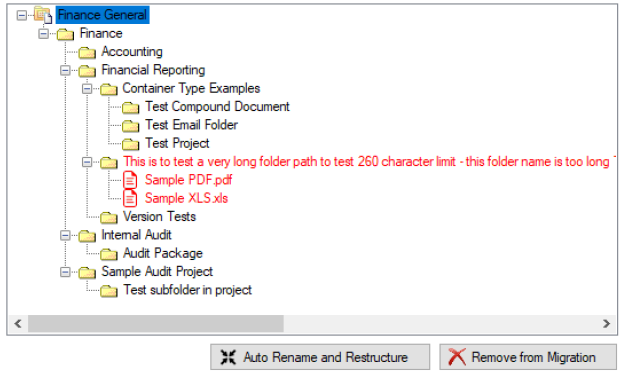
This is after the “Auto Rename and Restructure” is clicked – note that the red folder from above has been automatically renamed to enforce the path length. The documents that were originally in shown in red and over the limit before are now shown in green
User Mappings
About
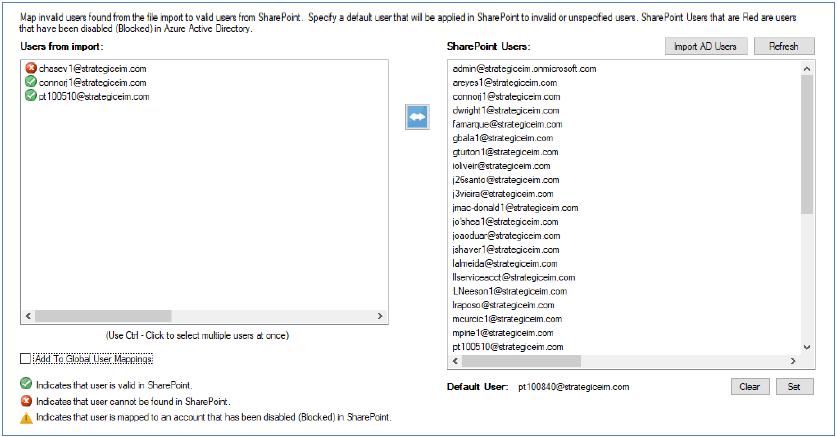
The Users Tab allows one to commonly identify and specify user mappings from source to destination (SharePoint AD / Microsoft 365 users).
Valid users will be shown with a green check to the left of their username or e-mail.
Invalid users will be shown with a red x to the left of their username or e-mail.
You can specify Default User mapping to apply if there is no mapping found.
Please note for your existing User mappings you can add Global User mappings (available to be used in other profiles automatically) if you enable the “Add to Global User Mappings” checkbox when you add a mapping. You can disable the setting if you do not wish to add a mapping to the Global User mappings.
-
Please note that if you re-import your AD User entries that you’re the Global User Mappings table will be deleted, and you will have to reset your user mappings.
-
The Global User Mappings can be set in the database directly as well if required but is not covered here. Updates to the Global User Mappings via the database is not supported.
From the User tab, you may:
-
Import AD Users (one-time load or refresh when required)
-
If you are using the migration profile (database) option – you can choose to import the AD users to the database. If you click the “Refresh” button the AD users will be refreshed with the latest list.
-
For cases where there are many AD users – saving their usernames locally will be beneficial for loading times as loading > 25,000 AD users can be slow.
-
-
Map a local user found from Source Import to a SharePoint Online user
-
Select the Users from the table on the left (this is from the shared drive), select the specific User from the SharePoint Users column on the right and then click the “Map SharePoint User to Import User” button
-
You can select multiple users from the Users from Import list for mapping by using Ctrl-Click
-
-
-
Set a default user that can be used to replace any user value that is not valid in SharePoint Online
-
Select the specific default User from the SharePoint Users column on the right and then click “Set” next to the Default User value
-
The selected User will be used as the default User if the specified User account/name is not found in Microsoft 365
-
-
User Mappings from Content Server: By default, e-mail User Principle Names (UPNs) will map correctly across to SharePoint AD as long as the UPN is the same across source and destination, and if the user account exists in Active Directory and is correctly synched into both Content Server and SharePoint.
SharePoint Online Users: These are generally available to be mapped if your organization currently uses Azure Active Directory sync to Office 365. This would mean that your local user accounts are also available in Microsoft 365.
For example for a fictional company domain Strategiceim.com, MAPIT for Microsoft 365 would determine that a shared drive file was created by user pframpton – from the username you could then easily map pframpton to pframpton@strategiceim.com (using the MAPIT for Microsoft 365 interface) which is the user account that is synchronized into Azure Active Directory for use with SharePoint Online. Performing this mapping action would allow one to preserve the history of created and modified by users from your internal network automatically.
Link Redirection
The Link Redirection functionality can be enabled from the Database Tab, and is optional for use with Legacy OpenText Livelink Content Server migrations. If you are doing a straight File Share migration you can disable this option.
If you are doing a migration from the Legacy OpenText Livelink Content Server environment this setting will allow you to preserve your legacy links contained within existing documents, emails, and intranet pages. Link Redirection will allow you to seamlessly preserve your links to automatically redirect users to the correct destination location in SharePoint Online.
Please consult with your Gimmal support contact to access the documentation for the Link Redirector web application. The specific Link Redirection configuration, setup, and use are not covered in this guide.
To enable the Link Redirection option – enable the checkbox and provide the credentials to your SQL Server database.
You will need to provide the SQL Server:
-
Account Name
-
Password
-
Server name
-
Database name
-
Authentication mode
-
TCP Port (optional)
When ready you can click the button “Test Connection” to ensure you can connect to the database and authenticate properly.
Migrate
Analyze
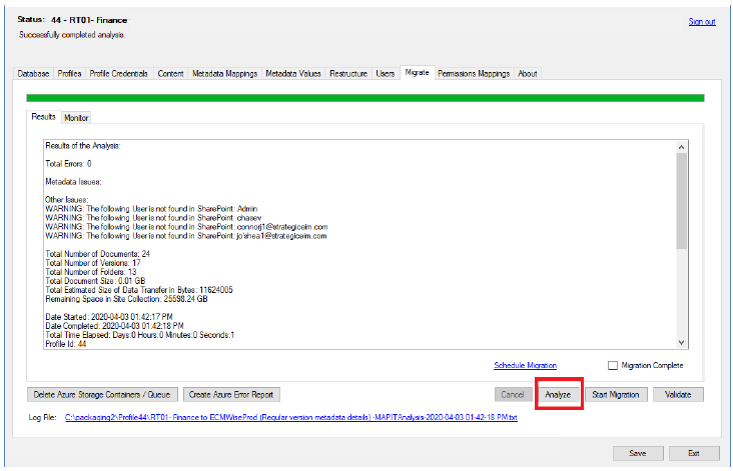
The Analyze function is a feature that migration administrators can leverage to validate or plan a migration and to identify potential migration issues prior to running the migration. It can be a crucial step in the analysis and planning of your migrations.
The Analyze function is not intended to identify all potential issues, as some issues can only be identified during staged migration testing. Gimmal recommends that test migrations are also done in a near-production-level staging environment to ensure all migration issues are resolved prior to conducting the production migration.
Please note that it may take some time to run the Analyze function if the migration plan is quite large. You can cancel the Analyze operation at any time by clicking the “Cancel” button.
Maximum path length: As of writing the current new max length of the path in Microsoft 365 is 400 Unicode units.
URL = protocol + server name + folder or file path + folder or file name+ parameters. The tool will provide a warning if the path lengths are found to be exceeded.
The Analyze results: are written to a log as specified in the Logs folder location. This would allow further analysis by other migration team members to rectify any potential warnings or errors before testing migrations further.
Start Migration: Package and Migrate
At this step, after you’ve analyzed and tested a sample migration you are now ready to begin your final package and migration step into Microsoft 365.
Package and Start Migration
From the Migrate Tab, you would be able to click the “Start Migration” button. This will automatically kick off the scan, package, and upload operation to Azure. Once the upload is completed by MAPIT for Microsoft 365 - the Microsoft 365 tenant migration queues will pick up the job within 1 minute. At this point in the migration process the speed and performance to complete the final migration are out largely out of your control as the processing is occurring within the Microsoft environment. Once the migration is completed – the appropriate log files can be found in Azure Storage in the package specified. Post-migration if there are any Azure error logs they can be generated from the “Create Azure Error Report” function. .
Summary of the Migration Process Steps
-
Click “Start Migration”, and the process below is automatically started:
-
Analyzes migration if this was not already done
-
Packages up migration according to migration requirements specified in the migration profile
-
Uploads N package(s) to Azure
-
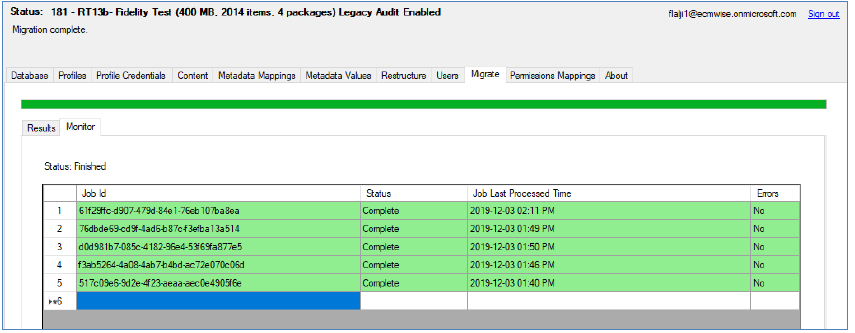
Begin monitoring (“Migrations > Monitor Tab”) – click on the tab to begin monitoring the jobs in real-time
-
Microsoft Migration API assigns a migration job to each of the N packages
-
Displays the status of the N jobs as they are uploaded and the status of the migration job
-
If there are multiple packages being uploaded - they will be displayed here in real-time once an upload is completed and a job ID is then assigned for processing
-
The status bar (percentage) is of the current jobs in the queue, as more jobs are added the status is adjusted accordingly
-
-
Once all the jobs are completed the migration is finished and the status bar will indicate migration completion
-
Please note if your connection to the WAN/internet is interrupted during the upload operation to Azure – the upload may be compromised and will be incomplete. This tool is not responsible for managing or preventing such service interruptions within and outside of your network. If this occurs your migration may encounter errors that are outside of our control due to connection being lost during the upload and job submission time.
You can cancel the Package and Start the Migration process at any time by clicking the “Cancel” button.
If you cancel the process it will stop the packaging and upload process. Once the upload has been completed you cannot cancel the migration using MAPIT for Microsoft 365.
Schedule Your Migration
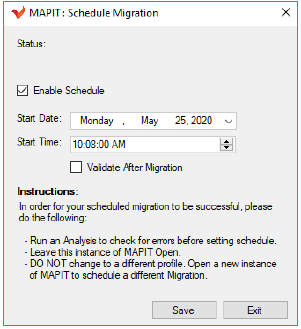
There may be times when you do not wish to start your migration until later in the day to take advantage of faster speeds and or business reasons such as to avoid busy times for customers. To accommodate the ability to schedule your migrations to occur during off-peak hours you may wish to leverage the “Schedule Migration” function.
To use the “Schedule Migration” function your migration profile must be marked as “active” and the migration also must not be marked as “completed”. In addition, you must first perform an “Analysis” and have resolved any issues prior to scheduling. If all requirements are met the migration profile can be scheduled and set to run on the scheduled time. You may also set Validation to occur after the migration has been completed. Once the migration profile is successfully scheduled you will see a countdown in the status display for when the migration will begin.
Best practices:
-
Leave the migration profile open on the migration tab and wait for the migration scheduler to start
-
If you wish to run multiple scheduled migrations, you will need to have multiple migration windows and migration profiles open and scheduled accordingly
-
Your migration PC / VM must be running along with MAPIT with the countdown displayed
-
If your PC restarts or you log out of that session for whatever reason – your scheduled migration cannot occur
-
-
Schedule migrations to occur at different times (not at the same time) – this allows maximum bandwidth and thread usage (stagger migrations – ex. 6:30 pm, 6:45 pm, …)
-
When using the migration scheduler – the best practice is to schedule the migration to occur that same day to avoid unexpected changes or if you forget that a migration is occurring in the future
-
Upon migration completion + validation we recommend you close the instance of MAPIT to avoid session conflicts
Monitor Migration Jobs
Monitor and Check Migration Job Status
The migration job(s) can be monitored – you may monitor the status and estimated progress of the migration by clicking the “Migrations > Monitor” tab. The Migration Job Status tab will update periodically with the current status reported back from the Microsoft Migration API Job(s). When the migration is complete – the job status will read “Migration Complete”.
Retrieve Azure Error Logs if Applicable
If an error occurs, you can click the option “Create Azure Error Report”. This will go to Azure and retrieve the reported job errors. If an error is reported the Job row will be highlighted in red. You may then click the “Create Azure Error Report” button as a convenience feature that will retrieve the errors if any that were logged by the Azure Microsoft migration job. This will compile all the errors and store to a log file in the log folder specified. The file can be opened for review and for your manual error resolution processing.
Resolving Azure Migration Errors
There are times when the Microsoft Migration API itself will encounter issues with your migration content.
Commonly errors can be due to:
-
Invalid content or corrupted documents/objects that somehow violate Microsoft’s Migration API rules
OR
-
Hiccup on a migration job on one of Microsoft’s servers or some other one-off error due to a Microsoft Job Error
In the case that you encounter a Job Error and you have reviewed the Azure Error Logs and you are confident that the migration error was due to a Microsoft one-off error you may re-run a migration job to resolve the issue. To attempt to resolve the Microsoft Job Error once the migration has been completed:
-
This function only works if your Azure Migration Containers are still intact (do not delete them)
-
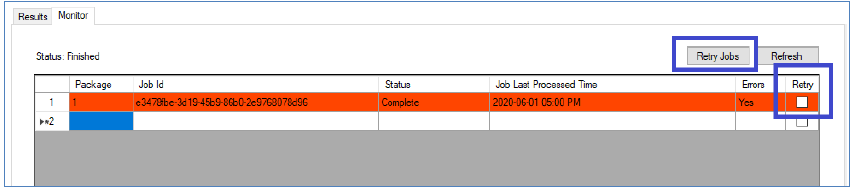
Identify the Jobs that have an Error (the row will be red and Error=Yes will be indicated in the Error column)
-
Click the Retry checkbox for all the Jobs that you wish to re-run
-
When ready click the “Retry Jobs” button
-
Wait for the Jobs to be resubmitted and re-ran
-
Upon completion, a Retry Job Log will be created
-
Click “Validate” to check if the errors have been resolved
There may be cases where errors are due to underlying issues with certain documents. If your validation comes back with errors, you will need to perform additional analysis to determine the appropriate fix for re-migrating those select special case documents.
You also have the flexibility to re-submit any job that has already been migrated – in case someone has mistakenly deleted a document post-migration. You would just need to identify the job/package for re-run. Please use care when re-running migration jobs as it will have an impact on migration performance.
Delete Azure Storage Containers and Migration Queue
From the Migration Tab, you also have the option to choose to delete the storage containers and migration queue from Azure. We recommend you review the Microsoft Migration API logs first.
Once you have reviewed your logs and validated your migration you should delete your storage containers from Azure. You can delete the Azure packages from this screen by clicking “Delete Azure Storage Containers / Queue” or manually in Azure.
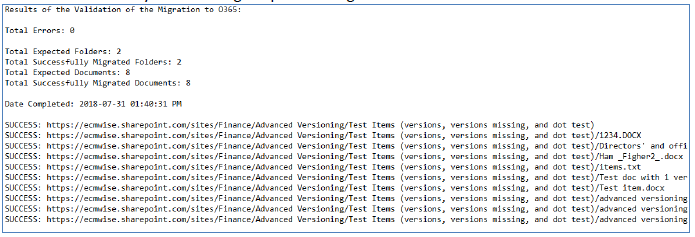
Validate Migration
Validate
Once the migration has been completed (status is showing complete). You may wish to perform a simple migration validation.
There are 2 validation options:
-
If your migration is relatively small (< 1000 objects) you can perform a simple validation
-
For smaller migrations, the basic validation will be the fastest. Note: Basic validation only validates object existence and does not validate the existence of all versions. In many cases, basic validation (object existence) is enough for organizations to validate their migrations.
-
-
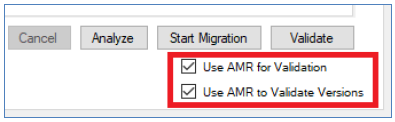
If your migration is large (> 1000 objects) you can perform an AMR (Asynchronous Metadata Read) based validation
-
For larger migrations, AMR based validation will be optimized to handle thousands of objects
-
If you wish to use AMR validation you must enable this option for your specific migration profile
-
In addition, if you wish to validate your versions – you must enable “Validate Versions” option – if you do not enable this option then only the base object (object existence) will be checked, and the tool will not check the version counts. Note: If you choose to validate versions it will take longer to validate since the versions are also checked.
-
Post migration, to run your validation – just click the “Validate” function from the Migrate Tab. This function will perform a very simple validation step by checking that every container (folder) and document now exists in SharePoint. The validation does not check version counts or metadata transfer. It is intended as a simple validation that documents and folders were created.
We recommend the following validation steps as part of a standard validation process immediately post-migration:
-
Perform the simple validation available in MAPIT for Microsoft 365
-
Save your validation log as proof of migration
-
-
Perform manual validation effort of a set % of your content as a best practice
-
Save your findings
-
-
Please reference your package Azure logs to ensure there are no other errors raised by the Microsoft SharePoint Migration API
-
Save your Azure logs as proof of migration
-
Best Practices
Auto-Correct Invalid Characters: On packaging invalid characters are automatically corrected for migration items (applicable for folder names, and files names) – the following characters are automatically removed to prevent issues in Microsoft 365:
-
"?", "*", ":", "<", ">", "|"
-
Document names cannot start or end with a period.
-
Optionally – depending on your SPO configuration you may be required to also remove “#” and “%” in the name of object items
-
If you need to also remove the # and % characters you can do this by locating the install folder location for MAPIT for Microsoft 365
-
Browse to the MAPIT for Microsoft 365 install folder
-
Locate the mapit.exe.config file
-
Edit and save the config file and locate the entry below
-
<add key="Disable#%" value="false" />
-
Set to “false” if you wish to allow # and %
-
Set to “true” if you wish to remove those characters
-
You must close the application and re-open it for the change to take effect
-
-
-
Time Zone Check
When performing your first migration using MAPIT for Microsoft 365 we recommend you review your tenant time zones to ensure the migration of dates works as expected.
The best way to confirm that the times will match is to choose a small folder area for migration. Perform the migration and spot-check a document – check the created date/time in Microsoft 365 and ensure it matches the date/time in your metadata.csv file for that same document. If the times do not match that may mean there is a difference in your tenant service locations. If your times do match then you are good to start your migrations since you can be confident that the time zones match.
If your time zones are off, you can apply a time zone offset value.
-
Browse to the MAPIT for Microsoft 365 install folder
-
Locate the mapit.exe.config file
-
Edit and save the config file and locate the entry below
-
<add key="UniversalTimeCorrectionHours" value="0" />
-
Set the value to a valid number to correct for any time zone differences (ex. value=”1” would add 1 hour to the time specified in the metadata.csv files.
-
-
You must close the application and re-open it for the change to take effect
Azure Storage Best Practices
-
Please use a unique Package Container Name for each new migration you conduct (available from the Credentials tab). This will ensure you do not accidentally overwrite or re-run a previous migration that was already completed.
-
Once your migrations have been validated in SharePoint Online – delete the migration packages you no longer require to free up Azure storage space. You can delete the packages from your Azure Storage > Blog Service page.
Below is a screenshot of the Package Containers in Azure Storage.
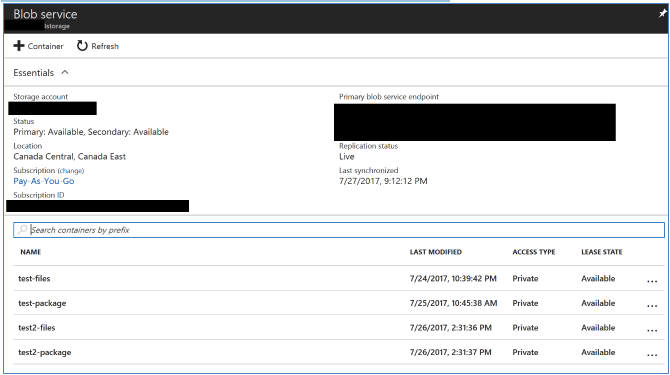
Performance Tip: Plan for and Conduct Parallel Migrations
When conducting migrations, planning for size and performance is important. Choosing overly large structures for import will mean a longer wait time to for completion and potentially more issues to correct before migrations can start. Splitting imports or migrations into smaller sizes is a best practice for enhancing the ability to promote manageable migrations. For example, if you had folders A which contained B and C you could run import for A, or run a separate package for B and a separate package for C. The latter approach would be more efficient as the imports could be done in parallel.
The limiting factor would be Microsoft 365 tenant’s capability to handle the migration jobs via the available threads.
Delta Migration Considerations
It is our best practice and recommendation to freeze a folder structure prior to migrating. In the case that is not possible, the use of delta migrations can be implemented at the Clients own risk. We caution against delta migrations due to the nature of potential cases for deleting objects and adding new objects that would compound migration complexity.
Please note - in the current version of the tool, one must manually determine the new documents to be added first and then create a separate metadata.csv containing those new documents to be added for packaging and migration.
Advanced Versioning Considerations in SharePoint
If you choose to export your content from Content Server with advanced versioning capture fields enabled, in order to process those fields in SharePoint Online – it is a requirement to target a destination SharePoint Library where both Major and Minor versioning is enabled. If you target a library where only major versioning is enabled the migration will be blocked from starting.
Default Content Type
We recommend as best practice for the duration of the migration to use the default Content Type of “Document” for migrations where you are applying/transferring metadata as part of your migration. If you change your default Content Type to something other than Document – there may be cases where managed metadata values may not be applied correctly. In such cases where you require a different default Content Type – it is best to set the default to Document, conduct your migrations, and then change the default Content Type to the desired type post-migration. This would ensure that all your managed metadata values are mapped correctly.
About Your Azure Migration Log
The Migration log files are an important tool for analysis and testing. They can be used to validate your migration, stored as proof of migration, and can be used to troubleshoot errors or warnings encountered during migration.
The logs will summarize your migration settings, metadata settings, total items migrated, size, and duration.
We describe the 2 sets of logs available. We strongly recommend that you save your logs as part of your migration projects as record proof of migration.
MAPIT for Microsoft 365 Logs
-
Aside from the Analysis logs that are generated, upon package and start migration – migration logs are generated in the Logs folder location you would have specified earlier.
Analysis logs use a naming convention similar to: YourMigrationProfileName-MAPITAnalysis-2017-07-27 08-20-12 PM -
Migration package logs use a naming convention similar to: YourMigrationProfileName- MAPITMigration-2017-07-27 08-55-21 PM
The Migration log would capture any errors or warnings prior to upload. We recommend you review these logs as part of your overall migration validation procedure.
Microsoft Migration API Logs
Microsoft’s SharePoint Online Migration API migration jobs will generate a set of logs that are stored along with your container name package folder. Accessible from Azure Portal > Storage > Blob Service, you can navigate to your container package. Upon migration completion, you will see 3 log files created and available. They are the .err, .log, .wrn files. As the names suggest the .err file includes the errors seen in the migration. The .log file includes a detailed listing of all migration operations. The .wrn file includes the warnings seen in the migration.
We recommend you review and save the logs to your project area upon migration completion to ensure that any issues are dealt with as required.
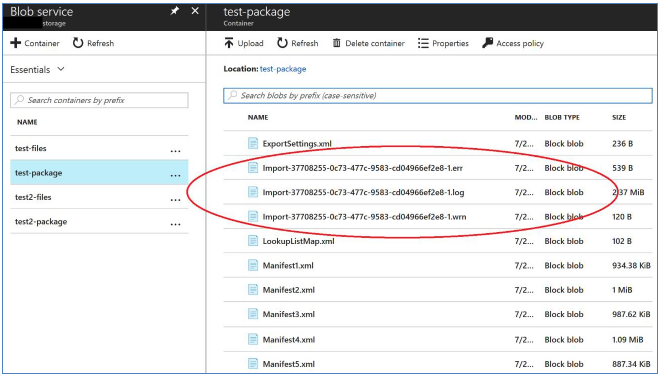
Modifying Your Metadata.csv Files (Gimmal Support Policy)
When enabling migrations using MAPIT for Microsoft 365 for Content Server as a source:
“Bulk Import Content Server using metadata.csv”
The metadata.csv is loaded on “Import” into MAPIT as the master control file indicating the documents, folders, and metadata that will be available for migration into SharePoint Online.
It is possible, but not recommended to manually update metadata.csv files. For example, if you had a list that needed to be copied and pasted in bulk. We always recommend you add the values from within the MAPIT metadata-values tab.
If you choose to update the metadata.csv file prior to importing it into MAPIT for Microsoft 365 - you would need to use care to ensure that you are not overwriting any columns and you need to ensure you save the file correctly - save-as UTF-8 CSV. Use a save as a new file name each time so that you have your previous copy is preserved in case you need it. If you do not save the CSV properly, Excel will by default not save it as CSV and then format of the file will be lost.
In Excel - when adding a new column to metadata.csv, you would need to add it to the immediate empty column.
When adding the column heading the first row title must follow the format –
CATEGORY:ATTRIBUTE NAME:TYPE
Where TYPE = DateValue, StringValue, IntegerValue, BooleanValue
Ex.) Test Inject Metadata:Purchase Date:DateValue
This will allow MAPIT to automatically know that this is a column that is mappable as the data type specified. The data for that field for each row would need to be blank or a valid data type value to maintain the data integrity of the metadata.csv file.
Manually updating your Metadata.csv files invalidates your support for that migration profile
This support policy in effect as of May 1, 2019 and applies if a customer decides to update their metadata.csv files manually by updating values, or adding new values, or by adding new rows or folders. If a customer wishes to manually update their metadata.csv for import into MAPIT for Microsoft 365 – they accept the risk and will not receive Gimmal Support for any resultant migration profile issues. Therefore, any support related to metadata.csv updates are the responsibility of the customer who is making the change to ensure the CSV format and rules are enforced.
Given the nature of such changes - accidental spelling mistakes, typos, CSV formatting issues, or accidental deletions or unintended consequences of said changes in the metadata.csv. Gimmal Support will no longer support any issues that result from manually updating your metadata.csv files. We strongly recommend that any metadata value update you need to make is performed directly in MAPIT for Microsoft 365 from the Metadata Values or Restructuring Tab.
Apply Permissions (optional)
The mapping and application of original source permissions is an optional step for Content Server source migrations only.
Best Practices for Permissions in SharePoint
As a best practice and recommendation, most organizations migrating from Content Server to SharePoint would implement a new Information Architecture for security in SharePoint and inherit those permissions.
Best practice – Gimmal based on experience enabling successful migrations – we recommend re-architecting permissions in SharePoint versus preserving source permissions
A few reasons why it is against best practice to NOT migrate permissions from Content Server to SharePoint, since Content Server source permissions:
-
Departments have been re-organized and group naming is out of date
-
Out-of-date group membership
-
Users have changed groups
-
Users have left the company
-
Poorly named groups
-
Mismatch of groups and permissions
-
Incorrect nesting of permission group and membership
-
Performance impact on SharePoint when > 5,000 unique permissions up to a maximum of 50,000
In summary, migrating the Content Server source permissions (via groups and access control settings) only perpetuates a security headache and can make it very difficult to administrate from the SharePoint perspective.
Note that our tools only apply permissions on a container level and not on the object level – which follows ECM Best Practices from both OpenText and Microsoft.
In the case that an organization has somewhat clean permissions and wishes to preserve original source permissions it is indeed possible by using the Permissions mapping functionality provided in MAPIT for Microsoft 365.
The Permissions functions are intended to be used post-migration to map and apply the permissions from Content Server to the new structure in SharePoint Online. For select cases migration (ex. Human Resources) you can use this functionality hybrid to preserve the source permissions only where required to achieve the best of both worlds.
Display and Review Content Server Source Permissions
When your migration is completed, you may display and review the original source permissions and access control lists from Content Server. This will give you an idea of where permission inheritance is broken in Content Server and how the corresponding group mappings permissions can be applied. Any folder shown in purple means there is unique permissions at that level.

Large folder structures can take a long time to load and display - due to the intensive processing required to analyze and display the permissions of the entire folder structure. Please use care when you intend to view the permissions of a large folder area. It may take several minutes or longer to load if there are many folders to process.
If the restructuring of folders via renaming or shortening paths was done from the Metadata Values step – the original source permissions may not be displayed here. Please use care when modifying folder paths and when you wish to preserve source permissions.
Folder Renaming Rules and Impacts:
-
If you change all entries for a folder: ex. “confidential” renamed to “confidentialprivate” – the permissions are kept intact
-
If you add a new path in front of folder: ex. “confidential” path changed to “/newfolder/confidential” – the permissions are broken (since “newfolder” doesn’t exist), in this case, the confidential folder will inherit it’s grandparent folder permissions
-
If you move an existing folder into another existing folder: ex. “/assessments/confidential” – move folder (ex. change all entries) to “/reviews/confidential” – the permissions are kept intact for the confidential folder.
Map Content Server Groups to SharePoint
From the group mappings interface, you can map the source Content Server user or group to a SharePoint group – existing or new.
If you wish to map the item to an existing SharePoint group, you will need to click the Select SP Group button to select from the available groups.
If you wish to create new groups in SharePoint – you will need to fill in the SharePoint Group column or click the Generate Default Group Name button, this will pre-fill out the group names with the original Content Server group name (the group name must be unique to the SharePoint site collection).
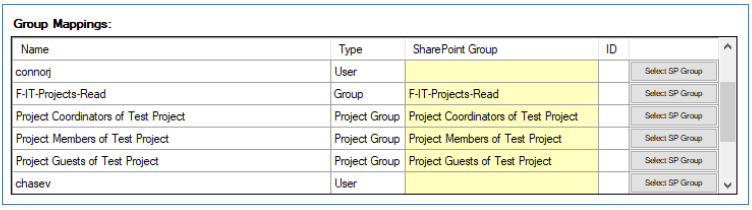
If you have nested groups within Content Server, the group mappings functionality will automatically load the users and any group members contained in the immediate groups. This recursive group membership only goes 2 levels deep. For example: if you had a group called F-IT-Projects-Read containing F-IT-Projects-Edit, the tool will load all users in F-IT-Projects-Read and all the users contained within F-IT-Projects-Edit, but not any deeper groups contained within F-IT-Projects-Edit – such as to avoid circular references.
Create Groups
After you have set your Group Mappings the next step would be to apply your mappings in SharePoint. To create the SharePoint Groups and apply membership to existing SharePoint groups please click the “Create Groups in SharePoint” button.
A corresponding log file (“…Permissions Create Groups…”) will be generated listing the groups created, and a full listing of the users added to the groups.
Mapping User X to User Y: In MAPIT for Microsoft 365 – User’s Tab - you can map User X to User Y (see User Mapping section in this document). This is generally done when a user is no longer with the company and is no longer in Azure Active Directory. One would then map User X (old user) to User Y (valid user). In the case of your Content Server permissions – the mapping rule you have specified will be followed. That is if User X belongs to a group in Content Server – the corresponding user mapping will be used when applying the group membership in SharePoint.
Ex.) All User X references will be replaced with User Y when creating and applying for group membership. This will be noted in the Group Creation log file.
Apply Groups
After you have created and set up your SharePoint Groups + User membership - the next step would be to apply the groups according to the Access Control Lists from Content Server. MAPIT for Microsoft 365 automatically maps over the corresponding access control levels according to the mapping below.
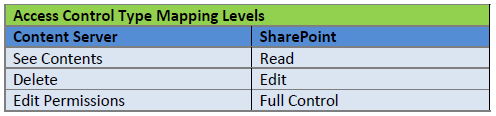
A corresponding log file (“…Permissions Apply to Folders…”) will be generated listing the groups applied to the specific library or folders.
Ex.)
Apply new permissions since inheritance is broken at: https://yoursite.sharepoint.com/sites/finance/templates
Removed group: F-FIN-AP-Admin
Removed group: F-FIN-AP-Edit
Removed group: F-FIN-AP-Read
Removed group: F-Records Analysts-Read
Added group: Project Coordinators of Project Financials with the role: Full Control
Added group: Project Members of Project Financials with the role: Edit
Added group: Project Guests of Project Financials with the role: Read
A best practice is to copy your log files for permission creation and permission application and store those with your migration logs to preserve your proof of migration documentation.
Appendix A - TLS Information
If the workstation/server that MAPIT is installed on is running an older version of Microsoft Windows, it may not have the required support for TLS1.2. This problem typically results in an error indicating an HTTP request error as seen below:
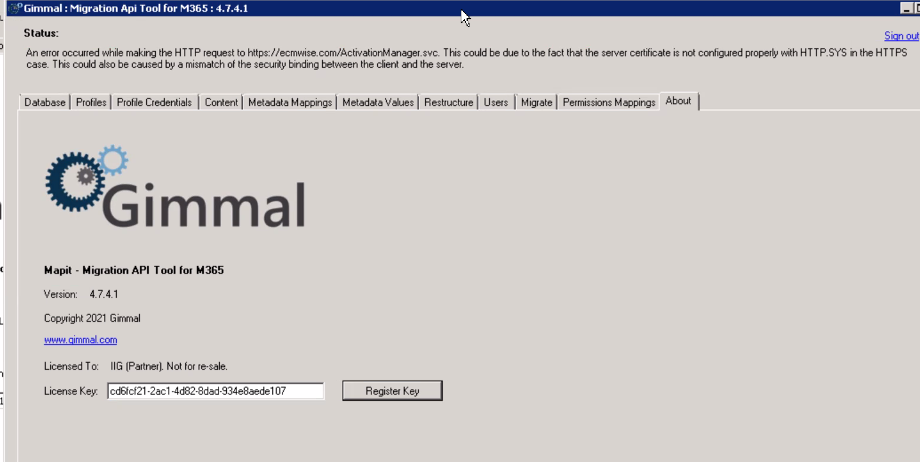
This Microsoft link provides more details on TLS dependencies and adding TLS support to older versions of Microsoft Windows:
https://docs.microsoft.com/en-us/security/engineering/solving-tls1-problem
The versions of TLS currently installed can be verified using this PowerShell command:
[Net.ServicePointManager]::SecurityProtocol
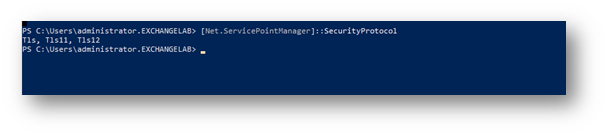
If Tls12 is not shown in the list, it will need to be installed using one of the Microsoft methods detailed below. Note: Option 2 (below) is the preferred method since it adds TLS1.2 to the whole system, whereas option 1 only persists for the current PowerShell session.
-
Modify the script in question to include the following: [System.Net.ServicePointManager]::SecurityProtocol = [System.Net.SecurityProtocolType]::Tls12;
-
Add a system-wide registry key (e.g. via group policy) to any machine that needs to make TLS 1.2 connections from a .NET app. This will cause .NET to use the "System Default" TLS versions which adds TLS 1.2 as an available protocol AND it will allow the scripts to use future TLS Versions when the OS supports them. (e.g. TLS 1.3). Below are the registry keys for both 64 and 32 bit systems.
reg add HKLM\SOFTWARE\Microsoft\.NETFramework\v4.0.30319 /v SystemDefaultTlsVersions /t REG_DWORD /d 1 /f /reg:64
reg add HKLM\SOFTWARE\Microsoft\.NETFramework\v4.0.30319 /v SystemDefaultTlsVersions /t REG_DWORD /d 1 /f /reg:64
Appendix B - Legacy Authentication
Description: Legacy Authentication to Microsoft 365 needs to be enabled in Azure AD and SharePoint Online. Behind the scenes, an older Microsoft technology is used there to prepare your migrations and communicate with Azure.
Benefits: Anyone can use this method if the user credentials provided have Site Collection Admin access to the destination Site Collection. You do not need to use App ID if you do not have the authority to grant delegated access.
Drawbacks: This migration method will be prioritized as a lower priority by Microsoft and once the User’s migration quota is reached the migrations will be throttled by Microsoft. This mechanism is subject to higher throttling by Microsoft. This login mechanism will be deprecated from support in a future version of MAPIT for Microsoft 365 as Microsoft forces a move into Modern Authentication.
Pre-Requite Steps for Legacy Authentication
-
Install SharePoint Online Management Shell
-
Install Azure AD PowerShell V2.0.X Steps to install:
-
Open a Windows PowerShell session as Administrator
-
Run the following command
-
Install-Module -Name AzureAD -RequiredVersion 2.0.1.10
-
Enter 'Y' to the “Nuget provider is required” prompt
-
Enter 'A' for the “Untrust repository” prompt (A is Yes for all)
-
-
If installing on Windows 7 – please install the Windows 6.1-KB file (not required for Win10)