
Copyright Notice
Copyright © 2014 - 2023 Gimmal LLC. (hereinafter called the “Company”). All Rights Reserved.
This product contains proprietary and confidential technology provided by and owned by the Company.
Any use, copying, publication, distribution, display, modification, or transmission of such technology in whole or in part in any form or by any means without the prior express written permission of the Company is strictly prohibited.
Except where expressly provided by the Company in writing, possession of this technology shall not be construed to confer any license or rights under any of the Company's intellectual property rights, whether by estoppel, implication, or otherwise.
ALL COPIES OF THE TECHNOLOGY and RELATED INFORMATION, IF ALLOWED BY the Company, MUST DISPLAY THIS NOTICE OF COPYRIGHT AND OWNERSHIP IN FULL.
Acknowledgments
Products or company names are used for identification purposes only and are trademarks of their respective owners. All rights reserved.
Restricted Rights Legend
The software and documentation are “commercial items,” as that term is defined at 48 C.F.R. §2.101, consisting of “commercial computer software” and “commercial computer software documentation,” as such terms are used in 48 C.F.R. §12.212 or 48 C.F.R. §227.2702, as applicable. Consistent with
48 C.F.R. §12.212 or 48 C.F.R. §227.2702-1 through 227.7202-4, as applicable, the commercial computer software and commercial computer
software documentation are being licensed to U.S. government end users (A) only as commercial items and (B) with only those rights as are granted to all
other end users pursuant to the terms and conditions set forth in the Company’s standard commercial agreement for this software re. Unpublished rights reserved under the copyright laws of the United States of America and Canada.
Disclaimer
Information in this document is subject to change without notice. Companies, names, and data used in examples herein are fictitious unless otherwise noted. The provision of such information does not represent any commitment on the part of the Company. The Company makes no warranty of any kind with regard to this material, including, but not limited to, the implied warranties of merchantability and fitness for a particular purpose.
The Company shall not be liable for errors contained herein or for incidental or consequential damages in connection with the furnishing, performance, or use of this material.
Introduction
Organizations have been using Content Server for many years. Content Server allows the use of links to reference documents and serves as a good way to ensure users are referencing and consuming the correct version. These links may be contained in documents (manuals, training materials, process documents, diagrams), emails, intranet pages, and even other applications (financial, HR, engineering).
Compound the use of links over many years, and it is clear that an organization’s links are vital pathways to organizational knowledge.
As part of an organization’s decision to migrate / decommission Content Server - there are decisions that need to be considered when migrating documents and folders from Content Server.
-
Breaking the links would lead to a big headache for users when trying to access the documents they need, could lead to losing the ability to find documents in a timely fashion, and ultimately result in a loss of productivity.
-
Updating the links in some cases is impractical and sometimes not possible (can’t update an email) and if possible, would be largely time consuming and difficult as one would need to update many disparate systems.
-
It is best to utilize a redirection mechanism to translate your old links to the current location in SharePoint or the network drive.
-
The Gimmal Link Redirector utility is part of the Gimmal Suite of Migration utilities. Leveraging the Link Redirector technology allows organizations to preserve the original source document and folder links (where applicable) and have them redirect to the new destination location. When the Link Redirector is used alongside the Content Server Migration Tool – this allows you to enable your organization to migrate their documents and folders to SharePoint or network drives. The source locations from Content Server would be linked to the new destination locations and be available to be redirected using the Link Redirector technology.
The Link Redirector supports your migrations and helps you to preserve your organizational links in a simple manner. No losing or breaking your organizational links, and no time-consuming link updates required!
The Gimmal Migration Tool Suite makes your migrations manageable! Fast, effective, and efficient.
Requirements and Planning
Accounts
Depending on whether SQL Authentication or Windows Authentication will be used (both described later in this document) the accounts required are as follows:
-
Application Pool account – Windows domain account, required.
-
If Windows Authentication is used, a domain account with db_datareader access to the Gimmal Migration database in SQL.
-
SQL Account – If SQL Authentication is used, this account must be granted db_datareader access to the Gimmal Migration database in SQL.
-
Installation – The user account running the installation should have at least local administrator permission.
ASP.NET
ASP.NET 4.5 or above is required.
SharePoint Versions Supported
|
Name |
Version |
Status |
|
SharePoint Server2 |
2016, 2019 |
Certified and tested |
|
SharePoint Online |
|
Certified and tested |
Database
Gimmal Link Redirector requires the Gimmal Content Server Migration Tool to Network Drives (i.e., Content Server Export Tool) and MAPIT. MAPIT installation will configure the database for use.
For best performance, a dedicated SQL server instance is recommended, especially if there is a large, active user base that relies heavily on Content Server legacy links.
The Link Redirector tool requires:
|
Name |
Version |
Status |
|
Microsoft SQL Server |
2008 and higher |
Certified and tested |
IIS
Gimmal Link Redirector requires IIS (Internet Information Services) with the URL Rewrite Module installed:
|
Name |
Version |
Status |
|
Microsoft IIS |
7.0 and higher |
Certified and tested |
In-Flight Redirection or Post-Migration Redirection
Prior to beginning your migrations, decide whether to redirect your Content Server document links during migration (in-flight redirection), or wait until migration is complete to enable redirection (post-migration redirection). Link Redirector supports redirection of links for both scenarios. Ultimately, the decision depends on your organizational needs; use the table below to assist in your decision.
|
Option |
Pros |
Cons |
Required Action to Support |
|
1.) In-flight redirection |
Seamless redirection to both new destination locations and legacy locations during migration |
- Require pass through to direct machine name (Content Server name) for documents and folders that have not yet been migrated |
Proceed with the steps in the Configuration section Perform migrations |
|
2.) Post-migration redirection |
- Simplest option – documents links are either being redirected, or not |
- No redirection is provided until all migrations are completed |
Perform migration Proceed with the steps in the Configuration section |
Other Considerations
-
SharePoint Links
-
Link Redirector follows default SharePoint behavior. That is, static links will be broken if you move a document to a new location in SharePoint.
-
-
Network Drive Links
-
If you migrate from Content Server to a network drive, the Link Redirector will only know of the original destination location. Links to documents or folders moved to a new location post migration will not be redirected correctly.
-
Installation
Installations should be conducted by an IT Administrator with appropriate access to the required environments.
Please note: information about configuring IIS and ASP is intended for use by Administrators who are knowledgeable about IIS configuration and methodologies. This is covered in brief below but may differ depending on specific environments.
IIS Setup
Configure IIS for use with Link Redirector:
Determine the dedicated web server for use with Link Redirector
It is strongly recommended that the web server for Link Redirector be dedicated for this purpose. URL rewriting is used which can potentially negatively affect other applications if hosted on the same IIS instance.
Activate IIS’s ASP.NET features
Add Roles and Features-> Web Server->Web Server->Application Development->ASP.NET 4.x
Install the IIS Rewrite Module provided by Microsoft
https://www.iss.net/downloads/microsoft/url-rewrite
IIS - Deploy Application and Settings
-
Create a new application pool called linkredirector – specify .NET 4.X, and check enable start pool immediately.
-
Under Advanced Settings for the new application pool.
-
If using a version of IIS older than 8.5, set the application pool identity to NetworkService.
-
If using IIS version 8.5 or newer, set the application pool identity to ApplicationPoolIdentity.
-
-
Verify the application pool has started.
-
Locate and extract (if necessary) the downloaded linkredirector folder and copy entire folder into your IIS root directory, usually found at C:\inetpub\wwwroot.
-
In IIS, expand Sites->Default Web Site
-
Right click on the linkredirector folder and select Convert to Application. Use the linkredirector application pool from step 1.
-
-
Select the linkredirector site in IIS and click on Authentication.
-
Set permissions to linkredirector folder in Windows Explorer.
-
Select Properties->Security on the linkredirector folder.
-
Ensure IIS_IUSRs has at least Modify permissions on the linkredirector folder and contents (this ensures the web.config file can be updated programmatically by the administrator.
-
Apply permissions.
-
-
Make sure the Default Web Site has been started in IIS.
IIS Rewrite Rule
Install and activate the URL Rewrite Module in IIS (refer to Microsoft documentation for more information).
Edit the Default Web Site web.config file, usually located at C:\inetpub\wwwroot. If this file does not exist, create a new one at this location. Add the IIS Rewrite rule below (the rewrite node below, shown in bold) and save the file, it should look like:
<?xml version="1.0" encoding="UTF-8"?>
<configuration>
<system.webServer>
<rewrite>
<rules>
<rule name="Redirect All" stopProcessing="true">
<match url="(.*)" />
<conditions>
<add input="{URL}" pattern="^/linkredirector" negate="true" />
</conditions>
<action type="Redirect" redirectType="Permanent" url="/linkredirector/default.aspx?host={HTTP_HOST}&url={URL}" appendQueryString="true" />
</rule>
</rules>
</rewrite>
</system.webServer>
</configuration>
This rule directs all incoming Content Server requests to the linkredirector application while preserving the host, URL, and query string.
To verify access to the linkredirector configuration page, browse to
http://<web server hostname>/linkredirector/Config/Configure.aspx. You should see the Link Redirector configuration page in your browser.
After confirming access to the linkredirector application, you should change your Administrator default password (see below).
Change Administrator Password
By default the DM Link Redirector is configured with a default password of changepassword. You can change this by visiting http://<web server hostname>/linkredirector/ChangeAdminPassword.aspx. Make sure to document the updated password and store in a secure location. This password is required for any further configuration changes.
Configuration
This section describes the configuration process for Link Redirector and the associated options that can be set. This configuration should be conducted by an IT Administrator with appropriate knowledge of the Content Server and SharePoint environments.
Migration Mapping SQL Server Database
Navigate to the Link Redirector Configuration page: http://yourhost/linkredirector/Config/Configure.aspx
The Link Redirector tool uses the same SQL server database as the Content Server Exporter and MAPIT tools. You will need to provide the connection information for that database. Refer to the following sections for the appropriate (SQL Server, or Windows) authentication method.
Connect via SQL Server Authentication
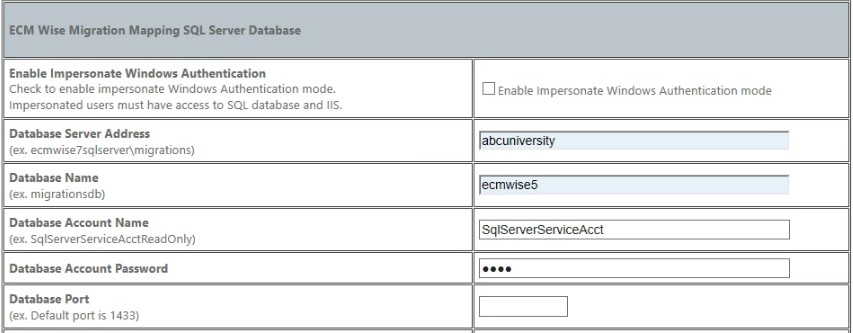
By default, the Migration Mapping settings are configured for SQL Authentication. If this is desired, confirm or update the settings below as indicated:
-
Enable Impersonate Windows Authentication – leave unchecked
-
Database Server Address – Enter the SQL Server name or SQL Instance
-
Database Name – Gimmal Migrate database name
-
Database Account Name – SQL account used to access the database
-
Database Account Password – current password for the Database Account
-
Database Port – Leave blank to use the default port of 1433; if using a non-standard port enter it here
To confirm IIS is properly configured to connect using SQL Server authentication, ensure the following:
-
In IIS select the linkredirector application. Double click Authentication in the middle pane.
-
Enable Anonymous Authentication and Forms Authentication.
-
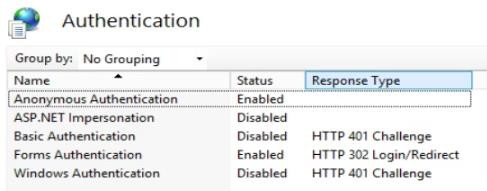
Ensure ASP.NET Impersonation, Basic Authentication, and Windows Authentication are disabled.
Connect via Windows Authentication
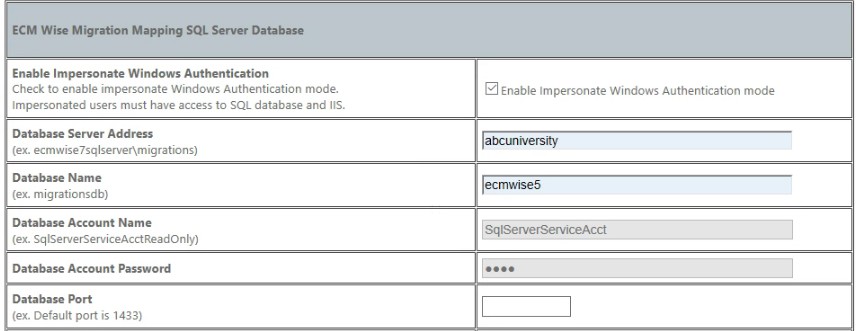
To use Windows Authentication for Link Redirector, confirm or update the settings below as indicated:
-
Enable Impersonate Windows Authentication – check this option
-
Database Server Address – Enter the SQL Server name or SQL Instance
-
Database Name – Gimmal Migrate database name
-
Database Port – Leave blank to use the default port of 1433; if using a non-standard port enter it here
-
The Database Account Name and Database Account Password are grayed out and can be ignored. Any values in them will be discarded when the configuration is saved.
To confirm IIS is properly configured to connect using Windows Authentication, ensure the following:
-
In IIS select the linkredirector application. Double click Authentication in the middle pane.
-
Disable Anonymous Authentication and Forms Authentication.
-
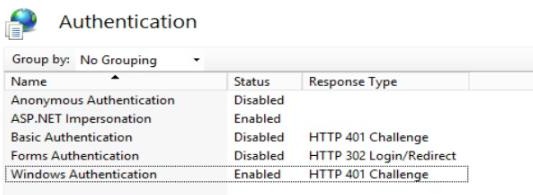
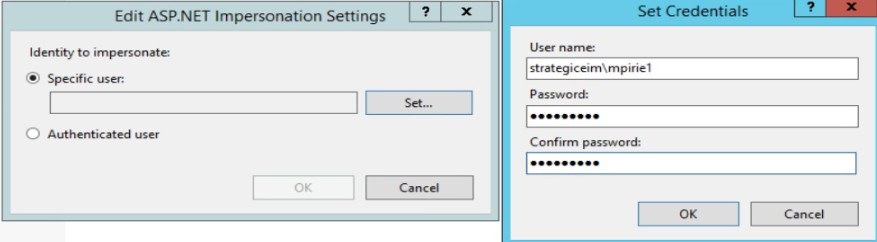
Enable Windows Authentication and ASP.NET Impersonation.
-
Right click ASP.NET Impersonation and select Edit, then select Specific user and enter the appropriate Windows account credentials. This account must have access to the SQL database.
DM Link Redirector Options – General
The General Redirector Options can be updated as indicated below:
-
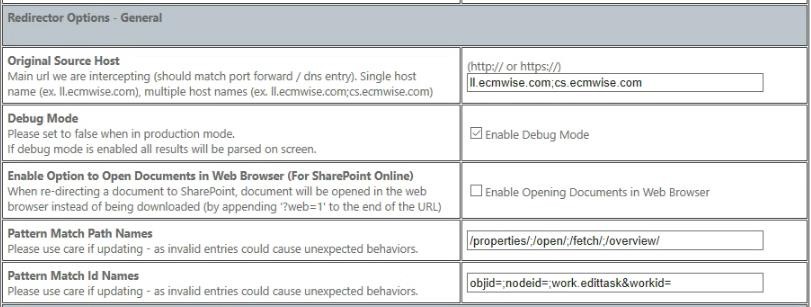
Original Source Host – must match the original Content Server host name. If there are multiple host names, separate them using the ; delimiter, e.g., ll.gimmal.com;cs.gimmal.com.
-
Debug Mode – enabled by default to allow for real-time display of redirection processing. Disable this open when ready for production use. The Debug Mode section provides more information for using this option.
-
Enable Option to Open Documents in Web Browser (For SharePoint Online) – This feature only applies to SharePoint Online and controls how documents accessed via redirected links are opened.
-
Enable Opening Documents in Web Browser is unchecked: The default setting. When users are re-directed to a document in SharePoint Online, it will be automatically downloaded.
-
Enable Opening Documents in Web Browser is checked: When this option is enabled, documents accessed via a redirected URL will be opened directly in the web browser (Link Redirector does this by appending ?web=1 to the URL).
-
Note: You may need to activate your SharePoint Online Site’s Site Collection Feature, Open Documents in Client Applications by Default
-

-
Pattern Match Path Names – It is recommended to leave the default value as is. This setting is used to determine the Content Server object ID’s being referenced by the path format /command/id.
-
Pattern Match Id Names – It is recommended to leave the default value as is. This setting is used to determine the Content Server object ID’s being referenced by the name format noderef=id.
DM Link Redirector – If No Mapping Found
Each document exported/migrated generates a mapping entry in the migration database. This entry is what Link Redirector uses to return the correct target document. If no such entry exists:
-
the document link is incorrect, OR
-
the document does not exist, OR
-
the document has not yet been migrated.
The settings in this section specify the action taken when a mapping record is not found. Each setting is optional, if you do not specify any options (by leaving the options blank) – a pre-defined catch-all message will be displayed to the user if they try to use a link for an invalid Content Server document.
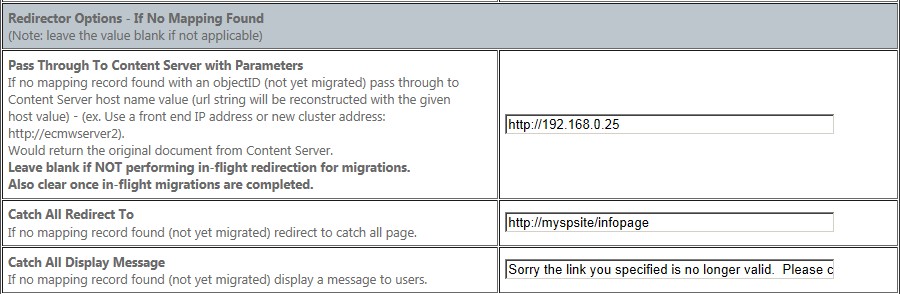
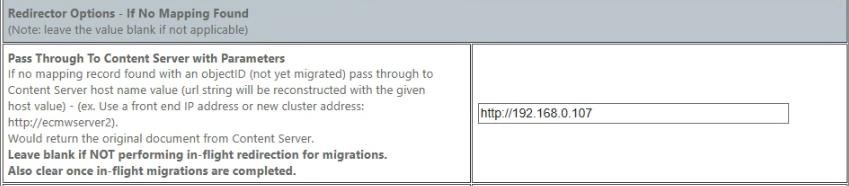
Pass Through to Content Server with Parameters
You should use this option if you intend to support in-flight redirection during migrations. When enabled, if a document has not yet been migrated, Link Redirector will redirect to the single named Content Server instance – reconstructing the parameters that were originally provided.
You can temporarily specify a specific front end IP address to a Content Server Front End or set up a new cluster address for pass through to Content Server.
This option is not recommended once all migrations are complete as your Content Server servers would likely be decommissioned at this point - in this case one of the following two options would be recommended. Make sure to clear this entry after in-flight redirection and migrations are complete.
Catch All Redirect To
If a mapping record is not found, you can specify a catch-all redirect URL. Any object link that does not have a mapping record could redirect to a catch all page that describes the situation or be redirected to your main SharePoint site, for example.
Catch All Display Message
This setting provides for a short display message to be shown for any object link that does not have a mapping record – the message might indicate to the user that the link was invalid and to contact an administrator for further assistance.
Software License
Link Redirector requires a valid license key. After obtaining a new license key from Gimmal, enter it in the Software License section of the configuration page. You must Submit Changes after entering the key to successfully register Link Redirector.

If you need a new license key (e.g., date of expiry is approaching) please contact Gimmal in advance and request an updated license key. If the license key expires users will no longer be able to search or perform automatic Link Redirection (the tool will default to debug mode) and display the license error to the user.
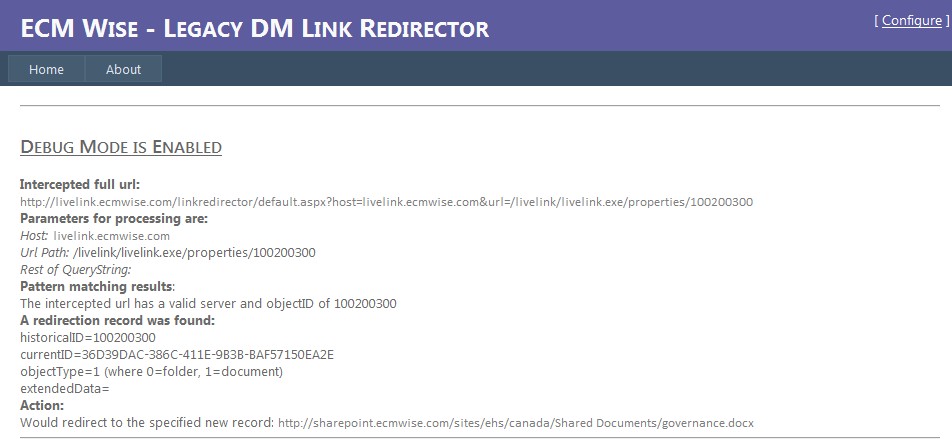
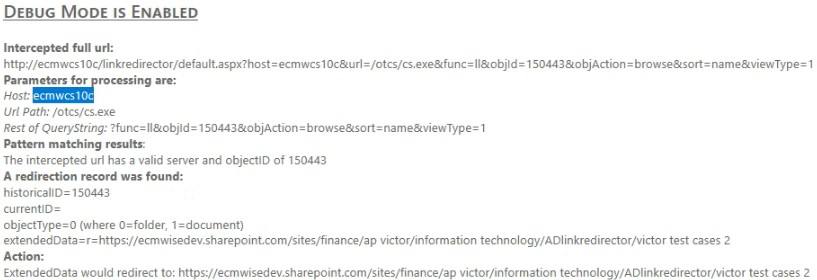
Testing - Debug Mode
Debug mode allows for debugging, testing, and validation prior to enabling for production use. It shows a description of what would occur if Link Redirector was configured for production use (i.e., Debug Mode disabled). See below for an example of Debug Mode results.
Original Content Server Document URL: http://cs.gimmal.com/Content Server/Content Server.exe/properties/100200300
Intercepted Link Redirector debugging results:
-
The Host, Url Path, and Rest of QueryString are shown in Parameters for processing.
-
The objectID of 100200300 is identified from the original link.
-
A mapping/redirection record is successfully located.
-
The mapping record tells us the document (historicalID) has been mapped to the new currentID in SharePoint.
-
The Action tells us that in production mode the tool would automatically redirect the user to the SharePoint document specified by the link.
Make sure to disable Debug Mode when ready for Production Use.
Testing - Simulating DNS Changes
This section is optional and describes one method for simulating production Link Redirector behavior without making explicit changes to DNS.
-
On the server where Link Redirector is installed, run Notepad as administrator and open the hosts file located at C:\windows\system32\drivers\etc\. It is advisable to save a copy of the hosts file prior to making any changes.
-
Add an entry for the Content Server hostname with the IP address of Link Redirector and save the file.
-
If a new URL will be configured in DNS for the existing Content Server load balancer, add that entry to the hosts file as well.
-
-
From the Link Redirector server, browse to the Link Redirector configuration by using the Content Server hostname. E.g., http://cs.gimmal.com/linkredirector/config/configure.aspx
-
Modify the Original Source Host to be the current Content Server hostname (e.g., cs.gimmal.com).
-

-
On the Configure.aspx page, modify the Pass Through to Content Server with Parameters to the IP address of your Content Server load balancer or one of your Content Server web servers. Make sure to include either the http:// or https:// protocol.
-
-
With Debug Mode enabled, browse (entering legacy links into a web browser) for a document that has been migrated and a document that has not been migrated. You will observe the expected behavior in both cases, as though the DNS entry for Content Server had been updated to point to the Link Redirector server.
-
-
Link redirection can also be tested with the hosts file in place by disabling debug mode.
-
After testing is complete, comment or remove the additions to the hosts file, and ensure debug mode is disabled.
Go-Live/Production
After testing is complete and you are ready to begin using Link Redirector in production, make sure to complete the following configuration updates. The steps necessary to go-live with Link Redirector differ slightly for in-flight redirection vs. post-migration redirection. These steps are listed below and described elsewhere in this document.
Post Migration Redirection
Upon migration completion perform the following steps to enable link redirection.
-
Update DNS to point the Content Server hostname to Link Redirector.
-
Clear settings for Pass Through to Content Server with Parameters – this will cause all redirections to be directed to the target destination.
-
Fill in at least one of the remaining Redirector Options – If No Mapping Found.
-
Catch All Redirect To – redirects the user to a custom page that you have created which may include information on how they should proceed, or who to contact.
-
Catch All Display Message – displays a custom message to the user if the mapping record is not found.
-
-
Disable Debug Mode.
-
Comment or remove any entries added to hosts files during testing.
In-flight Redirection
While migration is in progress, link redirection is occurring. Users are automatically redirected back to Content Server (for items not yet migrated) or to the target destination (for items already migrated) as appropriate. Perform the following steps to enable link redirection.
-
Update DNS to point the Content Server hostname to Link Redirector.
-
Enter the web front end IP or server name, or new Content Server load balancer URL in Pass Through to Content Server with Parameters.
-
Fill in at least one of the remaining Redirector Options – If No Mapping Found.
-
Catch All Redirect To – redirects the user to a custom page that you have created which may include information on how they should proceed, or who to contact.
-
Catch All Display Message – displays a custom message to the user if the mapping record is not found.
-
-
Disable Debug Mode.
-
Comment or remove any entries added to hosts files during testing.
Redirect DNS to Link Redirector
Please ensure you have reviewed the section on in-flight vs. post-migration redirection. If you wish to simulate/test a DNS change using hosts file on a local machine before going live, refer to the Testing - Simulating DNS Changes.
To proceed: At this time, work with your IT/Network Administrators to update the “Content Server” DNS entry to the Link Redirector server is installed.
For example:
The original Content Server URL, http://cs16.gimmal.com/ should now point to the Link Redirector server and all Content Server links are directed to Link Redirector for processing.
In some cases, depending on how your Content Server environment(s) are configured you may also need to add a reference to your new host systems for the Link Redirector into the Content Server Administration section of Content Server. Add an entry for the Link Redirector hostname into the Trusted Referring Websites setting and save your changes. You need to restart your Content Server services for the changes to take effect.
Search Manager
The Link Redirector Search Manager allows users to search for documents within Link Redirector to check the migration status, and if applicable, the new destination location.
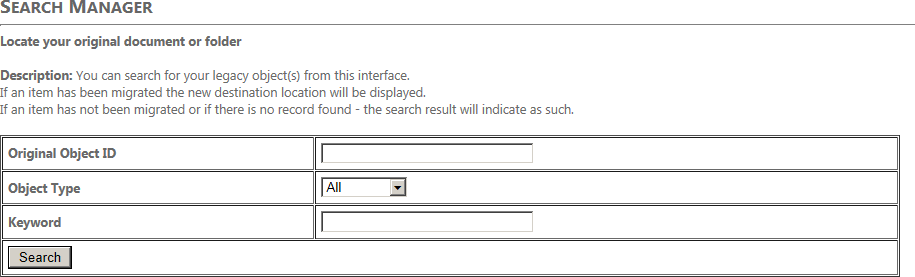
The Keyword search field is available only for migrations using MAPIT for O365/SharePoint Online (and have enabled the MAPIT Keyword Search function in the Link Redirector configuration). By default, this option is disabled.
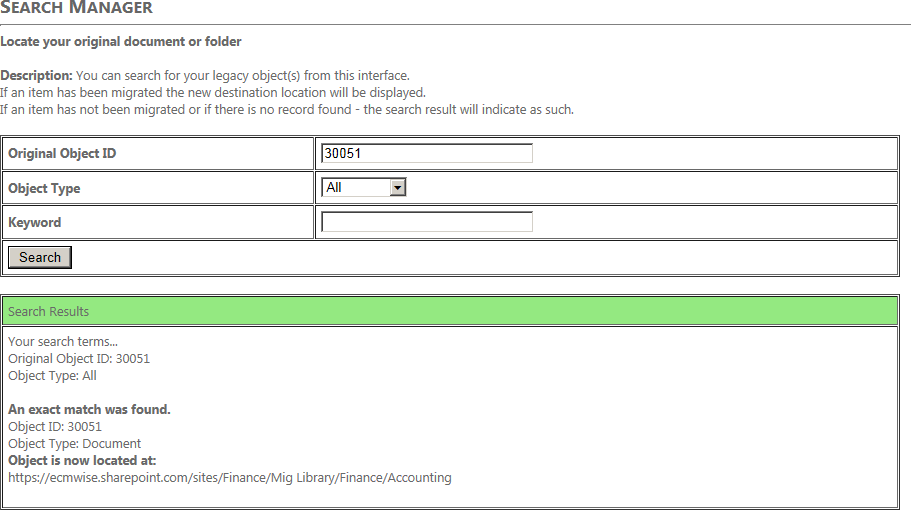
Figure 1 - Sample search by Object ID
Search results are automatically limited to 50 items.
Reference
Link Redirection Mapping Link Types
Please note the automatic link types that are used in a migration (destination):
-
SharePoint 2016, 2019 – automatically uses durable links (if applicable)
-
SharePoint Online –static links only
When static links are used, the link represents the migration destination. If a document is moved, the link redirection record will no longer be valid for that item. While it may be possible to manually update the link table to match the new location, doing so is not supported and may result in unrecoverable errors.
Supported and Unsupported Legacy Link Types
The Supported Link Types from Content Server specified by Pattern Match Path Names and Pattern Match Id Names include:
-
Properties short link
-
Open short link
-
View as WebPage
-
Download
-
Open
-
Folder Browse Links
-
Fetch (historical)
In-Flight Redirection Links Supported include:
-
Enterprise Workspace
-
Personal Workspace
-
Workflow Task
-
Personal Assignments
-
Document Overview
Specific Document Versions:
Linking to specific versions of documents is not supported. For example, the link below that specifically references version 2, will target the current document version only:
http://Content Server.ecmwise.com/Content Server/Content Server.exe/fetch/165252904/Test.pdf?nodeid=170001123&vernum=2
WebDav Links:
WebDav links from Content Server, if used as links in an organization, are not supported at this time.
SQL Server Connection String Parameters
The SQL Server connection strings for Link Redirector default as shown below. If you wish to modify or add parameters to the connection string, edit the web.config file of the linkredirector application in IIS.
-
{0}: SQL server name
-
{1}: SQL server port
-
{2}: SQL account’s username (only applicable for SQL server authentication)
-
{3}: SQL account’s password (only applicable for SQL server authentication)
1
2 Both SharePoint Server 2010 and SharePoint Server 2013 have passed their End-of-Life dates with Microsoft.