
Contents
Purpose: Provide the steps and outline for accurate usage, and understanding, of the Migration Tool to Network Drives utility. We will refer to this as the Content Server Export Tool for the rest of this document.
Description: The Export Tool is a Windows-based utility that allows you to export content and metadata from OpenText Content Server, Livelink, or Documentum to a network file share location. After export, the files and metadata are available for the MAPIT tool to migrate to SharePoint Online.
-
The Content Server and Livelink versions of the Export Tool are .NET-based programs that run on the desktop
-
The Documentum version of the Export Tool is a JAVA-based program that runs on the desktop
-
Functionally the tools are almost identical, and this document should apply to both. This document will use the Content Server version screenshots for reference.
Analysis and Validation logging functionality of exports is also provided.
IMPORTANT: Prior to beginning, please ensure you have read and met the pre-requisites for the Export Tool. This includes:
-
.NET Framework
-
Web services
-
Cookie expiration settings
-
Minimum supported application versions for Documentum or Content Server
About Tab
Prior to use, the Export Tool must be registered with a Gimmal provided License Key. To register the Export Tool, enter the key on the About tab of the UI. Registering the Export Tool requires external internet access. If a license is configured for multiple users and instances of the Export Tool, each user will need to register the Export Tool the first time they use it.
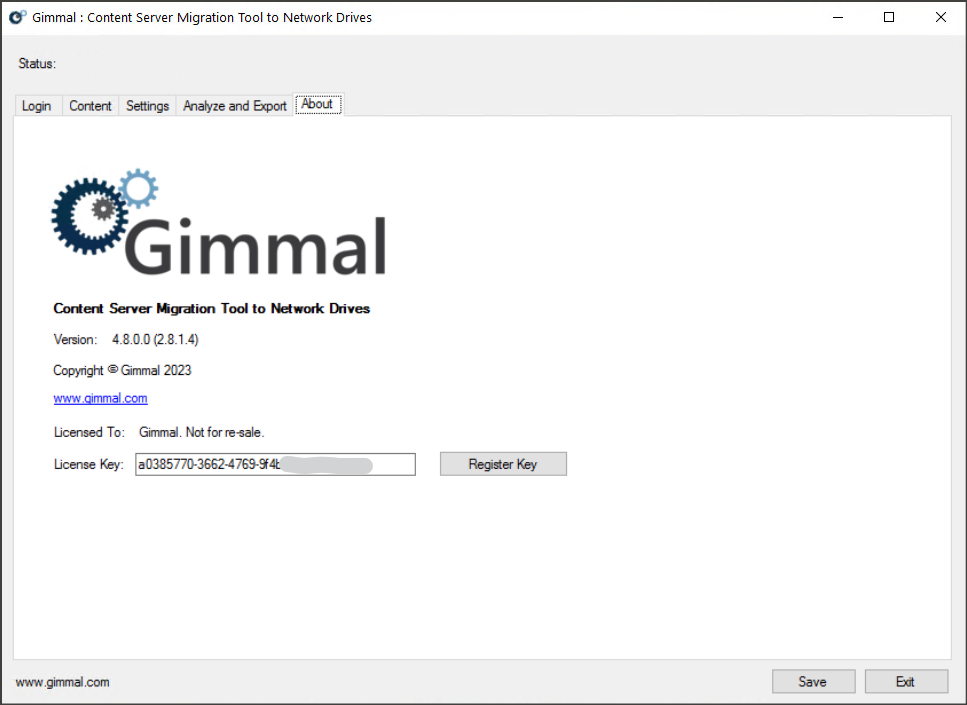
Make sure to click save after registering. If you have problems with registering the license key, contact Gimmal Support. Registration can be prevented due to:
-
No external internet access.
-
The license key is expired – could be incorrectly configured, or the validity period has expired.
-
Incorrect license key – if you are using multiple Gimmal Migrate Products, they each have their own unique key.
Login Tab
The Login tab is where you will enter credentials for your Content Server environment. The Export Tool logs into your Content Server environment and uses the Web Services API’s to extract the content and metadata.
There are two login areas, Content Server and Link Redirection. If you are not using the Gimmal Legacy Link Redirector tool, you can ignore the second section. In this case, ensure the Enable Link Redirection box is NOT checked. To log into Content Server:
-
Enter your Content Server User ID. This user will need full permissions on the areas you want to export.
-
Enter your Content Server password. The password is masked as you enter it.
-
Enter the URL for the Content Server web services root. Contact your OpenText Administrator for this information.
-
If you are using records management services (RM) in Content Server AND you want to export records management metadata, click the checkbox and enter the Records Management Web Services URL.
-
-
Select the Web Services Type. If the Content Server app server is IIS, it will be .NET. If the Content Server app server is Apache Tomcat (or similar), it will be Java.
-
Click Test Connection. You should see a Successful status message in the upper left of the screen.
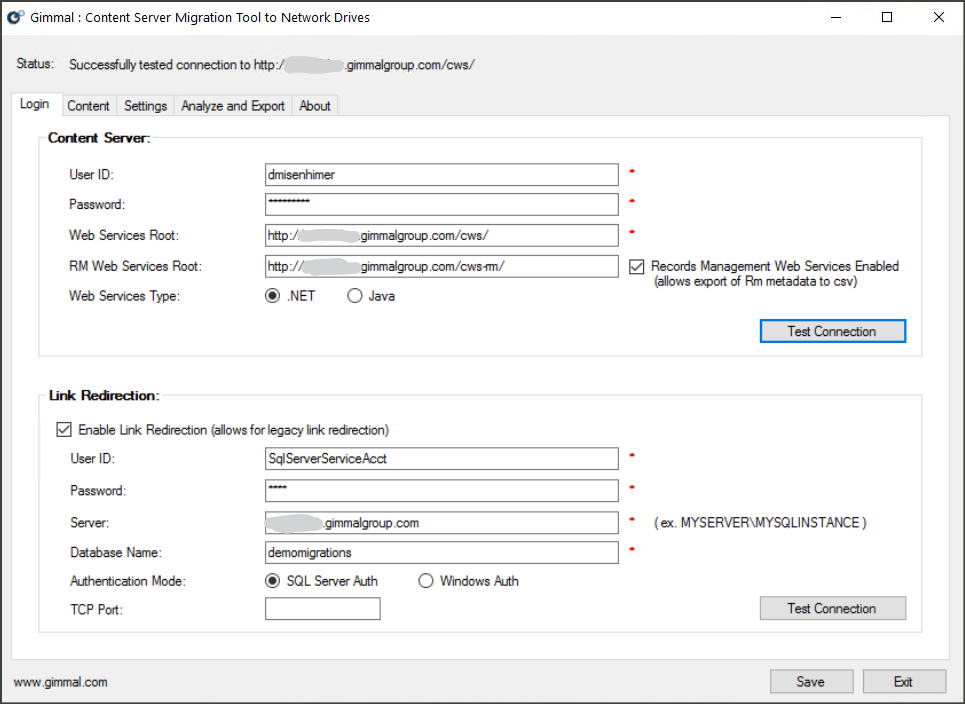
If you are using Legacy Link Redirector, refer to the Credential section of the Gimmal Export documentation. Once you have filled in the data, click the Test Connection button. You should see a Successful status message in the upper left of the screen.
Content Tab
The Content Tab gives you a view of the Content Server repository. When you first click the tab, the Export Tool queries the Content Server and retrieves the top-level structure of the repository, displaying the folder view. If you click any folder, it then queries that part of the structure and displays the sub-folders. For large repositories, this may take a few minutes!
You have two options to select the content set to export: Filter Content Server List or File Input.
Filter Content Server List
There are three options for export:
-
To select any folder in your tree view, select Start from Enterprise Workspace and then click the check box for a folder in the tree view. All content within that folder (including sub-folders) will be exported.
-
Start from Specified Object ID lets you enter the Content Server Object ID of any folder. All content in that folder (including sub-folders) and below will be exported.
-
Start from Personal Workspace lets you export any Personal Workspaces you may have in Content Server.
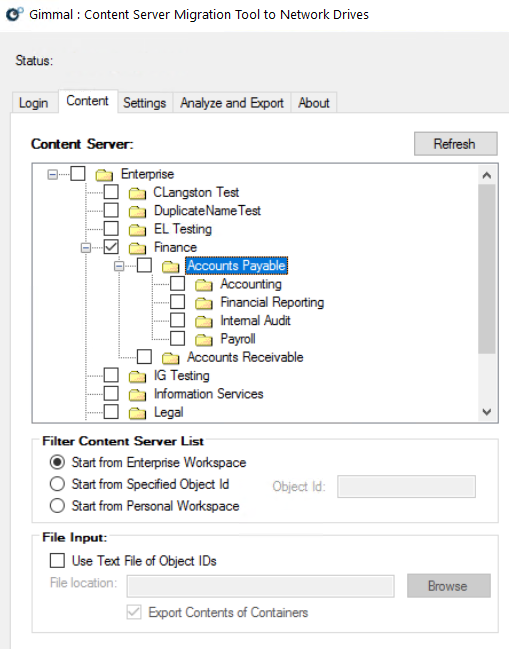
File Input
If you want to export a specific set of Content Server objects, enter the path to a text file that contains a list of object ID’s, one per line. If the object ID’s are folders, compound documents, etc. be sure you check the box that says, Export Contents of Containers.
At any time, you can hit the Refresh button to reload your view of the Content Server repository.
The Export Tool copies the files out of Content Server and puts them into the Export Location you specify. Select a Time Stamped folder to create sub-folders with data/time stamps for clarity. The Export Tool also creates a master metadata file called metadata.csv along with a log file.
Recommendation: For larger migrations where the work may be broken up into several batches, create an individual export folder for each batch. It will be easier to keep track of them this way rather than relying on the time stamp folder name.
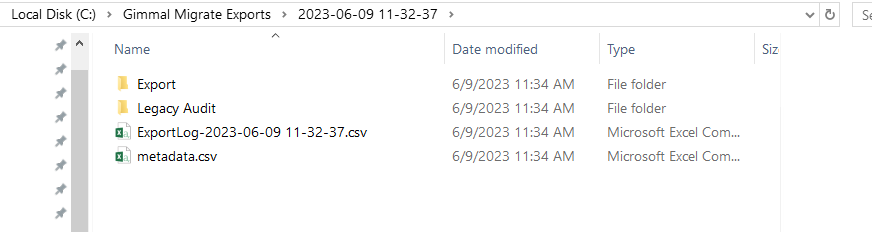
The Metadata.csv file is used later by the MAPIT tool. When content is exported you can select the file naming and folder structure for the export. For migrations to SharePoint Online, we recommend you use the following settings:
-
Export Type: Flat Structure
-
Document Naming Format: Name Document as Object ID
-
Metadata: Export Metadata and RM Data to CSV (one CSV for all files)
-
Select Include Root Folder in the TargetPath column of CSV if you want to include the parent folder of the exported content. Otherwise, only the selected folders’ children will be exported.
-
Do not select the Do Not Export Content (only create CSV) option
-
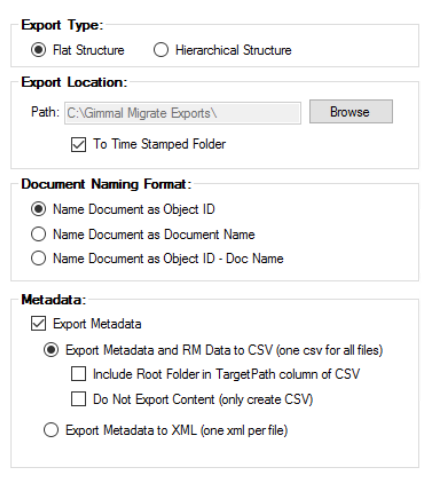
A hierarchical structure only needs to be used if you intend to leave the files on the file share permanently. It recreates the Content Server structure. If you do select this, set the Document Naming Format to Name Document as Document Name or Name Document as Object ID - Doc Name. You can also choose to export the metadata for each file to one XML file per file.
The Windows file system only supports paths up to 256 characters! Keep this in mind if you export to a hierarchical structure.
Settings Tab
You can set additional parameters for the export in the Settings tab. We will discuss each one.
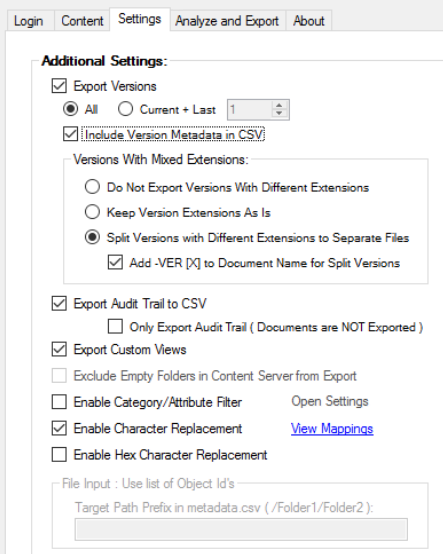
Export Versions lets you export every version of the files from Content Server or limit the export to the current version plus the last n versions. There can be many versions stored in Content Server.
TIP: You will have the option later in MAPIT to limit the number of versions imported, so choose All at this step for maximum flexibility.
Content Server supports versions with mixed MIME types. For example, you can have a version tree that looks like:
-
V1: MyDocument.docx
-
V2: MyDocument.pdf
-
V3: MyDocument.tif
SharePoint will not accept this version tree! We strongly recommend you select the box marked “Split Versions with Different Extensions to Separate Files” and you select the sub-box “Add -VER[X] to Document Name for Split Versions”. Post-migration, you will have three documents in SharePoint named as follows:
-
MyDocument-VER1.docx
-
MyDocument-VER2.pdf
-
MyDocument-VER3.tif
To retain the Content Server audit trails for each document, select Export Audit Trail to CSV. There will be one CSV file created for each exported document that contains the audit history of the document. These are imported to a SharePoint folder during the migration.
Leave Export Custom Views unchecked
Leave Enable Category/Attribute Filter unchecked
Check Enable Character Replacement. Content Server supports special characters in file and container names that are NOT supported by SharePoint. This automatically replaces any problematic characters. Click the View Mappings link to view the default character mappings.
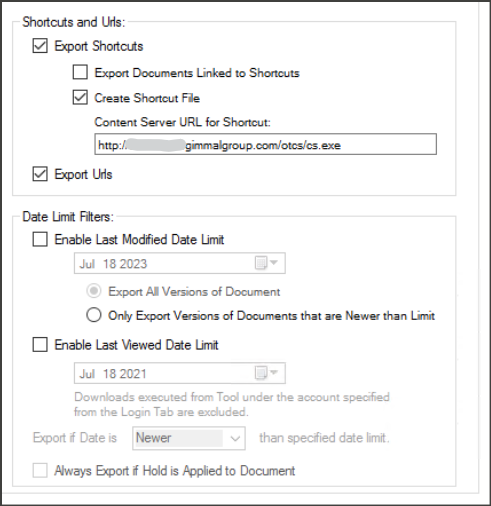
If you have Shortcuts and URL’s in Content Server, you can export these as well. Select Export Shortcuts, click the box for Create Shortcut File and enter the main Content Server URL in the box. If you select the Export Documents Linked to Shortcuts option, it will export a copy of the document for every shortcut that is exported. This could lead to multiple copies of the same document being migrated to SharePoint.
Select Export Urls to create shortcuts in SharePoint that correspond to Content Server URL’s.
Date Limit Filters are beyond the scope of this tutorial. Please refer to the documentation.
Analysis and Export Tab
The Analysis and Export tab reviews your settings, identifies any errors and warns you of any potential issues.
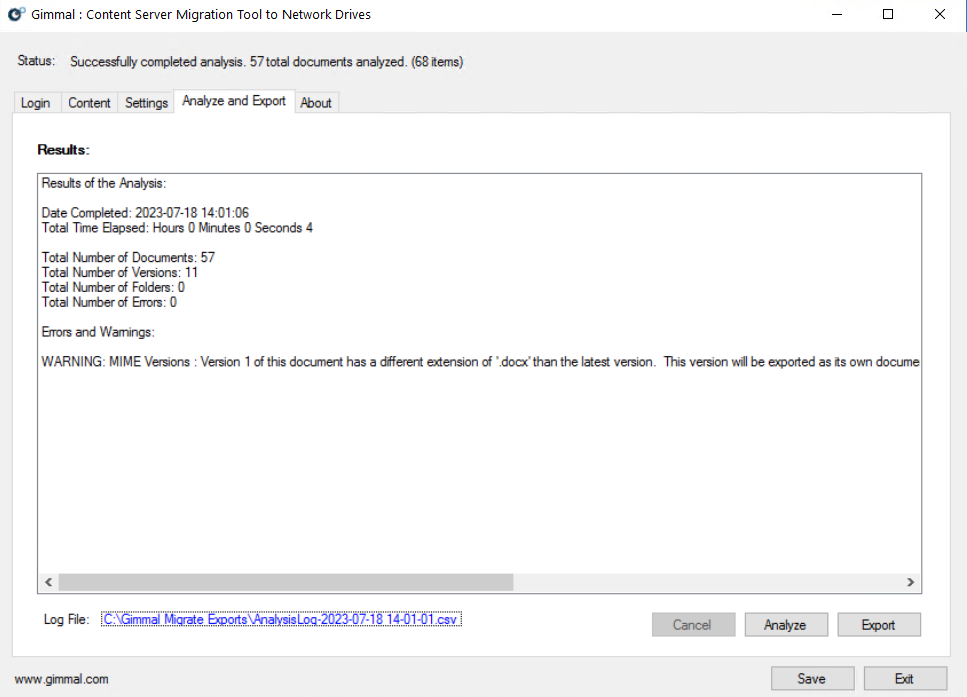
Click Analyze to review your Export job. Any Warnings or Errors will be displayed. A Warning does not prevent the export from running successfully. Any Errors must be addressed before performing the export. A link is provided to the log file created by the Export tool for audit purposes post-migration.
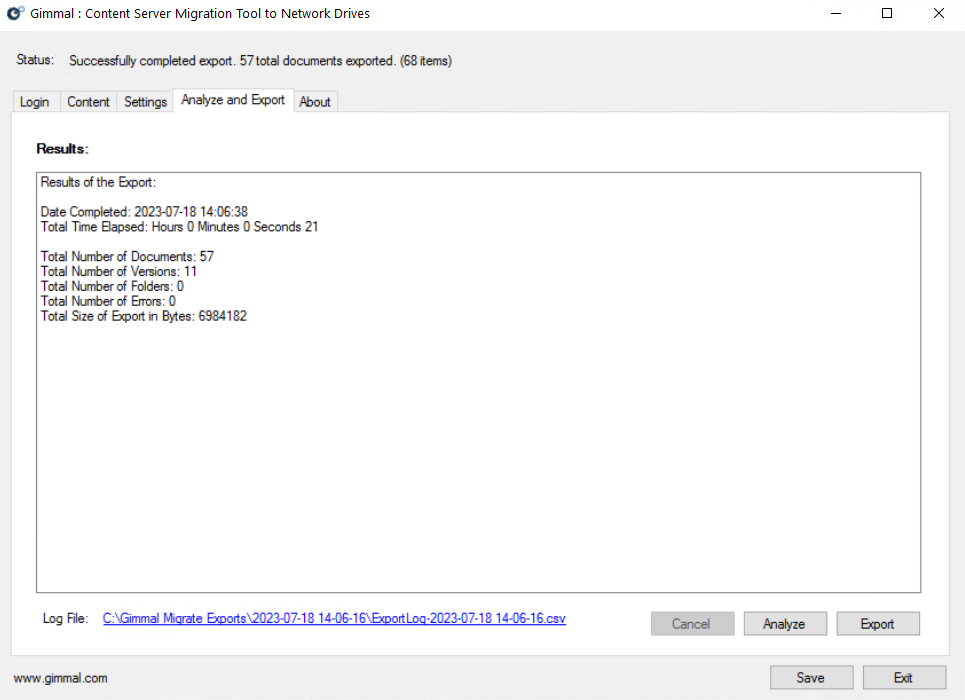
Click the Export button to perform the export. You are done!
Reference Materials
The documentation for the Gimmal Migrate suite of products is available online at docs.gimmal.com. The Gimmal Migrate Export Tool documents are here: