
Requirements
This section provides information about usage requirements for running the Exporter Tool.
Compatibility
The Exporter Tool supports the following Livelink or Content Server environments as source System. If you need support for an earlier version of Livelink prior to Livelink 9.7.1 please contact your Gimmal support contact.
Server Versions Supported by 4.8:
|
Livelink 9.7.1 |
Oracle backend |
Certified and tested |
|
Livelink 9.7.1 |
SQL Server backend |
Certified and tested |
|
Content Server 10.1 |
Oracle backend |
Certified and tested |
|
Content Server 10.1 |
SQL Server backend |
Certified and tested |
|
Content Server 10.5 |
Oracle backend |
Certified and tested |
|
Content Server 10.5 |
SQL Server backend |
Certified and tested |
|
Content Server Suite 16.X |
Oracle backend |
Certified and tested |
|
Content Server Suite 16.X |
SQL Server backend |
Certified and tested |
Server Versions Supported by 4.9
|
Content Server 22.X and up |
Oracle backend |
Certified and tested |
|
Content Server 22.X and up |
SQL Server backend |
Certified and tested |
As noted, version 4.9 of the product only supports Content Server 22.x and up due to changes required to support the Content Server web services references, which had some changes w.r.t variable types
Livelink and Content Server: Please note – throughout this guide – we refer to both Livelink and Content Server. Livelink was the original name of Content Server prior to version 10. Post version 10, Livelink was renamed to Content Server. In this guide when we refer to Livelink we are using the name interchangeably meaning either Livelink or Content Server.
Client Software Pre-requisites
Pre-requisites for the Client/Host PC must be satisfied:
-
Requires .NET Framework 4.7.2 or 4.8 installed on the client (host) where the tool will be run.
-
If the source Livelink System database is using Oracle
-
For exporting users and groups, the client you run off of must have appropriate Oracle Client installed with TNS listeners configured.
-
As these settings are environment specific please consult your local IT stakeholders for assistance
-
If using database connection for Migration Profiles or with the DM Link Redirector – you will require SQL Server database access and a service account with permissions to create the database schema required for Profiles and/or Link Redirection functionality. Recommended minimum SQL Server 2008 or newer instance required.
Content Server Pre-requisites
Ensure Enterprise Web Services are Enabled
Please ensure the Livelink Enterprise Web Services (EWS) or Content Web Services (CWS) are enabled and working as the web services are a requirement for communication. Livelink 9.7.1 and up have EWS/CWS automatically installed. Please ensure your Livelink Server(s) are enabled and configured for EWS use – both use over http and https (SSL) use is supported.
Please note: Information about configuring Livelink with Enterprise Web Services (EWS) is intended for use by System Administrators who are knowledgeable about Livelink Administration. Configuration of your Livelink environment for Enterprise Web Services should be done by your Livelink Administrator for your specific environmental needs and settings. Please consult with your local IT Administrator to ensure the services are enabled for your use.
Locate your Web Services path and attempt to test your connection by checking the URL
http://instancename/cws/DocumentManagement.svc?wsdl in your web browser to see if the svc renders, if it does not render then the IIS folder location may be different. If the wsdl renders then the OpenText EWS/CWS are already configured, proceed to step 2.3.3 to configure the web services. Of note: please add https:// to your path if your environment is enabled for https.
If you are still unable to determine your web services path you can login to a Content Server front end server – under IIS look for the virtual folder mapping (generally the default name is “cws” or “les-services”). If the locations do exist but the virtual folders do not exist, proceed to step 1.3.2 to enable the web services.
If Web Services are not Enabled
In some cases, IT may have decided to disable the OpenText EWS/CWS or it wasn’t enabled by default. You can re-enable the Web Services by following the general steps below.
To set up the web services:
-
In Windows Server > Server Manager --> Features --> ensure all options under .NET Framework 3.5 and 4.5 are enabled.
IIS:
-
Create a new Virtual Directory for cws (new name) or les-services (old name):
-
Set Name: cws or les-services
-
Set Path (may be different depending on your install folder):
o C:\OPENTEXT\webservices\dotnet\les-services OR
o C:\OPENTEXT\webservices\dotnet\cws
-
Convert to Application
-
Enable read, run scripts
-
Set folder / directory permissions
-
If using Web Services with anonymous or basic login – in IIS you must enable anonymous + basic auth only
-
Leave the corresponding web.config bindings in the web services folder as is.
-
-
If using Web Services with windows authentication – in IIS you must disable anonymous access, and basic auth and enable IWA (windows authentication) option
-
You would also need to edit the corresponding web.config and add the bindings for windows authentication. Consult with your Content Server admin for the right settings to add if you are using windows authentication.
-
-
If you require both windows auth and basic auth, you would just create a new virtual directory for each.
-
cws, cws2 (configure the security and web.config for each)
-
-
If you are configuring the web services for Livelink 9.7.1 you must also install the Microsoft J# redistributable 32 and/or 64 bit on the front-end server (if your server is 64 bit you need both J# 32 and 64, if your server is 32 bit you only need J# 32 bit). For Content Server you do not need to install Microsoft J# redistributable on the server since it is built in. When ready you may can attempt to re-test connection to your web services using the steps from step 1.3.1 above.
Web Service Configuration Settings
Verify Enterprise Web Service (EWS) Configuration Settings (applicable for .NET EWS only, Java EWS are set dynamically):
Locate your Livelink Web Service Configuration file (the location is dependent on how your Livelink Administrator first installed and configured Livelink and Web Services – the OpenText root directory specified). For example assuming the file is located at: C:\OpenText\webservices\dotnet\les-services\web.config
Open the file and verify the following setting is enabled for the binding named ContentServiceBinding, DocumentManagementBinding, and MemberServiceBinding with maxReceivedMessageSize values respectively set to the recommended size to 2147483647. Please consult with your Livelink Administrator for assistance or guidance on the maximum size. The value provided is a recommendation to allow large file and folder sizes. Please note this only applies for the .NET version.
<binding name="ContentServiceBinding" maxReceivedMessageSize="2147483647" messageEncoding="Mtom" transferMode="Streamed" />
<binding name="DocumentManagementBinding" maxReceivedMessageSize="2147483647" messageEncoding="Text" transferMode="Buffered" />
<binding name="MemberServiceBinding" maxReceivedMessageSize="2147483647" messageEncoding="Text" transferMode="Buffered" />
If your Content Server environment is using SSL you would need to update both the regular and SSL bindings respectively.
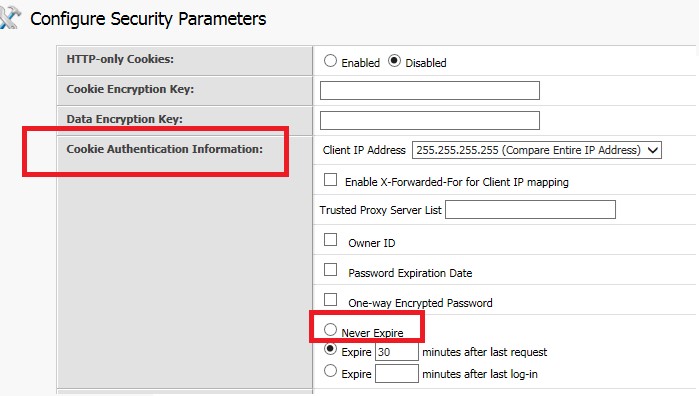
Verify Livelink Server Settings for Cookie Expiration:
Please work with your Livelink Administrator to review the settings below. It is important to review your Livelink Administration settings for authentication cookie expiration. By default, Content Server has this set to 30 minutes.
From the Livelink Content Server Admin Pages > Server Configuration > Configure Security Parameters > Set Cookie Authentication to “Never Expire”. Save your settings and restart your Livelink Services as per your IT service restart guidelines.
Content Server Permissions
For the Exporter Tool please use a user account or service account with full access rights to the areas in Livelink Content Server that is desired for exporting.
Although a user or service account only requires at a minimum see, and see contents access – there are cases where content may not be inheriting permissions; as such we recommend using a service account with elevated rights or System Admin rights where possible to avoid such problems. Please work with your local Administrator to obtain the proper access rights / permissions.
Please note the user/service account you provide is used for accessing Livelink Content Server.
Livelink Content Server permissions and access controls are enforced for the provided user/service account.
Overview and Optimizations
About
This quick start user guide is intended to provide a quick reference for Users/Administrators.
Gimmal - has provided created this tool as standalone executable exporter tool to allow a correctly permissioned user the ability to access a Livelink environment and extract information to network drives.
The exporter tool specifically performs read only exporting of documents and metadata from Livelink. Document and metadata from Livelink are not modified in any way with the sole exception of document export operations would be reflected in the respective Livelink audit trail for a document.
The exports from Livelink will allow an organization to extract documents and metadata from Livelink for multiple purposes including:
-
Further manipulation and loading to other destination locations
-
Long term archival
-
Removal of documents from Livelink and storage on network drives (allowing use of a search mechanism to index metadata for searching)
Functions of the Exporter Tool:
A. Document Export:
Allow selection of parent folder to export - extract from Livelink (can be from enterprise workspace, specific Object IDs, or from the personal workspace)
-
Specify the export destination network or local file share location
-
Document and document name
-
Major document versions only
-
-
Base metadata
-
Document ID
-
Description
-
Created Date
-
Created By
-
Owned By
-
Folder path
-
-
Category metadata
-
For each Category
-
The Attribute name and corresponding attribute value (text value equivalent)
-
-
-
Produce an XML file for each document describing
-
Versions
-
Base metadata and category metadata
-
Access control list permissions capture (Livelink Groups, AD Groups, Users) and for each ACL entry the level of access (from a Livelink access perspective, examples See, See Contents, etc.)
-
-
Or produce a master CSV file with a row for each document describing
-
Base metadata and category metadata
-
Created and Modified Dates and Users
-
-
Option to export just the master metadata CSV and not the documents
-
Option to export Legacy Audit Trail information for each individual Document as individual corresponding Audit CSV files
-
Export content based on
-
Category attribute filter (Category attribute values)
-
Date limit filter (Last modified date, Last view date )
-
Overview of Use
The Exporter Tool
-
Is intended to be run on a Client / Host PC
-
Requires login credentials to access the source Livelink System
-
Enforces the maximum document size of 2 gig limitation from Livelink
-
Provides one way read-only communication with Livelink – only extract, no modification to Livelink documents or metadata
-
Requires adequate permissions for user or use of a Livelink service account with full access rights
-
Supports Livelink document object type export only
-
Empty folders can be ignored and not replicated since we are only capturing documents
-
-
Will not replicate Livelink folder structure on the shared drive to prevent running into folder length name and windows 256 character path limits
-
Exports output to network shared drive with adequate capacity
Please note if the Livelink environment is down or unavailable during an export, errors will be reported and export restart required. This tool is not responsible for managing or preventing such outages.
Corrupt files are usually prevented from being added to Livelink, but there are unforeseen circumstances where a document is added to Livelink that is corrupted due to some factor. Please note if there are corrupt files in your Livelink environment - attempting to export a corrupted file is unsupported at this time. If you encounter corrupted files in your Livelink environment you should delete these before running the Exporter Tool.
Performance Optimization Considerations and Tips
Speed and performance of the Exporter Tool is dependent on many factors.
Gimmal - does not warrant or guarantee the performance of the Exporter Tool in any way.
We outline some tips and considerations for optimization of performance below.
The implementation of optimization considerations and tips is out of scope for this tool and document.
The performance of the exports depends on many factors such as:
-
Network latency
-
Server location impacts
-
Livelink Server configuration and hardware available (load balancing etc)
-
Livelink Enterprise Web Services (EWS) configuration
-
Front end servers versus application servers
-
-
Local IT environment and architecture
-
Dependent on how much metadata exists to be exported from Livelink
-
Factors such as versioning (how many versions for a document on average)
-
Size of documents
-
-
Amount of metadata such as Categories and number of attribute fields
-
Complexity of permission ACL entries (# of items in an ACL list)
-
-
Size and speed of destination location
-
Network traffic and relation to time of day the exports are run
-
Memory available on client/host machine (where you are running the Exporter Tool)
We recommend that you work with your local IT to review the considerations outlined above and to ensure performance optimizations are realized.
Performance Tip 1:
Running the tool directly on the Livelink Server may achieve some performance gains with regards to web service communication latency.
Performance Tip 2:
Another technique would be to split the document loads into smaller chunks and run on multiple clients to achieve parallel exporting. You would need to ensure the exports do not overlap both from the source data and destination location. In this case the limiting factor would be the Livelink servers’ capability to handle the additional load, as well as destination network drive speed and capacity considerations.
Performance Tip 3:
Please ensure the client/host has adequate amount of RAM memory (minimum 8 GB).
Performance Tip 4:
If possible, having a Livelink environment that is load balanced for Enterprise Web Service (EWS) use or dedicated application server is recommended.
Test Export Metrics
Performance is dependent on various factors including things like network latency - the test export metric example below is provided merely as an example of a well configured test environment for general planning comparison purposes. Your results will be dependent on the specific Client environment – see section 2.3 Performance Optimization Considerations and Tips for reference. These results are a mere test result and do not warrant performance expectations.
Performance is also dependent on size of metadata such as # categories and # of attributes in a category, as well as size of ACL list per document. Generally the more metadata the slower the performance – as more information needs to be gathered for an export.
|
Test Export Metrics Livelink 9.7.1 test environment: load balanced 2 front end servers with EWS enabled, 6gb RAM, 2.30 GHz Xeon E5 , Oracle backend Client: Ran on remote client (4gb ram) on same internal network located in same city, export to local drive, and use of a single Exporter Tool thread. |
|
|
# Documents |
6200 |
|
Exported File Item Count (including all major versions and 1 xml file per document) |
13000 |
|
Average # Livelink categories per document |
2 |
|
Average # of ACL entries in a documents permissions ACL list |
4 |
|
Exported location size of files (in MB) |
1280 |
|
Elapsed Time (in minutes) |
101 |
|
Exported items per minute |
128.71 |
Using the Exporter Tool
Activation
Please note a valid activation code is required on first use of the Content Server Migration Tool to Network Drives, required for every Client PC that it is run on.
Upon purchase of the Migration Tool Suite you would have been provided details on how to obtain the necessary activation codes for your requisite Client PC use.
When first running the Migration Tool you will be required to specify a unique license key to register the product for use. You can enter the provided License Key in the “About” tab and by clicking the “Register” button. The registration will occur one time and will activate the software for use, no further activation will be required.
If you require assistance or would like to obtain additional activation codes for additional Client PC use within your environment please contact your Gimmal support contact.
Credentials
Login
The user must provide the source Livelink System login credentials as displayed in the screenshot below.
You must also provide your Web Services Root path for the source Liveink System. The user id and password provided must be in the context of the source Livelink System you have specified.
For more information on Livelink configuration please refer to this
Optionally if you are using the Records Management module, you may also wish to enable your Records Management Web Services by specifying the path for the RM Web Services Root. If you do not wish to enable the ability to export RM metadata please disable the checkbox for RM Web Services.
Please click “Test Connection” to verify that you have specified valid credentials and a valid web services root path. Clicking “Save” will save your login values for future use.
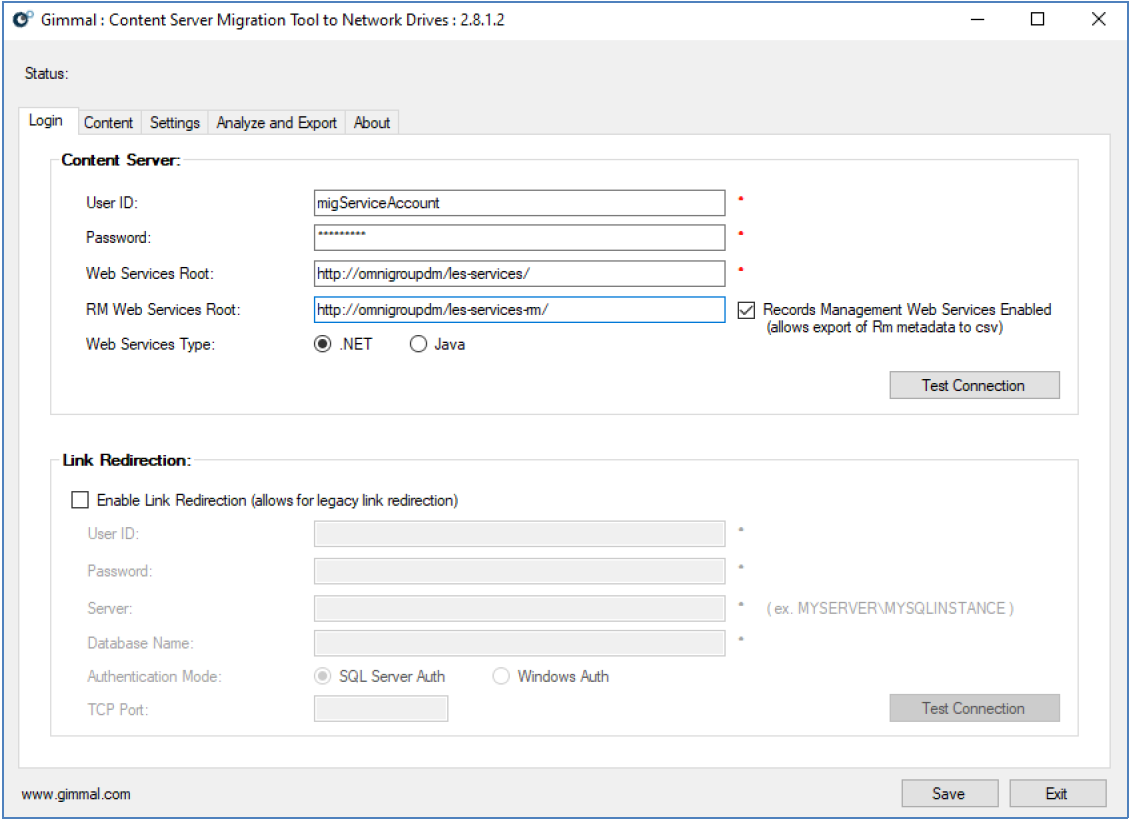
Options for Content Server Web Services
There are 2 options for connecting with Content Server Web Services.
.NET and Java Web Services are supported.
Please consult with your IT Administrator to determine how your Content Server Web Services are configured. Please review Section 1.3 Livelink Server Pre-requisites which covers a brief summary.
Link Redirection
Link Redirection functionality allows you to redirect your migrated legacy Livelink document and folder links to the new destination location on the Network Drives. This link redirection capability allows legacy links to continue to work seamlessly during and/or post migrations.
Please review the Gimmal – DM Link Redirector – User and Install Guide for further details on how to use the Link Redirection post migrations.
Please review the Gimmal – Content Server to SharePoint Migration Tool – User and Install Guide for further details on creating the initial tables for Link Redirection. We assume that most readers are using this tool first. If your organization is using the Gimmal – Content Server Migration Tool to Network Drives as a standalone tool you will need to create the database tables manually, in which case contact your support manager to obtain database script. Link Redirection is optional and not required.
In order to support use of Migration Profiles and Link Redirection you would need to work with your IT Administrator to obtain access and service account rights to a SQL Server instance. You would specify the service account credentials on tool first use to create the database for Profiles as well as Link Redirection.
Please use caution as you should only ever create 1 database for each Livelink instance you wish to redirect from and reference the correct database for the specific Livelink instance you wish to migrate from. If you are migrating from multiple instances of Livelink and wish to maintain the links for each instance you will need to use a separate migration database and link redirector instance for each instance of Livelink.
Link Redirection
If enabled – will map migrated documents (latest versions only) and folders links to the destination location.
Meaning the destination location will be available to the DM Link Redirector application for redirection purposes. Please review the Gimmal – DM Link Redirector – User and Install Guide for further details on how to use the Link Redirection post migrations.
If disabled – the migrated items will not be mapped for use with the DM Link Redirector.
Additional Migration Considerations
If you manually backout a migration and delete the contents on the Network drive or re-run a migration and create duplicate documents, the link redirector will replace the links or have invalid links in the case of deletion. If you need to delete an entire area that has been migrated, you must either delete those records from the link redirector or re-run the migration which will put in the new location for the original documents.
Please use caution when deleting migrated documents and folders where link redirection was enabled to avoid breaking the mapped historical links unintentionally. To rectify orphaned mapping links one would need to manually delete the links to the documents that were migrated but deleted from Network Drive, or re-run the migration on the content which would replace the mapping entries with valid mappings.
Please use caution when re-running a migration in the case of migrating the same content (documents and / or folders) to another area which will duplicate the content - resulting in the link redirection mapping records pointing to the latest locations and orphaning the originally migrated and now duplicated content. Support for duplicating content using the migration tool with regards to keeping historical link mappings is not supported. If there is a real business need to migrate the same content to different areas, link re-direction would either need to be disabled or manually populated by the migration administrator.
Mime Type Mappings
Rules for How Document Versions are Named on Export (Mime Type Value)
When exporting a version(s) of a document using this tool - please note the order for mime type processing/application is as follows:
-
The Livelink document’s version extension will be used first (as this extension was the extension provided when the document version was originally submitted, it could have been changed in Livelink at a later time, so the source of truth is to assume the version’s extension is correct on original version submission as a new document version)
-
If the version’s extension is missing, then secondly the tool will try to the Livelink document’s corresponding Specific Tab > Mime type setting
-
You should ensure your MimeTypes.xml mapping is configured as per the next section below
-
-
Lastly if there are still no valid extensions found then the tool will try to use the document name extension if it exists
-
If there are no other available extensions then the exported document version(s) will have no valid extension (mime type) specified
Ensure your Mime Types match your Livelink Mime Types
Please ensure the Livelink Mime Types are captured from a mapping perspective. Livelink provides base mime type mappings, but most Livelink source systems have some form of mime type customizations for custom document types.
The Exporter Tool requires mappings to ensure it knows how to deal with mime types from the source Livelink system. Out of the box the Exporter Tool includes a set of base mime type mappings located in the executable folder, specifically contained in the MimeTypes.xml file.
If the mime type is not captured in the configuration and is encountered in an export – an error is thrown, the error is logged and the export will skip the document and continue to the next document.
To avoid such issues it is best to capture all potential mime types from the source system and add to the Exporter Tool’s MimeTypes.xml configuration file.
For your source system Mime Types please ask your local IT Administrator to get access to the Mime.Types located in the OpenText Livelink root config folder for the source Livelink System. You would copy these mime types into the Exporter Tool’s MimeTypes.xml configuration file.
Running an Export
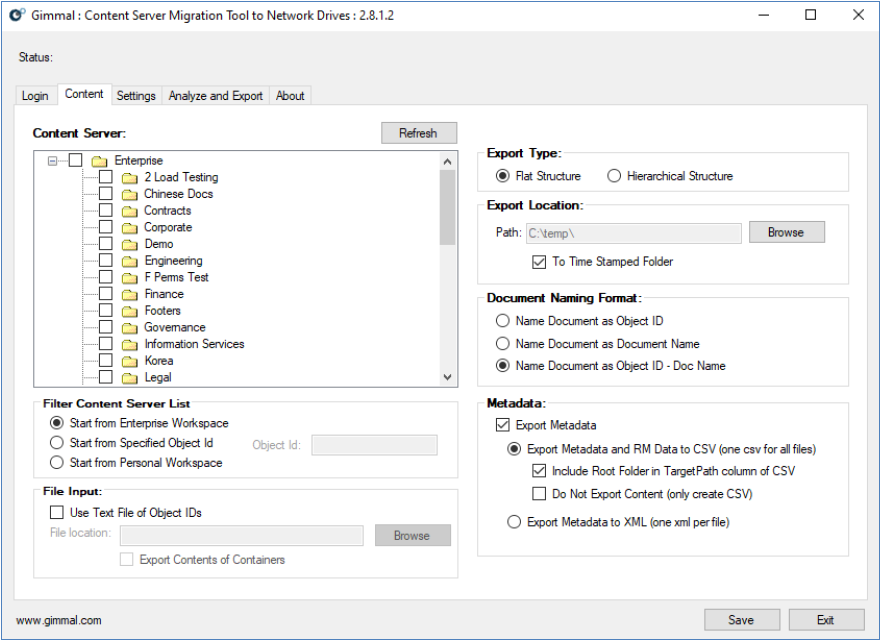
The Document Export Settings tab allows the User to export Document and metadata from Livelink source system to the destination export location (local or network drive).
Choose Source and Destination
Select Source Items for Export from one of the options below:
From the Enterprise Workspace via the Content Server tree view - browse to the folder area for the Documents to be exported.
-
You may select any number of folders to be exported – please use caution to ensure that you select folders that occur at the same level
-
When you select a folder – the selected folder and its children will be included in the export, you do not need to enable its children for exporting
-
Likewise, if you select the child folders you do not need to select the parent folder
Start from the Specified Object Id – please provide the Id of the folder node
Start from Personal Workspace – please provide the User Id of the personal workspace node
Use Text File of Object IDs - provide a pre-prepared list of Livelink Content Server Object ID’s to be exported.
-
Each Object ID should be separated by a new line and in a text readable format
-
The Object IDs will be taken for processing in the sequence provided You can specify Object ID of folders but if you do so you would have to enable the option to Export Contents of Containers.
As a Recommendation – splitting out areas to be exported is recommended: as doing so will minimize potential for error conditions, and allows for parallel processing and generally makes migrations / exports more manageable as they are in smaller chunks.
Export Settings
Choose Export Type
Ignore the source folder structure and export as a flat structure (recommended).
-
You would want to use this option if your Content Server structure was deep (paths longer than 255 characters)
OR
Preserve the source hierarchical folder structure
-
Please be advised that there is a Windows 255-character NTFS path restriction.
-
If this option is chosen and a document or folder exceeds the path limitation the object will be logged as an error and the tool will try the next object for export. If it is a folder the contents of the folder will also be skipped.
-
We recommend in most cases to use the flat structure option as the path metadata is preserved in the XML files. If choosing hierarchical export most use cases would run into the 255 character NTFS limitation. This option would only be recommended in the cases that the location can be verified that the path limit will not be exceeded.
You may also wish to choose whether to export to timestamped folder
-
If enabled will create a unique timestamped folder for every export operation
-
If disabled will export documents to the same folder, if duplicates are found they will be skipped
-
We recommend in majority of cases to use timestamped folders to ensure your exports are uniquely identified
Browse to the destination export location – this can be a local, network drive, or OneDrive
-
The export location will have an impact on performance due to size and latency considerations
-
Please ensure adequate space is available on the destination export location to handle the size of the export
Specify Exported Document Name
-
Choose naming of documents
-
Name Document as Object ID (the unique Object ID from the Livelink source system)
-
Name Document as Document Name (the document name/title from the Livelink source system)
-
If you choose this setting and you happen to have collision in the document names across multiple source folders to the single destination folder – the document will be overwritten and replaced by the latest document. Please ensure you take this into account if you enable this option.
-
-
Name Document as Object ID - Doc Name
-
This option is desired if you are doing a flat export, this ensures that you will never have collision on the document names since the unique Object ID is appended to the front of the document name.
-
-
Note: The original Content Server file name is always preserved as metadata and can be rehydrated as required from your metadata.csv or xml files
-
Specify Export Metadata options for the content that will be exported.
-
Choose option to enable export of metadata
-
If metadata is included they will be generated and stored in XML files or in a master CSV file
-
Please note – including metadata has a performance impact depending on the amount and type of metadata
-
If choosing master CSV option – the master csv file – “metadata.csv” will be created at the root of the export area
-
-
If not enabled metadata file(s) are not generated
-
Option to export only metadata and suppress the download of content (folders and documents)
-
This option is useful for customers who wish to review the metadata only prior to exporting the content
-
If you enable this option – in the metadata.csv the source directory column will be invalid since we aren't exporting any of the files
-
-
If you choose to create XML metadata files – the naming convention will match the naming convention chosen for the documents
-
Please note: most customers will choose export as metadata.csv – since this provides the greatest flexibility in preserving a centralized manifest of all information about the exported content
Please note if you choose to export metadata to individual XML files – the access control lists from Livelink Content Server will also be included in the XML files. If you choose to export to a CSV master file all metadata will be included in a single file where each row in the file represents each document (related by local source path). For the CSV master file option the access control lists from Livelink Content Server are not included. If you need to preserve the access control lists for each document then you should use the XML format.
Choose number of versions to export.
-
Choose option to export All Document Versions, Latest Document Version, or N versions
-
Please note: Choosing all versions has a performance impact since a Document could have many versions
-
Option to Include Version Metadata in CSV (this will create a new row entry for each version of a document)
-
This will preserve the exact version numbers from Livelink as well as created by and modified by dates for those versions
-
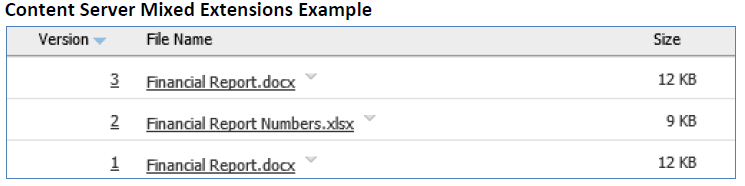
Versions with Mixed Extensions
-
In Content Server there may be cases where a document / object has multiple mixed extensions
-
This is Content Server behavior in that a single mime type extension is not enforced on a document
-
It may not be very common but you may encounter from time to time documents with versions that have mixed extension types
-
-
If you try to keep version extensions as is – you will receive a warning during analysis and migration steps:
-
“Version mime type of '.xlsx' is different than that of the latest version's mime type of '.docx'. This may be an issue if reimporting into another ECM System.”
-
This will cause problems when importing into a new system like SharePoint - SharePoint does not allow versions with mixed extensions for the same document
-
-
This feature allows migration analysts to choose what happens to documents with versions that have mixed extensions / mime types
|
Do not keep versions with different extensions |
Keep version extensions as is |
Split versions with different extensions to separate files |
|
Use Case: You don’t wish to keep the versions with different file extensions then the current version. In this case the latest versions file extension is used and all other versions with different extensions are not exported. |
Use Case: You are exporting to file share and not to SharePoint. You wish to keep the versioning and extensions the exact same as was from Content Server. In this case all versions and extensions are exported. |
Use Case: You are exporting to SharePoint and SharePoint does not allow mixed extensions for a single document object. This will automatically separate version extensions into separate documents by extension. |
|
Export Result: 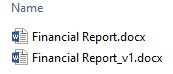
|
Export Result: 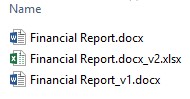
|
Export Result: 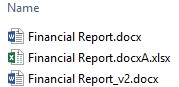
If you are using metadata.csv in this case the export will create separate line item for each extension type. The child documents will maintain the same Category metadata and Created Date as the parent document. In the metadata file the Child document name will have “- VER A” appended starting from letter A descending for each unique extension. |
Versions with Mixed Extensions - Recommendation
The recommended best practice is to use the setting “Do not keep versions with different extensions” where possible. This will ignore all versions with different extensions. This works well when the mixed extensions case is rare and you only care about the newest documents versions anyways - then this is the simplest approach.
In the case that you are migrating to SharePoint and MUST preserve all versions only then should you use the setting “Split versions with different extensions to separate files”. This will guarantee that all document versions are exported for SharePoint use and will allow the versions with different extensions to be loaded as separate documents altogether since SharePoint does not support documents with mixed extensions/mimetypes.
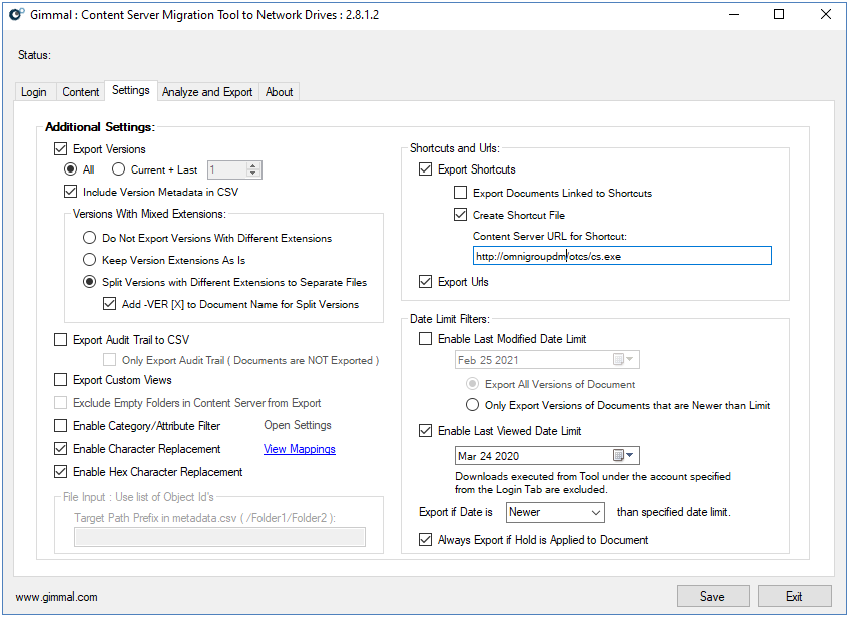
Specify additional settings
-
Export Audit Trail to CSV
-
This option is useful if you would like to preserve your Audit Trail information for each individual document from Content Server (for reference purposes)
-
Please exercise caution with this option as exporting Audit Trail information has an impact on overall export performance since we in effect are gathering and generating additional CSV files
-
If enabled – this will export each Document’s audit trail to individual CSV files in a separate folder area called Legacy Audit
-
If you enabled Export Metadata.csv option – the Audit CSV file information will be included in the Metadata.csv file (you will have one Audit CSV file entry in the metadata.csv corresponding to each unique Content Server document). Please note that the Metadata.csv entries for these items would default with the current export time stamp.
-
If you do not enable Export Metadata.csv option – then the Audit CSV files are generated but no metadata entries will be generated)
-
-
-
Export Custom Views
-
If enabled will include the custom view file and related metadata
-
Otherwise custom views are excluded
-
-
Exclude Empty Folders
-
If enabled empty folders will not be exported
-
Otherwise empty folders are exported when choosing hierarchical export option
-
This option is not enabled if a Flat export option is chosen
-
-
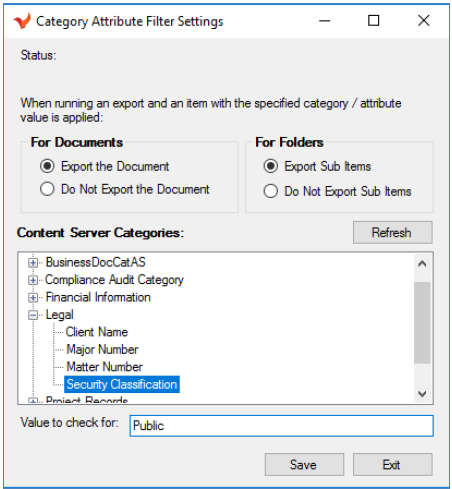
Enable Category Attribute Filter
-
If enabled allows a Category Attribute filter to be checked to determine if a document or folder is included in the export (please use care when using attribute filters – incorrect use of category/attribute filter may lead to inconsistent results)
-
Select the Category and attribute value to look for
-
Specify the value to match on
-
In the example below objects with Legal > Security Classification = Public will be exported
-
If that Category / attribute value is not applied to the objects they will not be included in the export
-
Note that the analysis log will capture what is included and excluded based on the rule you specified – you may wish to review the log prior to running your export to validate desired behavior
-
-
-
If Category/attribute filter is disabled it is not used
Additional Notes: Using Category Attribute Filter
You can choose to use the Category Attribute filter as either:
-
Inclusive rule – “export content that has this value” by using option “Export the Document”
-
Exclusive rule – “do not export content that has this value” by using the option “Do Not Export the Document”
In addition, if you specify for folders - “do not export sub items” you can effectively block sub folder content from being exported if the folder does not have the specific inclusive category attribute value applied.
Content Server as Source for SharePoint Destination – Version Notes
Advanced Versioning
It is possible to migrate with major/minor version numbers preserved in the metadata.csv file.
If you do not enable include version metadata in your source metadata.csv – major/minor versions from Content Server will be transferred into SharePoint as major versions only.
Content Server source ver#: 1.0, 1.1, 1.2, 2.0 will be in destination SharePoint as corresponding ver#: 1.0, 2.0, 3.0, 4.0
If you do enable include version metadata in your source metadata.csv – major/minor versions from Content Server are transferred into SharePoint as major / minor versions.
Content Server source ver#: 1.0, 1.1, 1.2, 2.0 will be in destination SharePoint as corresponding ver#: 1.0, 1.1, 1.2, 2.0 To do this you must enable Version Metadata in CSV checkbox option.
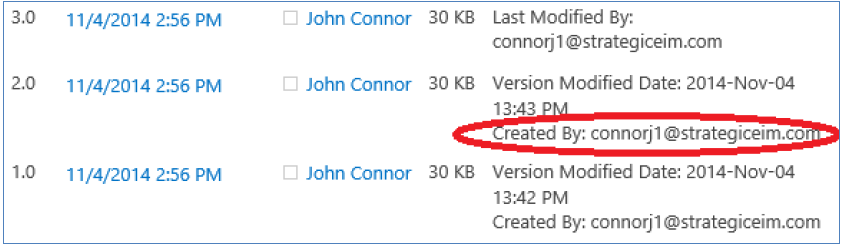
Version Created By
By default, the version created by comment is not preserved. It is possible to preserve your version created by metadata for all your versions in SharePoint. This would automatically add the Created By comment into the SharePoint version history comments. If you wanted to preserve this you would need to enable option to include version metadata in your source metadata.csv. To do this you must enable Version Metadata in CSV checkbox option.
Recommendation
In the cases that you wanted to either preserve your exact version #’s for major / minor versioning and or preserve the version CreatedBy comment – you would want to enable the version metadata setting for your metadata.csv file. To do this you must enable Include Version Metadata in CSV checkbox option.
In all other cases if the above use cases are not required then proceed with your source with no version metadata values specified.
Setting for Character Replacement
-
Content Server supports many characters that are invalid on a network file share. This setting allows one to replace invalid characters with valid characters in the exported location when it is enabled
-
By default, the main common replacement characters are already included in the Character Replacement list
-
If you need to add additional character mappings you can add them from the install folder – by editing the CharacterReplacementMappings.xml file and adding the corresponding character replacement entry
Setting for Hex Code Replacement
-
Content Server by default does not allow hex codes in document name or folder name. Sometimes customers have this in their environment due to legacy load processes or prior to upgrading to newer versions of Content Server.
-
OpenText does not support the hex code characters and as such it can be a problem for exporting
-
To fix and remove such codes it is possible to either remove them at the source in Content Server or by enabling the convenience feature included here - hex code replacement in the Content Server Exporter tool here by enabling this setting
-
If you need to change the replacement character (default is blank) for hex replacement you can edit the configuration file for CS Exporter for the key “HexCodeReplacementCharacter”
Warning: Adding additional char or hex code replacements will have an impact on performance since it takes effort/cycles to do the replacement checks. We recommend only adding the necessary replacement entries to ensure optimal performance is achieved.
Upgrading: When uninstalling an old version of Content Server Migration Tool to network drives and then installing new version – if you have custom CharacterReplacementMappings.xml files for char or hex replacements you must copy those files out first - otherwise upon uninstall the files will be lost. Upon install of new version you can copy the corresponding mappings.xml files back to replace the default char or hex files which preserves your custom replacement mappings.
File Input – Use list of Object ID’s – target path prefix
-
This setting allows one to force the target path prefix to be used when exporting a list of objects via the Object ID file list option
-
The prefix specified will automatically be added (prepended) to the front of the existing target path o This allows customers to customize the target path in bulk only available when using object ID list export option
Set shortcut and URL preferences.
-
Export Documents linked to Shortcuts (exports the actual document)
-
If enabled when a shortcut is encountered and the shortcut is to a document – the document and related metadata will be included into the current folder structure (target path)
-
If a folder shortcut is encountered – it does not export the folder contents, the tool logs this item in the analysis log that it won’t be exported
-
When exporting shortcuts - if a document with same name exists, will cause problem on name collision (documents will get replaced)
-
When you know you have shortcuts and plan to enable this option – we strongly recommend you export with naming of object-id prefixed to prevent collisions on document shortcuts exported
-
-
Otherwise the shortcut is ignored
-
-
Create Shortcut file option (creates a shortcut file pointing to the original source document)
-
If enabled when a shortcut is encountered – it will generate a windows shortcut file that points to the original source location in Livelink.
-
If you are using the Legacy Link Redirector for your migrations – we strongly recommend you use this option versus Export Documents linked to Shortcuts.
-
The reason is that the Legacy Link Redirector would automatically redirect a user to the correct destination location in either Livelink or SharePoint depending on if it has been migrated yet or not which is most accurate.
-
-
Set date limit filters.
-
Last Modified Date Limit
-
This feature will allow the migration analyst to choose to export documents (and all of its versions) that satisfy the Last Modified Date value specified
-
-
Last Viewed Date Limit
-
This feature will allow the migration analyst to choose to export documents (and all of its versions) that satisfy the Last Viewed Date value specified
-
Documents that have been created, viewed, fetched, version added or downloaded from Content Server on/after the specified date limit will be exported (depending on the Newer or Older setting chosen)
-
-
In either case – if you are exporting folders, the folders will always be included in the export, only documents will be checked for inclusion
-
If you enable both settings it will perform an AND operation – that is a document is exported if it meets both of those conditions, please use care when you use both settings
-
Optional setting: When using Records Management with Legal Holds – it is also possible to override the date limit filters shown above by enabling the option Always Export if Hold is Applied to Document
-
If enabled this will override the date limit filter and export the documents where any hold is found
-
Run Analyze
Perform Pre-Migration analysis, click “Analyze” button
-
This step performs an analysis of your planned export identifying potential issues with your export
-
The analyst can review the analysis log to determine if any actions are required to fix issues prior to performing the export
-
Summarizes a list of object types that are not supported if discovered in the path
-
Logs object types that are not supported by the Tool
-
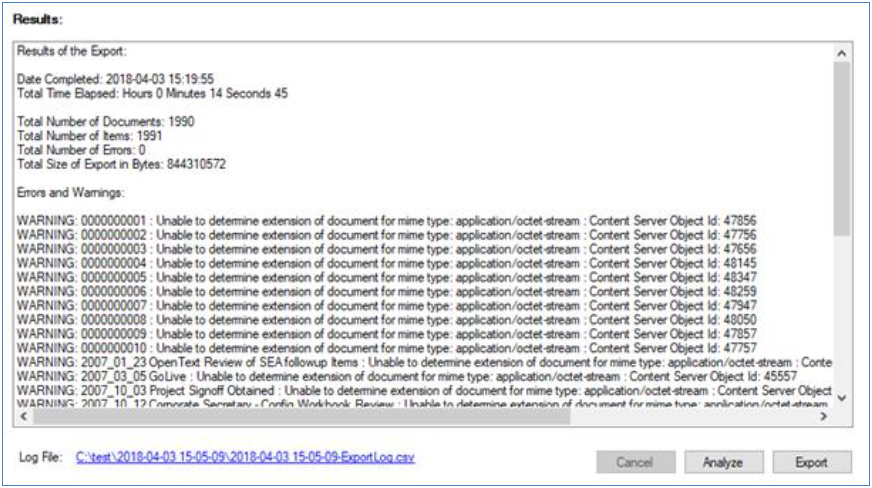
Run Export
-
Click “Export” button
-
The export will start
-
If timestamp is enabled - a new folder is created in the export location named with a time stamp ex.) YYYY-MM-DD HH-MM-SS
-
The export outputs are contained here (Export1,…)
-
The status bar will indicate the # of item currently processed
-
When completed the status bar will indicate completion
-
-
-
-
A log file is generated in the root folder (ExportLog.csv)
-
The log file contains a detailed logging of operations and logs successes or failures
-
The log file can be used as audit / proof of export as well as for validation purposes
-
-
You may interrupt and cancel an export by clicking the “Cancel” button at any time
-
Please be aware if you click the Cancel button the operation is stopped and would need to be restarted from the beginning
-
Resume Export on Content Server Outage or Export Cancellation
There are cases when your source Content Server / Livelink system experiences outages or when a migration analyst manually Cancels a migration. For small migrations it is fine to start the export process again from scratch. When you are doing a large migration, it is sometimes not possible to re-export the content since it could take a long time.
For such a use case – if your environment is experiencing intermittent outages – you can either fix your Content Server underlying issue working with your local IT Administrators / CS Administrators, or via the tool itself you can account for intermittent outages.
If you see exports failing due to Content Server outages (unplanned), you can work around your environment issues by choosing to (before doing your next migration):
-
Disable option to export to timestamp folder (the export will always go to the selected destination folder)
-
Run the export as per usual
-
If the export fails due to Content Server unplanned outage (due to system instability or health issue)
-
Delete your metadata.csv that was generated
-
Delete the last document and any corresponding last versions that were not exported
-
When your Content Server environment recovers
-
You can then click Export
-
The migration will start exporting documents that haven’t yet been exported (in effect resuming from where Content Server had failed
-
The metadata.csv file will be re-generated for all of the content
-
-
If you experience a Content Server outage during a migration where you have enabled export to timestamp folder. You can also resume the export in that case - you just need to disable the timestamp folder setting and choose the existing timestamp folder as the destination.
Following the instructions to resume as above - delete the metadata.csv, clean up the last document/version and re-export.
This process for workaround although not ideal would help save the migration analyst time and effort from having to re-migrate everything after an unplanned Content Server outage.
Release Notes
Use UNC Path for Export Location
There may be cases where you may wish to use a full UNC path when choosing your export location.
This would be the case when exporting to a non-mapped shared drive. Ex.) \\server123\share\myfolder
You can use a UNC path by enabling a setting in the configuration file.
-
Browse to your install folder:
-
Edit the config file and locate the entry below
-
Locate CSExporter.exe.config
-
Edit the key <add key=" EnableManualInputExportLocation" value="true" />
-
Set the value to “true”
-
-
-
You must close the application and re-open for the change to take effect
-
On restart of the application you will now be able to type in a valid UNC path as the Export Location.
Disable Export of Compound Document Releases/Revisions
There may be cases where you may wish to disable the export of Compound Document Releases and Revisions.
By default this is enabled, to disable this feature by editing a setting in the configuration file.
-
Browse to your install folder:
-
Edit the config file and locate the entry below
-
Locate CSExporter.exe.config
-
Edit the key <add key="ExportReleasesAndRevisions" value="true" />
-
Set the value to “false”
-
-
-
You must close the application and re-open for the change to take effect
-
On restart of the application, you export of Compound Document – Releases and Revisions will be disabled and the export will only include the Compound Document contents and not the Releases and Revisions.