
Contents
Settings
Installation Settings
ScannerConnect allows users to transfer records in the Gimmal Physical application with a tethered scanner device.
To configure ScannerConnect, enter the Settings options to match your organization's configuration .
The data entered in the screenshot below is SAMPLE DATA for example purposes only. Please enter the values specific to your organization.

Green check mark: Settings are valid
Required Settings
-
Application URL - the base URL for the Gimmal Physical web application (e.g. https://gimmal.example.com).
-
Application Name - The name of the application as found under Admin | Technical Information in the Gimmal Physical Application.
-
Web Service Address - the URL for the Gimmal Physical web service. The format will differ if your Gimmal Physical is on-premises or in the Cloud
-
Cloud example: https://client-services.gimmal.com. Please contact Gimmal to verify the correct Web Service Address.
-
On-Premises: This should be the URL to their Physical Records REST API site. example: https://sitename-services.example.com
-
-
Web Service Credentials –
-
SSO - A browser window will open when the user checks the User Single Sign-on checkbox, and the user will need to be authenticated against their SSO provider.
-
Important Note
-
-
Only Service Provider (SP) initiated SAML2 workflow is supported. Identity Provider (IdP) initiated workflow is not supported.
-
Basic – Username and password must be entered.
-
If the credentials are invalid, or ScannerConnect cannot connect to the web a red icon will appear next to the Web Service Address textbox.
-
Hover over this icon to view additional details on this issue.
-
Serial Port – this is the COM port through which the program receives input from the tethered scanner (e.g. COM 1). If the scanner is connected to the user’s computer, they can open Device Manager and expand the node entitled Ports (COM & LPT) to see which serial port needs to be selected in ScannerConnect.
Optional Settings
-
Remember Password - determines whether ScannerConnect stores the user’s web service credentials when using basic authentication.
-
Default Destination Barcode - the barcode of the destination to which items will be transferred if no other destination is provided. Without a default, a destination must be scanned for every transfer.
-
Barcode Prefix – text which will be prepended to all scanned barcodes.
-
Show Checkout Quantity Limit Messages – determines whether ScannerConnect displays warnings when the number of items transferred to a user puts them over the allowed limit. The limit is set as a preference in the web application.
-
Show at Startup – determines whether the Settings menu will be displayed every time the application starts.
To exit without saving changes, click ‘Cancel’. To save changes, click ‘OK’. The Settings menu can be accessed at any time by clicking ‘Settings’.
Using ScannerConnect
ScannerConnect allows you to perform transfers either by selecting the items and clicking ‘Transfer’, scanning the Transfer action barcode, or pressing ‘Enter’ from your keyboard.
Transfer
The destination may be scanned at any time; it does not need to be scanned before or after the items to be transferred.
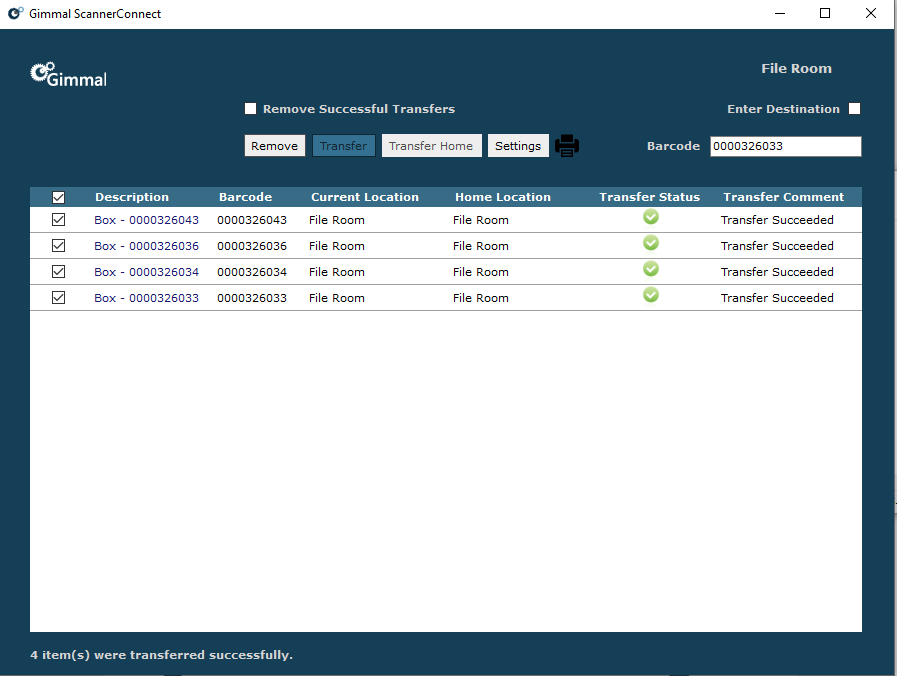
To Transfer Items
-
Scan the barcodes of the items and the barcode of the transfer destination.
-
Click ‘Transfer’ or scan the Transfer action barcode to transfer the selected items.
Note:
-
Scanning another destination will override the existing destination. If the item type of a scanned barcode cannot be transferred (e.g. Location, User), ScannerConnect will automatically recognize it as the destination.
-
However, if the item type of a scanned barcode can be transferred (e.g. Box), then check the ‘Enter Destination’ checkbox or scan the Make Location barcode to select the next received scan as the destination.
-
Item barcodes and destination barcodes may also be entered manually in the Barcode textbox.
Home Transfer
To Transfer the selected items back to Home Location:
-
Scan the barcodes of one or more items (a destination does not need to be scanned).
-
Click ‘Transfer Home’ or scan the Home Transfer action barcode to return the selected items to their respective home locations. Item barcodes may also be entered manually in the Barcode textbox.
Remove
One or more scanned items may be removed from the grid at any time.
-
Select the items you would like to remove in the grid and click ‘Remove’ or scan the Close action barcode.
-
ScannerConnect can also be configured to automatically remove items from the grid when they are successfully transferred. This is done by checking the Remove Successful Transfers checkbox.
Print
The items in the grid and the transfer results displayed in the grid may be printed at any time by clicking the printer icon next to the Settings button.
Other
-
Clicking on the Gimmal Physical logo in the top left corner of the application window will open a web browser and navigate to the Application URL specified on the Settings menu.
-
Scanned items displayed in the grid will include hyperlinks to the view page of each item in the Gimmal Physical web application.
Keyboard Shortcuts
-
Enter: If focus is on the Barcode textbox, ScannerConnect will try to find the item in Gimmal Physical. This is equivalent to scanning the item. If focus is not on the Barcode textbox, pressing the Enter key will transfer the selected items. This is equivalent to clicking the Transfer button or scanning the Transfer action barcode.
-
Ctl + R: Remove selected items from the grid. This is equivalent to clicking the Remove button or scanning the Close action barcode.
-
Ctl + H: Transfer selected items to their respective homes. This is equivalent to clicking the Transfer Home button or scanning the Home Transfer action barcode.
-
Ctl + S: Open the Settings menu. This is equivalent to clicking the Settings button.
-
Ctl + M: Toggle the setting Remove Successful Transfers. This is equivalent to clicking the checkbox of the same name.
-
Ctl + D: Toggle the Enter Destination switch. This is equivalent to clicking the checkbox of the same name or scanning the Make Location action barcode.
-
Ctl + B: Set focus on the Barcode textbox (to begin typing a barcode without using the mouse).
-
Ctl + L: Selects or deselects all items in the grid. This is equivalent to clicking the checkbox in the top left corner of the grid.