
Please use the links on the right to help navigate through this document.
Getting Started
Gimmal Physical PortableConnect is a barcode scanning application that allows users to use a portable scanner to perform actions in Gimmal Physical.
Note: Neither RFID nor Bluetooth can be used with the PortableConnect version for Android 13 or 14.
To start using PortableConnect:
-
Unlock the portable device.
-
Tap on the Gimmal Physical PortableConnect app icon on the home screen
• If the app icon is not on the home screen, search the device or open the app drawer and scroll until it is found.
Once in the app, tap the vertical ellipses (three dots) in the upper right corner and select the desired tab.
PortableConnect with Web Services
If using PortableConnect with Gimmal Physical Webservices, you will need:
-
URL for the Gimmal Physical Webservice
-
Valid Gimmal Physical login credentials
To use:
-
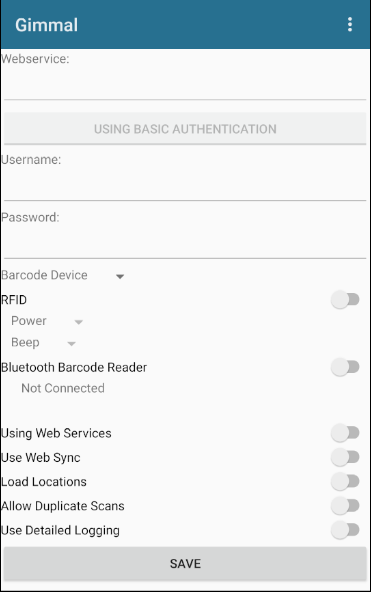
Go to the Preferences tab.
-
Enable ‘Using Web Services’ and ‘Using Web Sync’
-
Enter the Webservice URL in the ‘Webservice:’ textbox.
-
Enter the Gimmal Physical credentials in the ‘Username:’ and ‘Password’ textboxes respectively.
-
Tap on the ‘Save’ button at the bottom of the page.
PortableConnect with RFID
To enable using PortableConnect with RFID:
-
Go to the Preferences tab.
-
Ensure webservices are enabled. See PortableConnect with Webservices.
-
Select the appropriate device from the ‘Barcode Device’ dropdown.
-
Enable ‘RFID’.
Additional Configuration
Allow Duplicate Scans: If this setting is enabled, PortableConnect will not automatically remove multiple scans of the same item.
Data Collection
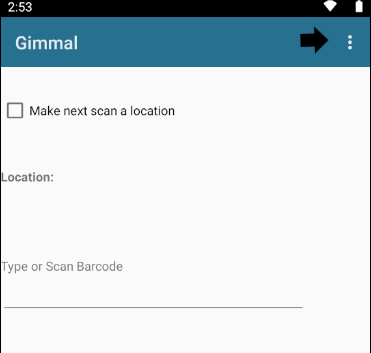
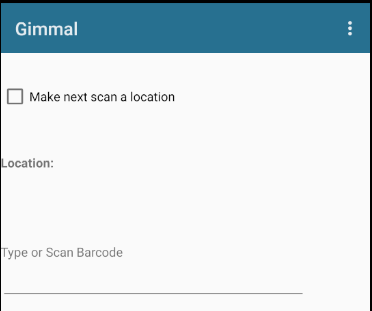
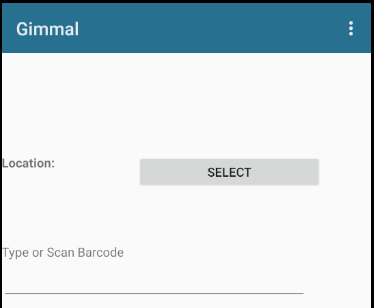
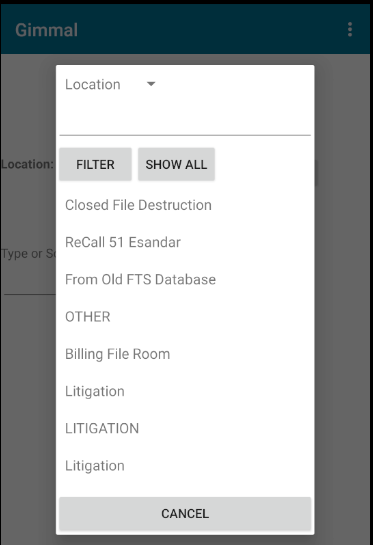
To begin scanning barcodes, select Collection from the menu.
-
Set the Transfer Destination:
-
Check the ‘Make next scan a location’ checkbox.
-
Scan the barcode of the location to transfer items.
-
If the location is successfully set, you will see the barcode scanned next to the ‘Location:’ label.
-
-
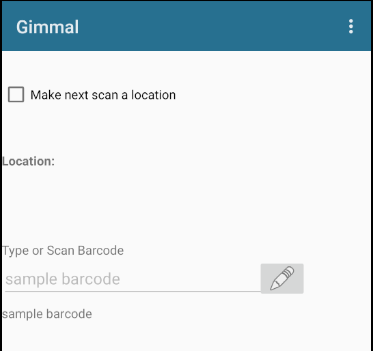
Scan the barcodes of the items to be transferred:
-
If the barcode label is damaged or won’t read, you can type it manually into the ‘Type or Scan Barcode’ textbox. The barcode will be logged once the enter key is hit.
-
-
Repeat the above process for all items to be scanned.
Data Upload
To generate a file of the transfers for upload to the Gimmal Physical application:
-
Select Create File from the menu.
-
To remove scans from the log, check the ‘Clear scans after creation’ checkbox.
-
Tap the ‘GENERATE FILE’ button.
A text file named TransferData.txt will be created in the Install Directory/Gimmal Physical Portable that can be uploaded through the Gimmal Physical Web UI.

Configuring Portable File Transfer in Gimmal Physical
The options shown below reflect version 3.15 and above. For information on the configuration in previous versions, please contact support.
The Portable Transfer page is found in Admin | Utility | Portable Transfer. It contains options that allow users with the appropriate permissions to:
-
Establish Rules for Barcode Processing
-
Preview and Analyze files before importing them
-
Execute the upload of a transferred file
If are having problems with viewing the file, please see the Troubleshooting section at the bottom of this page.
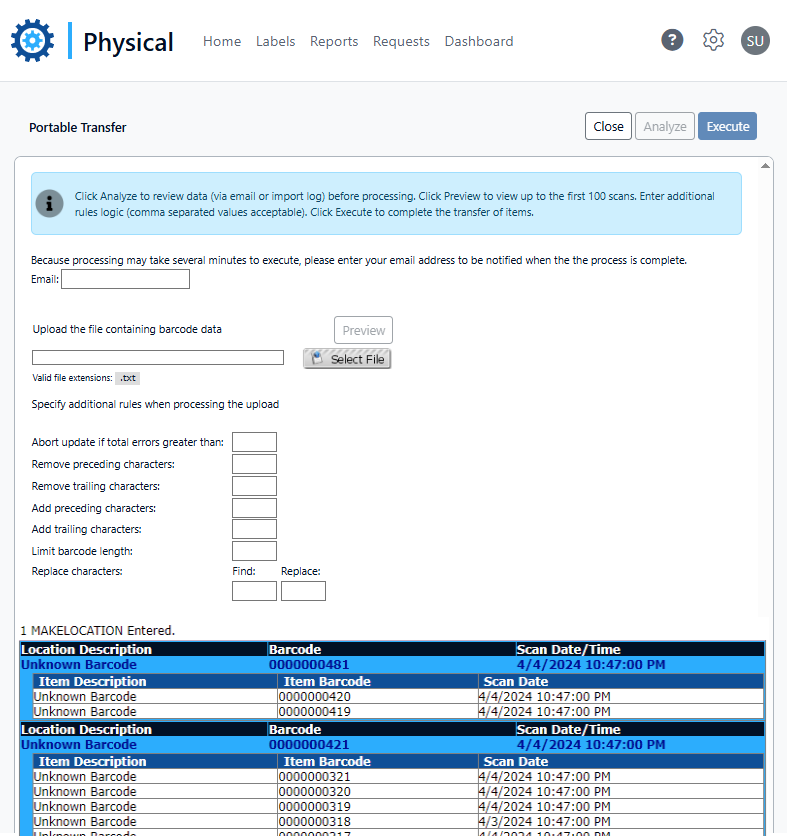
The following options will help you complete your transfer:
|
Name |
Description |
|---|---|
|
Email: |
Optional Email Address which will receive the report of the completed process or analysis once the job has been completed. Larger files can take a significant time to complete processing, so we recommend using this option to notify you when the transfer is complete. |
|
|
Choose the file to be processed. The box will turn green if the file is accessible, but red if there is a problem. The transfer file must be in .txt format. |
|
|
This option does not process the file but shows the first 100 lines on this page with a summary of the contents. |
|
Additional Rules |
These rules will be applied to the barcode values as listed in the file before processing into Gimmal Physical. They help handle certain types of legacy or ‘dirty’ data that may be present in the files. |
|
Abort update if total errors are greater than: |
Numeric value indicating the number of errors after which the process will be aborted. A large number of errors can indicate data or file issues and the best option would be to stop the processing of the file. |
|
Remove preceding characters: |
Enter the characters that should be removed from the beginning of the barcode line before it is ingested into Gimmal Physical. Leave blank if no characters should be removed. |
|
Remove trailing characters: |
Enter the characters that should be removed from the end of the barcode line before it is ingested into Gimmal Physical. Leave blank if no characters should be removed. |
|
Add preceding characters: |
Enter the characters that should be added to the beginning of the barcode line before it is ingested into Gimmal Physical. Leave blank if no characters should be added. |
|
Add trailing characters |
Enter the characters that should be added to the end of the barcode line before it is ingested into Gimmal Physical. Leave blank if no characters should be added. |
|
Limit barcode length: |
Truncate the barcode line to the entered value before it is ingested into Gimmal Physical. Characters will be removed from the end. Leave blank if the barcode should not be truncated. |
|
Replace characters: |
This option allows you to locate certain characters within the barcode as scanned into the file and replace them with others for processing within Gimmal Physical. If both are left blank, no characters will be replaced |
|
Find: |
Characters to locate and replace |
|
Replace: |
Characters to replace those found above in the ‘Find’ text box. If this field is left blank, but there are characters (including spaces) in the ‘Find’ text box, if they are found in the barcode, they will be deleted. |
|
|
Clicking this button will run the selected file through the rules as a fully featured test. An email will be generated with the results of the analysis, and there will be an entry in the logs table, but no items will be processed.
|
|
|
Runs the full process to upload and update the barcodes noted on the file. We recommend running the analysis first to ensure there are no outstanding issues before executing the transfer process. |
|
|
Exits the Portable Transfer screen and stores the values entered. |
If the 'Execute' or 'Analyze' options are used, the log file will be available from the Admin | Import Log list.
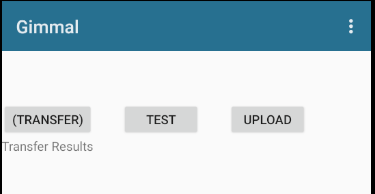
Data Update with Web Services
When using Webservices there’s no need to generate a file. The scans can be uploaded directly from the device.
-
Go to the Synchronize tab.
-
Ensure the upload type is set to ‘(TRANSFER)’.
-
Tap the ‘UPLOAD’ button.
-
The results of the upload will be listed below.
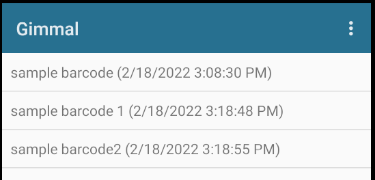
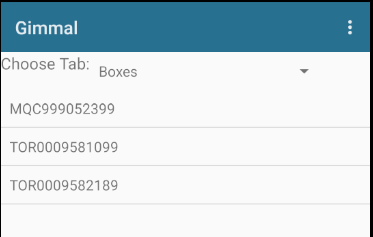
View Scanned Data
All scans are saved to a log on the device.
To view the logged scans:
-
Select History from the menu.
-
The barcode and scan date will be listed in order of scan.
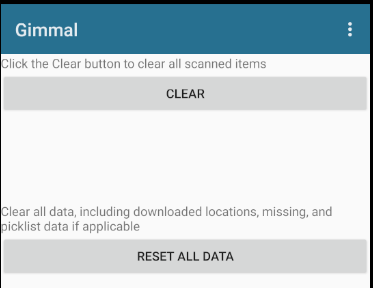
Clear Scanned Data
Once transfers are successfully uploaded, clear the scanned data log:
-
Select Clear from the menu.
-
Tap the ‘CLEAR’ button.
If there is other data saved to the device from using Webservices, you can clear from this option as well.
-
Select Clear from the menu.
-
Tap ‘RESET ALL DATA’.
Reconcile
A reconcile compares scanned data for a given location to what Gimmal Physical expects in that location, then updates Gimmal Physical to be in sync with the scanned data.
-
Scan a location barcode.
-
Scan the barcodes for all items in the location.
-
Upload the scanned data.
-
Without webservices:
-
Create a text file as detailed in the Data Upload section.
-
Copy the file to your workstation.
-
Upload the file through the Gimmal Physical website.
-
-
With webservices:
-
Go to the Synchronize tab.
-
Ensure the upload type is set to ‘(Reconcile)’.
-
Tap the ‘UPLOAD’ button.
-
The results of the reconciliation will be listed below.
-
-
A reconcile has three possible results:
-
The scanned item is in the expected location.
-
No action is taken.
-
-
Gimmal Physical found a scanned item that was not expected in that location.
-
Gimmal Physical will transfer the item to the scanned location.
-
-
Gimmal Physical expected an item, but it was not found in the scanned data.
-
Gimmal Physical will mark the item as missing.
-
Web Service-Specific Features
To use these features Webservices must be configured as detailed under PortableConnect with Webservices in this document.
Missing Records
To view a list of missing records in Gimmal Physical via PortableConnect:
-
Select the Missing tab.
-
Select the item tab to view missing items.
-
The items will populate below (see right).
If using RFID with PortableConnect, a ‘DETECT’ button will appear upon tapping on the item.
Tapping the ‘DETECT’ button will change the tab to the Detector tab and preload the item barcode. See PortableConnect with RFID for more information.
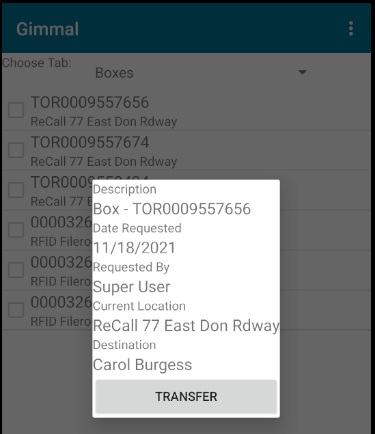
Picklist
PortableConnect with Webservices can be used to fulfill valid requests in Gimmal Physical.
-
Navigate to the Picklist tab.
-
Select the item tab to view valid requests.
-
Tap on the request to mark it as fulfilled.
-
Tap the ‘TRANSFER’ button.
This will add the appropriate barcodes to the log and mark the request as complete on the device. To complete the request and update Gimmal Physical an upload must be performed.
If using RFID with PortableConnect: a ‘DETECT’ button will appear on the request. Tapping the ‘DETECT’ button will change the tab to the Detector tab and preload the item barcode. See PortableConnect with RFID.
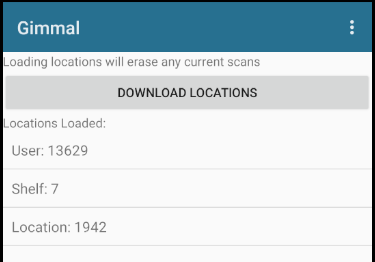
Load Locations
When using Webservices, PortableConnect can preload the list of possible locations from Gimmal Physical.
-
Go to the Preferences tab.
-
Enable ‘Load Locations’
-
Tap ‘SAVE’.
-
Go to the Locations tab.
-
Tap ‘DOWNLOAD LOCATIONS’; Wait for the download to complete.
-
Navigate to the Collection tab.
-
Tap the ‘SELECT’ button adjacent to the ‘Locations:’ label.
-
Select the location’s item tab.
-
Tap a location from the list to prepopulate the location.
RFID Specific Features
Detector: PortableConnect with RFID can be used to locate missing items.
-
Navigate to the Detector Tab.
-
Enter the barcode of the item to locate it.
-
Tap ‘READY TO SCAN’.
The device will beep if you are within range of the item and increase beeping the closer the device becomes.
TC5x Device Preparation Checklist
Parts required
-
TC5x Scanner
-
Docking Station
-
USB cable
-
Power cable (three parts)
Initialization Steps
-
Assemble the power cable:
-
Connect the three power cable pieces.
-
Plug the power cable into the dock.
-
Plug the power cable into a wall outlet.
-
-
Connect the USB cable to the dock and a PC.
-
Install a battery into the back of the scanner.
-
Dock the scanner and allow it to charge.
Note: Full battery is ideal, but not required. -
Once the scanner powers on, go to Settings and update the Date and Time.
Note: Automatic should be disabled while setting the date and time, and then re-enabled once it is accurate. -
Swipe down from the top of the scanner (while it is still docked) and change the USB connection type to Transfer Files. If you do not see this option, please see Troubleshooting Note below.
-
Copy the latest version of the APK that was delivered with these instructions. Paste it directly into the Internal shared storage drive of the scanner.
-
Install the APK:
-
Take the scanner out of the dock.
-
Unlock the scanner.
-
Navigate to the Home Screen, and swipe up from the bottom to get to the App Drawer.
-
Locate the File Browser app and browse to the top directory of Internal shared storage.
-
Double-click on the Gimmal.GimalPortableConnect.apk and follow the installation steps.
-
Select Open as the last step.
-
-
Select the square in the bottom-right corner and then use the Clear All button to reset the Gimmal Portable Connect app.
-
To locate the Gimmal Portable Connect app, navigate to the Home Screen and swipe up from the bottom. Note: For easier access, tap and hold and then drag the app icon onto the Home Screen
-
We recommend adding the Settings to the Home Page of the scanner for easier troubleshooting.
Troubleshooting
Changing Default USB Connection to enable File Transfer
Whenever the TC5x is docked, the USB connection type defaults to USB Charging. Because of this, the Internal Shared Storage is NOT available for browsing. To access the shared drive to drop the APK file or capture the TransferData file, the user must first change the USB connection type. The methodology differs based on the version of Android.
Newer Versions of Android
To enable file transfer on more recent versions of Android:
-
Dock the scanner
-
Swipe down from the top of the screen to open the Notification Pane,
-
Choose the ribbon for USB Charging
-
Change the selection to File Transfer.
Older Versions of Android
To enable file transfer on older versions of Android:
-
Navigate to the device Settings, then locate About Phone.
-
Quickly tap on the Build Number at least times to enable Developer Options.
-
Return to the main Settings list.
-
Choose System.
-
Select Developer Options.
-
Scroll down to locate the Default USB Connection,
-
Choose File Transfer.
If neither option works for your version of Android, please contact support with the model of the scanner and the version of Android in use.