
The language used by the Gimmal Physical interface is US-English by default. However, the application contains options that allow Administrators to change the text values of the application to a different language. This is done by first exporting the resource files for all available labels, then providing a translated version of those labels from English to the chosen language. These updates will be added to the application, which will allow users to choose their language option.
Please see the steps below for more details.
Please read through all the directions and double-check your translations before making any changes. Once the languages are added to the application, it is very difficult to change the values.
-
Navigate to Admin | Resource Files using the gear icon in the upper right of the screen.
-
Click on ‘Create Resource ' at the bottom of the 'Resource File’ page. This opens the 'Add Language' Page.
-
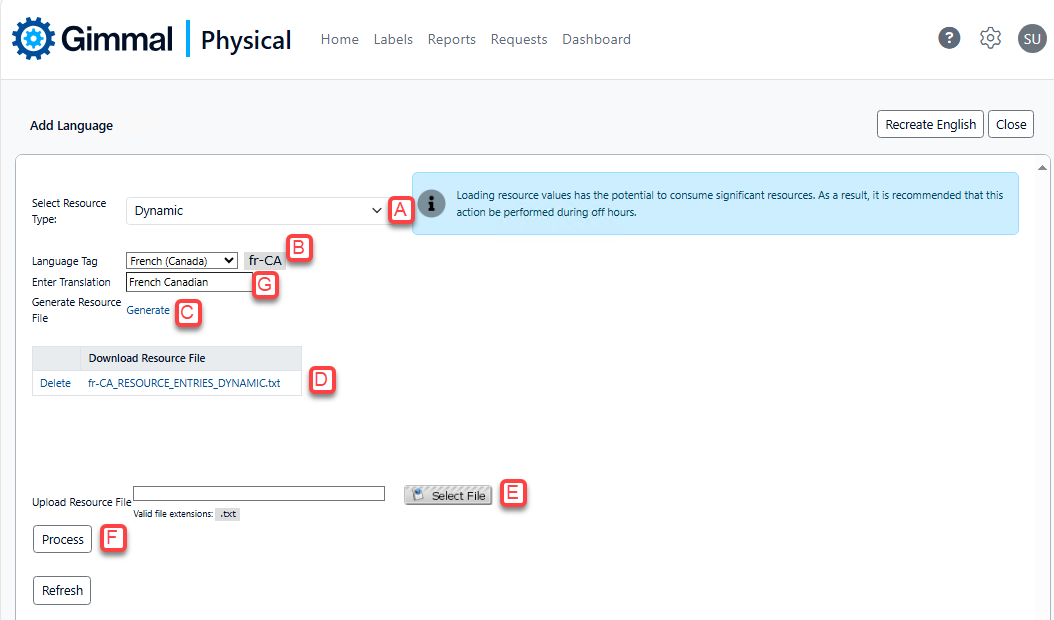
Select an option from 'Select Resource Type' to choose which file you would like to create (A).
Note: Both files are needed for a full translation to be accomplished.-
Dynamic: Fields that have been added to or adjusted in the application (Tabs, column names, etc.)
-
Static: Always present: Upper-level menus, fixed labels, can't be configured/adjusted.
-
-
Select a language from the drop-down 'Language Tag'(B).
Note: If your preferred language code is not found in the list, please contact support to review next steps. -
Choose a name for the type of translation (e.g., French Canadian) that will appear in the drop-down list on the Preferences page. (G)
-
Click the 'Generate' link to create the selected file. (C)
Note: This creates a pre-translation resource file that will be listed in the 'Download Resource File' list. -
Click on the listed file to download it from the 'Download Resource File' section. (D)
-
Open the file in a compatible program. There will be four pipe-delimited columns:
-
Language Prefix: The language selected in the drop-down field in Step 4 (B)
-
Source: Table where the value is used
-
Key: Name of the ‘field’ for the listed value
-
Value: Text that appears in the UI
NOTE: Only the Value field should be changed.
-
-
Update the values in the fourth column to the same text in your preferred language.
Note:-
There are a large number of fields to edit, so this may take some time
-
Some of the values may be blank. These fields do not need to have any text.
-
Do NOT change any of the generated text in the first three columns. Only the Value field should be updated.
-
-
When translations are complete, make sure the changes have been verified and saved.
Note: It is very difficult to undo a resource file update. Please double-check that all values are translated appropriately before continuing. -
Click the 'Select File' in the 'Upload Resource File' section and choose the updated file. (E)
-
Click 'Process' to add the new translation to the application. (F)
-
Repeat the process for each file (Dynamic and Static) for each language that needs to be added.
-
Once a new language has been added to the application, a new preference will appear in the Preferences | Application page per user.
-
For the ‘Selected language for application' option, choose the new language from the drop-down box. The names that appear in the drop-down are chosen by the value (G) on the 'Add Language’ page.
Note: The scope cannot be changed from 'User'. -
Choose 'Set as Default' only if you wish the language selected to be defaulted for everyone who logs in, replacing the default American English. Individual users would then need to navigate to their preferences page to set it back.
-
Click ‘Save Changes’.
-
When using SSO, the application will use the values in the new language at the next log-in. If you are using the 'Forms' login, you can choose the language on the login page.
Helpful Tips:
-
The export files are pipe-delimited. The values (fourth column) can be edited in Excel or Notepad.
-
Many values are repeated, so judicious use of ‘Find and Replace’ may prove helpful.
-
Save a copy of the old resource file before commencing the update for use as a backup and reference.