
This section contains instructions for configuring the Feature-Activated and Provider-Hosted versions of Provisioning in a SharePoint 2013/2016 and SharePoint Online environment.
Before you configure Provisioning, ensure that you have installed the Provisioning app, completed the post-installation tasks, and have updated the Gimmal Job Scheduler files (if applicable). See the Installing Content Governance for SharePoint section for information on these tasks.
Workflow
Understanding Provisioning Workflows
To ensure the security, consistency, and efficiency of a site or site collection request created by a user, you can create a SharePoint workflow to help streamline and automate a variety of processes. For example, you can apply a workflow that routes a provisioning site request to one or more individuals for their approval before the new site or site collection is provisioned. Without a workflow, all requested sites are created automatically, without any oversight.After the Provisioning request has been run through a workflow, you must verify that the Provisioning request status is set to "Ready to Provision" so that the Provisioning engine continues to process the request. If a site is not in "Ready to Provision" status, the Provisioning engine will ignore the request and it will remain in the queue. To understand the Provisioning request process with and without a workflow applied, refer to the diagram below.
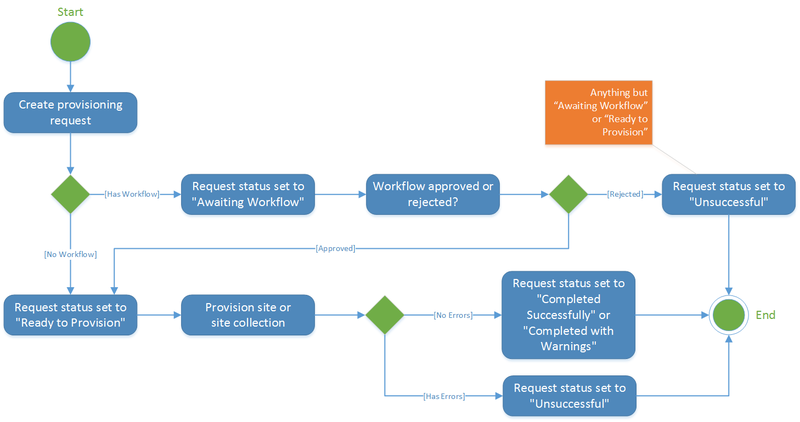
This diagram represents one possible workflow; your organization's request process may vary. You are responsible for setting your own workflow statuses for a Provisioning request.For information on how to set Approved or Rejected statuses for a workflow, see the following section, Applying a Workflow Status below.
Gimmal does not provide any workflows. You must create and attach one or more workflows to the Provisioning request list. Documentation on how to create a workflow is beyond the scope of this document. For more information on SharePoint workflows, see Get Started with workflows in SharePoint 2013.
Applying a Workflow Status
-
In SharePoint Designer, navigate to where Provisioning is installed.
-
Select the workflow that you want to apply the status to.
-
Click Step to insert the step that contains the status.
-
Click Action, and then under List Actions, click Set Field in Current Item.
-
Click field and select Status from the drop-down list.
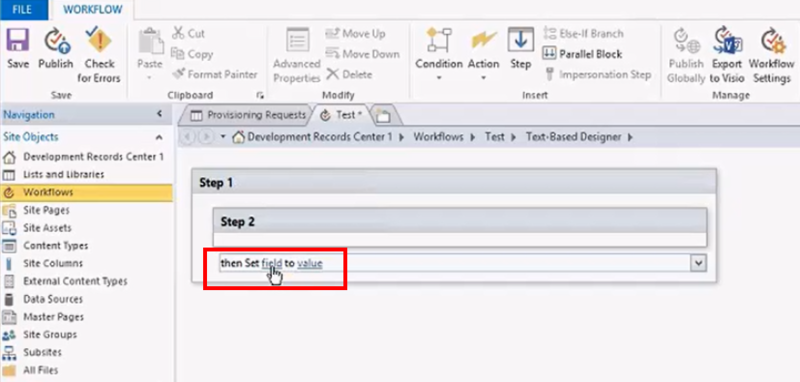
6. Click Value and then type one of the following statuses:
-
Ready to Provision
-
Unsuccessful
7. Click Publish to publish your workflow with these new settings.
Scheduling & Editing Timer Jobs
A timer job is a background process that is run by SharePoint to execute specific tasks on a scheduled basis. Timer jobs may be long-running or short-lived, scheduled to execute one-time only, on a regular basis, or somewhere in between. Gimmal's Governance Hub provides several timer jobs that are needed to support the Provisioning application. These jobs are listed in following table.
|
Title |
Description |
Default Job Schedule |
Type |
|
Gimmal.Provisioning.ProvisioningJob |
Provisions sites based on site requests (SharePoint Online).
|
Every 5 minutes |
Gimmal Job Scheduler |
|
Gimmal.Provisioning.UserCustomActionJob |
Creates site actions on all sites in the tenant (SharePoint Online) or in the farm (on-premises).
Note: You can exclude sites from displaying these menu items by adding them to the Edit Request Site Exclusions list. When you are done editing this list, you must click Publish Global Configuration for it to take effect. You can perform these steps in the Governance Hub under the Provisioning entry. See Setting your Provisioning Permissions (link) for more information. Note: Runs inside the Gimmal Job Scheduler that is included in the Gimmal Governance Hub. |
Daily, between 2am and 3am |
Gimmal Job Scheduler |
|
Gimmal - Provisioning Timer Job |
Provisions sites based on site requests (on-premises). This job results in a SharePoint timer job being createdto run inside the SharePoint Timer Service. |
Every 5 minutes |
SharePoint Timer Service |
Editing a Timer Job Schedule
To change the frequency of when your Provisioning timer jobs are run, you can edit the default job schedule, which is shown in the Provisioning Timer Jobs table above. The default job schedule is an option in the job definition file. You can access your job definition files from several locations, depending on the type of SharePoint installation you have. Table 10-4 shows the location for each Provisioning job definition file.
|
Title |
Location of Job Definition Files |
|
Gimmal.Provisioning.ProvisioningJob |
<Governance Hub Site>/Lists/GimmalJobDefinitions |
|
Gimmal.Provisioning.UserCustomActionJob |
<Governance Hub Site>/Lists/GimmalJobDefinitions |
|
Gimmal - Provisioning Timer Job |
<Governance Hub Site>/Lists/GimmalTimerJobs
|
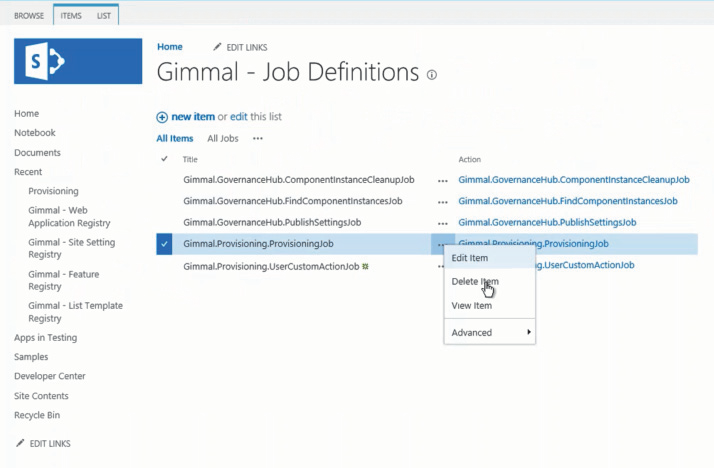
1. Click the Open menu (...) for the job definitions file you want to edit, and click Edit Item. The Edit Definitions page displays.
2. In the Job Schedule section, change the scheduled time to the desired frequency.
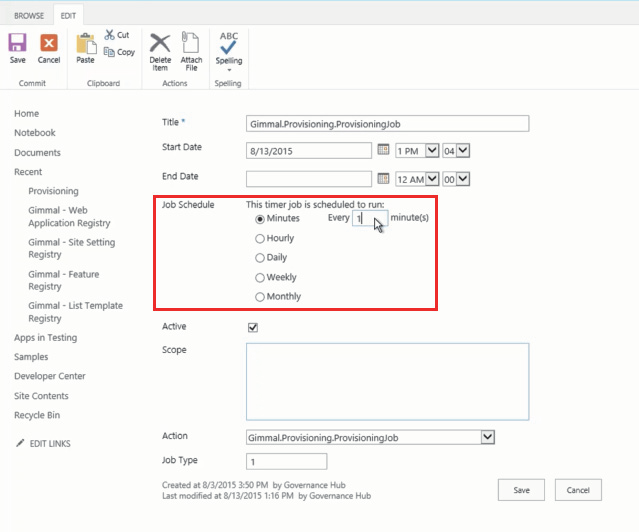
3. Click Save.
Pre-Configuration Tasks: Provider-Hosted
Adding Provisioning to a Host Site
To add Provisioning to a host site, you must be a Site Collection Administrator for that site. Also, to add apps from the App Catalog, you must have "Read" permission on the Apps for SharePoint library.
-
The host site is based on a SharePoint Team Site site template, OR
-
If not based on a SharePoint Team Site site template, then go to Settings > Site Settings > Page layouts and Site templates, and ensure that the following items are selected:
-
Subsites can use any site template
-
Pages in this site can use any layout
-
-
The Provisioning app must be deployed to the root web in a site collection.
-
The Provisioning app is only deployed once for the entire SharePoint farm and Gimmal recommends adding it to a site subscribed to the Content Type Hub so that all of the published content types are available.
-
Microsoft does not allow you to use the System Account to add apps! Use a non-system account with appropriate permissions to perform these steps!
-
Log in to the site where you want to add the app and navigate to Settings > Site Contents > Add an app.
-
Under Apps you can add, click the Provisioning tile. A window displays: Do you trust Provisioning?
-
Click Trust It on the screen. The page refreshes when the app is installed. Depending on your system, this can take several minutes to perform.
-
Click on the newly installed Provisioning app.
5. Ensure that the App Provisioned successfully message displays under Event Log, and the green checkmark displays next to Status. This could take several minutes.
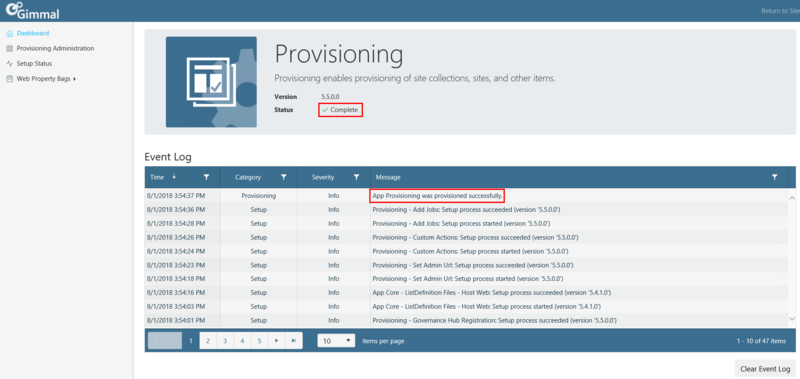
6. Verify that the Provisioning app displays on the Governance Hub Dashboard by following these steps:
-
On the Governance Hub site, select Settings > Site Settings to display the Site Settings page.
-
Under the Site Administration section, click Governance Hub. The Governance Hub dashboard displays.
-
Verify the Provisioning tile displays on this page.
Installing & Configuring the Web Application Registry
You must activate the Gimmal - Provisioning Administration and the Gimmal - Provisioning Timer Job features (link) before performing the steps below.
To run Provisioning, you must install and configure the Web Application Registry. This SharePoint list registers web applications so that they're available for provisioning and for establishing and configuring URLs.
-
Launch the SharePoint 2013/21016 Management Shell window as an Administrator. Do not use the PowerShell ISE to perform this step.
-
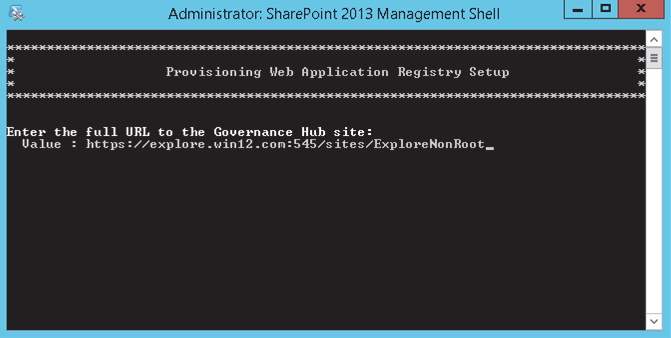
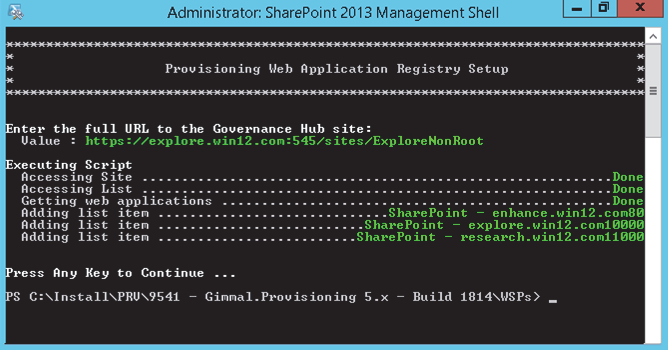
Navigate to the location of the Gimmal Provisioning WSP folder, and then run the ./Populate‐WebApplicationRegistry.ps1 script. The script begins running, and takes you to the Setup window.
-
Enter the URL of the Governance Hub site, and then press the Enter key. The script executes. If you are uncertain of your Governance Hub URL, perform the following steps; otherwise continue with step 4:
-
On the site that has Governance Hub enabled, go to Settings > Site Settings > Site Administration, and click Governance Hub.
-
In the window that opens, copy the URL from the browser's address bar and remove the text starting with "_catalogs" and any text after it. This is your Governance Hub URL.
-
4. Close the management shell window.
5. To verify that all of your Provisioning web applications are present, follow these steps:
-
Select Settings > Site Settings to display the Site Settings page.
-
Under the Site Administration section, click Governance Hub. The Governance Hub dashboard displays.
-
Click the Provisioning tile. The Provisioning configuration page displays.
-
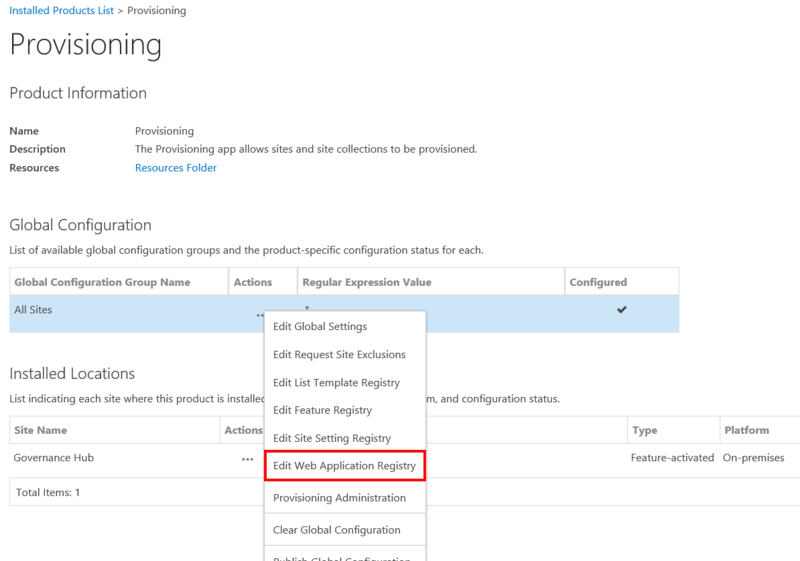
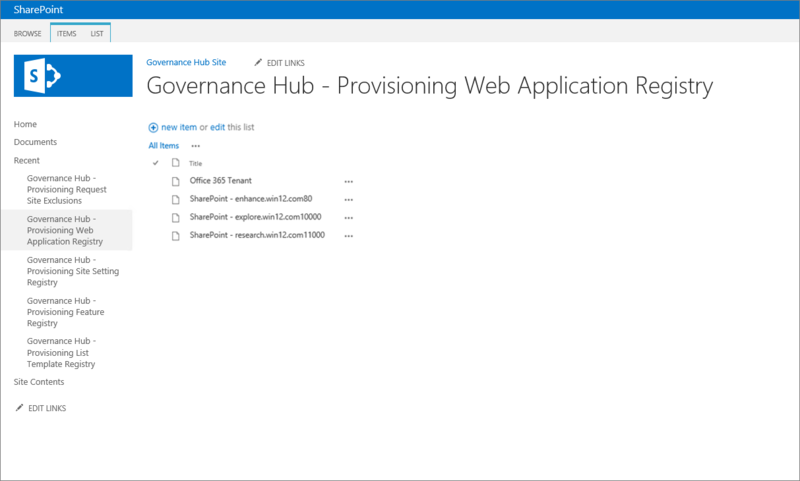
Under the Global Configuration section, click the Actions menu (...) or the All Sites Global Configuration Group, and then select Edit Web Application Registry. The Web Application Registry list page displays, providing a list of your web apps.
After you verify the availability of your Provisioning web applications, you must publish them from the Governance Hub Global Configuration Group to your Provisioning installed location (listed under the Installed Locations section on the Provisioning configuration page).
6. Return to the Provisioning configuration page.
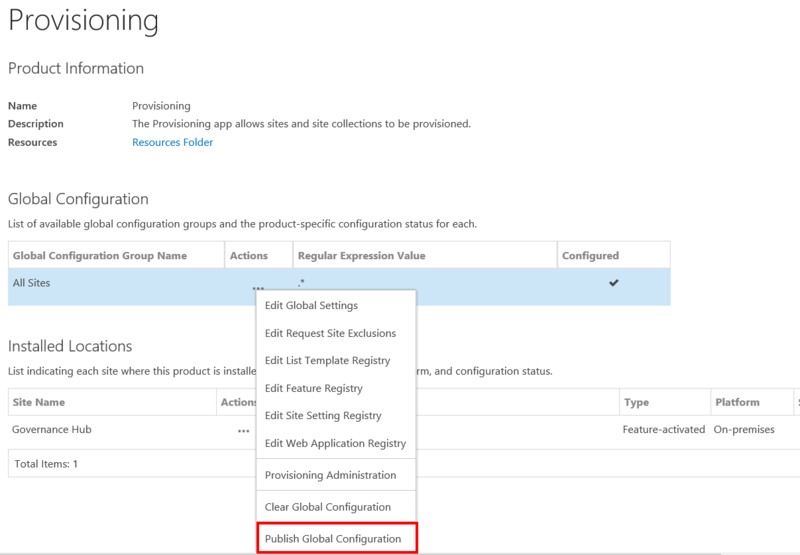
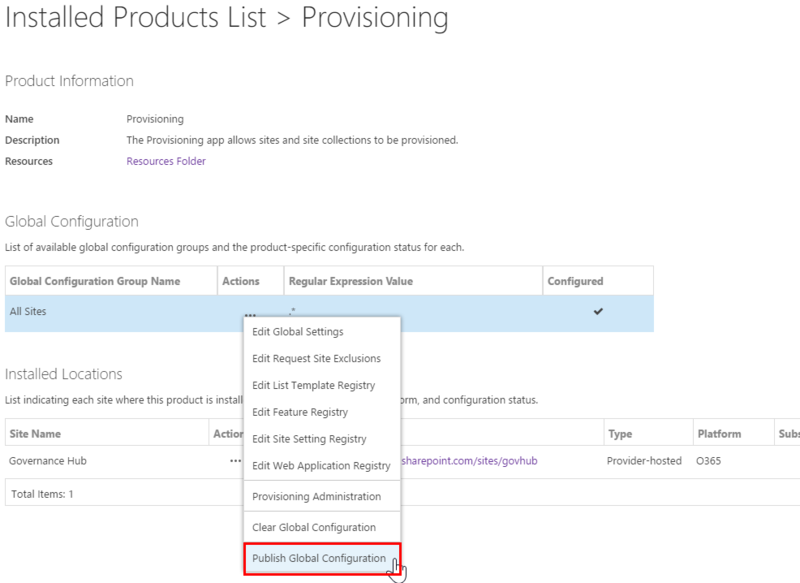
7. Under the Global Configuration section, click the Actions (...) menu for the All Sites Global Configuration Group, and then select Publish Global Configuration to publish the registry settings and push them to your Provisioning location. This may take several minutes.
Applying Provisioning Global Settings in Governance Hub
The Provisioning global settings page in Governance Hub enables you to set various properties for Provisioning. Follow these steps to configure these global settings:
-
On the site where Governance Hub is deployed, as a user with Contribute permission, select Settings > Site Settings to display the Site Settings page.
-
Under the Site Administration section, click Governance Hub. The Governance Hub dashboard displays.
-
Under Installed Products on the left navigation menu, select Provisioning. The Provisioning configuration page displays.
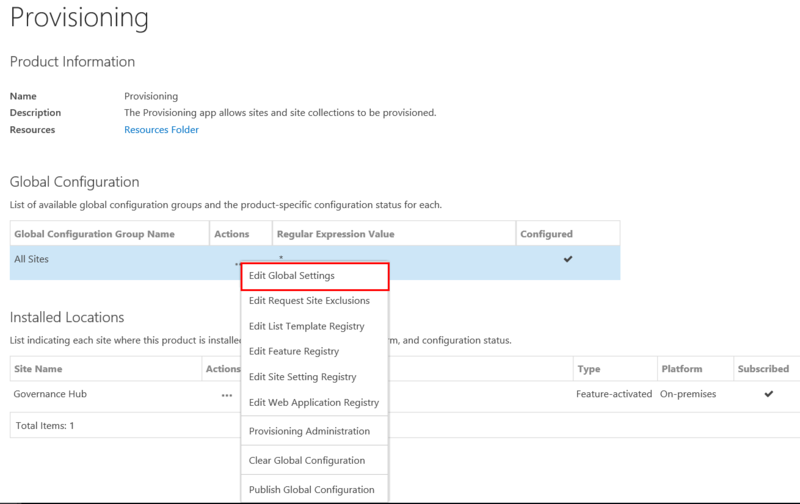
4. In the Global Configuration section, click the Actions menu (…) next to the All Sites Global Configuration Group, and then select Edit Global Settings. The Provisioning Edit Global Settings page displays.
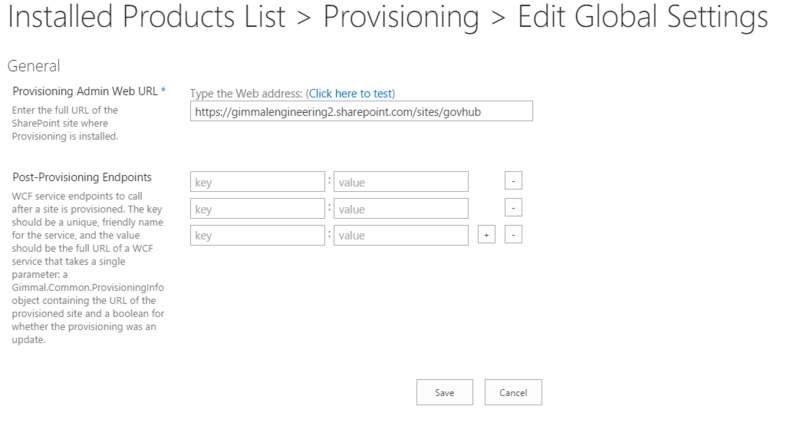
5. Complete the following fields:
-
Provisioning Admin Web URL – Displays the full URL of the SharePoint site where Provisioning is installed. This field is auto-populated when you install Provisioning; you should not have to fill it out manually.
-
Post-Provisioning Endpoints – Enter the WCF service endpoints to call after a site is provisioned. The key should be a unique, intuitive name for the service, and the value should be the full URL of a WCF service that takes a single parameter: a Gimmal.Common.ProvisioningInfo object containing the URL of the provisioned site and a boolean for whether the provisioning was an update.
6. Click Save to save your settings.
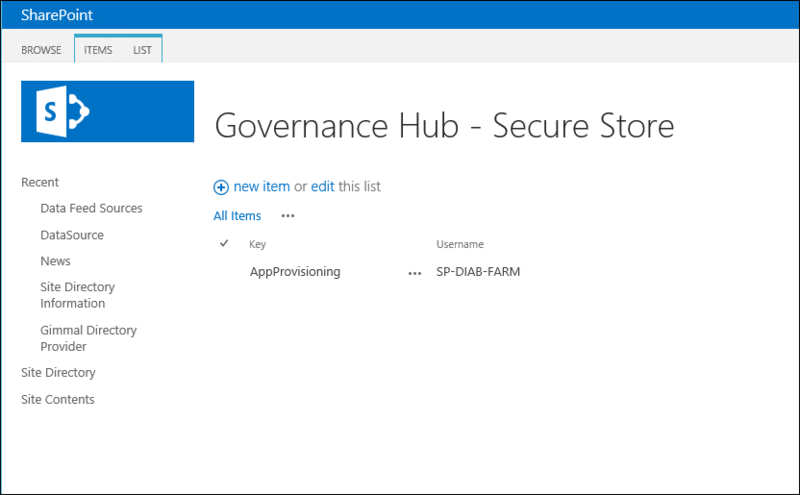
Creating a Governance Hub Secure Store Item (Optional)
To install add-ins during the provisioning process, you can manually create a secure store list item called AppProvisioning in the Secure Store list located on the Governance Hub site. This list item contains user credentials that are required to install the desired Gimmal add-ins.
For on-premises installations, do not use a web application App Pool Identity account for any Secure Store credentials. Ensure that you do not use multi-factor authentication when entering secure store credentials.
-
Access the Governance Hub – Secure Store page by navigating to the following list: <Governance Hub Site>/Lists/GimmalSecureStore, or by clicking Secure Store on the left navigation pane of the Governance Hub dashboard.
-
Click +new item. The list item page displays.
-
Enter the following information in the fields:
-
Key: AppProvisioning
-
Username: Username for farm or tenant account
-
Password: Password for farm or tenant account
-
Ensure that the username is in the form of '<username>@<domain>' and not '<domain>\<username>'.
4. Click Save. The AppProvisioning list item displays on the Secure Store page, as shown in the following figure.
Pre-Configuration Tasks: Feature-Activated
Installing & Configuring the Web Application Registry
You must activate the Gimmal - Provisioning Administration and the Gimmal - Provisioning Timer Job features (link) before performing the steps below.
To run Provisioning, you must install and configure the Web Application Registry. This SharePoint list registers web applications so that they're available for provisioning and for establishing and configuring URLs.
-
Launch the SharePoint 2013/21016 Management Shell window as an Administrator. Do not use the PowerShell ISE to perform this step.
-
Navigate to the location of the Gimmal Provisioning WSP folder, and then run the ./Populate‐WebApplicationRegistry.ps1 script. The script begins running, and takes you to the Setup window.
-
Enter the URL of the Governance Hub site, and then press the Enter key. The script executes. If you are uncertain of your Governance Hub URL, perform the following steps; otherwise continue with step 4:
-
On the site that has Governance Hub enabled, go to Settings > Site Settings > Site Administration, and click Governance Hub.
-
In the window that opens, copy the URL from the browser's address bar and remove the text starting with "_catalogs" and any text after it. This is your Governance Hub URL.
-
4. Close the management shell window.
5. To verify that all of your Provisioning web applications are present, follow these steps:
-
Select Settings > Site Settings to display the Site Settings page.
-
Under the Site Administration section, click Governance Hub. The Governance Hub dashboard displays.
-
Click the Provisioning tile. The Provisioning configuration page displays.
-
Under the Global Configuration section, click the Actions menu (...) or the All Sites Global Configuration Group, and then select Edit Web Application Registry. The Web Application Registry list page displays, providing a list of your web apps.
After you verify the availability of your Provisioning web applications, you must publish them from the Governance Hub Global Configuration Group to your Provisioning installed location (listed under the Installed Locations section on the Provisioning configuration page).
6. Return to the Provisioning configuration page.
7. Under the Global Configuration section, click the Actions (...) menu for the All Sites Global Configuration Group, and then select Publish Global Configuration to publish the registry settings and push them to your Provisioning location. This may take several minutes.
Adding Gimmal Features to the Feature Registry List
When you create a new Provisioning definition, you have the option to add additional Gimmal features so that they are available from the Features page (Feature page) of the Provisioning definition wizard. You must manually add these features to the Provisioning Feature Registry list in the Governance Hub. After you perform these steps, the features will then be available to select as you create your Provisioning definitions.
-
On the site where Governance Hub is deployed, as a user with Contribute permission, select Settings > Site Settings to display the Site Settings page.
-
Under the Site Administration section, click Governance Hub. The Governance Hub dashboard displays.
-
Under Installed Products on the left navigation menu, select Provisioning. The Provisioning configuration page displays.

4. Under the Global Configuration section, click the Actions menu (...) for the All Sites Global Configuration Group, and then select Edit Feature Registry. The Provisioning Feature Registry list page displays.
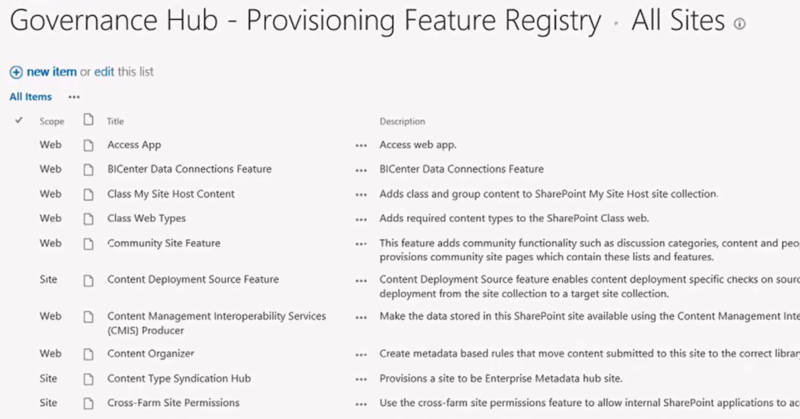
5. Click +new item to add the new Gimmal features to the Feature Registry list.
6. On the new item page, complete the following fields using the information provide in the table below:
-
Title – Enter the name of the Gimmal feature listed in the Title column in the following table.
-
Description – Enter the description of the Gimmal feature listed in the Description column in the following table.
-
Feature ID – Enter the globally unique identifier (GUID) of the feature listed in the Feature ID column in the following table.
-
Scope – Enter the scope in which the feature can be activated as listed in the Scope column in the following table.
-
Evaluation Priority – Not applicable.
Title
Description
Feature ID
Scope
Gimmal - Document Center
Deploys Document Center functionality with associated governance; places the Library Tile View and Library List web parts into the web parts catalog
4382c1b6-b90f-408e-95eb-1808e7ab50fd
Site
Gimmal - Drop Zone
Deploys the files and web part needed for Drop Zone
ad6a047f-5999-4d05-a459-a5994e49e99a
Site
Gimmal - Enhanced Search
Installs the Gimmal Enhanced Search files
bef440a6-dbd1-4658-b0c5-57d9e75d435e
Web
Gimmal - Metadata Inheritance Rules
Deploys the files, lists, and event receivers needed for Metadata Inheritance Rules
2618f811-6474-43cb-8cc7-83291cc65f3b
Site
Gimmal - Metadata Rule Actions
Deploys the files, lists, and event receivers needed for Metadata Rule Actions
d4dbb617-1b2f-420f-b7c0-ca80183e8b2c
Site
7. Click Save to save your settings. After you save your settings, the changes will take effect the next time the Governance Hub's "Publish Settings" job runs. If you want the changes to take effect sooner than that, follow the step below:
8. Return to the Provisioning configuration page.
9. Under the Global Configuration section, click the Actions menu (...) for the All Sites Global Configuration Group, and then select Publish Global Configuration.
10. Repeat steps 1 through 9 for each of the Gimmal features listed in the preceding table.
Applying Provisioning Global Settings in Governance Hub
The Provisioning global settings page in Governance Hub enables you to set various properties for Provisioning. Follow these steps to configure these global settings:
-
On the site where Governance Hub is deployed, as a user with Contribute permission, select Settings > Site Settings to display the Site Settings page.
-
Under the Site Administration section, click Governance Hub. The Governance Hub dashboard displays.
-
Under Installed Products on the left navigation menu, select Provisioning. The Provisioning configuration page displays.
4. In the Global Configuration section, click the Actions menu (…) next to the All Sites Global Configuration Group, and then select Edit Global Settings. The Provisioning Edit Global Settings page displays.
5. Complete the following fields:
-
Provisioning Admin Web URL – Displays the full URL of the SharePoint site where Provisioning is installed. This field is auto-populated when you install Provisioning; you should not have to fill it out manually.
-
Post-Provisioning Endpoints – Enter the WCF service endpoints to call after a site is provisioned. The key should be a unique, intuitive name for the service, and the value should be the full URL of a WCF service that takes a single parameter: a Gimmal.Common.ProvisioningInfo object containing the URL of the provisioned site and a boolean for whether the provisioning was an update.
6. Click Save to save your settings.