
Overview
Data Owner Retention is a feature that becomes available when a Discover customer has the ‘advanced policy’ option added to their provisioning. It allows administrators to define a set of labels that data owners can apply to their content items on a Discover report. These labels can then be used to power a disposition process. For example, data owners could apply a "delete" label to items that are no longer useful to them, and that label could be tested in a Discover Data Governance workflow to trigger the delete action.
This guide is divided into three sections: configuration, Data Owner interaction, and administration.
Configuration
Defining Labels
Typically, the first step in configuring Data Owner retention is to define the labels that your team will use to mark their content with. This can be done in the settings area of Discover. Click the gear icon in the upper right-hand of the dashboard, select Settings, then open the tab labeled Policy. On this page, you can use the Action button to add new labels. Once a Data Owner attaches one of these labels to a report item, that label can be used within a workflow to trigger a specific action (i.e., deleting a file).
.png?cb=d56bf798170cbcdb78ab3860ad149004)
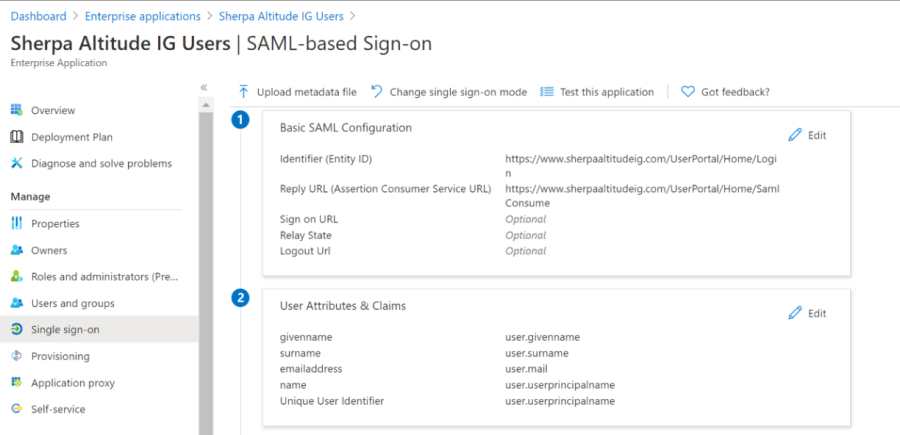
Single Sign-On
To access the portal where Data Owners review and label their content, Discover requires that single sign-on (SSO) be configured. If your SSO provider is Microsoft Azure, the screen capture below shows the portal configuration settings:
Please note that some browsers disable third-party cookies by default. One of the consequences of this is that applications that rely on third-party services for authentication may stop working reliably. This occurs because the session ID of the web session the browser has with the application, typically stored in a cookie, is lost in the transaction with the third-party provider (Azure or Entra in this case). Discover has implemented mechanisms to allow third-party cookies for this scenario, but if SSO is not reliably working from a Discover login, one possible issue is that the session cookie may be being cleared.
After establishing the SSO provider settings, the Discover SSO options may be entered on the Single Sign-On tab in the settings area. For more information on configuring single sign-on, refer to the SSO Technical Document
User Retention Settings
The final configuration step takes place on the User Retention page. This page contains several sections where specifics about the Data Owners may be configured.
.png?cb=eadd37c7dc12a1281e630d2946fe8d54)
Enabling User Retention – This section contains a check box that enables the data owner retention feature. Along with that setting, you can configure an email action to take place when all owners have completed the review of their content, and to bypass that notification if a particular user has expired.
Email Message Configurations – This area allows you to define the characteristics for a series of email notices the Data Owner will receive, including sender (address & name), CC, BCC, Subject, Body, and branding graphics. The areas for Subject and Body allow for rich text (photos, links) and also support the use of Discover tokens to supply information such as the report name, number of active days for review, etc.
IMPORTANT: When adding email configurations, be sure to define at least one with the type “Default”. The Default message will be the first email triggered when a data owner report is run. After the Default email has been sent, subsequent reminders may be defined based on a frequency that you specify.
Owner Report Instructions –This area allows you to provide instructions that a data owner will see when they review their report items. This text typically details how the various labels available to the data owner will affect an item that they mark.
Enabling Owner Activity Limits – Checking this box allows administrators to specify how long each Data Owner's report will remain active. Specify the number of days and, optionally, a reminder frequency (this option generates an email reminder to each Data Owner that they have pending items to review). When a report passes the Active Period specified on this screen, each item that a Data Owner has not labeled will automatically receive the Default Label you specify here.
Data Owner Interaction
Enabling Notifications in Workflows
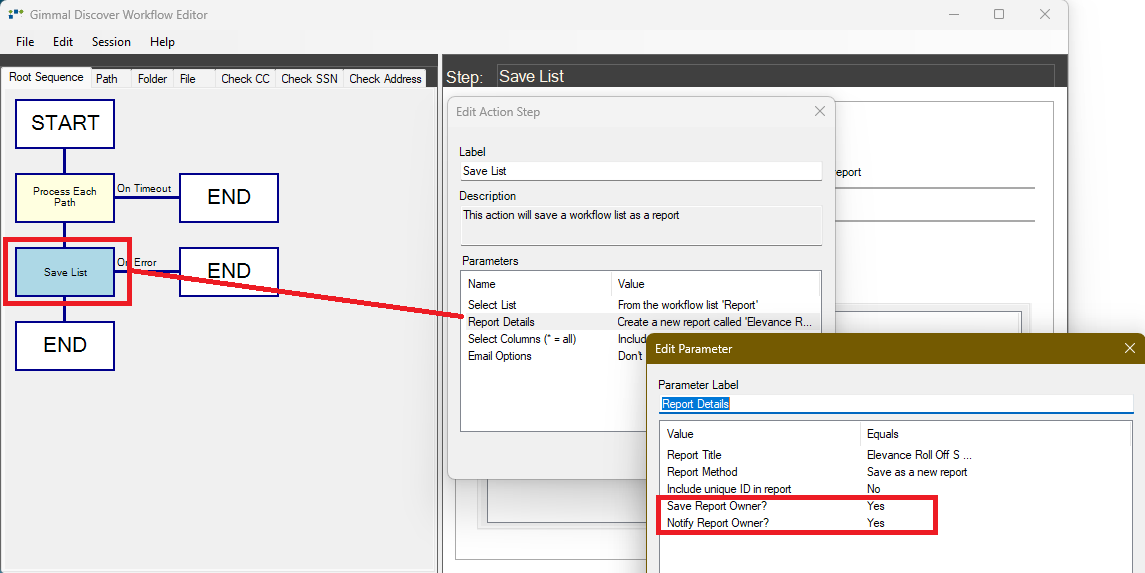
To notify Data Owners they have pending items to review, two options must be set in the Save List area of a workflow (please note, Data Owner notification is not possible in workflows using a Group Values action). In the Report Details area of the Save List action, two options must be set to Yes:
-
Save Report Owner – adds Data Owner information to the database table for the report
-
Notify Report Owner – triggers the automatic email notification to each Data Owner
Data Owners Email
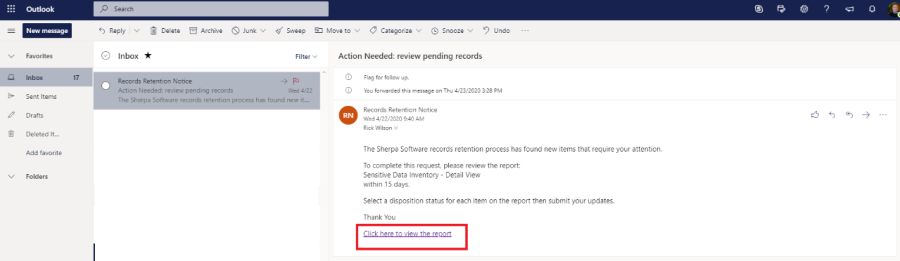
When the workflow has been configured to automatically notify Data Owners that they have items to review, they will receive a notification similar to the one shown below. That email will include a link directing them to the Discover User Portal. Clicking that link will open their default web browser, initiate an SSO login, and route them to the User Portal where they can review their content.
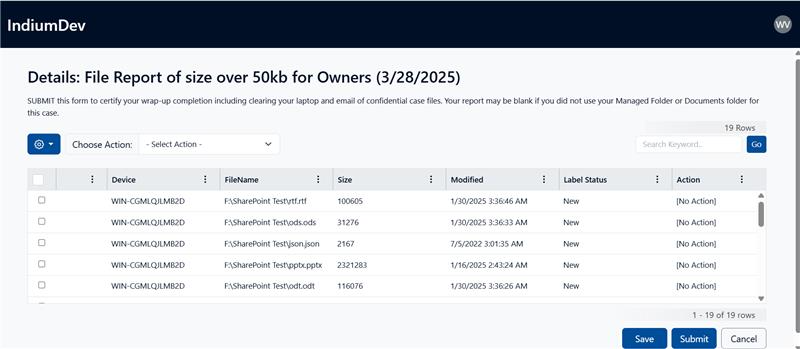
User Portal
The Discover user portal allows Data Owners to see any open reports requiring their attention, review each item, and apply one of the retention labels defined by the administrator. During the process of review, a Data Owner may use the Save button at the bottom of the screen to preserve any updates in progress, then return at a later time to complete their review.
Note: the labels applied by a Data Owner during this step do not immediately take effect on the items marked. The label is attached to that item (for example, a specific file) in the Discover database. To apply the action associated with a label (for example, deleting an item), the administrator must create a workflow that will run against the report, check for the label value, and then apply the appropriate workflow action.
When a Data Owner is finished reviewing their items in the portal, they click the Submit button to alert the administrator that their review is complete.
Administration
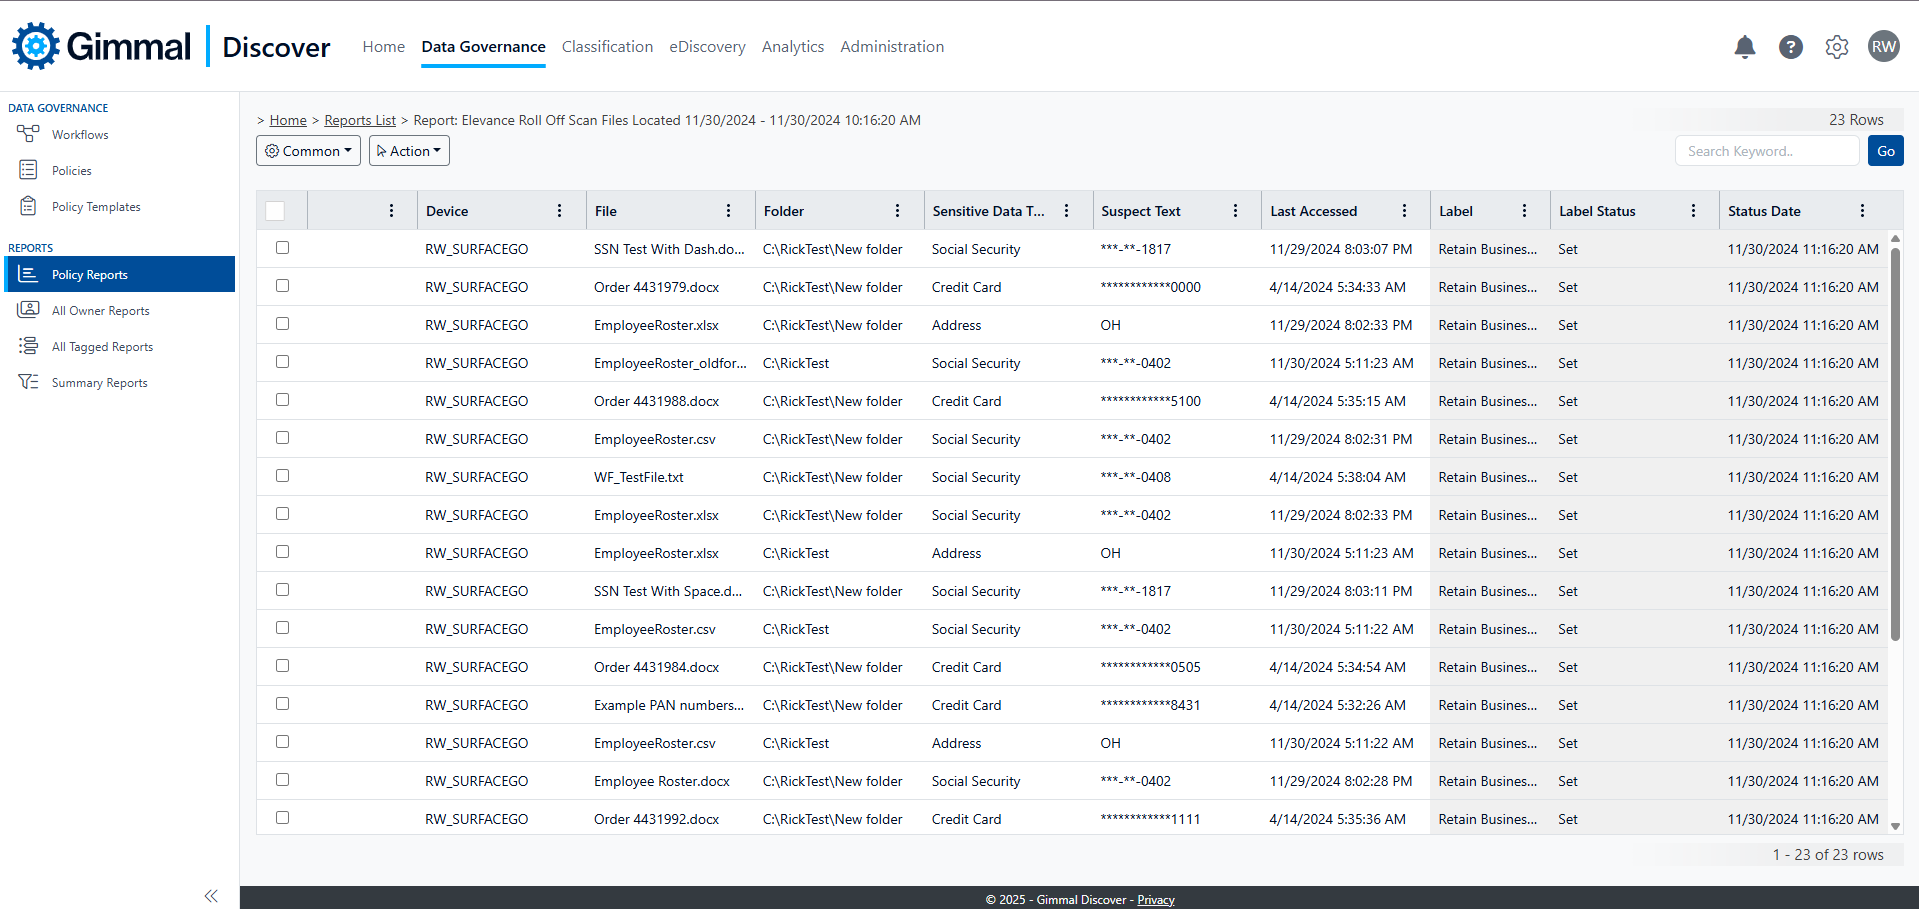
Report Status
When administrators view a Discover report, three system-maintained columns are shown to help them monitor the status of the Data Owner process.
-
Label – this column shows the value of any label a Data Owner has applied to the item. If the value 'No Action' indicates that the item is in its original state and has not been marked with any disposition action.
-
Label Status – "New" indicates the item has not been reviewed, "Set" means the Data Owner has specifically assigned a status
-
Status Date – the date an items are updated by the Data Owner
Managing Report Progress
To help administrators monitor report progress, there is a View Owner Activity option available under the More button.
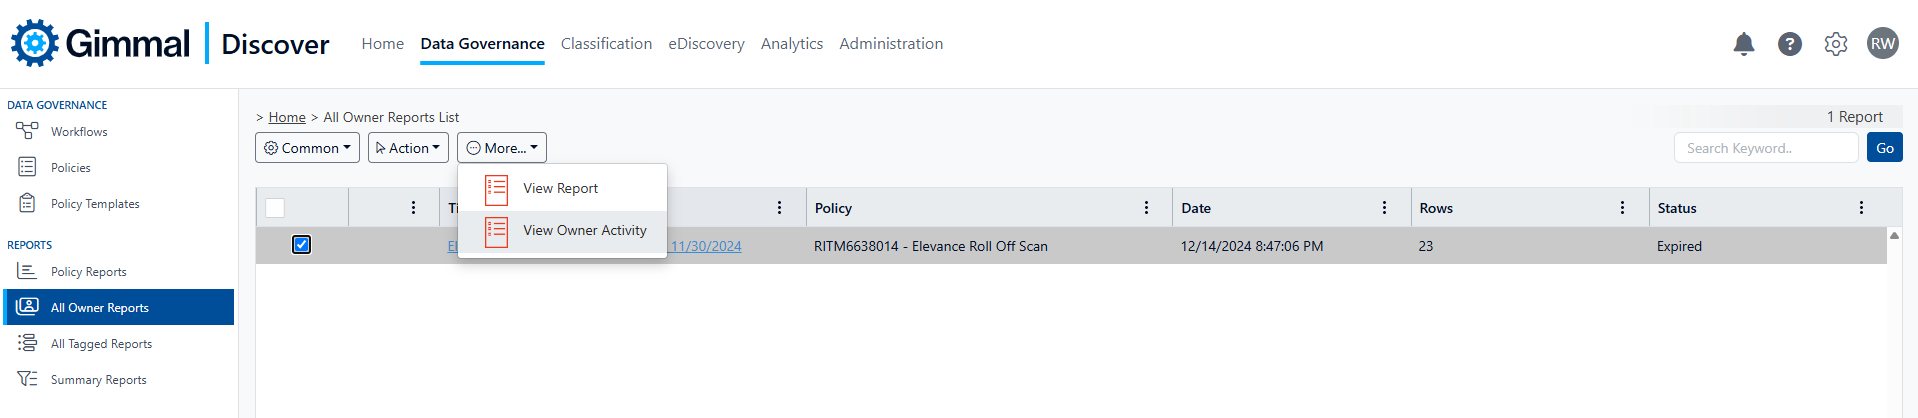
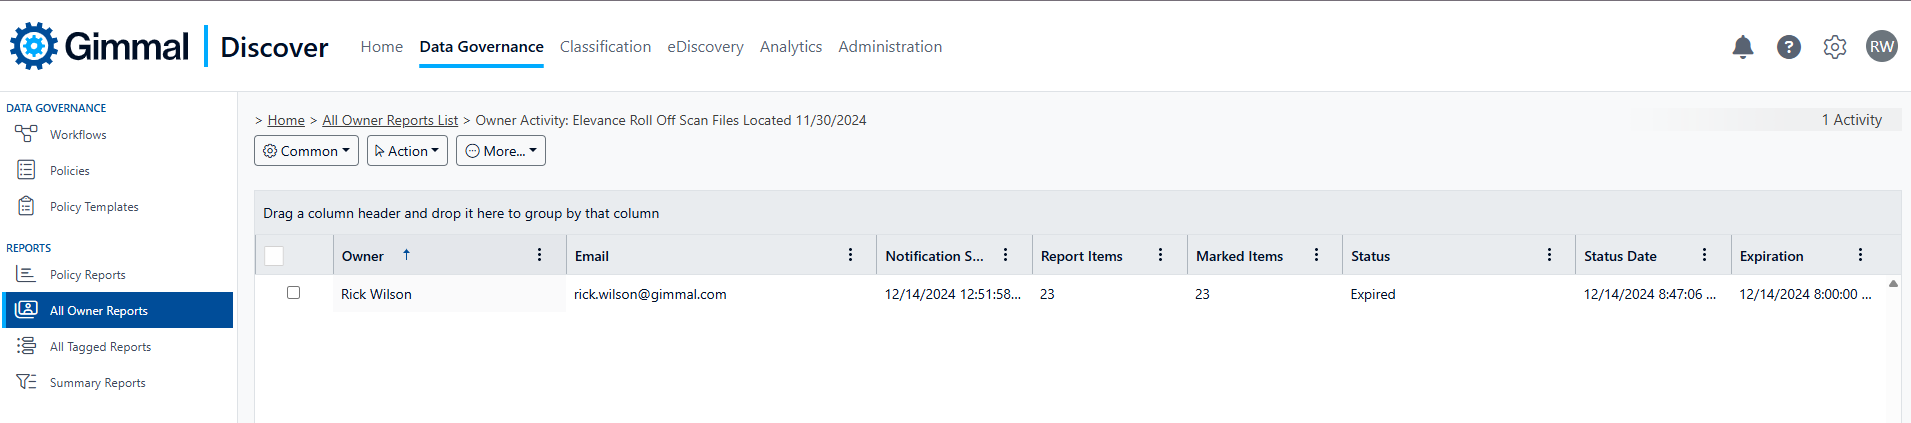
Selecting this option will display a status for each data owner with items on the report. For example, have they started reviewing their content yet? How many items have they marked? When does the report expire, etc?
Data Owner Interaction
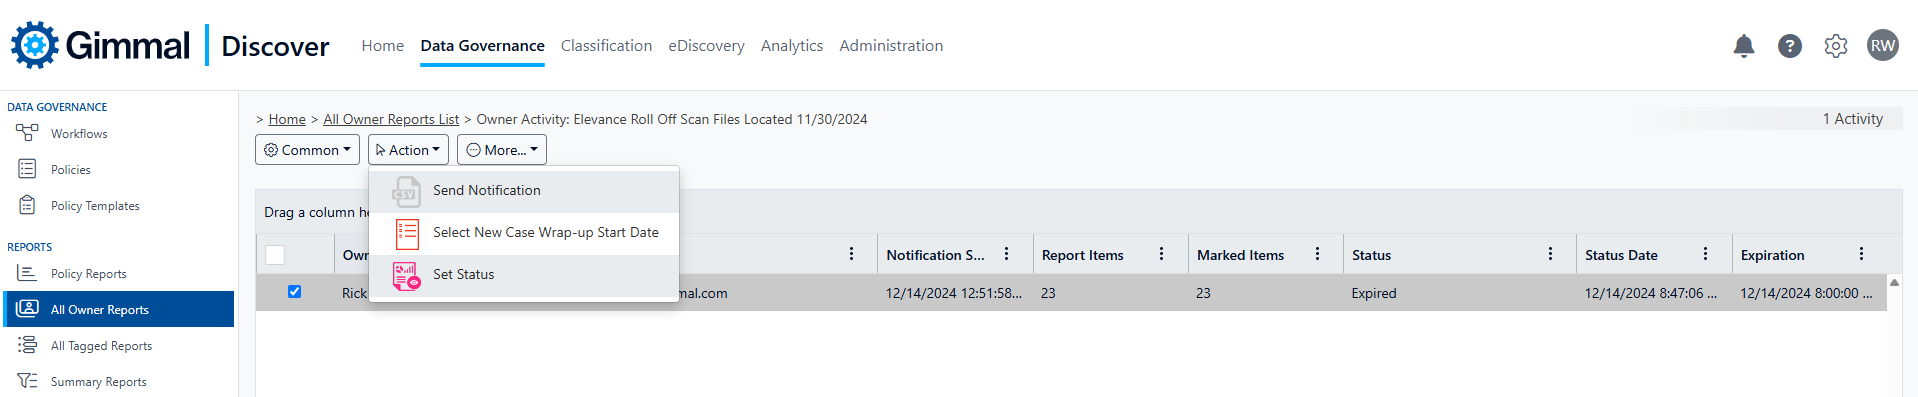
While in the 'View Owner Activity' view, administrators have a few tools to help them manage the Data Owner review process. After selecting a Data Owner, three options are available under the Action button:
-
Send Notification – This option will trigger an email notification to one or more Data Owners, reminding them there is a report to review. It is useful if a Data Owner has accidentally deleted their original email notice.
-
Modify Expiration Date – Allows administrators to extend the default expiration date, giving Data Owners more time to review their content.
-
Set Status – Allow administrators to set the report to done, in progress, new, or viewed for an individual Data Owner. For example, if an owner accidentally clicked the submit button before they had completed all their edits, using the 'in progress' option would allow them to continue editing their report.
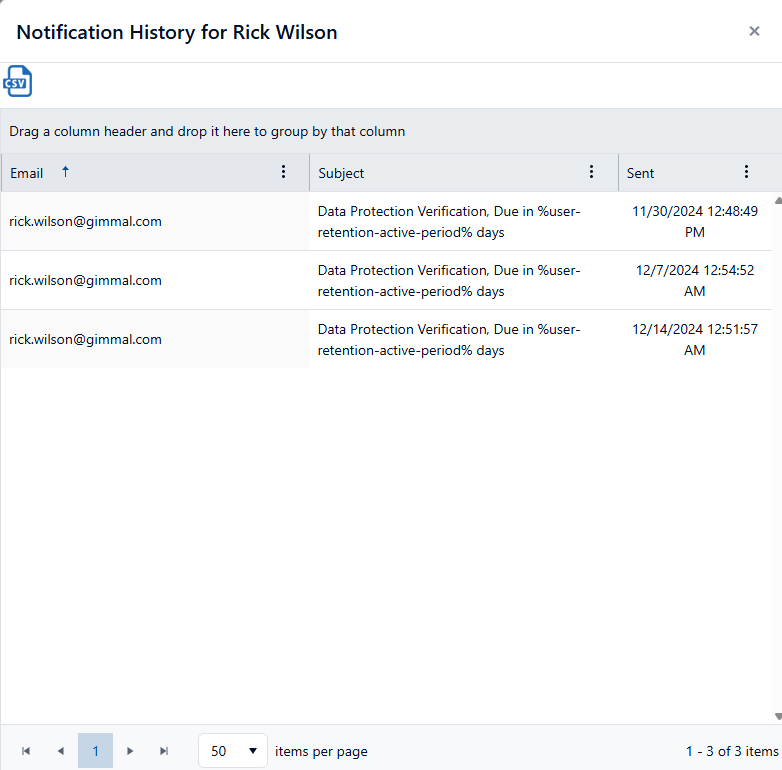
A final option in the 'View Owner Activity' view allows administrators to see the notification history for a particular Data Owner. After selecting a Data Owner, hover over the More button and select 'View Notifications'
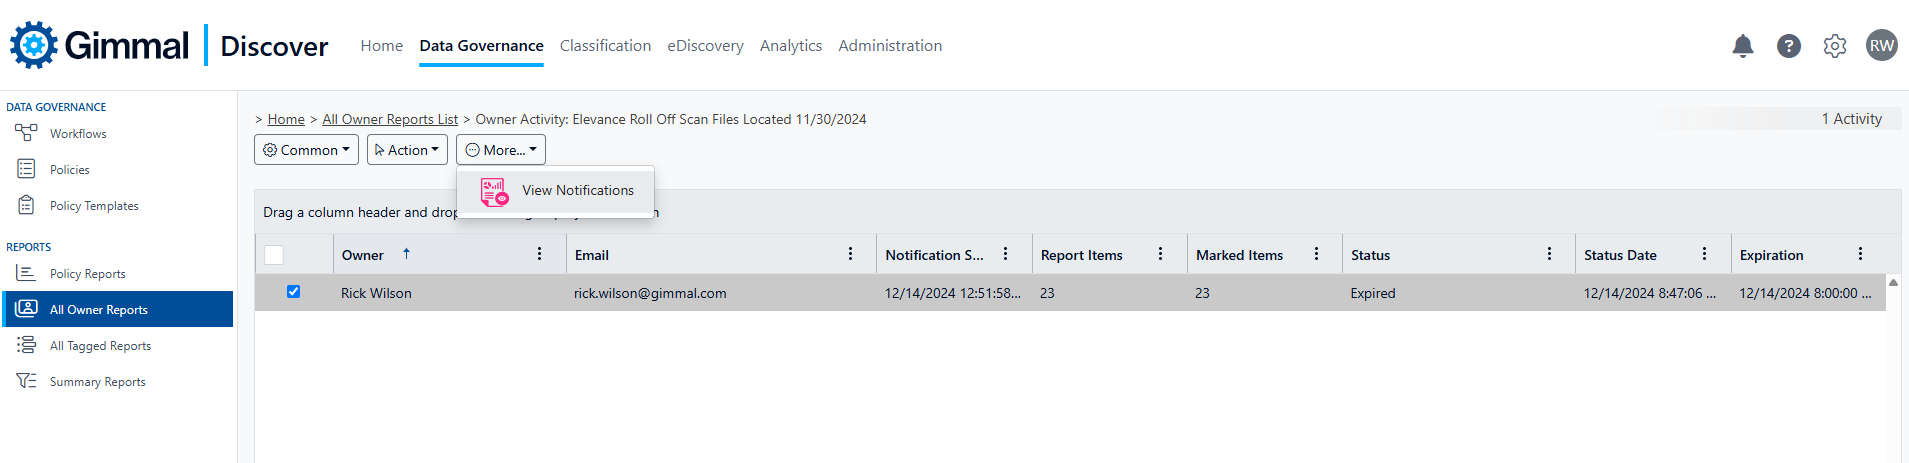
A pop-up screen will display each previous notification to that Data Owner.
Applying Data Owner Actions
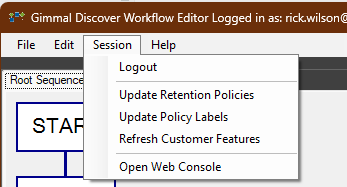
To apply the actions indicated by a Data Owner, administrators must create a workflow that will test the label value and then apply the appropriate action. The first step in this process is to update the Workflow Editor with any labels that have been defined in the Discover Settings area. From the top menu, select Session, then log in using a valid Discover user ID and password. Next, under the Session link, select the option to ‘Update Policy Labels’
After the labels have been added to the Workflow Editor, you will receive this confirmation dialog:
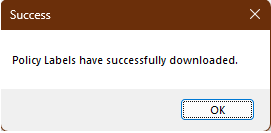
Once this step is complete, the label values will be available as workflow decisions. Whenever new labels are added in the Discover dashboard, this process should be repeated to keep the Workflow Editor up-to-date.
Important: Since these workflows will be applied to items on a Discover report, the root sequence of the workflow must contain a ‘process each item in list’ step for the type of content being managed.
The example below shows a workflow created to process file content that a Data Owner may have labeled, so it uses a ‘process each file in list’ step. There are corresponding ‘process each item in list’ steps for all of the content sources that Discover supports.
.png?cb=7e5508809ea98cd5b0a0ca73e6fd4a9b)
To interrogate the label value of each row on the report, this example workflow uses a decision step in the ‘Files’ sequence
.png?cb=ae43669f762c584fe583084c26d23d77)
In this workflow, when the value of the label is ‘delete item,’ the workflow will apply the delete action to remove the item that the Data Owner indicated. Data Owner workflows are executed by adding them to Data Governance policies. When creating the policy, select the check box ‘Run Policy on Report’.
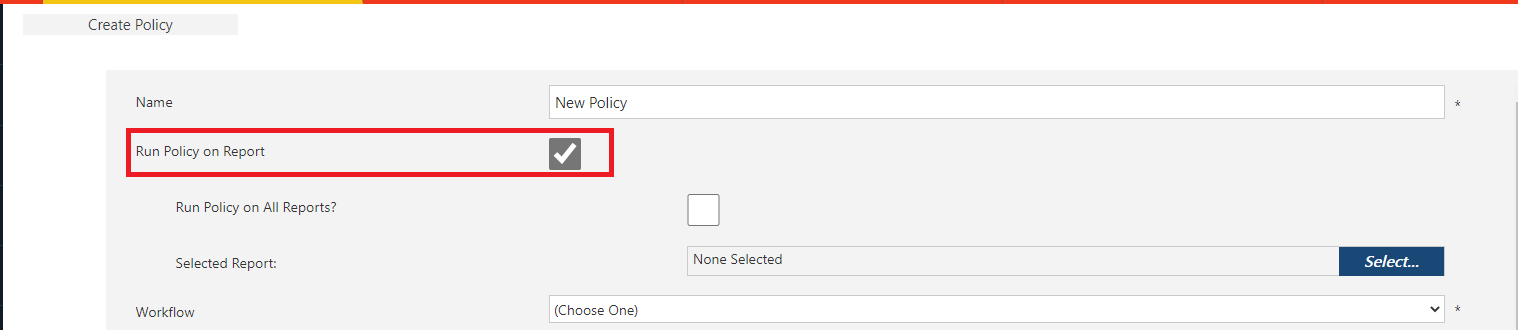
Checking this box displays two additional options
-
Run policy on all reports - this option will cause the workflow to run on ANY Data Owner report of the same type (i.e., email, files, etc.) that is present in the database. This is an ideal way to apply Data Owner labels on bulk content repeatedly
-
Selected reports - click the blue Select button to open a list of all the data owner reports. After selecting a report, you can designate a particular version of that report (based on its creation date) to run the policy on
After completing these selections, choose a workflow from the drop-down list.
Note: Only workflows containing a ‘process each item in list’ step will be displayed in the drop-down list.
The remainder of the Create Policy screen is the same as any other Data Governance policy. When clicking the Next button at the bottom of the Create Policy screen, you will be taken directly to the Schedule page. There is no need to select data targets since the workflow will be applied to every row of the report you selected on the Create Policy screen.