Prepare to use the SharePoint Online Connector
These instructions are provided for convenience. Registering the SharePoint App and creating the catalog are out of scope for Gimmal Support. Please contact your SharePoint Online or Microsoft 365 administrator for help completing these tasks.
Registering the SharePoint App
For the SharePoint Online Connector (SPOC) to be able to connect to SharePoint Online using OAuth, the app identity needs to be registered with Microsoft Azure Access Control Service (ACS) and the SharePoint App Management Service of the tenancy. To register the app, perform the following steps:
- Navigate to the following location: http://{your_sponline_url_to_any_sitecollection}/_layouts/15/appregnew.aspx
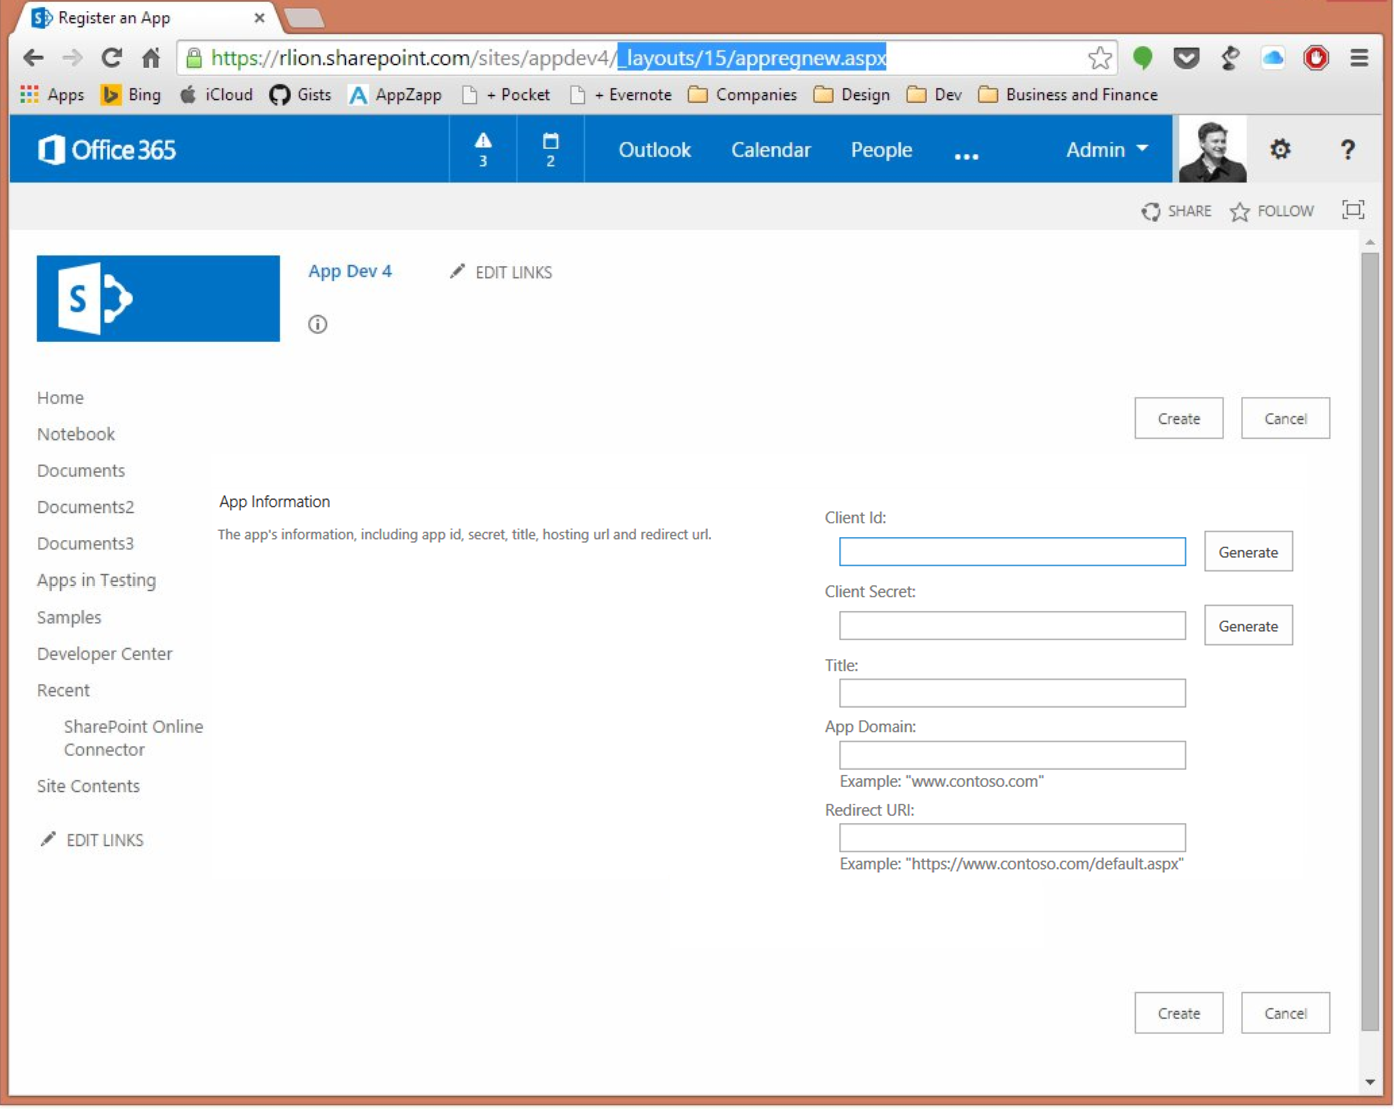
The following page displays, where you will provide the necessary configuration information described below.
Client ID: Click Generate to automatically populate this value.
Client Secret: Click Generate to automatically populate this value.
Title: Enter the value of “SharePoint Online Connector”.
App Domain: Enter the authority and port number portions of the exact URL to where the SharePoint Online Connector Web will be accessed; for example, spoc.domain.com:8084. If you are using the default HTTPS port (443) for your connector web, then you can omit it from the App Domain; for example, spoc.domain.com.
Redirect URL: Enter the exact, full URL to where the SharePoint Online Connector Web will be accessed; for example, https://spoc.domain.com:8084. If you are using the default port for HTTPS (443) for your connector web, then you can omit it from the Redirect URL; for example,https://spoc.domain.com.
SharePoint Online requires the Redirect URL to be secured via HTTPS or you will not be able to successfully register the app. Unsecured (HTTP) redirect URLs are not supported.
Existing Gimmal Cloud service customers (pre-Feb. 27th, 2021) should continue to use the existing URLs.
New Gimmal Cloud service customers (post-Feb. 27th, 2021) should use the new URLs.
Note: Existing customers already using the existing URL should not change to the new URLs as this may cause issues.
See special instructions below...
EXISTING CUSTOMERS - SPECIAL INSTRUCTIONS IF YOU SUBSCRIBE TO OUR CLOUD SERVICE AND YOUR CONNECTOR IS HOSTED IN THE GIMMAL CLOUD
Your SharePoint Online Connector app should be configured in O365 exactly as follows for a TEST tenant (https://test.recordlion.net):
App Domain: test-conn-spo.recordlion.net
Redirect URL: https://test-conn-spo.recordlion.net
Your SPOC app should be configured in O365 exactly as follows for a PRODUCTION tenant (https://app.recordlion.net):
App Domain: app-conn-spo.recordlion.net
Redirect URL: https://app-conn-spo.recordlion.net
EXISTING CUSTOMERS - SPECIAL INSTRUCTIONS FOR UNITED KINGDOM CLIENTS WHO SUBSCRIBE TO OUR CLOUD SERVICE AND YOUR CONNECTOR IS HOSTED IN THE GIMMAL CLOUD
Your SharePoint Online Connector app should be configured in O365 exactly as follows for a TEST tenant (https://testuk.recordlion.net):
App Domain: testuk-conn-spo.recordlion.net
Redirect URL: https://testuk-conn-spo.recordlion.net
Your SPOC app should be configured in O365 exactly as follows for a PRODUCTION tenant (https://uk.recordlion.net):
App Domain: uk-conn-spo.recordlion.net
Redirect URL: https://uk-conn-spo.recordlion.net
NEW CUSTOMERS - SPECIAL INSTRUCTIONS IF YOU SUBSCRIBE TO OUR CLOUD SERVICE AND YOUR CONNECTOR IS HOSTED IN THE GIMMAL CLOUD
Your SharePoint Online Connector app should be configured in O365 exactly as follows for a TEST tenant (https://records.gimmal.build):
App Domain: spo-records.gimmal.build
Redirect URL: https://spo-records.gimmal.build
Your SPOC app should be configured in O365 exactly as follows for a PRODUCTION tenant (https://records.gimmal.cloud):
App Domain: spo-records.gimmal.cloud
Redirect URL: https://spo-records.gimmal.cloud
NEW CUSTOMERS - SPECIAL INSTRUCTIONS FOR UNITED KINGDOM CLIENTS WHO SUBSCRIBE TO OUR CLOUD SERVICE AND YOUR CONNECTOR IS HOSTED IN THE GIMMAL CLOUD
Your SharePoint Online Connector app should be configured in O365 exactly as follows for a TEST tenant (https://records.uk.gimmal.build):
App Domain: spo-records.uk.gimmal.build
Redirect URL: https://spo-records.uk.gimmal.build
Your SPOC app should be configured in O365 exactly as follows for a PRODUCTION tenant (https://records.uk.gimmal.cloud):
App Domain: spo-records.uk.gimmal.cloud
Redirect URL: https://spo-records.uk.gimmal.cloud
NEW CUSTOMERS - SPECIAL INSTRUCTIONS FOR CANADIAN CLIENTS WHO SUBSCRIBE TO OUR CLOUD SERVICE AND YOUR CONNECTOR IS HOSTED IN THE GIMMAL CLOUD
Your SPOC app should be configured in O365 exactly as follows for a PRODUCTION tenant (https://records-ca.gimmal.cloud):
App Domain: spo-records-ca.gimmal.cloud
Redirect URL: https://spo-records-ca.gimmal.cloud
Prior to clicking Create in the next step, copy the Client ID and Client Secret to a file because they will be used when installing the Web and Services components of the SharePoint Online Connector. This file must be stored in a secure location so it can be referenced for future upgrades.
Make note of the Client ID and Client Secret in a secure location as they will be used when installing the Web and Services components of the SharePoint Online Connector.
Failure to make note of the Client ID and Client Secret will require you to regenerate them before installing the connector.
Click Create to complete the registration process.
Following the registration process, the Client Secret that is generated is only good for one year, and will need to be replaced by generating a new Client Secret for the corresponding Client ID. For information on how to renew a client secret, see Renewing a Client Secret
Creating the SharePoint App Catalog
To enable an App Package to be deployed to SharePoint Online, you must create the App Catalog where App Packages will be hosted and made available to each SharePoint Online Web. If this has not already been done for your tenancy, perform the following steps:
Open the SharePoint Online Admin Center.
Select “apps” from the left menu.
Click App Catalog, then click OK to accept the default option.
On the Create App Catalog Site Collection page, specify the Title and Address for your App Catalog, as well as any other options indicated.
Click OK to create the App Catalog.
