
1 Introduction
This User and Install Guide will review the Content Server Migration Tool to SharePoint which is part of the Gimmal Migrate - Tool Suite (formerly known as ECM Wise), this document specifically covers:
-
Detailed requirements for installation, and configuration for use
-
An overview of the tool and optimization tips
-
An overview of a sample generic overall migration process / plan and how the tool in context can be leveraged
-
Describe in detail the features and functionality of the tool
-
Provide additional FAQ’s and release notes
At a high level the Gimmal Migration Tool Suite will enable your organization to migrate from Livelink to SharePoint.
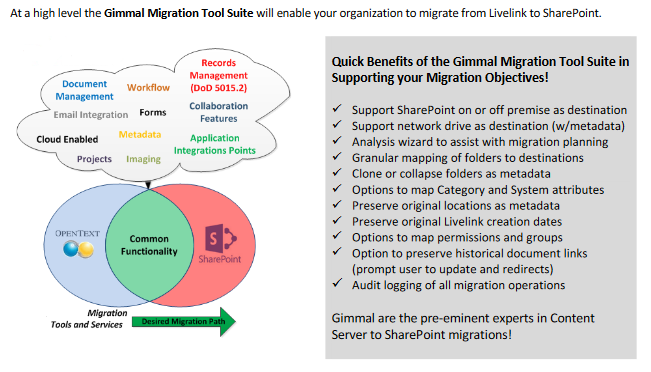
Follow along with the User Guide and you will learn how the Gimmal Migration Tool Suite can make your migrations manageable, fast, effective and efficient!
2 Requirements
This section provides information about usage requirements for running the Migration Tool.
2.1 Compatibility
The Migration Tool supports the following Livelink Server environments as source System.
Livelink Server Versions:
|
|
|
|
|---|---|---|
|
Livelink 9.7.1 |
Oracle backend |
Certified and tested |
|
Livelink 9.7.1 |
SQL Server backend |
Certified and tested |
|
Content Server 10.1 |
Oracle backend |
Certified and tested |
|
Content Server 10.1 |
SQL Server backend |
Certified and tested |
|
Content Server 10.5 |
Oracle backend |
Certified and tested |
|
Content Server 10.5 |
SQL Server backend |
Certified and tested |
|
Content Server 16.2 |
Oracle backend |
Certified and tested |
|
Content Server 16.2 |
SQL Server backend |
Certified and tested |
Support for Livelink 9.1.X to Livelink 9.7.0 is also available on request basis via a legacy migration path. If you require support for versions in the aforementioned range please contact your support representative to learn about and request those additional tools.
The Migration Tool supports the following SharePoint Server environments as destination System.
SharePoint Server Versions:
-
SharePoint 2010 Certified and tested
-
SharePoint 2013 Certified and tested
-
SharePoint 2016 Certified and tested
-
SharePoint Online Certified and tested
2.2 Client Use Prerequisites
Prerequisites for the Client/Host PC must be satisfied:
-
Requires .NET Framework 4.6 installed on the client (host) where the tool will be run.
-
Good network connectivity and network performance to both Livelink and SharePoint environments.
-
Livelink service account with sufficient permissions for read access to structure and documents from Livelink as per your migration requirements.
-
SharePoint service account with sufficient permissions for write / edit access to SharePoint for creation and addition of metadata and permissions.
-
If using database connection for Migration Profiles or with the DM Link Redirector – you will require SQL Server database access and a service account with permissions to create the database schema required for Profiles and/or Link Redirection functionality. Recommended minimum SQL Server 2008 or newer instance required.
2.3 Livelink Server Prerequisites
2.3.1 Ensure Enterprise Web Services are Enabled
Please ensure the Livelink Enterprise Web Services (EWS) or Content Web Services (CWS) are enabled and working as the web services are a requirement for communication. Livelink 9.7.1 and up have EWS/CWS automatically installed. Please ensure your Livelink Server(s) are enabled and configured for EWS use – both use over http and https (SSL) use is supported.
Please note: Information about configuring Livelink with Enterprise Web Services (EWS) is intended for use by System Administrators who are knowledgeable about Livelink Administration. Configuration of your Livelink environment for Enterprise Web Services should be done by your Livelink Administrator for your specific environmental needs and settings. Please consult with your local IT Administrator to ensure the services are enabled for your use.
Locate your Web Services path and attempt to test your connection by checking
http://instancename/cws/DocumentManagement.svc?wsdl
in your web browser to see if the svc renders, if it does not render then the IIS folder location may be different. If the wsdl renders then the OpenText EWS/CWS are already configured, proceed to step 2.3.3 to configure the web services. Of note: please add https:// to your path if your environment is enabled for https.
If you are still unable to determine your web services path you can login to a Content Server front end server – under IIS look for the virtual folder mapping (generally the default name is “cws” or “les-services”). If the locations do exist but the virtual folders do not exist, proceed to step 2.3.2 to enable the web services.
2.3.2 If Web Services are not Enabled
In some cases IT may have decided to disable the OpenText EWS/CWS or it wasn’t enabled by default.
You can re-enable the Web Services by following the general steps below.
To set up the web services:
-
In Windows Server > Server Manager --> Features --> ensure everything under .net Framework 3.5 and 4.5 are enabled.
IIS:
-
Create a new Virtual Directory for cws (new name) or les-services (old name):
-
Set Name: cws or les-services
-
Set Path (may be different depending on your install folder):
-
C:\OPENTEXT\webservices\dotnet\les-services OR
-
C:\OPENTEXT\webservices\dotnet\cws
-
-
Convert to Application
-
Enable read, run scripts
-
Set folder / directory permissions
-
If using Web Services with anonymous or basic login – in IIS you must enable anonymous + basic auth only
-
Leave the corresponding web.config bindings in the web services folder as is.
-
-
If using Web Services with windows authentication – in IIS you must disable anonymous access, and basic auth and enable IWA (windows authentication) option
-
You would also need to edit the corresponding web.config and add the bindings for windows authentication
-
Consult with your Content Server admin for the right settings to add if you are using windows authentication.
-
-
-
If you require both windows auth and basic auth, you would just create a new virtual directory for each.
-
cws, cws2 (configure the security and web.config for each)
-
-
If you are configuring the web services for Livelink 9.7.1 you must also install the Microsoft J# redistributable 32 and/or 64 bit on the front-end server (if your server is 64 bit you need both J# 32 and 64, if your server is 32 bit you only need J# 32 bit). For Content Server you do not need to install Microsoft J# redistributable on the server since it is built in. When ready you may can attempt to re-test connection to your web services using the steps from step 2.3.1 above.
2.3.3 Web Service Configuration Settings
Verify Enterprise Web Service (EWS) Configuration Settings (applicable for .NET EWS only, Java EWS are set dynamically):
Locate your Livelink Web Service Configuration file (the location is dependent on how your Livelink Administrator first installed and configured Livelink and Web Services – the OpenText root directory specified).
For example assuming the file is located at: C:\OpenText\webservices\dotnet\les-services\web.config
Open the file and verify the following setting is enabled for the binding named ContentServiceBinding and DocumentManagementBinding with maxReceivedMessageSize values respectively set to the recommended size 2147483647. Please consult with your Livelink Administrator for assistance or guidance on the maximum size. The value provided is a recommendation to allow large file and folder sizes. Please note this only applies for the .NET version.
<binding name="ContentServiceBinding" maxReceivedMessageSize="2147483647" messageEncoding="Mtom" transferMode="Streamed" />
<binding name="DocumentManagementBinding" maxReceivedMessageSize="2147483647"
messageEncoding="Text" transferMode="Buffered" />
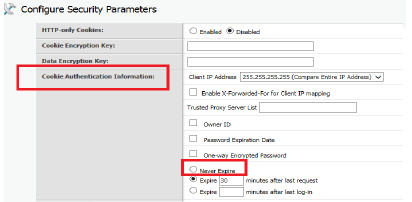
Verify Livelink Server Settings for Cookie Expiration:
Please work with your Livelink Administrator to review the settings below. It is important to review your Livelink Administration settings for authentication cookie expiration. By default Content Server has this set to 30 minutes.
From the Livelink Content Server Admin Pages > Server Configuration > Configure Security Parameters > Set Cookie Authentication to “Never Expire”. Save your settings and restart your Livelink Services as per your IT service restart guidelines.
2.4 Livelink Permissions
For the Migration Tool please use a user account or service account with full access rights to the areas in Livelink that is desired for migration. Please work with your local Administrator to obtain the proper access rights / permissions.
Please note the user/service account you provide is used for accessing content from Livelink.
Livelink permissions and access controls are enforced for the provided user/service account – hence it is important to use an account with the sufficient privileges. For permissions to be mapped and viewed in the Migration Tool, the service account would require minimum “edit permissions” access to the folder location.
2.5 SharePoint Permissions
For the Migration Tool please use a user account or service account with full access rights to the areas to SharePoint that is desired for migration. Please work with your local Administrator to obtain the proper access rights / permissions.
Please note the user/service account you provide is used for migrating content to SharePoint.
SharePoint permissions and access controls are enforced for the provided user/service account – hence it is important to use an account with the sufficient privileges.
2.6 Allowable Mime Types
Both Livelink and SharePoint support a set of allowable mime types.
As part of pre-requisites for migration tool use - please validate and configure your mime type mappings to match across Livelink and SharePoint.
This would involve:
-
Review for valid Livelink mime types
-
Updating the Migration Tool to SharePoint mime types (Section 2.7)
-
and Configure SharePoint to support the same set of mime types as deemed required
Failure to properly map the mime types for migration may result in migration errors.
For example if you are allowing .exe files to be migrated from Livelink to SharePoint, both the Migration Tool and SharePoint would need to be configured to allow the mime type as an acceptable file type.
To configure SharePoint supported mime types please consult with your SharePoint Administrator.
You would also want to review the SharePoint blocked file types list to ensure the mime types you wish to support are not identified by SharePoint to be disallowed. You can review the list at Central Administration > Security > Blocked File Types and can remove the extensions you wish to support.
2.7 Migration Tool Mime Types
Please ensure the Livelink Mime Types are captured from a mapping perspective. Livelink provides base mime type mappings, but most Livelink source systems have some form of mime type customizations for custom document types.
The Migration Tool requires mappings to ensure it knows how to deal with mime types from the source Livelink system. Out of the box the Exporter Tool includes a set of base mime type mappings located in the executable folder, specifically contained in the MimeTypes.xml file.
If the mime type is not captured in the configuration and is encountered in an export – an error is thrown, the error is logged and the export will skip the document and continue to the next document.
To avoid such issues it is best to capture all potential mime types from the source system and add to the Migration Tool’s MimeTypes.xml configuration file.
For your source system Mime Types please ask your local IT Administrator to get access to the Mime.Types located in the OpenText Livelink root config folder for the source Livelink System. You would copy these mime types into the Migration Tool’s MimeTypes.xml configuration file.
2.8 Link Redirection and Migration Profiles
The Content Server Migration Tool Suite supports Link Redirection and Migration Profile creation.
Migration Profile creation allows you to save your settings and configuration details for each migration that you perform. The profile can be reloaded for future use and allows you to save your settings prior to or after your migration is completed. This is useful if you are configuring a migration and save your settings so you don’t have to re-enter the migration settings anew. Likewise to open a profile you would navigate to the profile tab and highlight the migration profile you wish to open, followed by double clicking or clicking the edit link. This will open the profile for you to work on. Migration profile use is optional and not required.
Link Redirection functionality allows you to redirect your migrated legacy Livelink document and folder links to the new destination location in SharePoint or on the Network Drives. This link redirection capability allows legacy links to continue to work seamlessly during and/or post migrations.
Please review the Gimmal – DM Link Redirector – User and Install Guide for further details on how to use the Link Redirection post migrations.
Please review the Gimmal – Content Server Migration Tool to Network Drives – User and Install Guide for details on migrating to Network Drives with Link Redirection enabled.
Link Redirection is optional and not required.
In order to support use of Migration Profiles and Link Redirection you would need to work with your IT Administrator to obtain access and service account rights to a SQL Server instance. You would specify the service account credentials on tool first use to create the database for Profiles as well as Link Redirection.
Please use caution as you should only ever create 1 database for each Livelink instance you wish to redirect from and reference the correct database for the specific Livelink instance you wish to migrate from. If you are migrating from multiple instances of Livelink and wish to maintain the links for each instance you will need to use a separate migration database and link redirector instance for each instance of Livelink.
Link Types (when Link Redirection is enabled)
-
For SharePoint 2013 the Link Redirection will automatically use static path reference for both folders and documents
-
For SharePoint 2016 and SharePoint Online the Link Redirection will automatically use durable links for documents, and folders will continue to use static path links
3 Overview and Optimizations
3.1 About
This quick start user guide is intended to provide a quick reference for the following user types:
-
IT Administrators
-
Reason: For planning migrations
-
-
Migration Analysts
-
Reason: As an analysis tool and migration utility
-
Gimmal - has provided this tool as standalone executable migration tool to allow a correctly permissioned user the ability to access a Livelink environment and configuration details for testing and migrating to SharePoint.
The migration tool specifically performs read only actions on documents and metadata from Livelink.
Document and metadata from Livelink are not modified in any way with the sole exception of document export operations which would be reflected in the respective Livelink audit trail for a document.
The migration tool performs create and update actions on documents, folders and metadata copied to SharePoint.
The migrated objects from Livelink will be created in SharePoint according to the specific migration profile settings specified.
3.2 Overview of Use
The Migration Tool
-
Is intended to be run on a Client / Host PC
-
Can be used as a multi-threaded migrator tool (by pointing to separate source folder areas) on subsequent Client PC’s
-
Requires login credentials for read-only access the source Livelink System
-
Requires login credentials to create and update migrated objects in SharePoint
-
Enforces the maximum document size of 2 gig limitation from Livelink
-
Provides one way communication with Livelink – only migration, no modification to Livelink documents or metadata
-
Requires adequate permissions for user or use of a Livelink service account with adequate rights on the source area
-
Requires adequate permissions for user or use of a SharePoint service account with adequate rights on the destination area
-
Livelink supported object types for migration
-
Documents + versions, folders, compound documents, projects, email folder, and categories
-
Empty folders can be migrated (if folder replication is enabled)
-
-
Supports options for metadata (System and Category) mapping from Livelink to SharePoint
-
Supports options for permissions mapping from Livelink to SharePoint
-
Analysis wizard to analyze the migration plan for potential problems
-
Full system audit logging of migration operations
Additional Assumptions of Use
-
Pre-requisites for tool use have been met (see section 2)
-
Adequate storage is available in SharePoint
-
If the Livelink environment is down or unavailable during a migration, errors will be reported and migration restart required. This tool is not responsible for managing or preventing such outages.
-
The source Livelink or Content Server environment is stable and architected robustly.
-
If the SharePoint environment is down or unavailable during a migration, errors will be reported and migration restart required. This tool is not responsible for managing or preventing such outages.
-
Corrupt files are usually prevented from being added to Livelink, but there are unforeseen circumstances where a document is added to Livelink that is corrupted due to some factor. Please note if there are corrupt files in your Livelink environment - attempting to export a corrupted file is unsupported at this time. If you encounter corrupted files in your Livelink environment you should delete these before running the Migration Tool.
-
Adequate planning and design has been completed to ensure success via validation and signoffs (see section 4 for a sample migration project methodology)
-
Best Practice: Migration areas in Livelink should be frozen for editing + additions for duration of migration to prevent new documents from being added to those areas in Livelink (to be determined by your migration project leaders)
-
Best Practice: Furthermore migrated areas in Livelink should be locked down and deleted after a sufficient review and retention period has been met (to be determined by your migration project leaders)
3.3 Performance Optimization Considerations and Tips
Speed and performance of the Migration Tool is dependent on many factors.
Gimmal - does not warrant or guarantee the performance of the Migration Tool in any way.
We outline some tips and considerations for optimization of performance below.
The implementation of optimization considerations and tips is out of scope for this tool and document.
The performance of the migrations depends on many factors such as:
-
Network latency and bandwidth considerations
-
Server location impacts
-
Livelink Server configuration and hardware available (load balancing etc)
-
Livelink Enterprise Web Services (EWS) configuration
-
Front end servers versus application servers
-
-
SharePoint configuration and hardware available (load balancing etc)
-
Local IT environment and architecture
-
Dependent on how much metadata exists to be migrated from Livelink to SharePoint
-
Factors such as versioning (how many versions for a document on average)
-
Size of documents
-
Amount of metadata such as Categories and number of attribute fields
-
Complexity of permission ACL entries (# of items in an ACL list)
-
Mapping and transfer of Holds related metadata will have additional performance hit due to extra loads
-
-
Network traffic and relation to time of day the migrations are run
-
Processing power and memory available on client/host machine (where you are running the Migration Tool)
We recommend that you work with your local IT to review the considerations outlined above and to ensure performance optimizations are realized.
Performance Tip 1: Optimize network distance
Reduce network distance - running the tool directly on the Livelink Server (or application server) may achieve some performance gains with regards to web service communication latency and transfer of files. Likewise your source and destination locations should be within the same datacenter where possible.
Performance Tip 2: Conduct parallel migrations
Another technique would be to split the document loads into smaller chunks and run on multiple clients to achieve parallel migrations. You would need to ensure the migrations do not overlap both from the source data and destination location.
In this case the limiting factor would be the Livelink servers’ capability to handle the additional load, in addition to the destination SharePoint server’s ability to handle the load.
Performance Tip 3: Ensure minimum Client specifications are met
Please ensure the client/host has adequate amount of RAM memory (minimum 8 GB, recommended 16 GB).
For parallel migrations although multiple instances of the Migration Tool (production licenses only) can be run on the same Client, we recommend using dedicated Clients to maximize performance with regards to processor and memory usage.
Performance Tip 4: Optimize source Livelink performance
If possible having a Livelink environment that is load balanced for Enterprise Web Service (EWS) use or dedicated application server is recommended.
Performance Tip 5: Optimize destination SharePoint performance
If possible having a SharePoint environment that is load balanced or having available dedicated load balanced front ends for migration only use - could lead to performance gains.
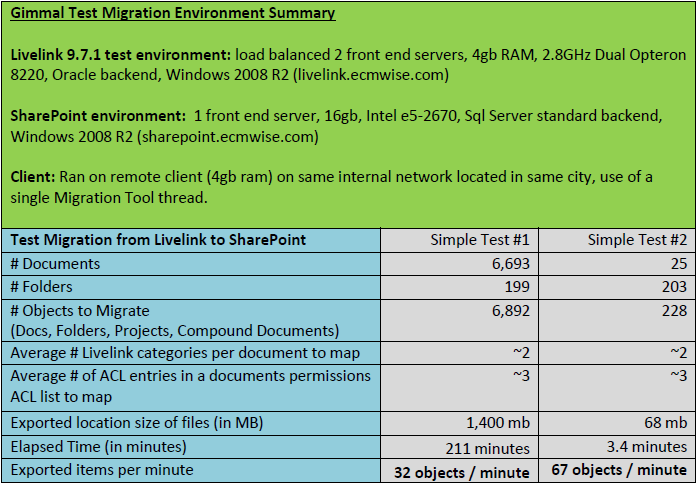
3.4 Test Migration Metrics Overview
General Considerations
Test migration metric examples are provided below for a near production quality test environment for general planning + comparison purposes. Results will be dependent on the specific Client environment performance characteristics such as network latency and bandwidth. These examples are a mere test result and do not warrant performance expectations for the specific Client environment.
Additional Considerations
-
Examples are for migrations to SharePoint on premise (tool supports off premise but these metrics are out of scope).
-
File size is not the ultimate predictor of performance, as performance is dependent on factors such as document file size counts, objects, metadata, versioning and permissions in the overall processing time. Often times we recommend using # of objects migrated/minute as the most accurate metric.
-
The Gimmal Migration Tool Suite has no requirements for a staging or temporary location to host documents or metadata. Migrations are handled via direct communication to Livelink and SharePoint.
-
Environment optimization strategies were not implemented for the base test environment – see section 3.3 for Performance Optimization Considerations.
-
As part of migration planning it is technically possible to split a migration area into multiple parts and run as more than 1 concurrent parallel process.
-
This could potentially result in a substantially faster migration time when utilizing parallel threads.
-
The implication is added complexity for management and validation of such migration areas.
-
Technically the feasibility of using parallel migration processing is dependent on the architecture of the environments and existing load on systems. The examples provided have been run using a single migration thread/process.
-
4 A Sample Generic Migration Process
4.1 About
In this section we help provide context for how an organization can use the Gimmal Migration Tools for successfully migrating from Livelink to SharePoint.
We have generalized a very high level approach and process that can provide context to how and when the Tool Suite should be leveraged. The examples are merely meant to illustrate how the Tool Suite can be leveraged to support a generic migration project. We do not warrant that this same process be used successfully for your specific migration requirement needs, but it is strictly a sample for how a migration project could be run successfully.
We state from a strategic viewpoint; that Gimmal from experience feels strongly that the keys to a successful migration are not found in any migration tool or technology. The tools merely support the key success factors below.
The keys for success often depend on people “factors” such as (which also happen to represent project risks):
-
Executive support and sponsorship + business availability and desire to migrate (core priorities vs migration)
-
Strong IT leadership and governance around Records and Information Management
-
Effective project planning
-
Effective change management and communication
-
Defining a migration strategy
-
“Right sized” planning/preparation
-
Defining a migration specifications document as a guideline for conducting migrations with key design decisions around things like folders, metadata, and permissions in SharePoint
-
Defining the plan and rigour of testing, validation and user signoff
-
Having the right resources available in a timely fashion
-
Excellence in execution for implementing your migration strategy
Please keep these keys in mind when running your migration projects!
4.2 A Sample Migration Process
4.2.1 A High Level Migration Process Overview
Below is a sample process for executing a Livelink to SharePoint migration project. Out of scope of this sample migration project would be line of business integrations with Livelink that may exist as well as Records Management requirements. Those additional out-of-scope considerations would have an impact on the migration project methodology and steps; for sake of general use we do not cover those requirements here.
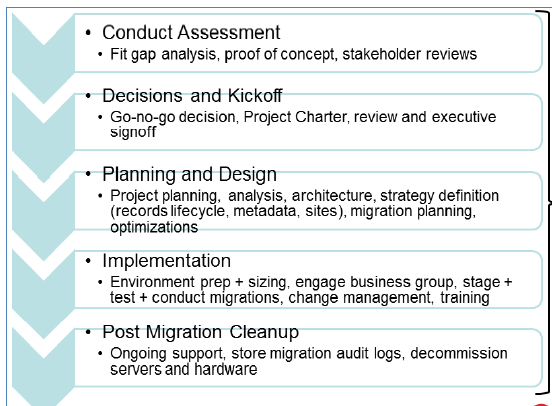
The high level process above describes a stepwise approach for migrating from Livelink to SharePoint.
Assuming executive sponsorship is in place and stakeholder availability is taken into account.
Gimmal has identified several common high level deliverables that would be beneficial for migration planning and implementation:
-
Project charter with clear definition of scope
-
Overall project plan
-
Organization wide migration specifications document and related decisions (design document)
-
Overall implementation / migration plan (the who, what, when, where, why, how)
-
Detailed migration schedule
-
Architecture sizing plan
-
Migration specification document specific to each migration area
-
Migration testing and validation plans
-
Rollback plan
-
-
Communication plan
-
Post migration and closure plan
4.2.2 When to Leverage the Migration Tool Suite
How can an organization leverage the Migration Tool Suite in context of the process above?
-
During planning and design – to understand migration speeds, capabilities, and support design decisions
-
During analysis of migration areas – to highlight potential issues with structures, metadata and permissions
-
During implementation – to perform test migrations (analyze migration plans), and to stage and conduct actual migrations to test and production environments (SharePoint on or off premise, and to network drives)
-
During post migration – to perform final testing, validation and stakeholder signoff on executed migrations using migration audit logs
4.2.3 A Sample Process for Migration Success
Before you start your production migration we recommend you review our best practice process steps below.
Gimmal recommends the following high-level process steps prior to deeming your migration as successfully completed:
Plan: Identify migration areas with your customer and perform any pre-migration cleanup as required (not covered in this document)
-
If this is your first time migrating, please choose a smaller area to test to ensure the behavior is as expected
-
You may wish to leverage the Gimmal Content Server Discovery, Analytics and Deduplication Tool to enable your content discovery and analysis activities
-
This tool will allow you to determine what you have prior to begin your migration planning and implementation phases
-
You can identify long paths and metadata mapping issues in advance of your migrations for resolution and decisions
-
Plan: Create new migration profile(s)
-
Best practice is to split a migration into smaller size profiles for validation purposes, optimize speed for thread usage, and allow easy error recovery in case that issues are encountered
-
For example: if migrating “Finance” department you may wish to split migration profiles by sub areas like Accounts Payable, Accounts Receivable, General etc.
Plan: Specify target location in SharePoint along with your migration settings such as versioning settings
Restructure: If you need to restructure your folders dynamically you may wish to restructure your folders prior to migration. The tools allow restructuring dynamically in memory to be applied upon migration step. This allows you to address things like long folder paths and re-organizing folders for optimal path lengths and organization in SharePoint.
Metadata: Map your source metadata to your destination metadata
Metadata: Review, correct and optionally add metadata to your migration plan
Map users: You may optionally map user accounts as part of your migration
Map other list items: You may optionally plan to migrate Discussions, Wikis and Blogs from Content Server to equivalent lists in SharePoint
-
Analysis: Analyze your migration using the “Analyze” function
-
Identify and correct any issues that may exist such as unmapped metadata or unknown mime-types
-
Save your analysis logs for proof of migration
Migrate: Conduct your migration and save your migration logs as proof of migration
Validate: Review logs and perform validation (UAT) to ensure that your migration was successful
-
We recommend you work with the stakeholder committee to determine a validation plan for migrations, below is a sample validation plan:
-
Identify 10% validation of migration contents
-
From the migration logs identify 10% for manual validation
-
Business and IT to conduct the 10% validation
-
In SharePoint validate the contents, structure and metadata are migrated as expected
-
Check the logs to ensure the settings are carried through appropriately – cross check against the source Content Server environment: object name, folder location, dates, metadata, and user info where applicable.
-
-
Once validated, save the validation results and perform User Acceptance Testing signoff
-
-
It is optional for IT to disable permissions for the original source Content Server folder area to restrict access or to delete the folder structure from Content Server.
-
We recommend you freeze the original source folder for 30 days
-
If there are no issues after 30 days then proceed to delete the contents of the original source folder
-
Apply Permissions: The mapping and application of original source permissions is an optional step.
-
Most organizations would implement a new Information Architecture for security in SharePoint and inherit those permissions. In the case that you wish to preserve your original source permissions it is possible by using the Permissions mapping functionality post migration to map and apply the permissions from Content Server.
-
We do not usually recommend re-using your Content Server permissions due to out of date and overly complex source permissions that likely exist from the source system.
-
Store your permission group creation and permission application logs along with your regular migration logs.
Link Redirection: If you are migrating from Content Server source - you may now choose to enable the Gimmal Legacy Link Redirector application to automatically redirect your legacy links contained in emails, documents, and web pages to the new destination SharePoint Online migration locations.
Closure: Your migration is successfully completed!
Generally upon successful validation of the migration to SharePoint – an administrator would archive or delete the local/network drive content that was migrated.
As a best practice we recommend you save your migration plans, manual test results, UAT signoff record, and migration logs to a SharePoint migration team site. This way all records of migration are available as proof of migration and legal chain of custody.
5 Using the Migration Tool
5.1 Activation
Please note a valid activation code is required on first use of the Content Server Migration Tool to SharePoint, required for every Client PC that it is run on.
Upon purchase of the Migration Tool Suite you would have been provided details on how to obtain the necessary activation codes for your requisite Client PC use.
When first running the Migration Tool you will be required to specify a unique license key to register the product for use. You can enter the provided License Key in the “About” tab and by clicking the “Register” button. The registration will occur one time and will activate the software for use, no further activation will be required.
If you require assistance or would like to obtain additional activation codes for additional Client PC use within your environment please contact your Gimmal support contact.
5.2 Database
The database tab allows you to specify the SQL Server database credentials. Use of a SQL Server database is optional as indicated in section 2.8 Link Redirection and Migration Profiles.
Please provide the necessary database access credentials if you intend to:
-
Enable legacy link redirection for migrated documents or folders
-
Or save your migration profiles for each migration that you wish to perform
If you leave the database section disabled, the local settings will be saved for your migration profile and they will not be available for re-use.
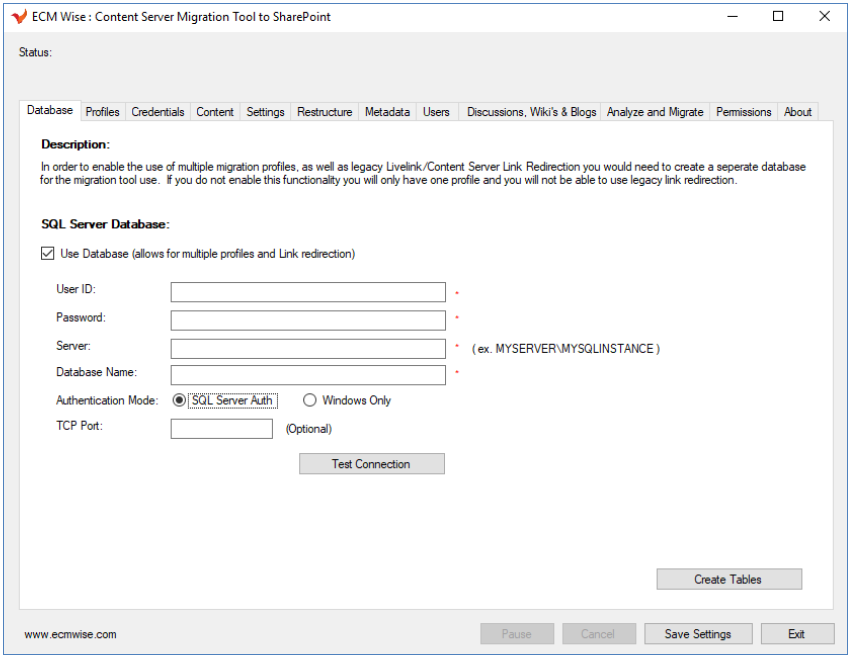
From this screen you can enable database use for Migration Profiles and Link Redirection.
If you wish to enable this functionality, please provide the SQL Server credentials and connection information.
-
You can test your connection from this screen before saving by clicking “Test Connection”.
-
For each Livelink instance targeted you should Create Tables (in each specified IT pre-provisioned database) to store the migration records related to the specific Livelink instance.
-
Please use care here, as each Livelink instance should only have 1 database defined.
-
If you wish to use with another targeted Livelink instance you would need to create a separate database in a new location and Create Tables for that instance.
-
The Migration Tool should point to only one Livelink instance and Link Redirection database at a one time, so to simplify we recommend using another instance of Migration Tool on another Client PC to target additional Livelink instances to avoid forgetting to update configuration settings. Otherwise your link redirection records for that Livelink instance would be impacted.
-
-
Please ensure you use an IT approved location for database files (usually san storage database files).
5.2.1 Supported SQL Server Authentication Modes
For Migration Profiles with the Content Server Migration Tool to SharePoint the default authentication for SQL Server is SQL Authentication. If you require use of Windows Authentication mode for SQL Server please select Windows Only Authentication for the Authentication Mode option.
5.3 Migration Profiles
Multiple Migration Profiles are enabled when you specify a database for use with the Gimmal Migration Tool Suite. Otherwise only 1 single profile is available if the database option is not enabled.
If multiple Migration Profiles are enabled, you would see a list of profiles in a list as shown below.
A Migration Profile represents your Migration Plan which includes all the settings for credentials, content, metadata, permissions and additional options for your specific migration.
-
Whenever you click “Save Settings”, the settings are saved for the Migration Profile.
-
To open or work on a Migration Profile simply double click on the line item, or click the corresponding Open button.
-
To delete a Migration Profile simply click on the corresponding Delete button.
-
Migration Profiles are accessible from any Content Server Migration Tool to SharePoint Client interface which is configured to use the same database connection.
-
Please use care to avoid running a Migration Profile that has already been migrated (as you could overwrite information that has already been migrated).
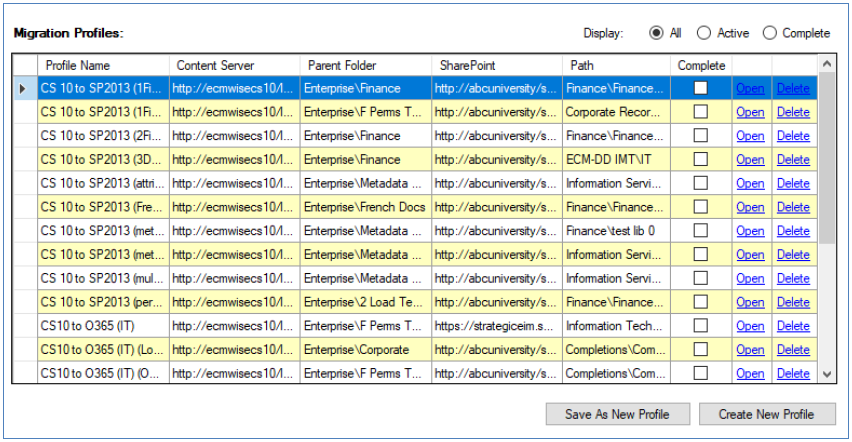
You can now take an existing migration profile and perform a Save-As on the profile itself. To use this function highlight the profile you wish to copy and click Save As New Profile.
This feature allows you to take a common set of values and save it as a new profile within the same environment for re-use.
An example of where you could use the Save-As New Profile functionality is if you wish to split up a number of folders in the same area for migration purposes and the settings will be largely the same. Using the Save-As New Profile functionality allows you to avoid the need to replicate the entire set of settings for each folder area. One would just need to update the Content tab with the source and destination location.
When your migration is completed you are able to mark a migration profile as “completed” so the profiles can be sorted and grouped according to status. You can mark a profile completed from the Credentials tab. Once a migration is marked as completed it is safeguarded from further analysis or migration activity unless reverted back to active status.
Please note the use of Save-As New Profile is intended to be used to copy a profile within the same Server environment. If you wish to target a new Livelink or SharePoint server environment we would recommend creating a profile from scratch. The metadata and permission mappings are specific to a server environment and cannot be copied between environments.
Recommendation – splitting out areas to be migrated is recommended: as doing so will minimize potential for error conditions, and allows for parallel processing and generally makes migrations / exports more manageable as they are in smaller chunks (for example in 5 GB chunks at a time).
When migrating from Content Server to SharePoint or SharePoint Online – the time-zones for the servers and SharePoint sites should match. If they do not match, the modified and create dates may not be represented accurately since there is no way to interpret the time zone difference in advance.
5.4 Credentials
Livelink Content Server Credentials
The user must provide the source Livelink System login credentials as displayed in the screenshot below.
See Livelink Permissions for additional notes on using the correct credentials here.
You must also provide your Web Services Root path for the source Liveink System, and optional for the RM Web Services if you intend to migrate the Livelink Records Management metadata.
The user id and password provided must be in the context of the source Livelink System you have specified. See Livelink Server Pre-requisites for additional notes on Livelink Enterprise Web Services.
Please click “Test Connection” to verify that you have specified valid credentials and a valid web services root path.
SharePoint Credentials
You must also provide the destination SharePoint site url, and service account credentials that will be used for migration (creations, and updates) in SharePoint. See SharePoint Permissions for additional notes on using the correct credentials here. For SharePoint Online you must choose the SharePoint Online option from the SharePoint versions drop down list.
Please click “Test Connection” to verify that you have specified valid credentials and a valid SharePoint site that is accessible.
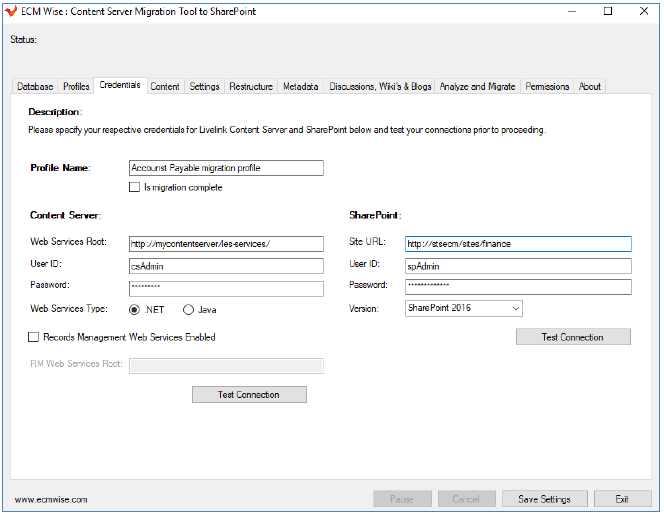
Clicking “Save Settings” will save your login values for future use.
Options for Content Server Web Services
There are 2 options for connecting with Content Server Web Services.
.NET and Java Web Services are supported.
Please consult with your IT Administrator to determine how your Content Server Web Services are configured. Please review Section 2.3 Livelink Server Prerequisites which covers a brief summary of these options.
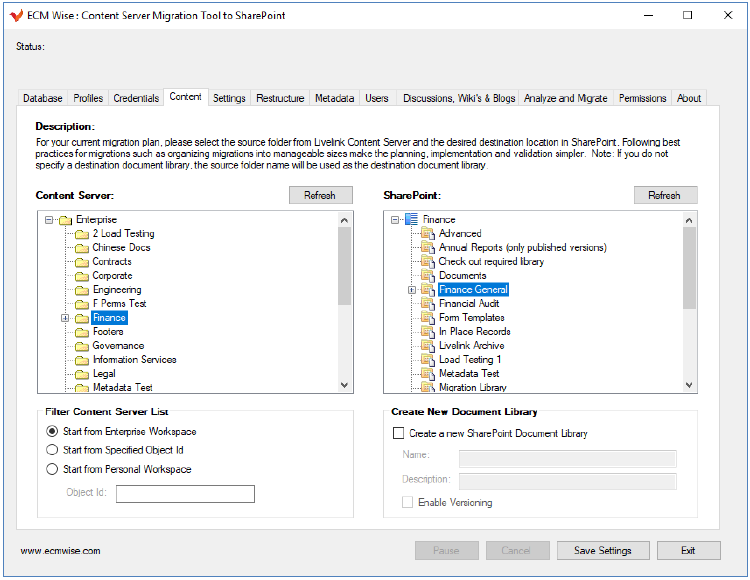
5.5 Content
The Content tab allows the migration administrator to specify the source Livelink location and the destination SharePoint location - which can either be a Site or a Document Library. Clicking on a specific location will provide the ability to expand child nodes where applicable.
Filter Content Server List
By default the Livelink Enterprise Workspace is displayed which is where organizations store their enterprise content. Other workspaces or direct access to folders or projects can be accessed. They can be accessed by choosing Personal Workspaces or Specific Object ID locations by typing in the corresponding User ID or Object ID respectively and by clicking the corresponding refresh button.
Create New Document Library
Optionally you can choose to create a new document library named the same as the source folder chosen from Livelink. You would then have the ability to specify a library name (by default it would use the same name as the Livelink folder name chosen) and description as well as indicate if versioning should be enabled on the pending library in SharePoint. Please note the document library will not be created until the Migration is actually started.
5.6 Settings
The Settings tab allows the migration administrator to specify migration related settings for migrating from Livelink to SharePoint.
Log Files
The migration administrator can also set the master log file location for the Migration Profile (or Migration Plan). This location will be used to store all log files related to migrations using the current instance of the migration tool.
Versioning
Versioning allows the migration administrator to configure versioning settings to one of: All Versions, Current Version Only, or Current Version and Additional Number of Versions to be migrated (from most recent version).
Additional Settings
Additional Content migration settings can be enabled from this screen including:
-
Link Redirection
-
If enabled – will map migrated documents (latest versions only) and folders links to the destination location. Meaning the destination location will be available to the DM Link Redirector application for redirection purposes. Please review the Gimmal – DM Link Redirector – User and Install Guide for further details on how to use the Link Redirection post migrations.
-
If disabled – the migrated items will not be mapped for use with the DM Link Redirector.
-
-
Create Folder Structure
-
If enabled – replicates the Livelink folder structure.
-
If disabled – merges the Livelink contents into the destination location (collapse folder content).
-
Create Content Server Root Folder (only applicable if Create Folder structure option is enabled)
-
If enabled – the source root folder is also created
-
If disabled – the folder contents are migrated directly to the destination location without creating the source root folder
-
-
-
Skip Document if Already Exists
-
If enabled – if the same document is already found in SharePoint – will skip the migration for that document.
-
If disabled and the destination location has versions enabled – the document will be overwritten with a new version.
-
If disabled and the destination location does not have versions enabled – an error will be logged during migration and the document will not be migrated.
-
-
Append Content Server ID to Duplicate Named Documents
-
In the case that you are merging content from multiple folders into one source location it is possible to have collisions on document names which would usually present a problem. This setting if enabled would ensure no content would be lost or overwritten incorrectly.
-
If enabled and if skip document if already exists is disabled – if a same named document already exists – the document will not be overwritten, instead the Livelink object ID will be appended to the document name ensuring a unique name is used.
-
If you wish to re-run a migration to resolve error conditions - on subsequent runs you would re-enable skip document if already exists.
-
-
If not enabled and Skip Document if Already Exists is disabled – it will add a version to the same named document.
-
If not enabled and Skip Document if Already exists is enabled – it will skip this same named document.
-
-
Use Content Server Created By
-
If enabled – migrates documents from Livelink and sets the created by field in SharePoint to the same named user from SharePoint – please note the user account must exist and be named the same in both Livelink and SharePoint. If the user account is not found, the service account specified will be used as the Created By field in SharePoint.
-
If disabled – migrates documents from Livelink and sets the created by field in SharePoint to the service account specified.
-
-
Use Content Server Create Date
-
If enabled – migrates documents from Livelink (and replaces the creation date in SharePoint with the Livelink document creation date).
-
If disabled – migrates documents from Livelink and uses the current date of creation in SharePoint as the create date.
-
-
Use Content Server Modified By
-
If enabled – migrates documents from Livelink and sets the modified by field in SharePoint to the same named user from SharePoint – please note the user account must exist and be named the same in both Livelink and SharePoint. If the user account is not found, the service account specified will be used as the Modified By field in SharePoint.
-
-
Use Content Server Modified Date
-
If enabled – migrates documents from Livelink (and replaces the last modified date in SharePoint with the Livelink document last modified date).
-
If disabled – migrates documents from Livelink and uses the current date / time as the last modified date in SharePoint.
-
Please consider potential impacts (See Section 5.12) when re-running a migration using the Skip Document if Already Exists in SharePoint flag.
If you are preserving modified by and date values from Livelink document versions - each version from Livelink will have it’s modified by and modified date preserved in the document Comments field in SharePoint. And the most recent version in SharePoint will automatically reflect the applicable modified by and modified date (not shown in the comments).

-
Migrate Content Server Shortcuts
-
If enabled you must specify the base Livelink url to use for the shortcut.
-
If you enable this option and your original documents referenced by the shortcut are also migrated you will need to ensure the Legacy Link Redirector is enabled. The Legacy Link Redirector will automatically redirect the shortcut (references to Livelink objects) to the migrated destination location in SharePoint.
-
-
Migrate Content Server URLs
-
If enabled – allows Livelink URL objects to be migrated as SharePoint HTML objects which reference the same destination URI.
-
-
Migrate Content Server Task Lists & Tasks
-
If enabled – migrates the task objects as SharePoint lists.
-
-
Enable File Size Limit
-
If enabled – warns (Analysis Wizard) and prevents the migration of documents that exceed the limit you specify here in MB or GB.
-
If disabled there is no limit for file size beyond what SharePoint will allow and accept.
-
Please Note
Mapping Created/Modified “Date” and “By” fields does have an impact on performance, please ensure you are migrating the fields that are most important to your organization.
Modified By and Date Impact to Document Versions
If you are enabling preservation of Livelink Modified By and Date Fields and your SharePoint destination library has versioning enabled. Please be aware that one result of preserving the Modified By and Date Fields are that an additional version is added as a record that the Modified By and Date field was changed. So if in Livelink you had 3 versions of a document, when migrated to SharePoint it would show 4 versions because SharePoint would interpret the modified by and date field setting to register as another version. This is by design in SharePoint, as any metadata update usually is registered as a new SharePoint document version.
Creation Dates and Records Management Considerations
Please note for Records Management considerations – your organization may require that Content Server Create Dates are maintained. This is because some Record Disposition processes key off original document creation dates.
Server Time Zone Differences
Please take special note of your Content Server and SharePoint time zone settings, particularly when using this tool to migrate to SharePoint Online. As different servers may have different time zone setting there may be issues between the times displayed in (source) Content Server and the (destination) document or folders dates in SharePoint. This can happen when the server time zones are set to a different time zone.
When doing a test migration you would see a time difference when migrating between a source server (Mountain Time) to destination server (Pacific Time). The document would be migrated to the destination location but the original created date/time and modified date/time may be off by N hours according to the timezone difference.
To fix this - you can set the offset by reviewing + changing the config file located at - program files (x86) > Gimmal > Content Server to SharePoint migrator > csmigratortosp.exe.config > locate the key="TimeZoneDifferenceHrs" value="0", change value to N hours offset as required. Close and re-open the migration tool to ensure the time zone differential is loaded so that the migration area migrates with the correct created and modified time.
5.7 Restructuring
The Restructuring tab functionality is optional.
If the restructuring of content flag is enabled, it allows the migration analyst to restructure the folders dynamically in the migration tool profile.
If the restructuring of content flag is disabled the migration will use the existing folder structure from the source destination.
In the cases where the migration analyst needs to restructure the folders for the target destination – this tab provides the functionality to move, rename and exclude folder content within the profile without changing the Content Server source.
Revert to Source
When enabling this function – at any time you can revert to the Content Server source by clicking “Revert to Content Server”. When you save your restructuring changes they are saved locally to the migration profile, they are not saved in Content Server nor are the changes (moves, renames) made in Content Server. There are no modifications made to Content Server.
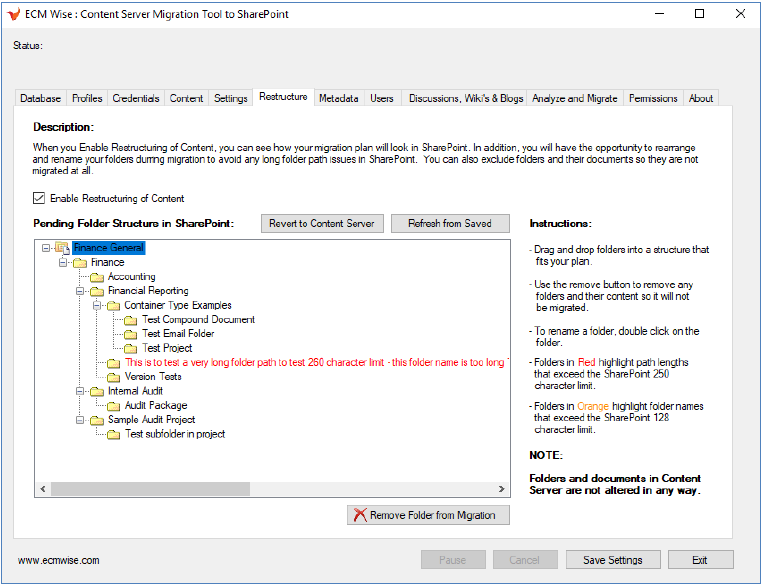
Restructure Folders
If a folder name is shown in red that means it exceeds the SharePoint folder name length limitations. You should rename the folder to fix this issue.
It is possible to rename a folder dynamically in the migration profile by right-click, left-click on a folder name and typing in the new name.
It is possible to move folders by dragging and dropping them within the tree view interface.
It is possible to exclude a folder and it’s content by clicking the “Remove Folder from Migration” button. This will remove the folder from the migration profile’s restructuring tree view.
If at any time you need to revert your planned restructuring changes during planning phase – just click the “Revert to Content Server” button. This will revert your migration profile restructuring view back to the original source Content Server folder structure. You will lose all of the in migration profile restructuring changes.
At any time when you are satisfied with your changes you can click “Save Settings” which saves your changes to the migration profile.
Best Practices
As best practice we recommend migration of “like” for “like” and avoid restructuring content on the fly to keep things simpler for migrations. If you absolutely must restructure – it is often best practice to do so in the source system prior to migration. This functionality supports restructuring on the fly without changes to the source structure.
Please use care when restructuring. You should never restructure and perform a delta migration once the migration has already run and completed - because if you restructure post migration and attempt to perform a delta migration that could break things since the document is going to a different location it may duplicate those items since you are choosing a new folder structure.
Restructuring should be done very close to when a group is ready to migrate to avoid missing any changes in the folder structure. If new folders are added after the restructuring has taken place - they will not be captured since there were new additions since you did the restructuring - so if you must use restructuring you would do so when you are almost ready to migrate to minimize/prevent late changes.
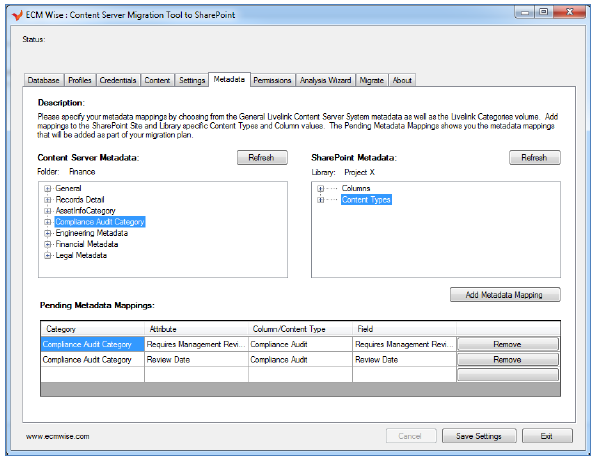
5.8 Metadata
The Metadata tab allows the migration administrator to specify the source Livelink metadata that can be mapped to the destination SharePoint metadata (which is loaded based on location – from the Site). The mapping of metadata is optional and is usually defined in a Migration Specification document for the specific migration area.
In Livelink – metadata is available via:
-
General
-
Represent general Livelink System metadata that is available for all documents
-
Document Name
-
Document ID
-
Description
-
Created By
-
Created Date
-
Owned By
-
-
Parent Container Name
-
Content Server Path
-
-
Records Detail
-
Records Management related metadata are available here (optionally if you specified RM Web Services to be enabled from the Connections tab).
-
-
Categories (attribute values)
-
Categories are displayed from the Livelink system categories volume (if a migration area is using local Categories you need to make sure the Category is available from the system Categories volume).
-
In SharePoint – metadata is available via:
-
Columns
-
Content Types
To add a metadata mapping:
Browse the Livelink source metadata and browse the corresponding SharePoint metadata you wish to map a value to. When you wish to add a metadata mapping please click the “Add Metadata Mapping” button. This will take the mapping fields and add it to the Pending Metadata Mappings. You can remove mappings by clicking the “Remove” button. When you have mapped all the metadata you can click “Save Settings” to save your Migration Profile settings for later use.
Additional Metadata Considerations
-
Use of multiple content types is supported as of version 1.5.1.1
-
When mapping to multiple content types:
-
If a document in Content Server does not have the Livelink Category mapped to a specific Content Type – then the Content Type is not applied on the source document in SharePoint
-
If a document in Content Server does have the Livelink Category mapped to a specific Content Type – then the Content Type is applied on the source document in SharePoint
-
-
-
Please note when mapping Content Server Holds metadata to SharePoint sites columns or Content Type columns – there is an additional performance hit as Holds require additional calls to retrieve the metadata for transferring. Please use caution when mapping Hold related metadata, using it only when it is required to ensure your migrations are optimized.
Applying Default Values
It is possible to apply default values for metadata values during the migration from Livelink to SharePoint.
The default value specified must match the allowable values for the column in SharePoint whether it is a text field, drop down list, user field or managed metadata value.
Use cases
If you wish to apply a default value to a column value in SharePoint regardless if a Category attribute is mapped or not
-
Use the General > New Constant Value and select the column in SharePoint you wish to map to and click “Add Metadata Mapping”
-
This will allow you to specify a default value constant that will be applied regardless if a category attribute is mapped to that column or not
If a Category is applied to the source objects and you wish to specify a default value if a value is blank
-
Please select the Category – attribute and map to the column in SharePoint by clicking “Add Metadata Mapping”
-
In the Default Value field provide the default value that will be applied when a blank value is encountered
-
The document must have the Category applied for it to receive the default value
-
A workaround in this case is to ensure the Category is applied to the desired parent and child structure
-
Otherwise use the constant value option described above
-
Please remember when using constant values they will always override the default values.
5.9 User Mappings
User Mappings allows one to optionally set mappings for users from Livelink to destination SharePoint user.
Please note:
-
User mappings only apply to the “Created By” and “Last Modified By” fields in SharePoint.
-
You would want to enable and use this functionality when you have users in Livelink that no longer exist in SharePoint and you want to remap Livelink users to specific SharePoint users.
-
The User Mappings apply to the current Site Collection and will be re-used in any profile targeting the same Site Collection.
Best practice:
-
Only use user mappings when you really want to map specific Livelink users to specific SharePoint users. All other cases just use the default migration user mapping behaviour.
By default, if you do not enable User Mappings – users are automatically mapped across if the Active Directory account names are the same between Livelink and SharePoint. If a Livelink user does not exist in SharePoint then it will be migrated over as the provided SharePoint Service Account name from the Credentials tab.
If you enable User Mappings – and a user exists in both Livelink and SharePoint they will automatically be mapped – same as before (represented by a green check). If a user doesn’t exist in SharePoint but exists in Livelink, then you have the option to map that user to a new SharePoint user via the Users mapping tab functions. Likewise, it is possible to set a Default User, the default user specified will be used for users from Livelink that do not exist in SharePoint. If no Default User is specified it will default to the SharePoint Service Account name from the Credentials tab.
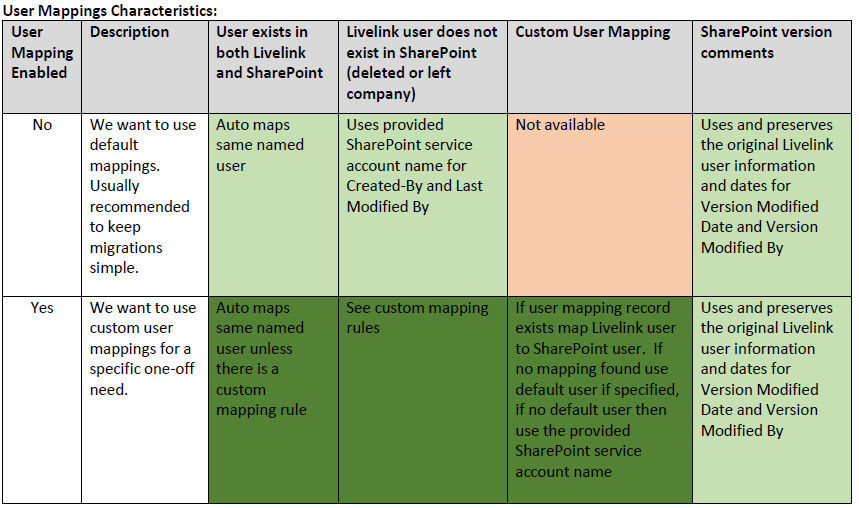
If you are preserving modified by and date values from Livelink document versions - each version from Livelink will have it’s modified by and modified date preserved in the document Comments field in SharePoint. The original modified by user is preserved regardless of user mapping. For example if “chasev” had originally added version 1 of the document – in SharePoint version 1 comments would indicate “chasev” regardless if the user no longer is at the company (not in Active Directory) or if the user is mapped from “chasev” to “briang”. This is done to maintain the historical comments on versioning for audit purposes.
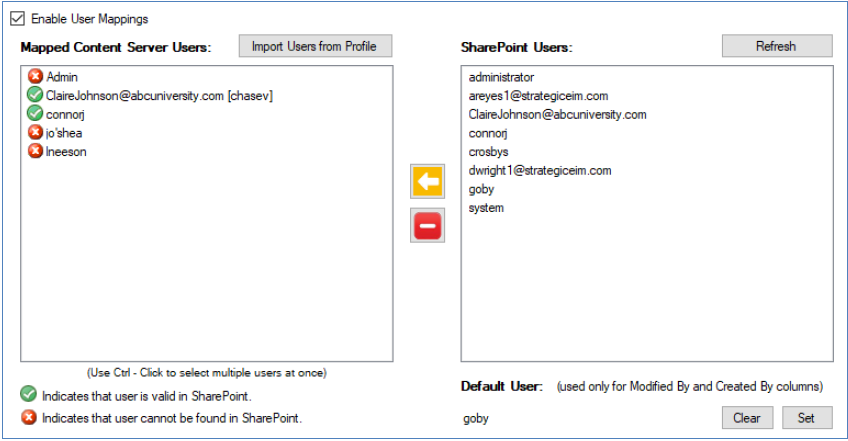
How to use User Mappings:
-
Check Enable User Mappings
-
Click button to Import Users from Profile – this will refresh the list with all the users from the Livelink folder area encountered.
-
Please use care as for large areas it may take a long time to itemize all the users found. For example running this against the Enterprise Workspace is not recommended as it could run for hours.
-
You would want to do this for every new folder area to ensure the full user list is available.
-
-
The SharePoint Users List displays the available users in the SharePoint Site Collection for mapping.
-
You can create a mapping by selecting user(s) from Mapped Content Server Users list and select a user to map to in SharePoint Users and click Map Button.
-
Remove a mapping by selecting Livelink user(s) from the Mapped Content Server Users list and clicking Remove Mapping Button.
-
You can set a default user by selecting user in SharePoint Users list and clicking Set button under Default User section
5.10 Wiki’s, Blogs and Discussions
As of version 1.2.X, support has been added to allow migration of Content Server Wiki’s and Blog’s to SharePoint. This means migrations can support direct migration of Blog or Wiki content respectively from Content Server to SharePoint Discussion Libraries and Wiki Libraries respectively. As of version 1.5.1.1, support has been added to allow migration of Content Server Discussions to SharePoint Discussion Libraries.
5.10.1 Livelink Wiki’s
This section is applicable only if Livelink Wiki’s (Livelink Wiki Module) are used and are required for migration to SharePoint. Using this migration functionality would enable the migration of Livelink Wiki content from Wiki’s to SharePoint Wiki Libraries.
General Settings
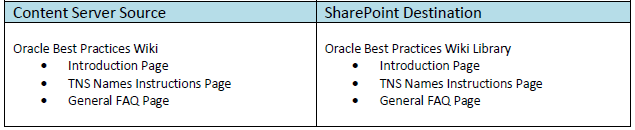
Take for example the following migration scenario below – where we encounter a Wiki for Oracle Best Practices and we migrate to the same named Wiki Library in SharePoint (using Wiki migration option 3):
Several options are supported for Destination Configuration (as displayed below):
-
Option 1 is to choose an existing Wiki Library in SharePoint to contain all migrated wiki’s from Content Server.
-
Option 2 is to create a new Wiki Library in SharePoint to contain all migrated wiki’s from Content Server.
-
Option 3 is to create a new Wiki Library in SharePoint for every corresponding wiki from Content Server.
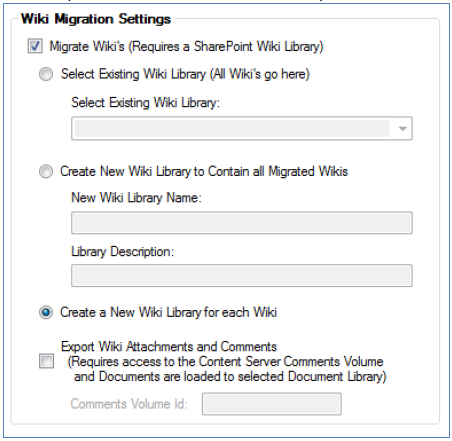
Additional Settings
It is possible to have Attachments and Comments in Content Server Wikis that may need to be migrated. If you wish to support the migration of Comments and Attachments you must specify the Comments Volume ID. If you do not specify this option only the Wiki pages themselves are migrated and not the Comments or Attachments provided by commenters.
To determine the Volume ID for your Content Server Comments Volume you would need to run the following SQL command and provide the DataID for use as your Comments Volume ID.
SQL Query:
select dataId from dtree where name='Comments' and subtype in (346, 347)
Additional Wiki Migration Notes
Supported for migration are static content within Wiki pages as well as the original creators (if user exists in SharePoint) and creation / posting dates.
Please note the internal Wiki page links are not currently preserved as only the Wiki’s static contents are preserved in a migration. Wiki administrators will need to re-populate page links within Wiki pages with the correct uri’s post migration.
5.10.2 Livelink Blogs and Discussions
This section is applicable only if Livelink Blog’s (Livelink Blog or Communities Modules) or standard Discussions are used and are required for migration to SharePoint. Using this migration functionality would enable the migration of Livelink Blog content from Blog’s and/or Discussions to SharePoint Discussion Libraries.
General Settings
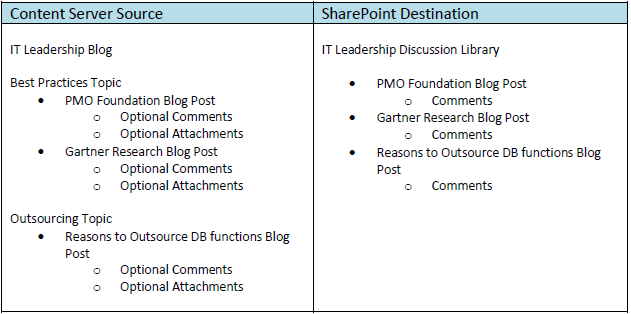
Take for example the following migration scenario below – where we encounter a Blog for IT Leadership where we migrate to the same named Discussion Library in SharePoint (using Blog migration option 3):
Several options are supported for Destination Configuration (as displayed below):
-
Option 1 is to choose an existing Discussion Library in SharePoint to contain all migrated blog’s from Content Server.
-
Option 2 is to create a new Discussion Library in SharePoint to contain all migrated blog’s from Content Server.
-
Option 3 is to create a new Discussion Library in SharePoint for every corresponding blog’s from Content Server.
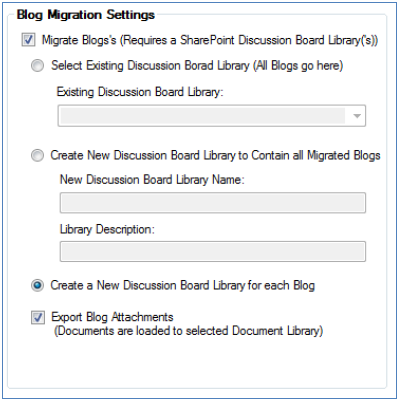
Additional Settings
It is possible to have Attachments in Content Server Blogs that may need to be migrated. If you wish to support the migration of Attachments you must enable this option. They are migrated to the overall destination Document Library.
Additional Blog and Discussion Migration Notes
Supported for migration are static content within Blog pages and Discussions as well as the original creators (if user exists in SharePoint) and creation / posting dates.
5.11 Analysis Wizard (Analyze Migration Plan)
The Analysis Wizard is a feature that migration administrators can leverage to validate or plan a migration and to identify potential migration issues prior to actually running the migration. It can be a crucial step in the analysis and planning of your migrations.
The Analysis Wizard is not intended to identify all potential issues, as some issues can only be identified during staged migration testing. Gimmal recommends that test migrations are also done in a near production level staging environment to ensure all migration issues are resolved prior to conducting the production migration.
The Analysis Wizard can produce:
-
A summary of the migration metrics of
-
# of documents
-
# of versions
-
Total size on disk
-
Total # of folders
-
-
Alert on preventing migrating versions to a library that doesn't have versioning enabled
-
Identify long folder and document names (> 260 characters total before domain)
-
Identify Metadata incompatibilities or missing metadata warnings
-
Livelink metadata that is applied to documents and is not mapped to SharePoint
-
Required SharePoint metadata that is not mapped to
-
-
Warning on checked out items from Content Server
-
Warning on documents with missing mime-types from Content Server
-
Warning on special folder names in SharePoint
-
Warning on duplicate file names (when collapsing folder structures)
-
Warning on document libraries or folders that have more than 5000 items contained within
-
Warning on permission group creation for destination locations with Inherited Permissions (sub site or library)
-
As this may be a security loophole to create a new group at a Site level granting unintended permissions
-
-
Automatically will correct for invalid characters in SharePoint (applicable for Site Names, folder names, and files names) and replacing with valid character (underscore)
-
Tilde, number sign, percent, ampersand, braces, backslash, colon, angle brackets, question mark, slash, pipe, quotation mark
-
-
Warning or errors detected for supporting migration of Blogs or Wikis from Content Server to SharePoint
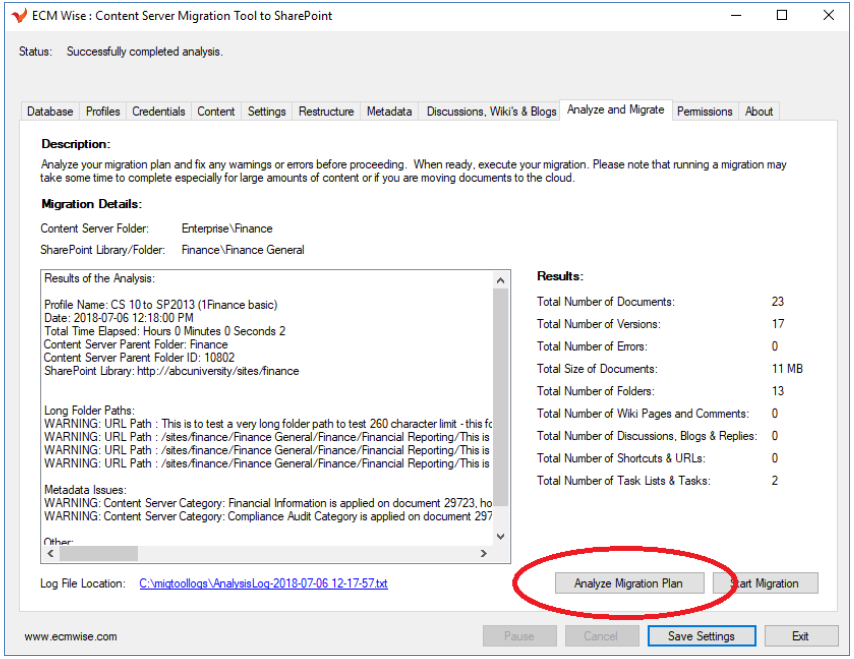
Please note that it may take some time to run the Analysis Wizard if the migration plan is quite large. You can cancel the Analysis Wizard operation at any time by clicking the “Cancel” button.
The Analysis Wizard results can be written to a log as specified in the Log File location. This would allow further analysis by other migration team members to rectify any potential warnings or errors before testing migrations further.
5.11 Migrate
The Analyze and Migrate tab allows the migration administrator to run the actual migration step based on the Migration Plan specified by filling out and working on the previous tabs.
At this point you would have likely already performed your Analysis Wizard step (Analyze Migration Plan from previous section), corrected any identified issues, and successfully ran a test migration to a staging environment with no further issue prior to being ready to migrate to production.
To run a migration, click “Start Migration”.
Please note that it may take some time to run the actual migration plan if it is quite large.
If possible please plan / organize your migrations into smaller sized migration groupings to ensure best performance and management. You can cancel the Migration operation at any time by clicking the “Cancel” button. You can pause a Migration operation at any time by clicking the “Pause” button.
Please note that it is up to the migration administrator to manually delete the cancelled migration items from SharePoint.
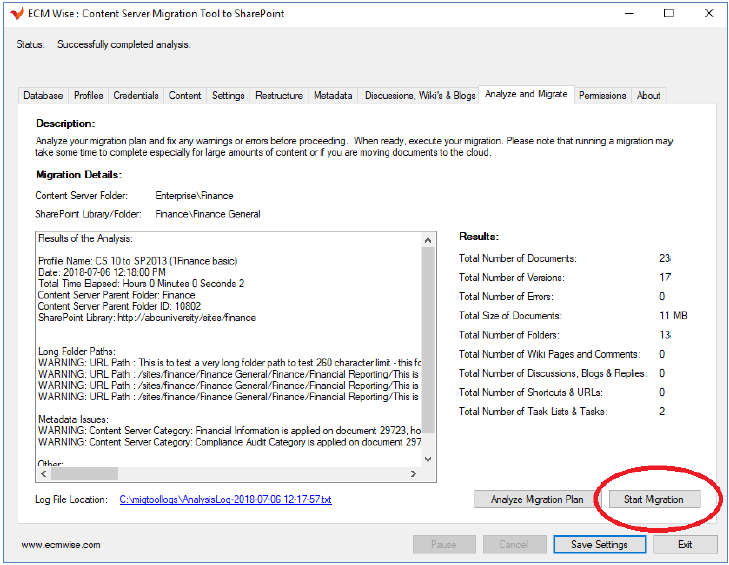
The Migration step will create a detailed log file identifying what was migrated and the status, as well as a summary showing total items migrated successfully. This migration audit log can be used for your migration team’s validation purposes as well as saved as proof of migration once the migration is validated and signed off as completed.
Please use care when pausing a migration, as any changes that are made to the source or destination structures could potentially result in potentially adverse impact to the migration when it resumes. Generally speaking you would want to perform a pause if you needed to temporarily stop a migration and resume within a short period of time.
Freeze Source Locations Prior to Migrating
It may be beneficial for migration team to consider or plan to freeze the source locations from further edits, changes or additions prior to migration. This will ensure all items are up-to-date prior to and during migrating to SharePoint. When the migration is completed a best practice would be to leave the freeze on for a set number of days to validate the migration, once the migration is deemed to be successful the frozen source location in Livelink can be deleted or archived.
Re-running a Migration
If for some reason you need to run a migration again - in case of a failure, or if someone added a new document to the source structure, you may re-run the migration with the Skip Document if Already Exists flag from the Content tab is enabled.
This will ensure all existing documents are not touched, and only the new document or failed documents will be migrated. This setting will greatly reduce the time to re-start a migration that was manually stopped-in-progress, or due to error or other stopping conditions – this is because existing documents will not be re-downloaded and re-created.
Please use caution when re-running a migration with this flag enabled.
If a complete re-migrated is desired, we would recommend deleting the destination contents and re-starting the migration from scratch.
Delta Migration Considerations
It is our best practice and recommendation to freeze a folder structure prior to migrating. In the case that this is not possible than use of delta migrations can be implemented at Clients own risk. We caution against delta migrations due to the nature of potential cases for deleting objects and adding new objects that would compound migration complexity. When re-running a migration where Skip Document if Already Exists flag is enabled is that it will account for some common delta migration use cases. If an object is new it will be migrated, if a document is found to have been updated with a newer modified date in Content Server versus SharePoint - the corresponding document in SharePoint will be deleted and re-added from Content Server. Deleted objects from Content Server are not accounted for in a delta migration.
Additional Migration Considerations
If you manually backout a migration and delete the contents in SharePoint or re-run a migration and create duplicate documents, the link redirector will replace the links or have invalid links in the case of deletion. If you need to delete an entire area that has been migrated, you must either delete those records from the link redirector or re-run the migration which will put in the new location for the original documents.
Please use caution when deleting migrated documents and folders where link redirection was enabled to avoid breaking the mapped historical links unintentionally. To rectify orphaned mapping links one would need to manually delete the links to the documents that were migrated but deleted from SharePoint, or re-run the migration on the content which would replace the mapping entries with valid mappings.
Please use caution when re-running a migration in the case of migrating the same content (documents and / or folders) to another area which will duplicate the content - resulting in the link redirection mapping records pointing to the latest locations and orphaning the originally migrated and now duplicated content. Support for duplicating content using the migration tool with regards to keeping historical link mappings is not supported. If there is a real business need to migrate the same content to different areas, link re-direction would either need to be disabled or manually populated by the migration administrator.
Please take note of the maximum supported file size for SharePoint when conducting your migrations. It is possible to store documents up to 2GB in size for SharePoint and it is supported by the migration tool, but it is not recommended. Please work with your SharePoint administrators to ensure your Livelink maximum file sizes fall within the expected range for best performance in SharePoint.
5.12 Apply Permission Mappings (optional)
The application of original Content Server Groups and Permission Mappings to SharePoint is optional.
If used, the applying permission mappings step is meant to be done post migration and requires the folders to be created in SharePoint as part of the migration.
Permission mapping is meant for migration of Folder level permissions from Content Server to SharePoint.
Document level permissions is generally not recommended approach for maintenance of permissions and is deliberately not included in scope here. Furthermore we follow industry best practice in use of Groups to control application of access control permissions, and as such we only apply Groups to folder permissions in SharePoint and not individual users.
5.12.1 Permissions Model Considerations
There are several schools of thought to consider when considering migrating content from Livelink to SharePoint with regards to permissions transfer.
Please consider the implications and benefits of the following approaches:
Largely replicate Content Server groups and permission schema + access control list mappings to SharePoint
Description:
Content Server will likely contain a large number of custom groups that are used throughout the Enterprise structure used to grant access control. These groups likely have undergone many changes over the years and often times include team members who should no longer have access due to role changes. Likewise organizational and naming changes may have occurred which would impact the usefulness of the group names and sub group nesting that would be historical in nature but largely invalid and in non-compliance with regards to conducting a security audit. Often times the groups are not applied in a consistent fashion meaning the name of the group would also conflict with the permission or access control granted.
Migrating these groups “as is” along with access control settings to SharePoint would reap the following pros and cons for your consideration.
Pros:
-
Less analysis required – because we just migrate as is
-
If a specific user had access in Livelink to a specific area they will still have the same access in SharePoint
Cons: -
Analogy of garbage in = garbage out, managing unruly groups in SharePoint could be messy
-
Mapping of access control rights from Content Server to SharePoint is not 100% overlapping since the security models are different – especially if Client is looking to collapse folders into metadata
-
Granting Site Administrative access in SharePoint to certain Content Server Group Owner groups or Group Owners may have unintended consequences since they may not actually require Site Administrative access in SharePoint but would be required in order to keep the same group permission granting authority
-
Miss an opportunity to clean up historical groups, membership and naming conventions
Re-architect permissions schema in SharePoint
Description:
SharePoint is likely a newer implemented System with fewer custom SharePoint groups that exist today and represents a clean slate opportunity.
Re-architecting a permissions schema in SharePoint is an option and opportunity to simplify permissions going forward for all users accessing documents.
Seeing as analysis is already required as part of migrations for business stakeholders - including a step to review and define new permission schema for a Site or Library in SharePoint, this would not add much overhead but reap the benefit of having a clean and up-to-date group membership. Likewise potential for re-using AD groups instead of custom SharePoint groups could further simplify management of group membership.
Pros:
-
Opportunity to enable simple and up-to-date permission groups
-
Opportunity to consider the concept of “open by design, closed by exception” which can greatly simplify future administration of permissions in SharePoint
-
Avoid need to migrate large number of Livelink groups to SharePoint
-
Avoid historical user membership in groups which may be non-compliant for security audit purposes
-
Avoid historical group naming conventions that may be out of date, misleading or incorrect
-
Avoid pitfalls of Content Server Enterprise level permission groups being inherited inadvertently (historical artefact)
Cons:
-
IT governance members required to define new permissions schema
-
May require additional analysis and signoff with the business to define permissions schema for each migration group and area
Gimmal’s recommended approach on permissions is to consider option to re-architect permissions schema in SharePoint.
Please Follow Permission Management Best Practices
We recommend following best practices when managing permissions in SharePoint. For example it is best practice to assign permissions to groups and add users to those groups rather than granting permission directly. If the default groups do not suit your needs, you can create new groups. Often new groups will be created if you want to restrict access a list or library.
5.12.2 Best Practices for Permissions in SharePoint
As a best practice and recommendation most organizations migrating from Content Server to SharePoint would implement a new Information Architecture for security in SharePoint and inherit those permissions.
Best practice – Gimmal based on experience enabling successful migrations – we recommend re-architecting permissions in SharePoint versus preserving source permissions
A few reasons why it is against best practice to NOT migrate permissions from Content Server to SharePoint, since Content Server source permissions:
-
Departments have re-organized and group naming is out of date
-
Out of date group membership
-
Users have changed groups
-
Users have left company
-
Poorly named groups
-
Mismatch of groups and permissions
-
Incorrect nesting of permission group and membership
In summary migrating the Content Server source permissions (via groups and access control settings) only perpetuates a security maintenance problem and can make it very difficult to administrate from the SharePoint perspective.
In the case that an organization has somewhat clean permissions and wishes to preserve original source permissions it is indeed possible by using the Permissions mapping functionality provided in the Content Server to SharePoint Migration Tool.
The Permissions functions are intended to be used post migration to map and apply the permissions from Content Server to the new structure in SharePoint. For select cases migration (ex. Human Resources – confidential information) you can use this functionality hybrid to preserve the source permissions only where required to achieve best of both worlds.
5.12.3 Display and Review Content Server Source Permissions
When your migration is completed, you may display and review the original source permissions and access control lists from Content Server. This will give you an idea of where permission inheritance is broken in Content Server and how the corresponding group mappings permissions can be applied. Any folder shown in purple means there is unique permissions at that level.
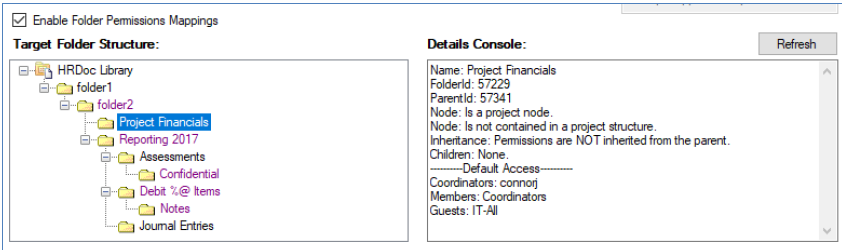
Large folder structures can take a long time to load and display - due to the intensive processing required to analyze and display the permissions of the entire folder structure. Please use care when you intend to view the permissions of a large folder area. It may take several minutes or longer to load if there are many folders to process.
If restructuring of folders via renaming, or moving folders was done from the Restructuring tab step – the original source permissions may not be displayed here. Please use care when modifying folder paths and when you wish to preserve source permissions.
Folder Restructuring Rules and Impacts:
-
If folder permissions for a folder object were originally inheriting it will still inherit from the parent (whatever the existing or new parent may be based on restructuring)
-
If folder permissions for a folder was unique it will keep that setting (purple named items) – meaning the folder will keep its original permissions from Content Server whether it is restructured to a new folder area or if it remains in its existing parent folder structure
-
At the top entry level folder where Content Server contents are migrated to – the original Content Server root node permissions are used regardless if restructuring is done to the top node
5.12.4 Map Content Server Groups to SharePoint
From the group mappings interface, you can map the source Content Server user or group to a SharePoint group – existing or new.
If you wish to map the item to an existing SharePoint group you would need to click the Select SP Group button to select from the available groups.
If you wish to create new groups in SharePoint – you will need to fill in the SharePoint Group column, or click the Generate Default Group Name button, this will pre-fill out the group names with the original Content Server group name (the group name must be unique to the SharePoint site collection).
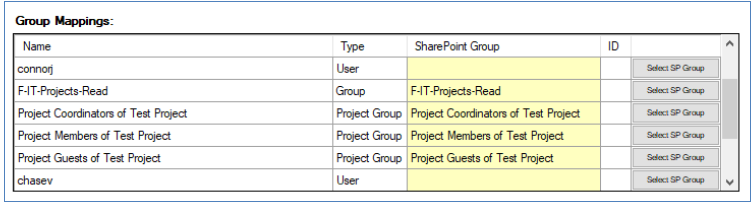
If you have nested groups within Content Server, the group mappings functionality will automatically load the users and any groups members contained in the immediate groups. This recursive group membership only goes 2 levels deep. For example: if you had a group called F-IT-Projects-Read containing F-IT-Projects-Edit, the tool will load all users in F-IT-Projects-Read and all the users contained within F-IT-Projects-Edit, but not any deeper groups contained within F-IT-Projects-Edit – such as to avoid circular references.
5.12.5 Create Groups
After you have set your Group Mappings the next step would be to apply your mappings in SharePoint. To create the SharePoint Groups and apply membership to existing SharePoint groups please click the “Create Groups in SharePoint” button.
A corresponding log file (“…Permissions Create Groups…”) will be generated listing the groups created, and a full listing of the users added to the groups.
Please note when creating groups if you enable the check box “Generate PowerShell script” – the group creation steps are generated to user editable PowerShell scripts for application in SharePoint at a later time via PowerShell. This is useful if you wish to further customize the permissions manually. If you disable this option – the groups will be created dynamically in SharePoint immediately. If you do use this function to create SharePoint groups we recommend that you create the groups dynamically by unchecking the PowerShell option.
5.12.6 Apply Groups
After you have created and set up your SharePoint Groups + User membership - the next step would be to apply the groups according to the Access Control Lists from Content Server.
Please note when applying permissions to the folders in SharePoint if you enable the check box “Generate PowerShell script” – the group permissions application steps are generated to user editable PowerShell scripts for application in SharePoint at a later time via PowerShell. This is useful if you wish to further customize the permissions application manually. If you disable this option – the group permissions application step will be applied dynamically in SharePoint immediately. If you do apply group permissions we recommend that you apply group permissions dynamically by unchecking the PowerShell option.
The Content Server to SharePoint Migrator automatically maps over the corresponding access control levels according to the mapping below.
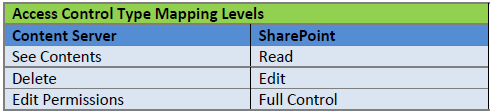
A corresponding log file (“…Permissions Apply to Folders…”) will be generated listing the groups applied to the specific library or folders.
Ex.)
Apply new permissions since inheritance is broken at:
https://yoursite.sharepoint.com/sites/finance/templates
Removed group: F-FIN-AP-Admin
Removed group: F-FIN-AP-Edit
Removed group: F-FIN-AP-Read
Removed group: F-Records Analysts-Read
Added group: Project Coordinators of Project Financials with the role: Full Control
Added group: Project Members of Project Financials with the role: Edit
Added group: Project Guests of Project Financials with the role: Read
A best practice is to copy your log files for permission creation and permission application and store those with your migration logs to preserve your proof of migration documentation.
6 Release Notes
6.1 Content Support for Migration (Subtypes)
The following are the supported content types for migration:
-
Supported Workspaces: Enterprise (141), Personal (142), Project (201), Custom Workspaces (customer defined)
-
Supported Object types: Document (144), Compound Doc (136), Email (749)
-
Supported Containers: Folder (0), Email Folder (751), Compound Email (557), Project (202), Community Library (3030202)
-
Other: Communities (3030201), Blog (356), Blog Entry (357), Wiki (5573), Wiki Page (5574), Aliases (1), Urls (140), Tasks (204, 206), Discussions (130, 134)
-
Metadata Related: Category metadata, Records metadata, General Tab metadata, Holds metadata, Physical Records specific metadata Via our custom Physical Object Load Scripts (please contact us for separate add-on tools): Physical boxes (424), Physical containers (412)
6.2 Content Type Organization
Support for Content Type organization by heading will be added in an upcoming release.
6.3 Using Multiple Migration Instances on a Single Destination Library
For a destination doc library, if using multi instances of the tool - your library should have require check out set to enabled for the duration of the migration to the destination as part of the process.
Behind the scenes, whenever a migration occurs, the tool automatically enables check-out to required so that metadata mappings do not invoke new version increment on each document (if you have 5 metadata fields to be mapped, each one could generate a new version – as SharePoint would consider the document being touched with the application of each metadata value, by requiring checkout this can be limited to the same version as the latest version uploaded to SharePoint).
So to avoid one of the migration instances targeting the same destination doc library from disabling check-out required while another migration instance is migrating to the destination doc library it is recommended to leave the default for the duration of the migration for the library to check out required.
Keep in mind error checking exists within that would re-enable the library to check-out enabled on subsequent documents with metadata and would continue to work as designed.
If not using multi-instance threads on a library, check out can either be enabled or disabled by default since the migrator automatically reverts the setting to it’s default original value on completion. Just in the case of multi instances, we need to maintain check-out required to yes to prevent the version metadata synchronization issue.
6.4 Managed Metadata Support Clarification
Support for mapping metadata values from Livelink to SharePoint managed metadata values is currently supported for Content Type destination mappings. Currently direct mapping a metadata value to a column mapping directly via metadata from Livelink to SharePoint managed metadata value is unsupported.
6.5 Common Warnings and Errors
Migration Log File Error
Error Message: 500 Internal Server error
Possible Cause: SharePoint SQL Server full.
Analysis Wizard Warnings
The analysis wizard tab can be utilized for planning, analysis and design phases for a migration area. The results of the Analysis Wizard may lead to actions to resolve the warnings and errors prior to conducting the production migration. In any case it may be worthwhile as part of the process to also perform a migration to staging areas prior to the production migration. You would want to resolve the Analysis Wizard actions prior to performing the staging migration.
We list out common warnings and errors and best practices for handling them in the following list:
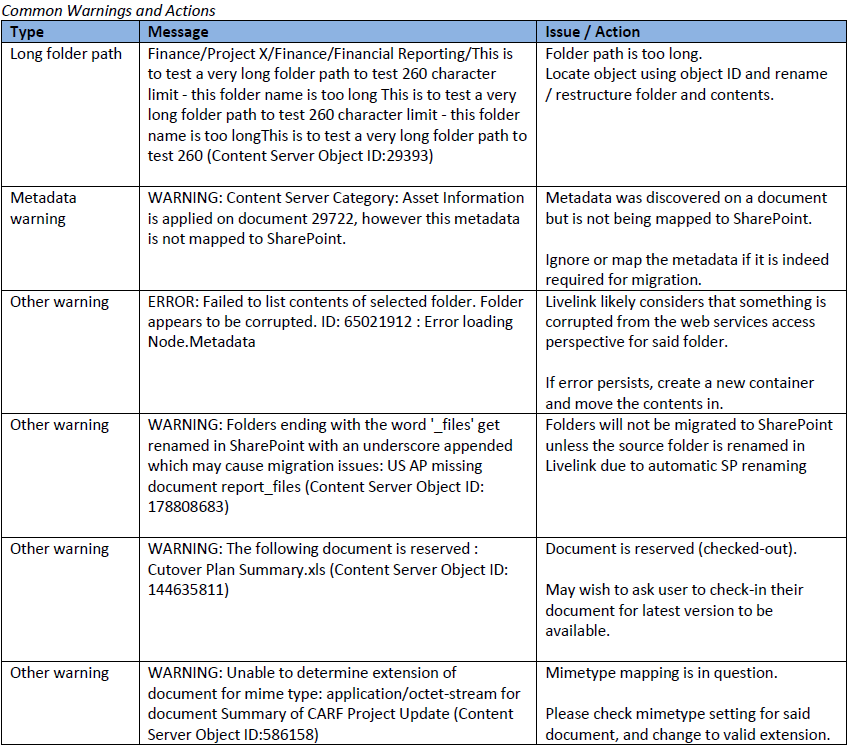
6.6 Metadata Versions
In the majority of cases migration users would only want to transfer the final metadata values from Content Server category attributes to SharePoint Content Type columns. This is the behavior of the tool by default.
There are rare cases where during a migration you may wish to capture metadata changes per Content Server document versions. This would be to see changes in attribute values over time. It is possible to enable transfer of metadata version history as part of the metadata migration if mapped.
As a best practice we do not recommend transferring metadata version information as there is little business value in general to capture this. Also keep in mind there is a performance hit when transfer the metadata version information because it does require further processing and retrieval. We strongly recommend you proceed with caution and ensure the need outweighs the performance hit.
To enable metadata version transfer please:
Modify the config file located at - program files (x86) > gimmal > Content Server to SharePoint migrator > csmigratortosp.exe.config > locate key="ApplyMetadataToVersions" value="false", change value to true as required. Close and re-open the migration tool to ensure the setting change is registered.