Appendices: Provisioning
Appendix A: List of Supported Features
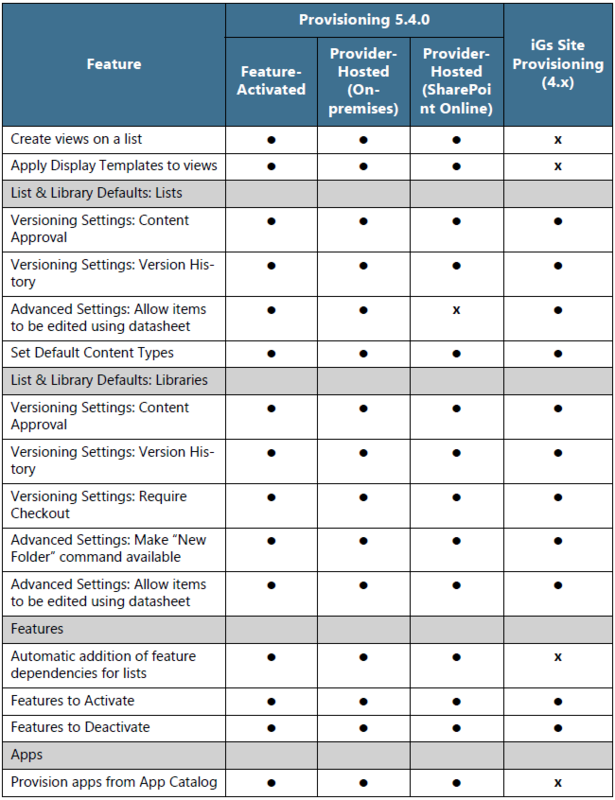
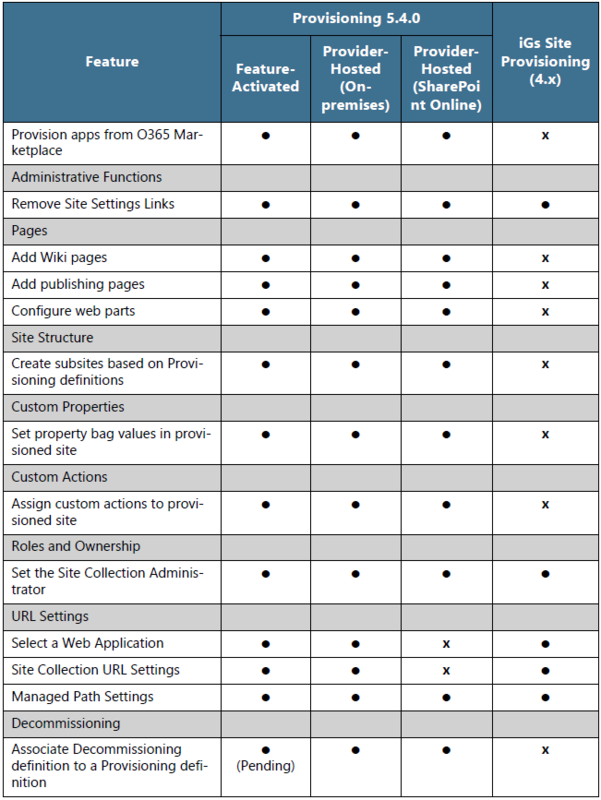
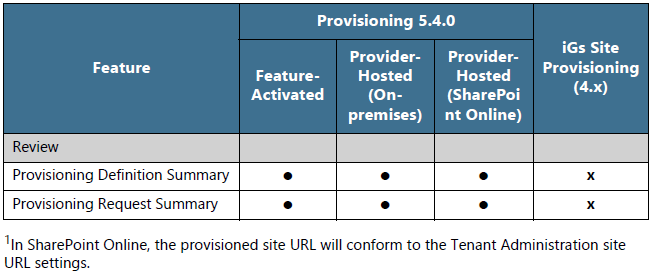
The following tables list the features available for the various Provisioning hosting options.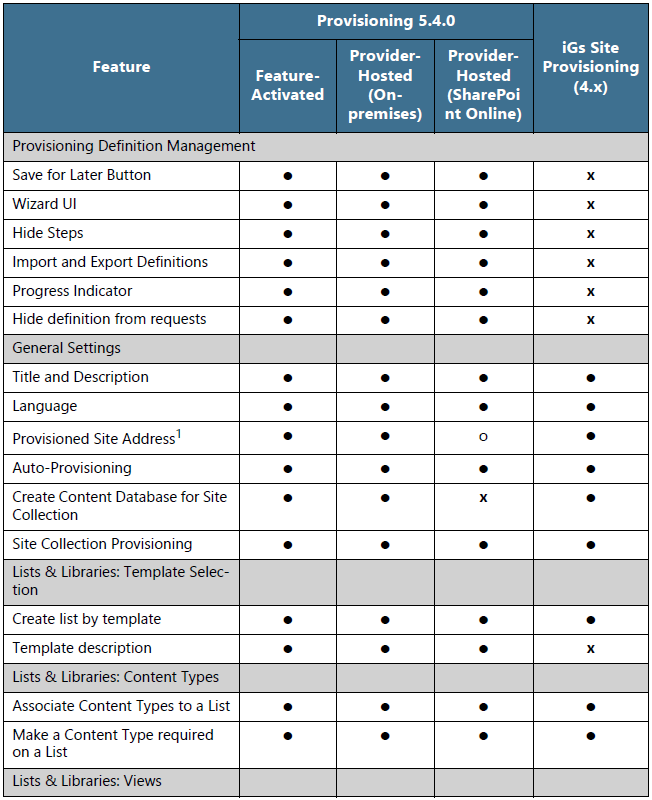
Appendix B: SharePoint Lists for Provisioning
The following table displays the SharePoint lists that are installed automatically to support the Provisioning process.
Title | URL Name | Description | Columns |
Gimmal - Web ApplicationRegistry | /Lists/GimmalWebAppRegistry | Registers web applications available for provisioning and also for establishing URL settings configuration |
|
Gimmal - Feature Registry | /Lists/GimmalFeatureRegistry | Registers features available for provisioning |
|
Gimmal - List Template Registry | /Lists/GimmalListTemplateRegistry | Registry for list templates available for provisioning |
|
Gimmal - Provisioning Requests | /Lists/GimmalProvisioningRequests | Shows provisioning requests, status, logging for errors |
|
Gimmal - Provisioning Definitions | /Lists/GimmalProvisioningDefinitions | Storage for provisioning definitions |
|
Appendix C: Governance Hub Resource Gallery
The Governance Hub Resource Gallery provides a central storage location for your global app resources/artifacts. The Provisioning Resource Gallery has two functions:
- Provisioning resources can be pushed down and used by your local provisioned sites
- Provisioning resources can be used to store common resources that the Provisioning user interface needs when provisioning sites.
This appendix contains information and/or procedures on the following Resource Gallery topics:
- How to access the Resource Gallery
- The types of Provisioning resources available in the Resource Gallery
- How to upload resource files to the Resource Gallery
- How to load Publishing page layouts to the Resource Gallery
- How to load custom actions to the Resource Gallery
Accessing the Resource Gallery
You can access the Resource Gallery from two locations in the Governance Hub:
From the Governance Hub Dashboard
- On the site where Governance Hub is enabled, navigate to Settings > Site Settings.
- Under the Site Administration section, click Governance Hub. The Governance Hub dashboard displays.
- Select Resource Gallery on the left navigation pane. The Resource Gallery page opens, displaying a list of resource folders for Provisioning and several other Gimmal applications.
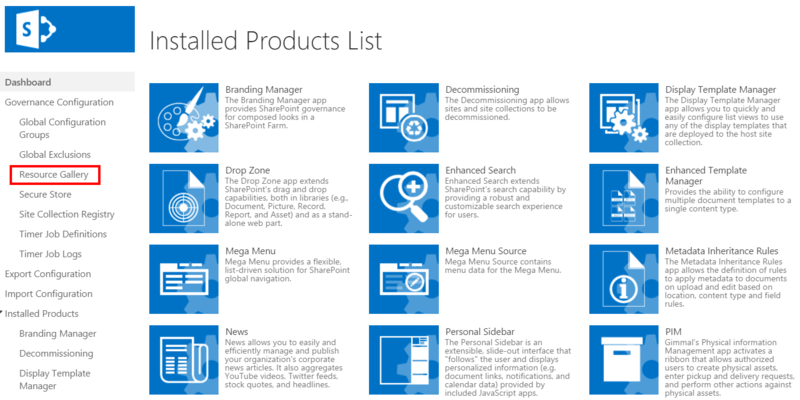
4. Select the Gimmal.Provisioning folder. The Gimmal.Provisioning Resource Gallery page opens, displaying a list of all of the available Provisioning resources.
From the Provisioning Settings Page
- On the site where Governance Hub is enabled, navigate to Settings > Site Settings.
- Under the Site Administration section, click Governance Hub. The Governance Hub dashboard displays.
- Under Products on the left navigation pane, select Provisioning. The Provisioning configuration page displays.
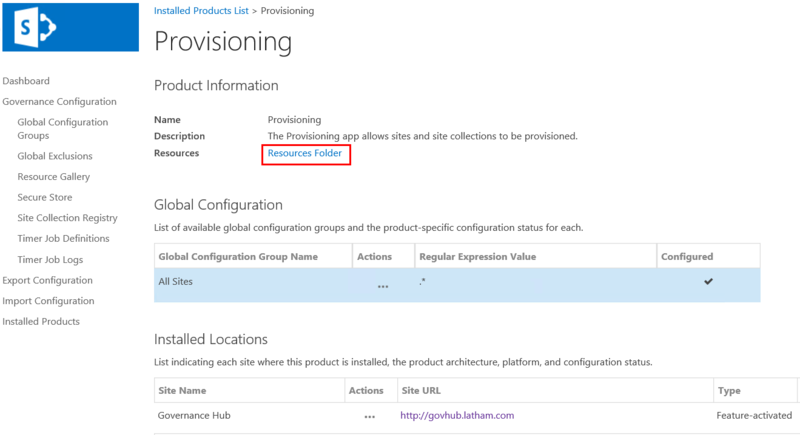
4. Click the Resources Folder link under the Product Information section. The Gimmal.Provisioning resource folder displays.
Provisioning Resources Available in the Resource Gallery
The following table lists the Provisioning resources that are available in the Resource Gallery. Where indicated by an asterisk, several of the resources have caveats listed in the sections below the table.
Resource | Uses Resource Gallery? |
General Settings | No |
Lists & Libraries | No |
Views* | Yes |
List Defaults | No |
Library Defaults | No |
Content Type Defaults | No |
Features | No |
Add Ins | No |
Administrative | No |
Pages** | Yes |
Web Parts*** | Yes |
Site Structure | No |
Property Bag | No |
Custom Actions*** | Yes |
Roles & Ownership | No |
Views
- The Display Template section appears in the Provisioning Definition wizard only if the Display Template Manager Add-In is added to the same site where Provisioning is added.
- List View Display Templates are located in the Gimmal Resource Gallery under the Gimmal.Provisioning/Display Templates/List View Web Parts folder.
- There are currently no requirements for the Content Type for Display Templates.
Pages
- Publishing Page Layouts are added to the Gimmal Resource Gallery under the Gimmal.Provisioning/Page Layouts folder.
- Wiki Page Layouts are added to the Gimmal Resource Gallery under the Gimmal.Provisioning/Wiki Page Layouts folder.
- Publishing Pages use the Page Layout Content Type.
- The Wiki Page Layouts use the Page Layout Content Type.
- The Associated Content Type field is used to specify the Content Type to associate with the Publishing Page and the properties to load in the Provisioning definition when the Layout is selected. This is only relevant for Publishing Page Layouts. Wiki Page Layouts ignore this field.
- Changing the Page Type discards all Web Part configuration associated with the page.
- Adding Wiki Pages or Publishing Pages to a definition will add the Wiki Page Home Page or SharePoint Server Publishing Features respectively to the definition, since these are required to provision the pages.
Web Parts
- Web Parts are loaded in the Gimmal Resource Gallery under the Gimmal.Provisioning/Web Parts folder.
- Web Parts use the "Web Part Gallery" Content Type.
- The field "Group" is used to specify which Group the web part will show under in the Provisioning Definition interface.
- Lists in the Provisioning definition display under the Group List Web Parts.
- Web Parts can be dragged onto the different Web Part Zones.
- List Web Parts will display a dropdown for the View to use on the Web Part. The configured views for each List will be auto-populated from the Views created in the Views step for each list.
Custom Actions
- Custom Actions are added to the Gimmal Resource Gallery under the Gimmal.Provisioning/Custom Actions folder.
- Custom Actions use the "Custom Action" Content Type.
- The Scope field in the Custom Action should be either "Site" or "Site Collection". The value for this field will determine under which section the Custom Action will show in the Provisioning definition.
Uploading Resource Files to the Resource Gallery
The following Resource Gallery files are automatically pushed down to sites during the provisioning process:
- Web Parts
- Page Layouts
- Display Templates
- Styles
- Scripts
- Images
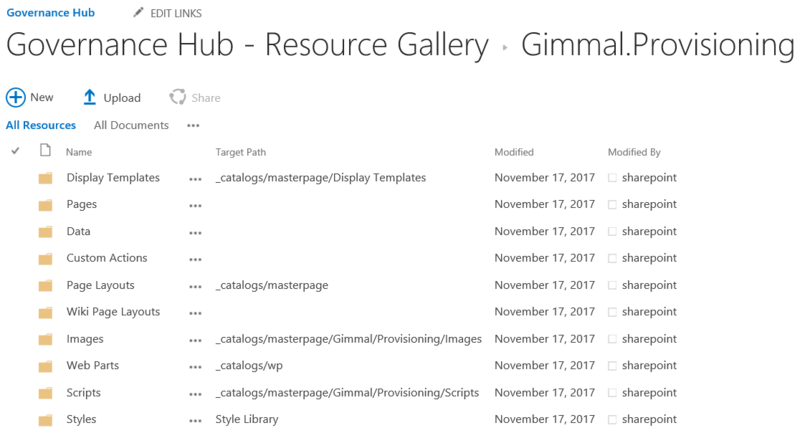
If you want to push down custom files to each provisioned site, you can add these files to the appropriate folder listed above. When the provisioning process takes places, these folders, and any custom files in them, will be pushed down to each provisioned site.
To upload your custom files, follow these steps:
- From the Governance Hub Resource Gallery, click the Gimmal.Provisioning folder. The Gimmal.Provisioning Resource Gallery page opens, shown above.
- Select the folder you want to add a custom file(s) to, for example the Web Parts folder shown below.
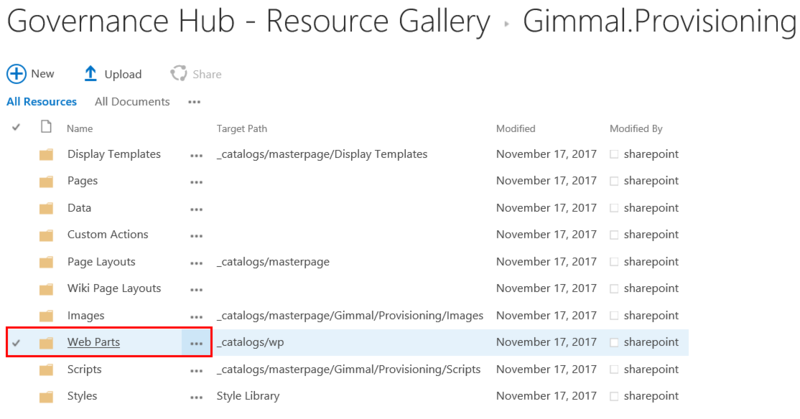
The Web Parts folder displays.
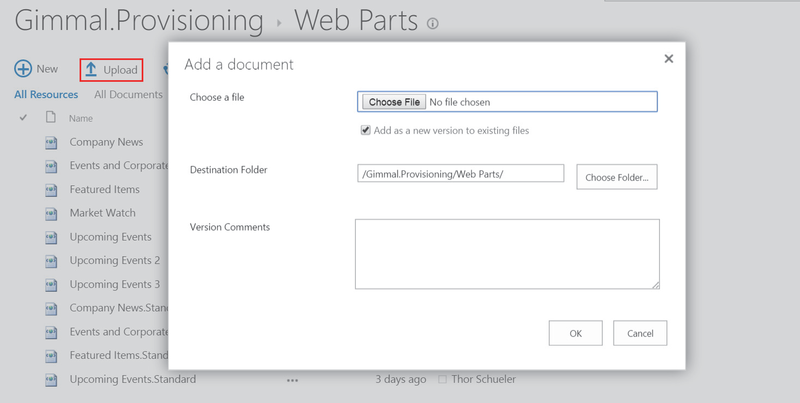
3. On the Web Parts folder, click Upload. The Add a Document dialog displays.
4. Select your web part file, the destination folder, and add any comments if desired.
5. Click OK. The file is uploaded, and then the document Properties dialog displays.
6. Enter any required information, and then click Save. The file displays in the Web Parts folder list.
The Target Path field is the location where your custom files will be pushed to. If a Target Path is specified on a subfolder, the contents of the folder will be deployed to that target path on the Provisioned site. If a Target Path is not specified on a subfolder, it will inherit the Target Path of the parent, plus the name of the subfolder.Do not change Target Paths on the root folders.
Uploading Publishing Page Layouts to the Resource Gallery
For publishing pages to function correctly in Provisioning, they must be created and added manually to the Resource Gallery so that they can be used in a Provisioning definition. For information on creating a new Publishing page layout, see Microsoft's documentation.
Publishing pages require the Page Layout content type. The Name and Title properties must be filled out. The file extension must be .wikilayout.
After you create a new Publishing page layout, you can upload it to the Resource Gallery by following these steps:
- Navigate to the Resource Gallery by following the steps in Accessing the Resource Gallery section at the top of the page.
- Select the Gimmal.Provisioning > Page Layouts folder. The Page Layouts page displays.
- Click Upload. The Add a Document dialog displays.
- Select the Publishing page layout file you want to upload, the destination folder, and then click OK. The new layout displays in the Page Layouts folder.
Creating and Uploading Custom Actions to the Resource Gallery
For Custom Actions to function correctly in Provisioning, they must be created and added manually to the Resource Gallery so that they can be used in a Provisioning definition. For information on creating a new Custom Action, see Microsoft's documentation.
Custom Actions require the Custom Action content type. The file extension must be .xml.
After you create a new Custom Action, you can upload it to the Resource Gallery by following these steps:
- Navigate to the Resource Gallery by following the steps in Accessing the Resource Gallery section at the top of the page.
- Select the Gimmal.Provisioning > Custom Actions folder. The Custom Actions folder displays.
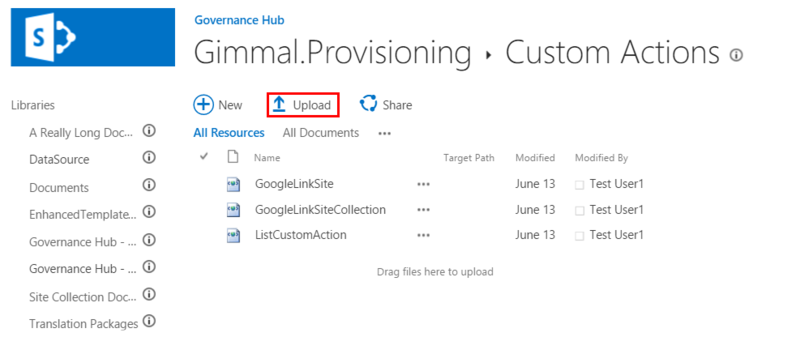
3. Click Upload. The Add a Document dialog displays.
4. Select the Custom Action file you want to upload, the destination folder, and then click OK. The file displays in the Custom Actions folder.
