
Appendix A: Updating Gimmal Job Scheduler Files
The following steps do not apply when using Azure WebJobs.
To update a component's scheduled job, you must copy its scheduled job files to the Gimmal Job Scheduler location on the server that is hosting the Gimmal Job Scheduler Service by following these steps:
-
Stop the Gimmal Job Scheduler Service by executing the following command in a command prompt or in PowerShell: net stop "Gimmal Job Scheduler"
-
Copy all files EXCEPT GovernanceHub.TimerService.exe.config (if it exists) from the <App Extract Folder>\Gimmal Software\Gimmal Job Scheduler folder and paste them into the Gimmal Job Scheduler Service deployment location*. Overwrite/replace any files, if you are prompted.
Do not overwrite your existing GovernanceHub.TimerService.exe.config file!
3. Start the Gimmal Job Scheduler Service by executing the following command in a command prompt or PowerShell: net start "Gimmal Job Scheduler".
You have completed the steps for updating a component's Gimmal Job Scheduler files.
Appendix B: Provisioning Pre-Installation Tasks
If you intend on using Provisioning to provision sites into a SharePoint 2013 or SharePoint 2016 on-premises environment, perform the following tasks before adding the Provisioning component to a site or before upgrading the component.
If you use Provisioning to provision sites into a SharePoint 2016 on-premises environment, you must install the Microsoft SharePoint Server 2013 Client Components SDK on each WFE in your farm before performing the following tasks.
Install/update the SDK and the Provisioning Timer Job
-
Follow the steps in Appendix C: Installing/Upgrading the Gimmal SDK (on a server that is part of the SharePoint farm, e.g. a WFE or App Server).
-
Download and extract the latest version of the Provisioning package to a temporary location (for example C:\Temp).
-
In the temporary location where you extracted the files, go to the <Extract Folder>\Gimmal Software\WSPs directory. You should see the WSP file "Gimmal.Provisioning.TimerJob.wsp".
-
Launch the SharePoint Management Shell window as an Administrator and run the Setup.ps1 file located in the <Extract Folder>\Gimmal Software\WSPs directory.
Run the Set-GovernanceHubProperties.ps1 script. (Initial install only)
If you installed the Feature-Activated version of Governance Hub, steps 1 - 4 have been done previously.
-
Open the SharePoint 2013 Management Shell as an administrator (right-click and choose Run as Administrator).
-
Run the Set-GovernanceHubProperties.ps1 script located in the <Extract Folder>\Gimmal Software\WSPs folder.
-
When prompted, enter the full URL to the site where Governance Hub was installed.
-
When prompted whether or not to perform a search crawl, ensure that you use lower case letters to make your selection.
Activate the Gimmal - Provisioning Timer Job feature (Initial install only)
-
After the script has completed successfully, navigate to Central Admin > System Settings > Manage Farm Features.
-
Verify that the Gimmal - Provisioning Timer Job feature has been activated. If it has not, then click Activate to activate it.
-
Navigate to Central Admin > Monitoring > Review job definitions to ensure the Gimmal - Provisioning Timer Job was created successfully.
Appendix C: Installling/Upgrading Gimmal SDK
If you are performing a new installation of the Gimmal Solution Development Kit (SDK), complete both sections. If you are upgrading an already installed version of the SDK, perform the first section only.
Downloading and Running the SDK Package
-
Connect to the SharePoint Server using the Farm Administrator account.
-
Retrieve the latest version of the Gimmal Solution Development Kit (SDK) from the Gimmal product download site.
-
Extract the package files to a local folder on a SharePoint server (e.g. a WFE machine).
-
Open the SharePoint 2013/2016 Management Shell as an administrator (right-click and select Run as Administrator).
-
Browse the Management Shell to the included <Extract Folder>\Gimmal Software\WSPs folder.
-
Run the .\Setup.ps1 script found in the directory.
When executed, the Setup.ps1 script performs an iisreset and stops and starts the SharePoint Timer Service. If you see a message similar to "setup.ps1 cannot be loaded because the execution of scripts is disabled on this system," you must enable running scripts. Run the following command: Set‐ExecutionPolicy Unrestricted
-
For more information, see Using the Set ExecutionPolicy Cmdlet.
7. Wait for the script to complete.
Granting Application Pool Account Permissions (Initial Installation Only)
-
Ensure the application pool account has at least Read access to the Central Administration site, and then perform the following steps:
-
Navigate to Central Administration > Site Settings > Site Permissions.
-
From the Permissions tab, click Grant Permissions in the ribbon.
-
The Share 'Central Administration' dialog displays.
-
Click the SHOW OPTIONS link.
-
From the Select a group or permission level drop-down list, select Read.
-
In the Invite people to 'Read' field, enter the web application pool account (service account) for each content web application in your farm.
-
Click Share.
-
-
Ensure the application pool account has at least Read access to the Carbon Configuration list, and then perform the following steps:
-
Navigate to Central Administration > Site Contents, then click the Carbon Configuration list.
-
On the Carbon Configuration list page, click the List tab.
-
In the ribbon, click the List Settings button.
-
The list settings screen displays.
-
Click Permissions for this List.
-
Ensure that all content web application pool accounts (service accounts) have Read access to the list.
-
If the Carbon Configuration list permissions are inherited from the parent site, the content web application pool accounts will have the proper Read permission.
3. Ensure the application pool account has at least Contribute access to the Carbon Job Definitions list, and then perform the following steps:
Each time you create a new application pool account for a content web application, perform the steps in this section for the application pool account.
-
Navigate to Central Administration > Site Contents, then click the Carbon Job Definitions list.
-
On the Carbon Job Definitions list page, click the List tab.
-
In the ribbon, click the List Settings button. The list settings screen displays.
-
Click Permissions for this List.
-
In the Permissions tab, click the Stop Inheriting Permissions button. (Note that permission inheritance may already be broken, and that the service accounts may already be added to the list with Contribute permissions.)
-
Click OK in the confirmation dialog.
-
In the Permissions tab, click the Grant Permissions button. The Share 'Carbon Job Definitions' screen displays.
-
In the Invite people to 'Contribute' field, enter the web application pool account (service account) for each content web application in your farm.
-
Click Share.
Appendix D: Creating New Azure App Service Web App
If you plan on using the Azure App Service remote web, you must first create a new Azure Web App for each Gimmal component that you want to install before running the App Installer. The name of the Azure Web App is critical.
When creating the Web Apps in the App Service, go to Settings > Application Settings > Virtual applications and directories. Ensure the Application selection is made for each Web App. Set the physical path to site\wwwroot
{applicationName} where {applicationName} is the name provided in the You must create an Azure Web App named column in the following table.
-
Create a root Azure App Service.
-
In the Virtual Directory field, enter the Azure Web App name for the component(s) you want to install by referring to the following table. The name you enter must match the name that displays in the Azure Web App name column on the right.
Component
Feature
Decommissioning
Decommissioning
Document Center
DocumentCenter
Drop Zone
DropZone
Enhanced Search
EnhancedSearch
Enhanced Template Manager
EnhancedTemplateManager
Governance Hub
GovernanceHub
Metadata Inheritance Rules
MetadataInheritanceRules
Metadata Rule Actions
MetadataRuleActions
Provisioning
Provisioning
Appendix E: Configuring Azure to Run Azure WebJobs
Perform the steps in this section to run WebJobs in the Azure App Service. Each component that uses scheduled jobs is packaged with an Azure WebJob that can queue and run one or more job definitions in your Azure App Service. Azure WebJobs are installed automatically when you select the Azure App Services remote web as the target web host using the App Installer. Before the WebJobs can function, you must perform the following steps to configure the App Service and create an Azure storage account.
-
Configure two required connection strings.
-
Navigate to your App Service's settings in the Azure Portal.
-
Click the Application settings section under the General heading.
-
Find the Connection strings heading and add connection strings for the following keys:
-
The type on both should be set to Custom.
-
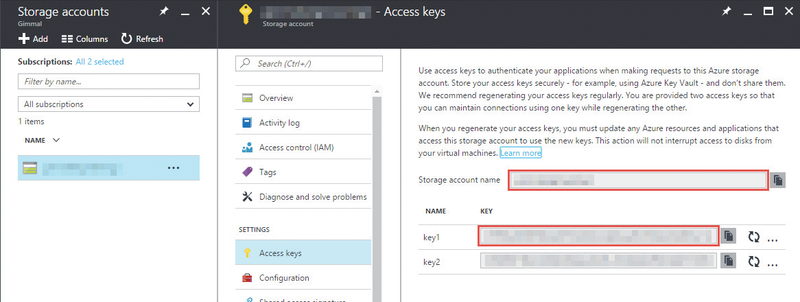
The value on both should point to an Azure storage account using the following format: DefaultEndpointsProtocol=https;AccountName=[accountname];AccountKey=[accesskey]
-
The account name and access keys can be found in the Access keys section of your storage account settings in the Azure Portal, as shown in the following figure.
-
2. Configure a required app setting.
-
Navigate to your App Service's settings in the Azure Portal.
-
Click the Application settings section under the General heading.
-
Find the App settings heading, and add a setting with the key 'GovHubUrl' and set the value to the URL of your Governance Hub site.
3. Ensure that your App Service is set to Always On in the Application settings section.
Appendix F: Miscellaneous Information
"Dev" Mode
"Dev" (Developer) Mode is a special function built into the Gimmal App Installer, providing Gimmal developers and support personnel access to advanced administrative tools for the App Installer. To access "Dev" mode, start the App Installer and then, once the application has started, click Ctrl+Shift+D to enable Dev Mode. To turn off "Dev" mode, click Ctrl+Shift+U.
Appendix G: Installing Azure SQL Database
Gimmal recommends that you use the same database for all Content Governance for SharePoint apps. However, you may use a unique database for each app, if desired. To set up your Azure SQL Database, log in to your Azure portal and perform the following steps:
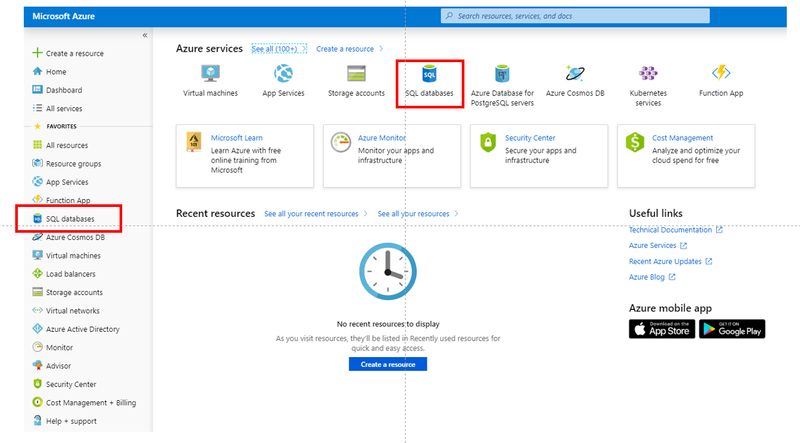
1. Click SQL databases in the left-hand pane of the Azure portal. The SQL databases page displays.
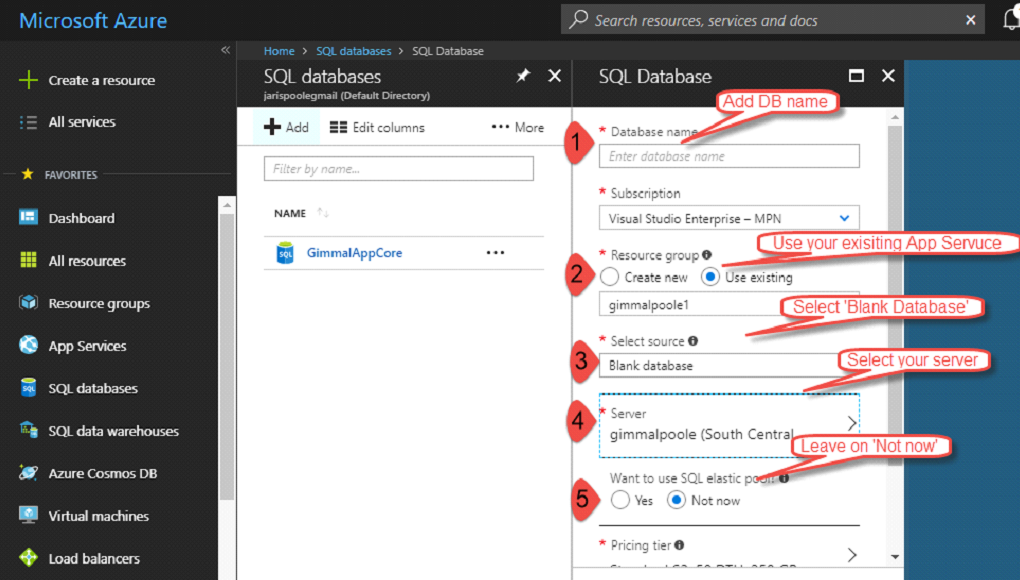
2. Click + Add in the upper left-hand corner of the SQL databases page. The database settings page displays.
3. On the settings page, enter the following information as shown below in the following two figures:
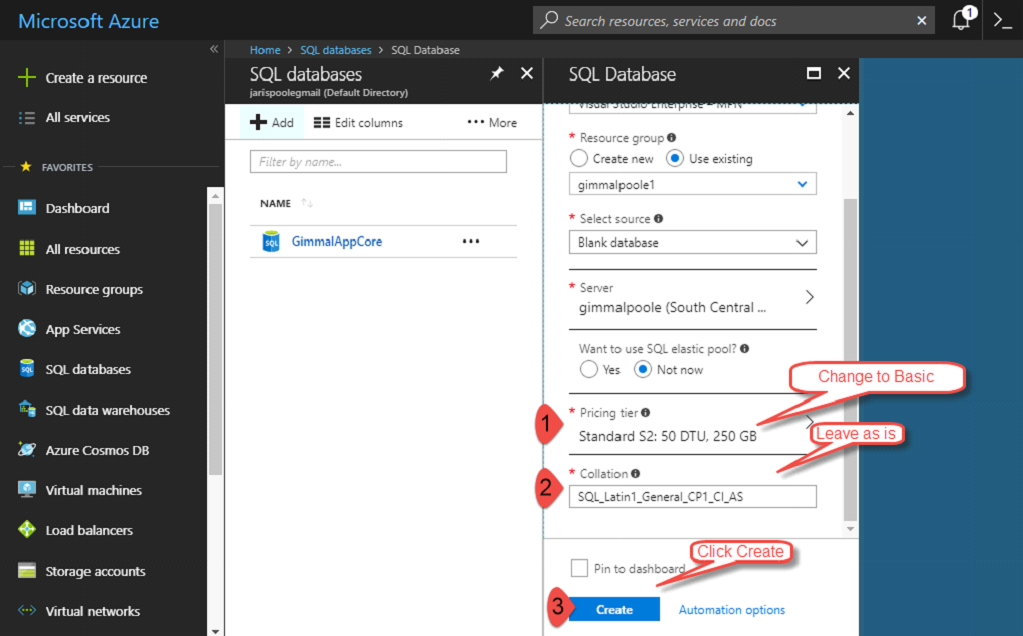
4. Click Create to create the database. The new database displays in a list on the SQL databases page.
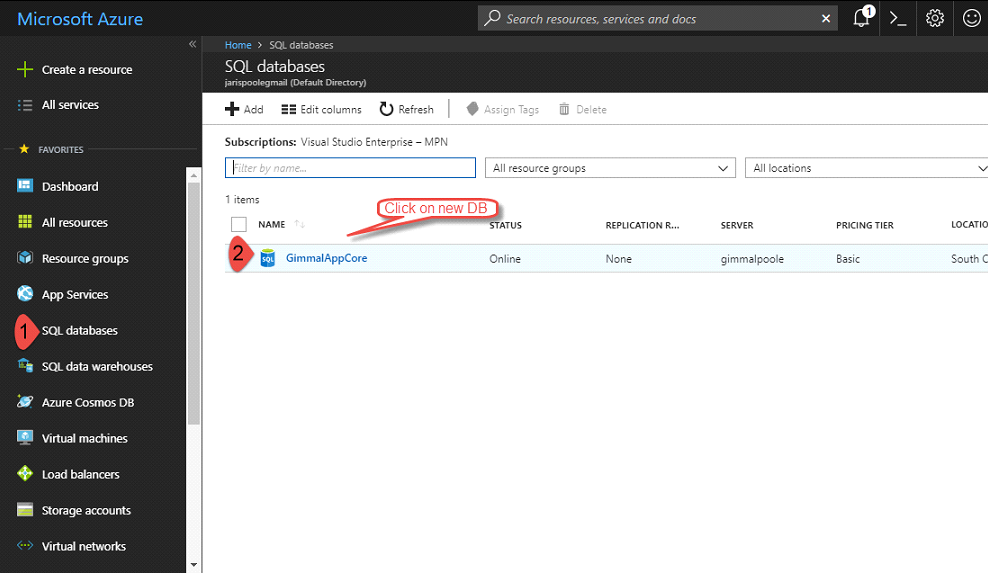
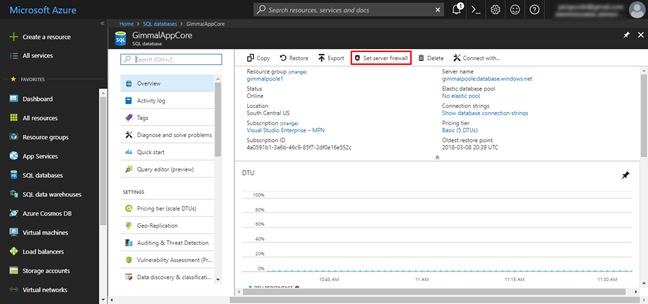
5. Click the new database name. The database Overview page displays.
6. Next, you must create a firewall rule to enable your computer to connect to the database. To do this, click Set server firewall.
7. On the Firewall settings page, click +Add client IP. (Note that the client IP address is automatically created in the list of Firewall rules.)
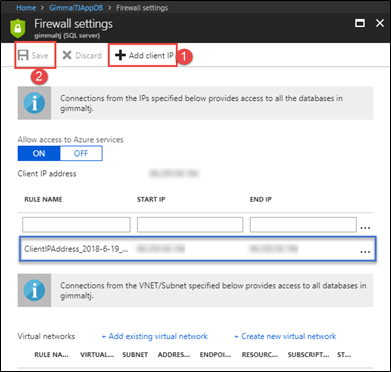
8. Click Save.
9. Return to the database Overview page and click the link under "Connection strings". The Connection strings page displays:
10. Click the Copy icon to the right of the connection string to copy the string to the clipboard.
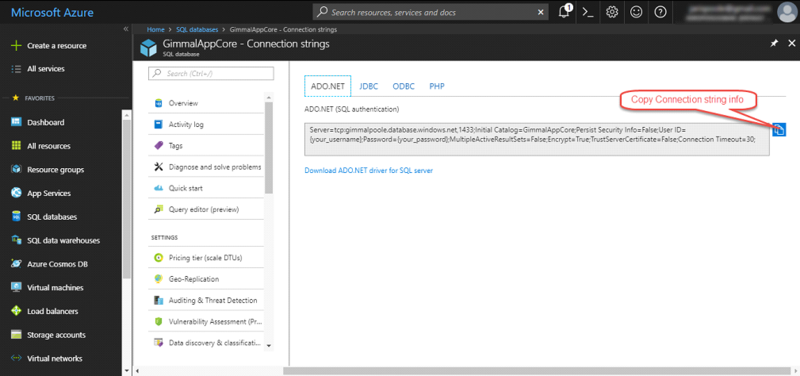
11. Return to the App Installer Database Info page, and paste the connection string data into the Connection String field for the desired app, entering your valid username and password.
