
Introduction
OAuth authentication, or what Microsoft calls 'Modern Authentication,' is a method of identity management that offers more secure authentication and authorization for users and applications. Discover Agents utilize OAuth to connect to Microsoft 365 email, SharePoint, OneDrive, and Teams. This guide provides configuration details for Discover customers planning to implement modern authentication for the Microsoft Graph Agent, which is required to access Microsoft Teams content
oAuth Configuration
Step 1: Self-Signed Certificate Creation
-
Create a Self-Signed Certificate using the attached PowerShell commands in Appendix A, or ask Gimmal support to provide the PowerShell script file
-
Run PowerShell or PowerShell ISE as an Administrator, then navigate and open the provided script file
-
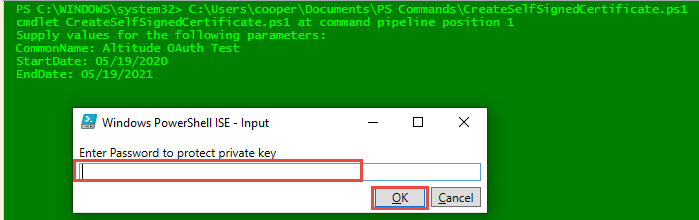
Execute the script; the first prompt will be the Common Name (CN) of the certificate

-
Press Enter to continue; the second and third prompts will be the Start and End (expiration) dates of the certificate

-
Then press Enter again to continue; the fourth prompt will be to assign a password to this certificate, and click OK
-
Verify that the certificate has been created and exported to the C:\WINDOWS\SYSTEM32 folder
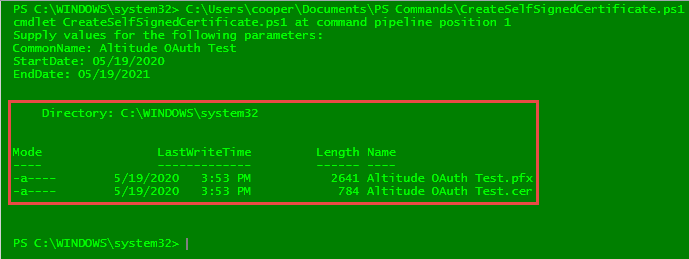
Copy both certificate files to a safe location and make sure you remember the password assigned during the creation of it. This information will be used during the Azure API registration process in Step 3.
Step 2: App Registration in Microsoft Azure
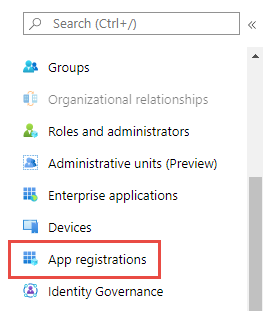
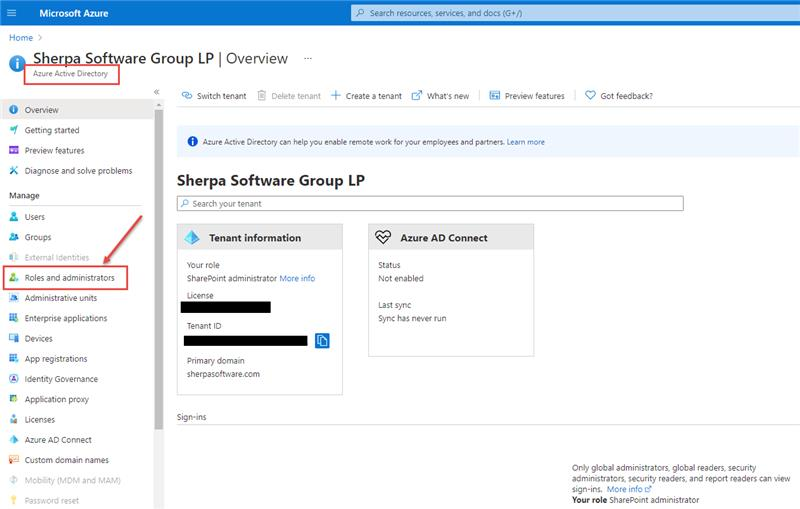
Log in to the Microsoft Azure portal: https://portal.azure.com/ , and select Azure Active Directory
-
In the left-hand navigation, select 'App registrations':
-
Click on the 'New registration' button:

-
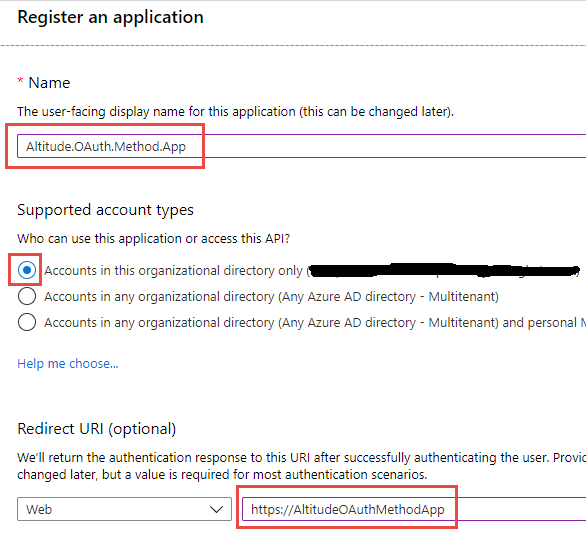
Fill out the Name and Redirect URI fields as shown in the example below (the user-facing display name Altitude.OAuth.Method.App shown below is an example)
-
Click the 'Register' button when finished.
Note: Please make sure to note the 'Application (client) ID' and 'Directory (tenant) ID'. The value for the Application (tenant) ID will vary from SharePoint/OneDrive to EWS and Teams
Step 3: OAuth Permissions Setup
The section details the steps that must be taken in the Azure Active Directory administration portal to register the OAuth service, make it available, and assign the appropriate application permissions.
-
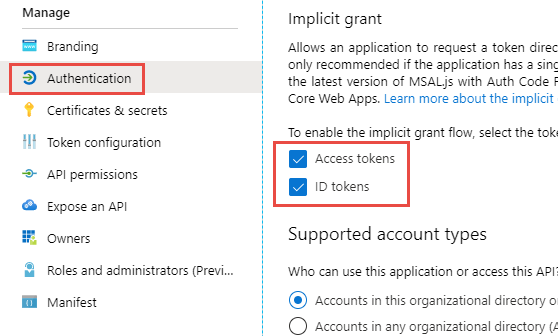
Select 'Authentication' - then checkmark both boxes under the Implicit grant section:
-
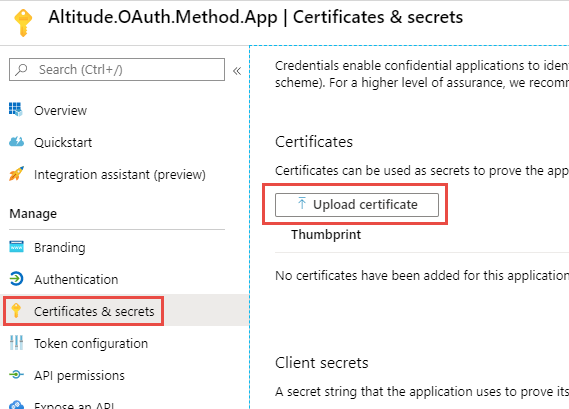
Certificates & secrets - click the 'Upload certificate' button, then navigate to the folder path where the certificate created in Step 1 of this document is stored (look for the file with a .cer extension). Click the Add button to continue:

Step 3.1 MSGraph Agent Permissions
If your organization plans to use Discover to search Microsoft Teams content, please complete the steps in this section. If you do not plan to use teams, please continue with Section 3.4
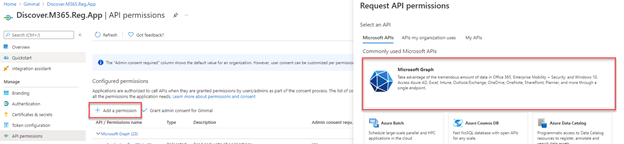
Select Quickstart in the navigation pane, then click on Add Permission. Locate Microsoft Graph in the Microsoft API's section of the list and select it
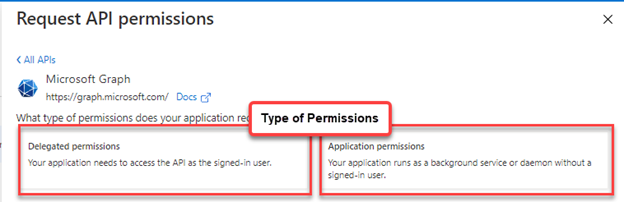
Select both the Delegated and API Permission types
Then click the ‘Add permissions’ button:
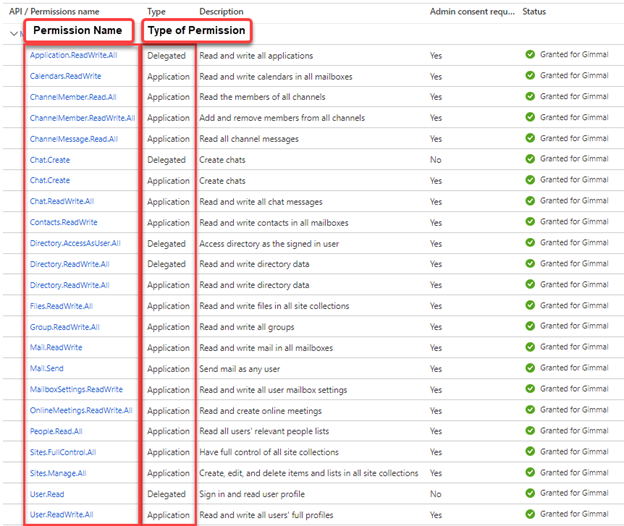
The Microsoft Graph permissions list should look something like this example:
Before attempting to access Teams content through Discover, a permission request form needs to be submitted to Microsoft for access to their ‘Protected APIs’ data
For more information about Microsoft protected API's, please refer to this Microsoft Link.
This link provides direct access to the Protected API Request Form.
There are 14 questions on the Protected APIs request form, but you only need to fill out the first 10 questions for single tenant environments. If multiple tenants are required, then all 14 questions need to be answered.
The first 10 questions should be answered as follows:
-
Enter email addresses of all who should be owners of the registered application (semicolon separated)
-
Contact you about your app’s use of the non-protected APIs = Answer ‘Yes’
-
Publisher Name = Your Company Name
-
App Name = Registered Application name
-
App ID = Client ID from Azure portal
-
Reason the app exists = ‘To collect information on Teams, Channels, Messages, and Files for company reporting requirements.’
-
Reason your app needs read access to messages = ‘Our app needs access to messages for company reporting and litigation’
-
Second radio button = It is obvious to any admin installing this app that it will make a copy of Microsoft Teams messages
-
Tenant ID = Tenant ID from Azure portal (multiple Tenant IDs can be semicolon separated)
-
Does the Organization own all Tenants listed above = Answer ‘Yes’
Click the ‘Next’ button on this page and then click ‘Next’ on the following page; finally, click ‘Submit’.
Note: Request forms are reviewed on Wednesdays, then permission changes are rolled out the following Friday (If Approved).
Step 3.2, Expose the API
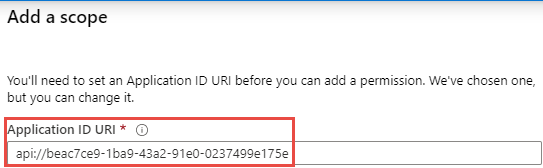
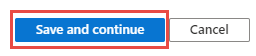
Click on the 'Add a scope' button

-
The 'Application ID URI' window will pre-fill with the application ID, click Save and Continue to proceed
-
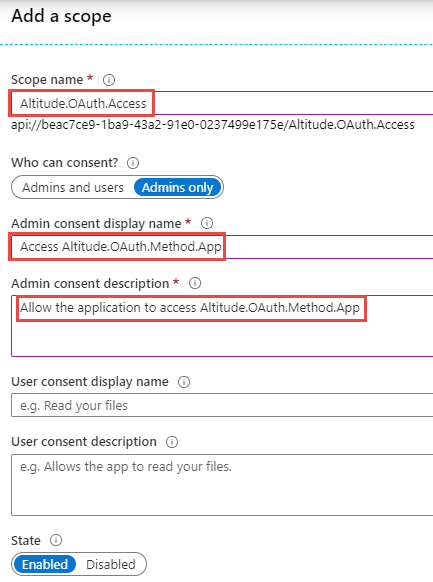
Fill out the highlighted fields in the 'Add a scope' window, then click the Add scope to proceed
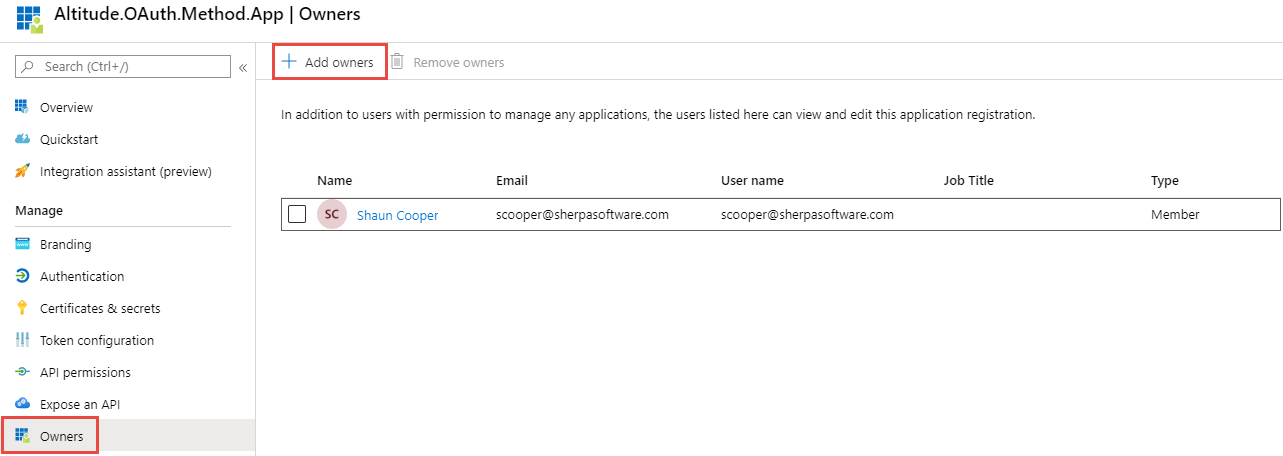
Step 3.3, Adding Additional Owners
Click the 'Add owners' button if additional users need to have access to manage applications and edit application registration
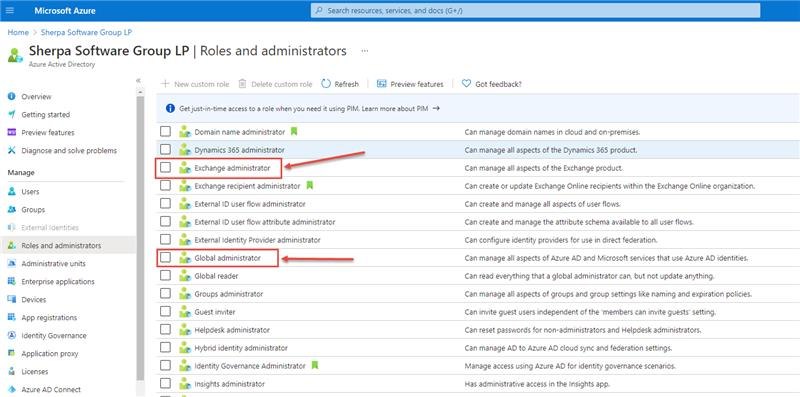
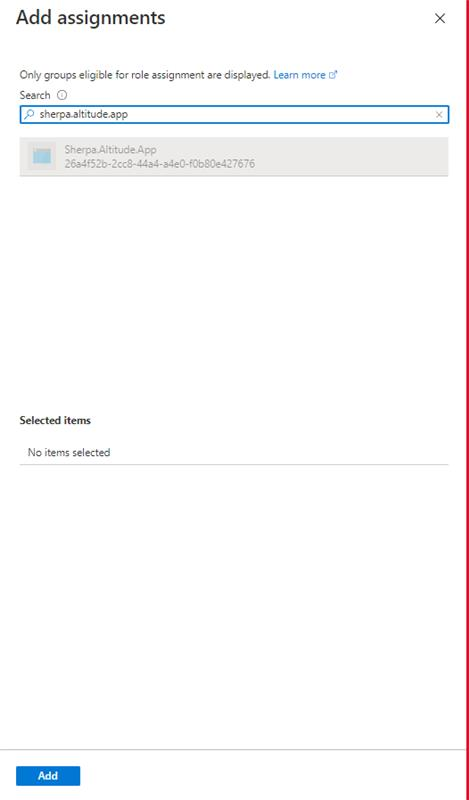
Step 3.4, Configuring Roles and Administrators
In the Azure dashboard, click on "Roles and Administrators".
Either role outlined below will work, but Exchange Administrators is typical for the registered app to use
After selecting a role, double click on it to view its Assignments then select 'Add Assignments' and search for the registered app:
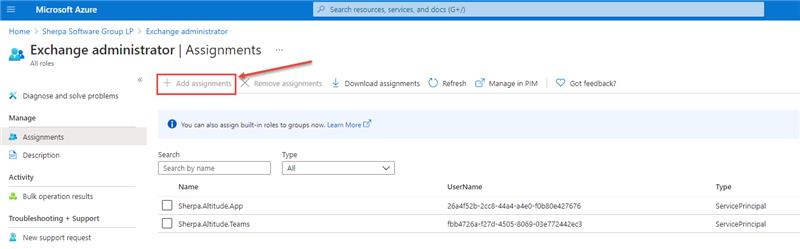
Type the name of the registered app and click the 'Add' button at the bottom:
For more information on modern authentication role permissions, please refer to this Microsoft post
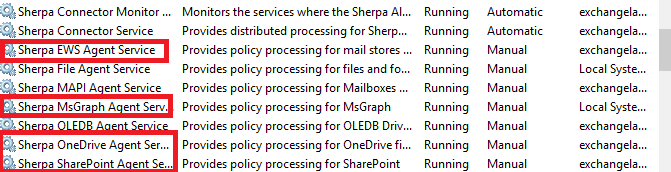
Discover Agent Setup
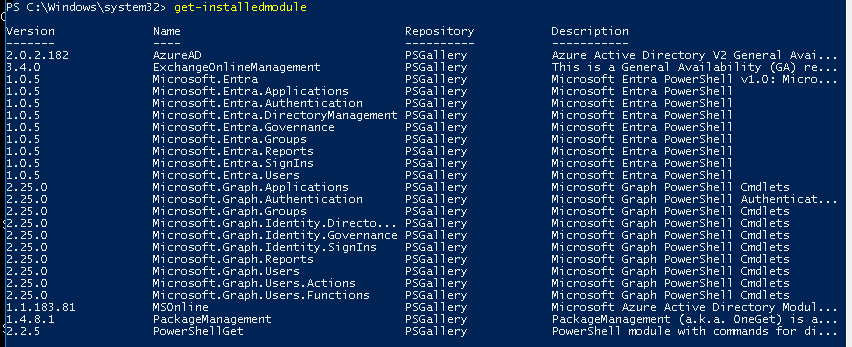
Verify Required PowerShell Modules are Installed
The remote PowerShell commands issued by Discover require these modules to be installed on the Agent server:
-
Microsoft.Entra
-
PowerShellGet
-
ExchangeOnlineManagement
-
PackageManagement
You can determine what modules are installed by launching a PowerShell session and issuing the command get-installedmodule as shown below:
If you do not have all of the required modules, they can be installed by issuing the following commands in a PowerShell session:
-
Install-Module -Name Microsoft.Entra -AllowClobber
-
Install-Module -Name PowerShellGet -RequiredVersion 2.2.5 -Force -Allowclobber
-
Install-Module -Name ExchangeOnlineManagement -RequiredVersion 2.0.4
-
Install-Module -Name PackageManagement (note: this module may be installed automatically)
Note: If you receive errors when attempting to install the PowerShell modules, please check the TLS configuration as described in Appendix B – TLS Troubleshooting
For both Existing and New Customers
To access and enable the OAuth authentication fields, you will need to do the following:
-
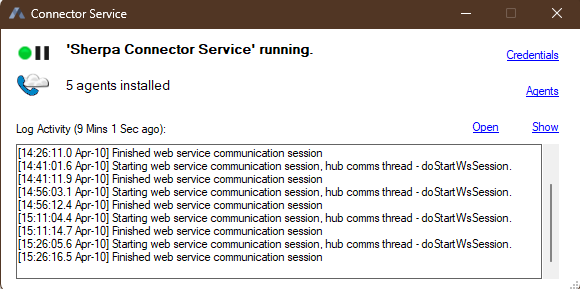
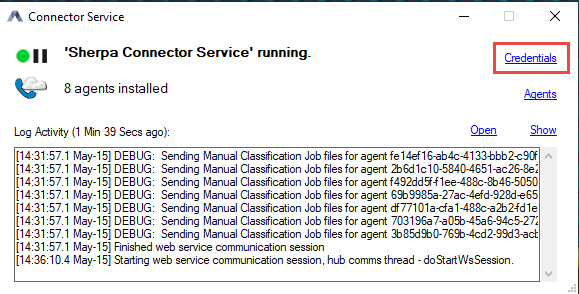
Double click on the Connector Status Tool application shortcut on the Desktop:

Once the application is open, click on the 'Credentials' link in the status tool window:
MSGraph Credentials tab:
Check the 'Use Azure Registration Credentials' box, this will gray out the Basic Authentication fields and enable OAuth Authentication. The fields listed in the screenshots below will need to be filled out with the IDs obtained during the App Registration process.
MSGraph requires an Azure Client ID and Tenant ID. To add the Certificate File, click on the browse button to navigate to the folder path where it is stored. Please note that this cert file has an extension of (.pfx), NOT (.cer). Lastly, please enter the password that was assigned to the certificate at the time of creation and click SAVE to exit the window.

Updating the Agent Settings
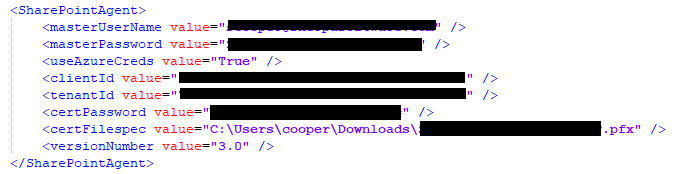
You can validate that the updated agent settings have been stored properly by opening the Credentials.config file in notepad. This file is located in the folder: C:\$Sherpa Software\Altitude\Connector. For each agent, the config file will contain an entry similar to this:
To apply the newly configured agent permissions, the MSGraph Agent service will need to be shut down and restarted.
Appendix A – PowerShell Script Example
The following PowerShell script example details the commands necessary for creating a self-signed certificate.
#Requires -RunAsAdministrator
<#
.SYNOPSIS
Creates a Self Signed Certificate for use in server to server authentication
.DESCRIPTION
.EXAMPLE
.\Create-SelfSignedCertificate.ps1 -CommonName "MyCert" -StartDate 2015-11-21 -EndDate 2017-11-21
This will create a new self signed certificate with the common name "CN=MyCert". During creation you will be asked to provide a password to protect the private key.
.EXAMPLE
.\Create-SelfSignedCertificate.ps1 -CommonName "MyCert" -StartDate 2015-11-21 -EndDate 2017-11-21 -Password (ConvertTo-SecureString -String "MyPassword" -AsPlainText -Force)
This will create a new self signed certificate with the common name "CN=MyCert". The password as specified in the Password parameter will be used to protect the private key
.EXAMPLE
.\Create-SelfSignedCertificate.ps1 -CommonName "MyCert" -StartDate 2015-11-21 -EndDate 2017-11-21 -Force
This will create a new self signed certificate with the common name "CN=MyCert". During creation you will be asked to provide a password to protect the private key. If there is already a certificate with the common name you specified, it will be removed first.
#>
Param(
[Parameter(Mandatory=$true)]
[string]$CommonName,
[Parameter(Mandatory=$true)]
[DateTime]$StartDate,
[Parameter(Mandatory=$true)]
[DateTime]$EndDate,
[Parameter(Mandatory=$false, HelpMessage="Will overwrite existing certificates")]
[Switch]$Force,
[Parameter(Mandatory=$false)]
[SecureString]$Password
)
# DO NOT MODIFY BELOW
function CreateSelfSignedCertificate(){
#Remove and existing certificates with the same common name from personal and root stores
#Need to be very wary of this as could break something
if($CommonName.ToLower().StartsWith("cn="))
{
# Remove CN from common name
$CommonName = $CommonName.Substring(3)
}
$certs = Get-ChildItem -Path Cert:\LocalMachine\my | Where-Object{$_.Subject -eq "CN=$CommonName"}
if($certs -ne $null -and $certs.Length -gt 0)
{
if($Force)
{
foreach($c in $certs)
{
remove-item $c.PSPath
}
} else {
Write-Host -ForegroundColor Red "One or more certificates with the same common name (CN=$CommonName) are already located in the local certificate store. Use -Force to remove them";
return $false
}
}
$name = new-object -com "X509Enrollment.CX500DistinguishedName.1"
$name.Encode("CN=$CommonName", 0)
$key = new-object -com "X509Enrollment.CX509PrivateKey.1"
$key.ProviderName = "Microsoft RSA SChannel Cryptographic Provider"
$key.KeySpec = 1
$key.Length = 2048
$key.SecurityDescriptor = "D:PAI(A;;0xd01f01ff;;;SY)(A;;0xd01f01ff;;;BA)(A;;0x80120089;;;NS)"
$key.MachineContext = 1
$key.ExportPolicy = 1 # This is required to allow the private key to be exported
$key.Create()
$serverauthoid = new-object -com "X509Enrollment.CObjectId.1"
$serverauthoid.InitializeFromValue("1.3.6.1.5.5.7.3.1") # Server Authentication
$ekuoids = new-object -com "X509Enrollment.CObjectIds.1"
$ekuoids.add($serverauthoid)
$ekuext = new-object -com "X509Enrollment.CX509ExtensionEnhancedKeyUsage.1"
$ekuext.InitializeEncode($ekuoids)
$cert = new-object -com "X509Enrollment.CX509CertificateRequestCertificate.1"
$cert.InitializeFromPrivateKey(2, $key, "")
$cert.Subject = $name
$cert.Issuer = $cert.Subject
$cert.NotBefore = $StartDate
$cert.NotAfter = $EndDate
$cert.X509Extensions.Add($ekuext)
$cert.Encode()
$enrollment = new-object -com "X509Enrollment.CX509Enrollment.1"
$enrollment.InitializeFromRequest($cert)
$certdata = $enrollment.CreateRequest(0)
$enrollment.InstallResponse(2, $certdata, 0, "")
return $true
}
function ExportPFXFile()
{
if($CommonName.ToLower().StartsWith("cn="))
{
# Remove CN from common name
$CommonName = $CommonName.Substring(3)
}
if($Password -eq $null)
{
$Password = Read-Host -Prompt "Enter Password to protect private key" -AsSecureString
}
$cert = Get-ChildItem -Path Cert:\LocalMachine\my | where-object{$_.Subject -eq "CN=$CommonName"}
Export-PfxCertificate -Cert $cert -Password $Password -FilePath "$($CommonName).pfx"
Export-Certificate -Cert $cert -Type CERT -FilePath "$CommonName.cer"
}
function RemoveCertsFromStore()
{
# Once the certificates have been been exported we can safely remove them from the store
if($CommonName.ToLower().StartsWith("cn="))
{
# Remove CN from common name
$CommonName = $CommonName.Substring(3)
}
$certs = Get-ChildItem -Path Cert:\LocalMachine\my | Where-Object{$_.Subject -eq "CN=$CommonName"}
foreach($c in $certs)
{
remove-item $c.PSPath
}
}
if(CreateSelfSignedCertificate)
{
ExportPFXFile
RemoveCertsFromStore
}
Appendix B – TLS Troubleshooting
If the connector server is running an older version of Microsoft Windows (2010 R2 or lower) it may not have the required support for TLS1.2. This Microsoft link provides more details on TLS dependencies and adding TLS support to older versions of Microsoft Windows:
https://docs.microsoft.com/en-us/security/engineering/solving-tls1-problem
The versions of TLS currently installed on the server can be verified using this PowerShell command:
[Net.ServicePointManager]::SecurityProtocol
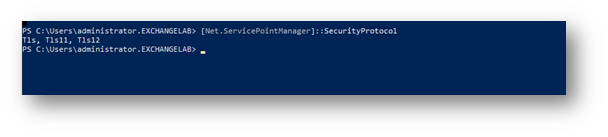
If Tls12 is not shown in the list, it will need to be installed on this server using one of these Microsoft methods. Option 2 (below) is the preferred method since it adds Tls12 to the whole system, where option 1 only persists for the current PS session.
-
Modify the script in question to include the following: [System.Net.ServicePointManager]::SecurityProtocol = [System.Net.SecurityProtocolType]::Tls12;
-
Add a system-wide registry key (e.g. via group policy) to any machine that needs to make TLS 1.2 connections from a .NET app. This will cause .NET to use the "System Default" TLS versions which adds TLS 1.2 as an available protocol AND it will allow the scripts to use future TLS Versions when the OS supports them. (e.g. TLS 1.3). Below are the registry keys for both 64 and 32 bit systems.
reg add HKLM\SOFTWARE\Microsoft\.NETFramework\v4.0.30319 /v SystemDefaultTlsVersions /t REG_DWORD /d 1 /f /reg:64
reg add HKLM\SOFTWARE\Microsoft\.NETFramework\v4.0.30319 /v SystemDefaultTlsVersions /t REG_DWORD /d 1 /f /reg:64
-
Install-Module -Name Microsoft.Entra -AllowClobber
-
Install-Module -Name PowerShellGet -RequiredVersion 2.2.5 -Force -llowclobber
-
Install-Module -Name ExchangeOnlineManagement -RequiredVersion 2.0.4
-
Install-Module -Name PackageManagement (note: this module may be installed automatically)
Note: if you receive errors when attempting to install the PowerShell modules, please check the TLS configuration as described in Appendix B – TLS Troubleshooting
Existing Discover Customers
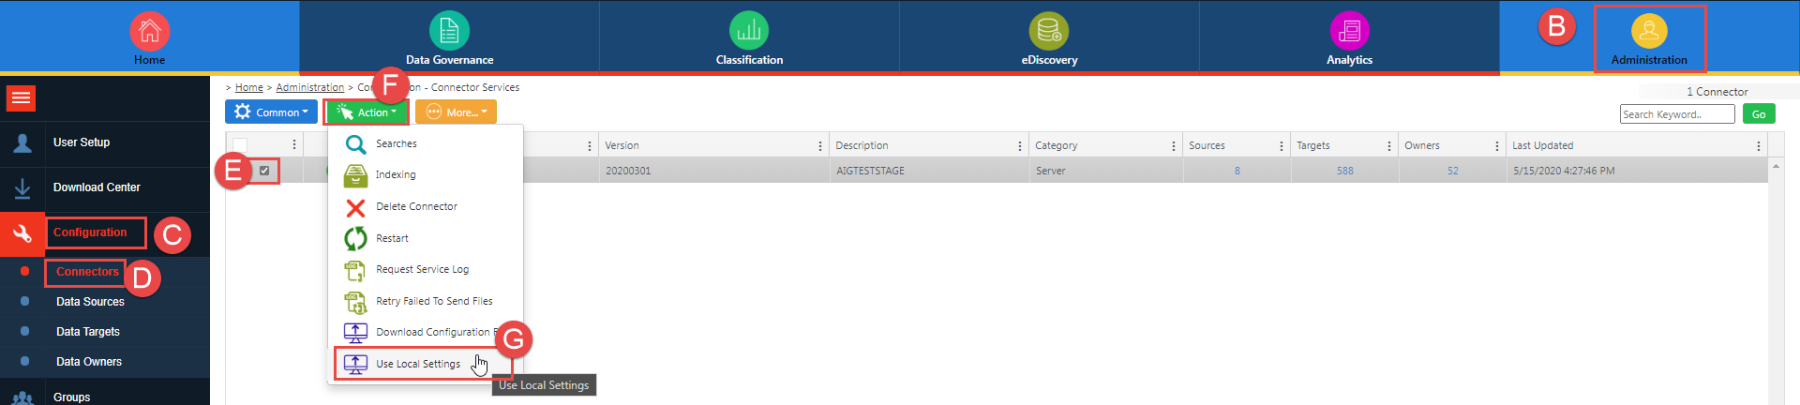
To enable OAuth for the MIcrosoft Graph Agent, existing customers need to convert their Connector and Agents to use the 'Use Local Settings' configuration file. This is taking all Username and Password-related entries from the Discover servers (removing the fields) and adding them to the Credentials.config file located in the $Sherpa Software folder on the Connector machine. To update the Connector/Agents please perform the following steps outlined below, each letter corresponds to an area shown in the diagram:
-
Login to Discover
-
Click on the Administration module
-
Click 'Configuration'
-
Click on 'Connectors' (you will need to do this for all connectors)
-
Select the Connector to convert
-
Click the Action menu
-
Click 'Use Local Settings'
-
Finally, click YES to confirm the change

New Discover Customers
For new customers, no additional action is required. When you download and install a Discover Connector and Agents on a new device, the local config file will be used by default.
For both Existing and New Customers
To access and enable the OAuth authentication fields you will need to do the following:
-
Double click on the Connector Status Tool application shortcut on the Desktop:
Once the application is open, click on the 'Credentials' link in the status tool window:
-
Check the 'Use Azure Registration Credentials' box, this will gray out the Basic Authentication fields and enable OAuth Authentication. The fields listed in the screenshots below will need to be filled out with the IDs obtained during the App Registration process.
MSGraph Credentials tab:
MSGraph requires an Azure Client ID and Tenant ID. To add the Certificate File, click on the browse button to navigate to the folder path where the it is stored. Please note that this cert file has an extension of (.pfx), NOT (.cer). Lastly please enter the password which was assigned to the certificate at the time of creation and click SAVE to exit the window.
Updating the Agent Settings
You can validate that the updated agent settings have been stored properly by opening the Credentials.config file in notepad. This file is located in the folder: C:\$Sherpa Software\Altitude\Connector. For each agent the config file will contain an entry similar to this:
To apply the newly configured agent permissions, the MSGraph Agent service will need to be shut down and restarted.
Appendix A – PowerShell Script Example
The following PowerShell script example details the commands necessary for creating a self-signed certificate.
#Requires -RunAsAdministrator
<#
.SYNOPSIS
Creates a Self Signed Certificate for use in server to server authentication
.DESCRIPTION
.EXAMPLE
.\Create-SelfSignedCertificate.ps1 -CommonName "MyCert" -StartDate 2015-11-21 -EndDate 2017-11-21
This will create a new self signed certificate with the common name "CN=MyCert". During creation you will be asked to provide a password to protect the private key.
.EXAMPLE
.\Create-SelfSignedCertificate.ps1 -CommonName "MyCert" -StartDate 2015-11-21 -EndDate 2017-11-21 -Password (ConvertTo-SecureString -String "MyPassword" -AsPlainText -Force)
This will create a new self signed certificate with the common name "CN=MyCert". The password as specified in the Password parameter will be used to protect the private key
.EXAMPLE
.\Create-SelfSignedCertificate.ps1 -CommonName "MyCert" -StartDate 2015-11-21 -EndDate 2017-11-21 -Force
This will create a new self signed certificate with the common name "CN=MyCert". During creation you will be asked to provide a password to protect the private key. If there is already a certificate with the common name you specified, it will be removed first.
#>
Param(
[Parameter(Mandatory=$true)]
[string]$CommonName,
[Parameter(Mandatory=$true)]
[DateTime]$StartDate,
[Parameter(Mandatory=$true)]
[DateTime]$EndDate,
[Parameter(Mandatory=$false, HelpMessage="Will overwrite existing certificates")]
[Switch]$Force,
[Parameter(Mandatory=$false)]
[SecureString]$Password
)
# DO NOT MODIFY BELOW
function CreateSelfSignedCertificate(){
#Remove and existing certificates with the same common name from personal and root stores
#Need to be very wary of this as could break something
if($CommonName.ToLower().StartsWith("cn="))
{
# Remove CN from common name
$CommonName = $CommonName.Substring(3)
}
$certs = Get-ChildItem -Path Cert:\LocalMachine\my | Where-Object{$_.Subject -eq "CN=$CommonName"}
if($certs -ne $null -and $certs.Length -gt 0)
{
if($Force)
{
foreach($c in $certs)
{
remove-item $c.PSPath
}
} else {
Write-Host -ForegroundColor Red "One or more certificates with the same common name (CN=$CommonName) are already located in the local certificate store. Use -Force to remove them";
return $false
}
}
$name = new-object -com "X509Enrollment.CX500DistinguishedName.1"
$name.Encode("CN=$CommonName", 0)
$key = new-object -com "X509Enrollment.CX509PrivateKey.1"
$key.ProviderName = "Microsoft RSA SChannel Cryptographic Provider"
$key.KeySpec = 1
$key.Length = 2048
$key.SecurityDescriptor = "D:PAI(A;;0xd01f01ff;;;SY)(A;;0xd01f01ff;;;BA)(A;;0x80120089;;;NS)"
$key.MachineContext = 1
$key.ExportPolicy = 1 # This is required to allow the private key to be exported
$key.Create()
$serverauthoid = new-object -com "X509Enrollment.CObjectId.1"
$serverauthoid.InitializeFromValue("1.3.6.1.5.5.7.3.1") # Server Authentication
$ekuoids = new-object -com "X509Enrollment.CObjectIds.1"
$ekuoids.add($serverauthoid)
$ekuext = new-object -com "X509Enrollment.CX509ExtensionEnhancedKeyUsage.1"
$ekuext.InitializeEncode($ekuoids)
$cert = new-object -com "X509Enrollment.CX509CertificateRequestCertificate.1"
$cert.InitializeFromPrivateKey(2, $key, "")
$cert.Subject = $name
$cert.Issuer = $cert.Subject
$cert.NotBefore = $StartDate
$cert.NotAfter = $EndDate
$cert.X509Extensions.Add($ekuext)
$cert.Encode()
$enrollment = new-object -com "X509Enrollment.CX509Enrollment.1"
$enrollment.InitializeFromRequest($cert)
$certdata = $enrollment.CreateRequest(0)
$enrollment.InstallResponse(2, $certdata, 0, "")
return $true
}
function ExportPFXFile()
{
if($CommonName.ToLower().StartsWith("cn="))
{
# Remove CN from common name
$CommonName = $CommonName.Substring(3)
}
if($Password -eq $null)
{
$Password = Read-Host -Prompt "Enter Password to protect private key" -AsSecureString
}
$cert = Get-ChildItem -Path Cert:\LocalMachine\my | where-object{$_.Subject -eq "CN=$CommonName"}
Export-PfxCertificate -Cert $cert -Password $Password -FilePath "$($CommonName).pfx"
Export-Certificate -Cert $cert -Type CERT -FilePath "$CommonName.cer"
}
function RemoveCertsFromStore()
{
# Once the certificates have been been exported we can safely remove them from the store
if($CommonName.ToLower().StartsWith("cn="))
{
# Remove CN from common name
$CommonName = $CommonName.Substring(3)
}
$certs = Get-ChildItem -Path Cert:\LocalMachine\my | Where-Object{$_.Subject -eq "CN=$CommonName"}
foreach($c in $certs)
{
remove-item $c.PSPath
}
}
if(CreateSelfSignedCertificate)
{
ExportPFXFile
RemoveCertsFromStore
}
Appendix B – TLS Troubleshooting
If the connector server is running an older version of Microsoft Windows (2010 R2 or lower) it may not have the required support for TLS1.2. This Microsoft link provides more details on TLS dependencies and adding TLS support to older versions of Microsoft Windows:
https://docs.microsoft.com/en-us/security/engineering/solving-tls1-problem
The versions of TLS currently installed on the server can be verified using this PowerShell command:
[Net.ServicePointManager]::SecurityProtocol
If Tls12 is not shown in the list, it will need to be installed on this server using one of these Microsoft methods. Option 2 (below) is the preferred method since it adds Tls12 to the whole system, where option 1 only persists for the current PS session.
-
Modify the script in question to include the following: [System.Net.ServicePointManager]::SecurityProtocol = [System.Net.SecurityProtocolType]::Tls12;
-
Add a system-wide registry key (e.g. via group policy) to any machine that needs to make TLS 1.2 connections from a .NET app. This will cause .NET to use the "System Default" TLS versions which adds TLS 1.2 as an available protocol AND it will allow the scripts to use future TLS Versions when the OS supports them. (e.g. TLS 1.3). Below are the registry keys for both 64 and 32 bit systems.
reg add HKLM\SOFTWARE\Microsoft\.NETFramework\v4.0.30319 /v SystemDefaultTlsVersions /t REG_DWORD /d 1 /f /reg:64
reg add HKLM\SOFTWARE\Microsoft\.NETFramework\v4.0.30319 /v SystemDefaultTlsVersions /t REG_DWORD /d 1 /f /reg:64