
Section One:
Preparing for Integration
When a customer of Google's GSuite Business level wishes to access Discover there are several steps included with creating the Service Account and Key required to operate the Google Agent for Discover.
Log in to the Google Admin site using the following link:
https://admin.google.com/AdminHome
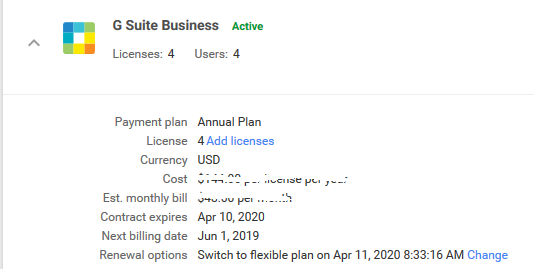
Click on the 'Billing' icon in the dashboard to ensure the client has a G Suite Business account.
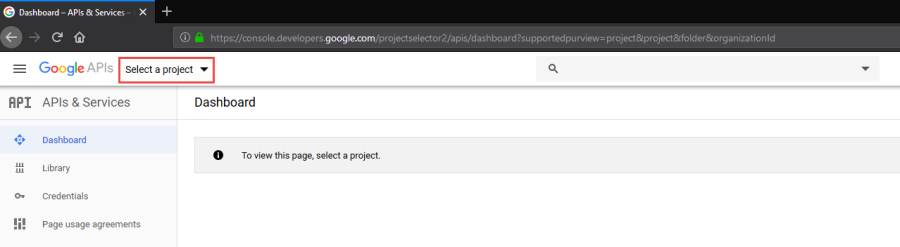
Next, log in to the Google API Developers site by using the following link:
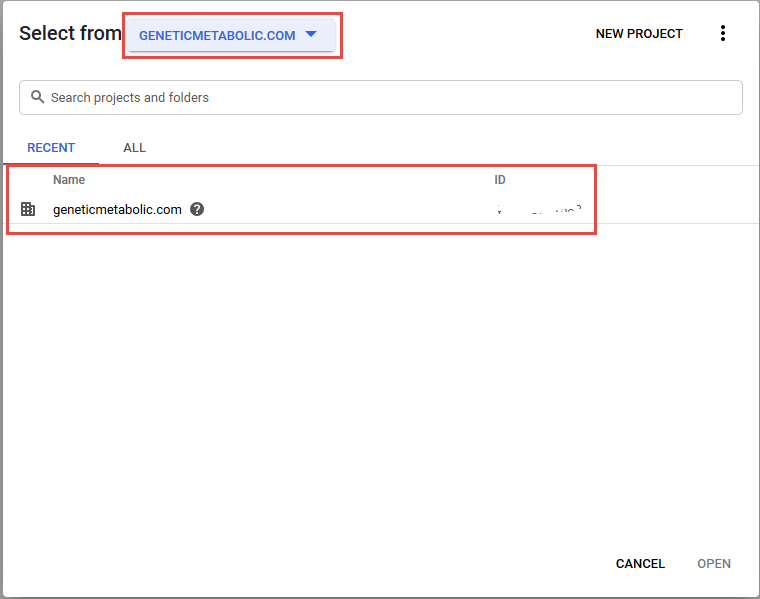
Here, create the Project associated with our Organization. Click on the drop-down box to initiate the next box and then click on the drop-down to select the organizational name.
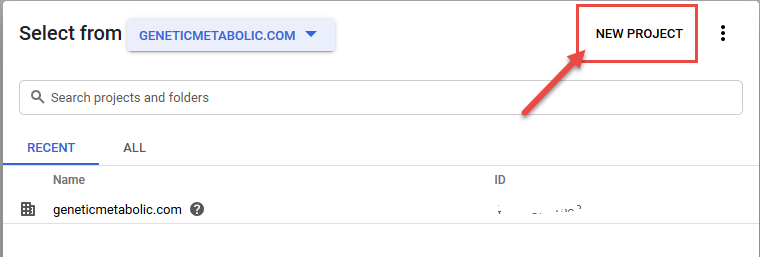
Click on the 'New Project' button:
On the new project screen, please name the project and click on the 'Create' button:
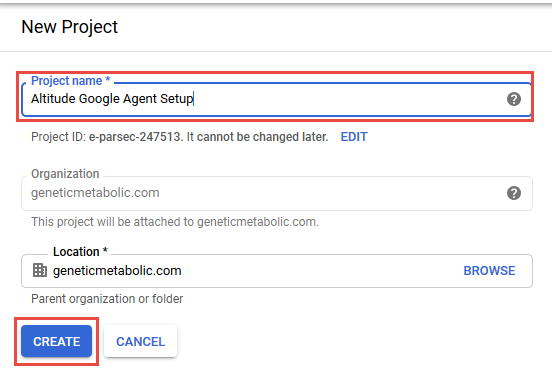
NOTE: It will take approximately 15-25 seconds to create the project, indicated by the Google spinning wheel.
Once successfully created, click on the 'Enable APIS and Services' option:
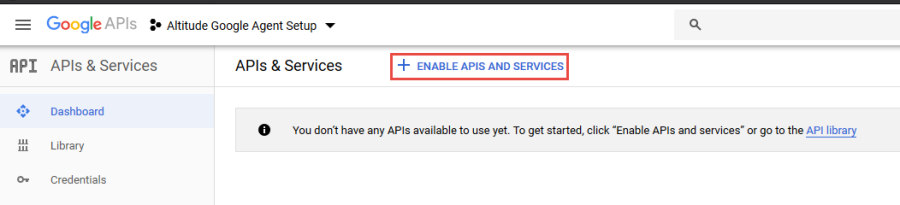
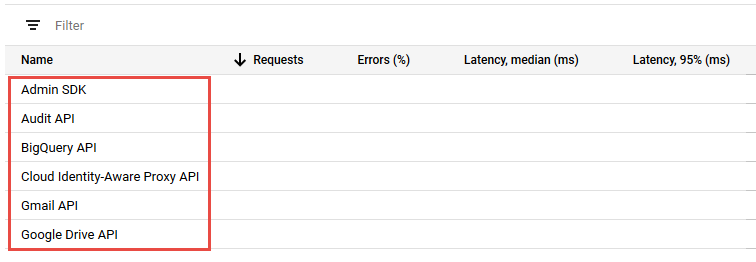
This enables you to add the APIs you wish to track metrics. These are the ones currently tracked to show traffic flow for Google Drive and Gmail by the Discover Agent.
Next is the creation of the Service Account that will allow the SAIG Agent to interact with Google Cloud infrastructure.
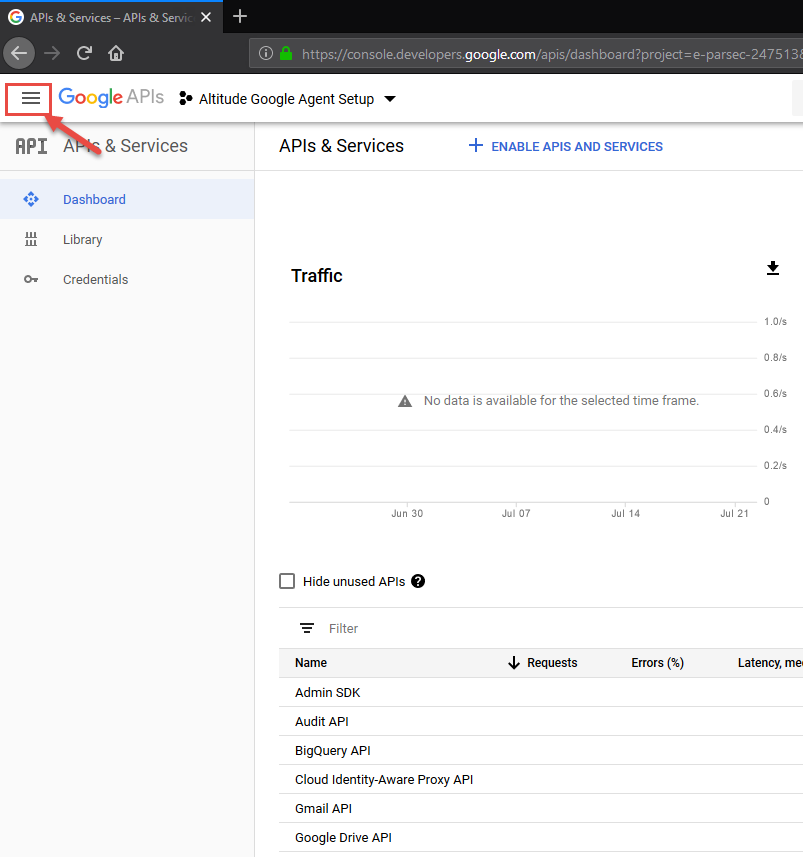
Click on the menu button next to the 'GoogleAPIs' logo:
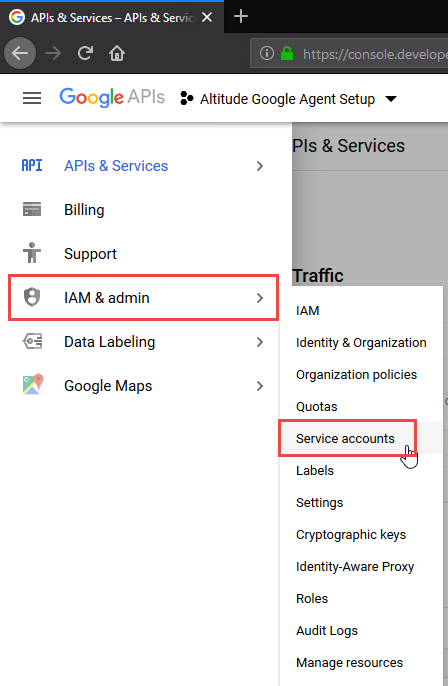
Navigate to 'IAM & admin' --> 'Service accounts':
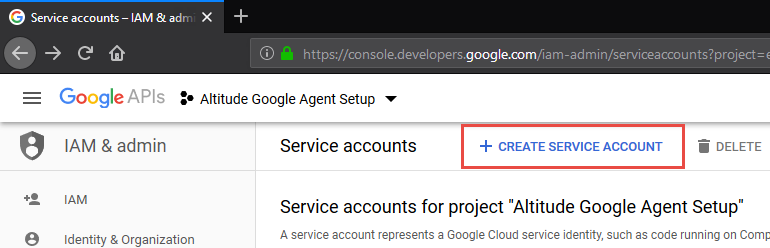
Click on the 'Create Service Account' button:
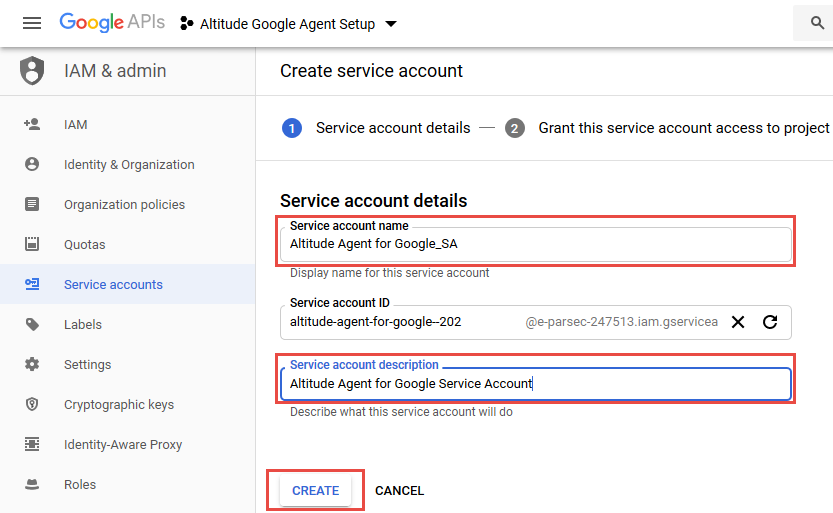
Add the name of the service account and the description, when finished click on the 'Create' button:
After your service account is created, click on the 'Manage Access' link at the top of the page:
.png?cb=96d64e6ff80a24729a2190de5f57a9f5)
Inthe “Manage Access” pane and make sure the service account has the roles for Editor and Owner:
.png?cb=81bc149b8337fdeb379e7862dac09345)
Now click on the service account again, select the three-dot ellipsis in the Actions column and select “Manage Keys” :
.png?cb=879e959a1c1e1b7081761b6d6e53eec1)
then click on the 'Generate Key' button. Choose the 'P12' radio button and then click 'Create'
.png?cb=4c5711791bf60100351ab817b4fe6521)
NOTE: When you click 'Create', it will prompt you to save the P12 file to the computer. Keep this file in a safe place that is easy to remember it will be required during the Discover configuration process. Ignore the password box and click close.
Click 'Done'
From the left-hand navigation select the Service Accounts link once more then scroll down the page to Advanced Settings
.png?cb=5610f7c6cc47ef3a960daf856bde02c1)
On the Advanced Settings page, click the link to “View Google Workspace Admin Console
.png?cb=da12051d18259b174a6c98195314bd25)
In the Admin console click the “Show More” button in the left hand navigation to locate the Security link:
.png?cb=13d38881dd648bf192fb9b2c955a9ce7)
Click on Security in the left-hand navigation then open the link for “Access and data control”
.png?cb=a963e5a48df1bd60f0e2e4b02be42372)
Select API Controls. Make sure the option for Trust Internal Domain-owned apps is checked then click on the Manage Domain Wide Delegation link:
.png?cb=f90a6756fc1d67d55c8d77827bda1653)
Make sure the Gimmal account you have created has all of the “Scope” entries shown below. If it does not, click the edit button to add any missing scope.
.png?cb=0341722906e4bd755044817c1453188e)
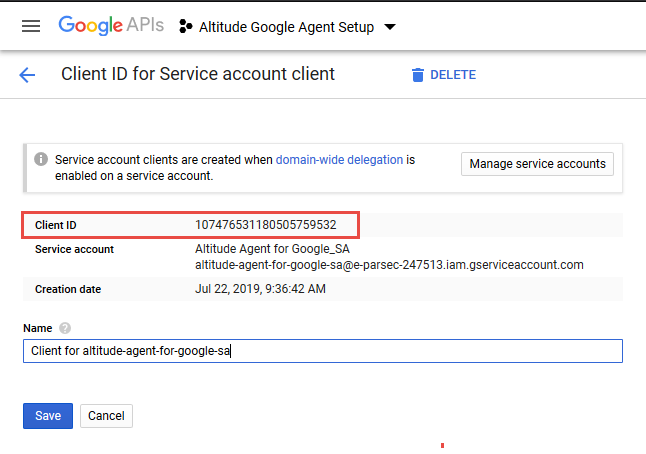
NOTE: This is the step that generates the 'Client ID' required for permission setup and the Discover Agent.
NOTE: This concludes the setup of the Google service account required to run the Discover Agent. Now we can apply the account credentials to the Agent settings window in section two.
Section Two:
Google Agent Setup in Discover
Log in to the Google API Developers site by using the following link:
https://console.developers.google.com/
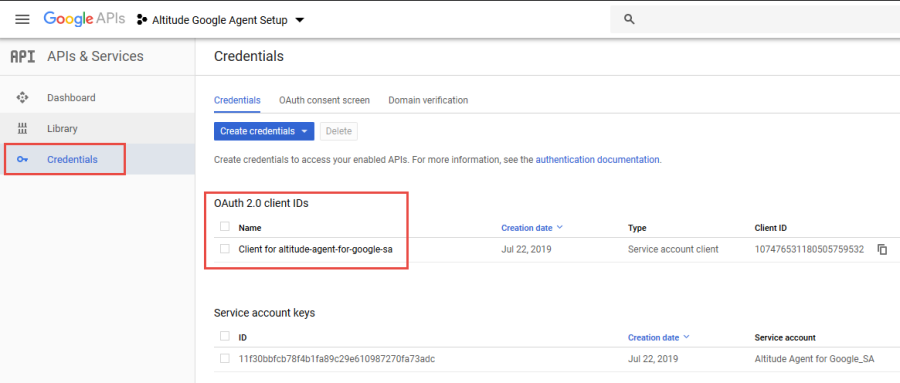
Go to the 'Credentials' option on the left-hand side and then click on the account under 'Oauth 2.0 client IDs' (account name will be different per organization):
Copy/paste the 'Client ID' into the Google Agent in Discover:
Once you login to Discover; navigate to Administration --> Configuration --> Connectors --> check mark the connector --> 'More' button --> Connector Settings.
Click on the 'Google Agent' tab, then scroll down to where you will see the Admin account field. Enter the admin account created when the G Suite account was initially created, then paste the 'Client ID' into the 'Service Account Email' field. Next, click on the 'Browse' button to select the P12 file created in Step 15 of 'Section One'.
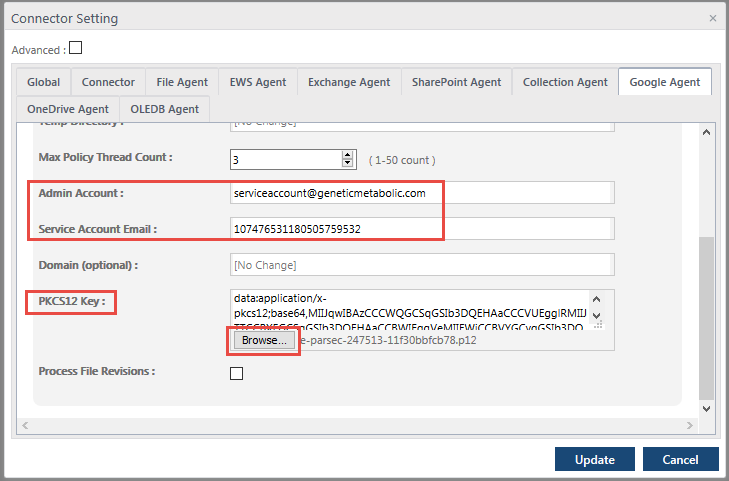
Click the 'Update' button to save changes.
-
Give the connector service a couple of minutes to check back in with the web console.
-
Moving forward, you will be able to create the Owner, Google Drive, and Gmail search to pull Data Targets into Discover.
Appendix
Troubleshooting Note 1:
Issue
When running a Google Owner search, I receive the following error in the Google Agent Log:
[07:21:43.5 Jul-23] ERROR: Error while obtaining G Suite users root information
Google.Apis.Auth.OAuth2.Responses.TokenResponseException: Error:"unauthorized_client", Description:"Client is unauthorized to retrieve access tokens using this method, or client not authorized for any of the scopes requested.", Uri:""
at Google.Apis.Auth.OAuth2.Requests.TokenRequestExtenstions.<ExecuteAsync>d__0.MoveNext()
— End of stack trace from previous location where exception was thrown —
=====================================================================================
Solution
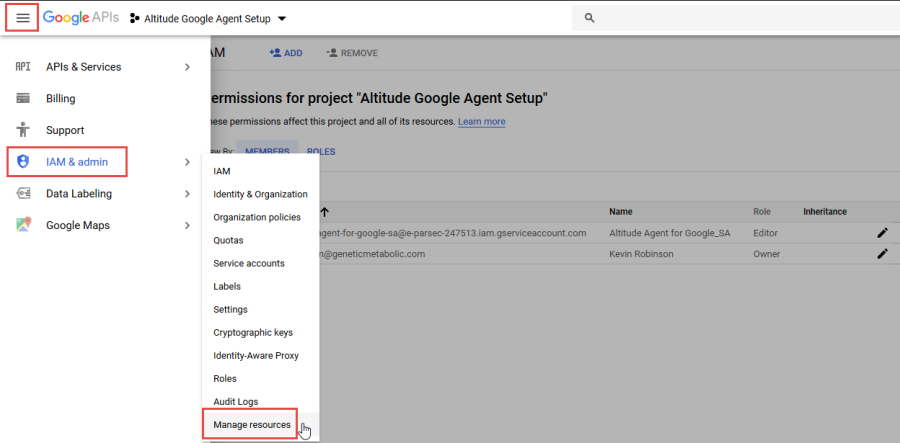
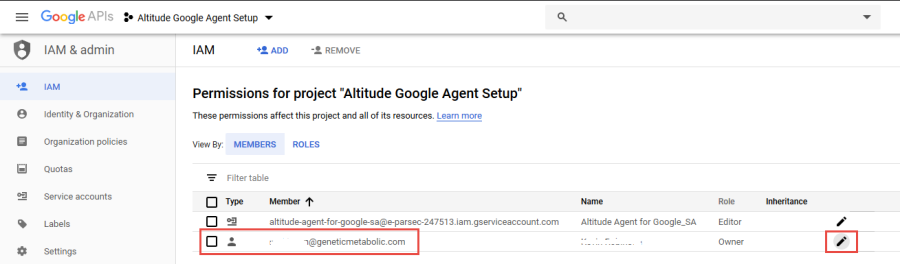
Make sure the Service Account used in the Google Agent configuration has 'Owner' rights to the newly created Google project. This is corrected by updating the following:
Click on the Google API Developers site by using the following link:
Click on the menu button next to the 'GoogleAPIs' logo
Next click on the IAM & admin --> Manage resources
Select the project created under the organization.
Click on the vertical three dots button and select the Permissions option.
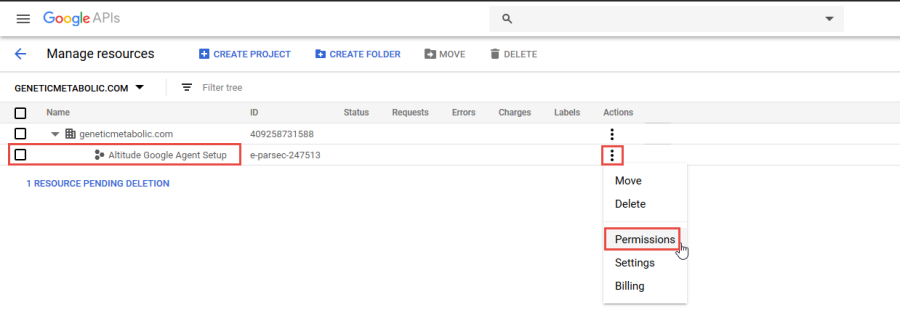
Select the Service Account and click on the pencil icon to edit the account.
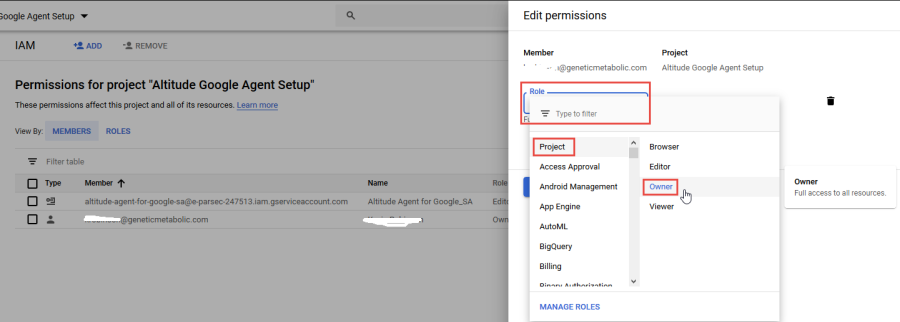
Click on the Role dropdown arrow --> select Project --> then select Owner.
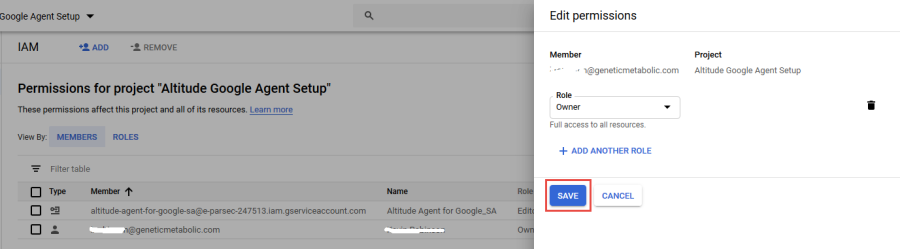
When finished click on the 'Save' button.
Run the Google Owner search again.
Troubleshooting Note 2:
Issue
When running a Google Owner search, I receive the following error in the Google Agent Log:
[11:33:00.8 Jul-23] ERROR: Error while obtaining G Suite users root information
The service admin has thrown an exception: Google.GoogleApiException: Google.Apis.Requests.RequestError
Domain not found. [404]
Errors [Message[Domain not found.] Location[ - ] Reason[notFound] Domain[global]
at Google.Apis.Requests.ClientServiceRequest`1.<ParseResponse>d__34.MoveNext()
— End of stack trace from previous location where exception was thrown —
at System.Runtime.ExceptionServices.ExceptionDispatchInfo.Throw()
at Google.Apis.Requests.ClientServiceRequest`1.Execute()
at SherpaSoftware.GoogleAPIs.AdminDirectory.ListAllUsers(List`1 nonFatalErrors, String domain)
at SherpaSoftware.AoGoogleAgent.appSearchFolderThread.OnPerformPersonSearch(IOwnerSearch search)
====================================================================================
Solution
This is caused when the organization configuration in the Google API Developers site does not have an OAuth consent screen designated for their domain. This is corrected by updating the following:
Click on the Google API Developers site by using the following link:
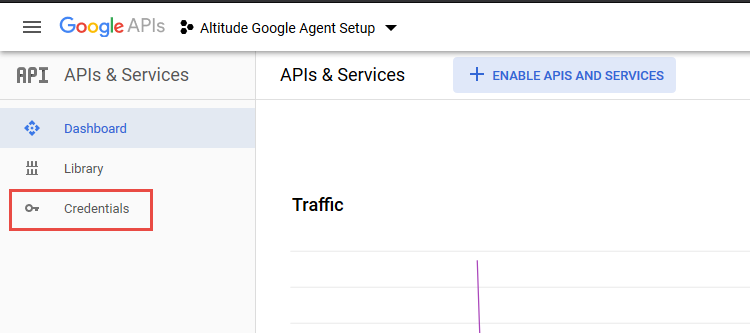
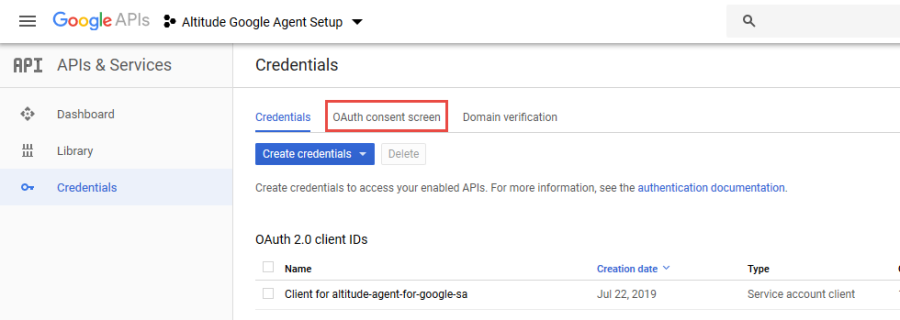
Click on 'Credentials' from the main dashboard page.
Then click on the 'OAuth consent screen'
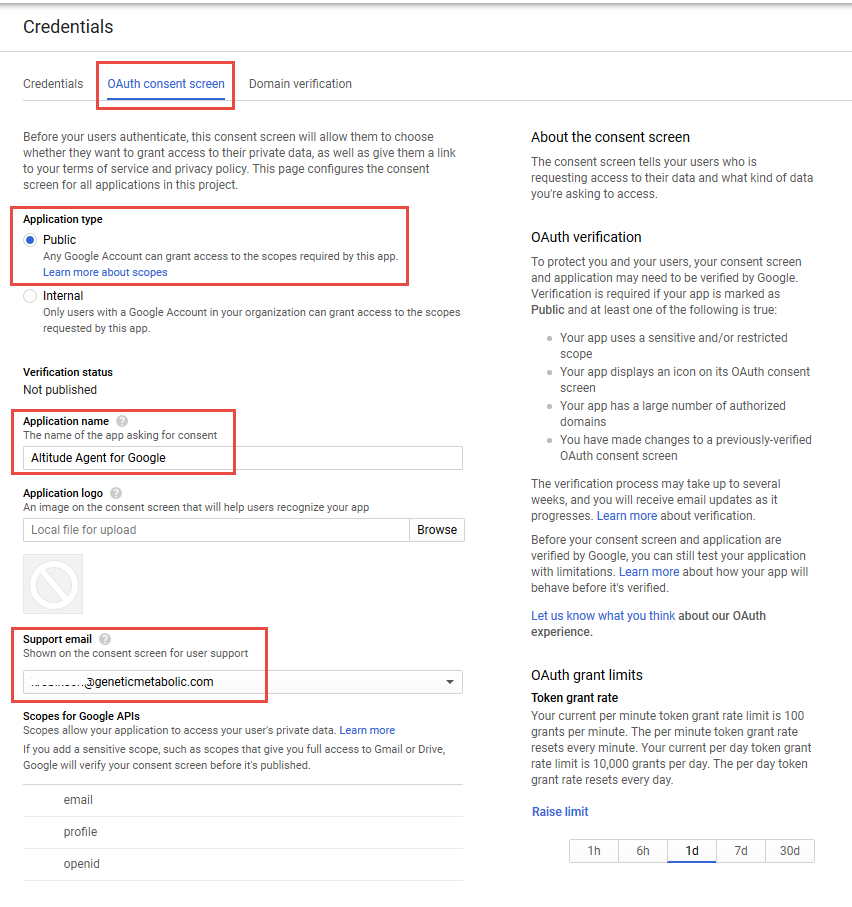
Fill out the consent screen as follows:
-
Application type = Public
-
Application name = 'Organizations Choice'
-
Support email = 'Service Account email address'
-
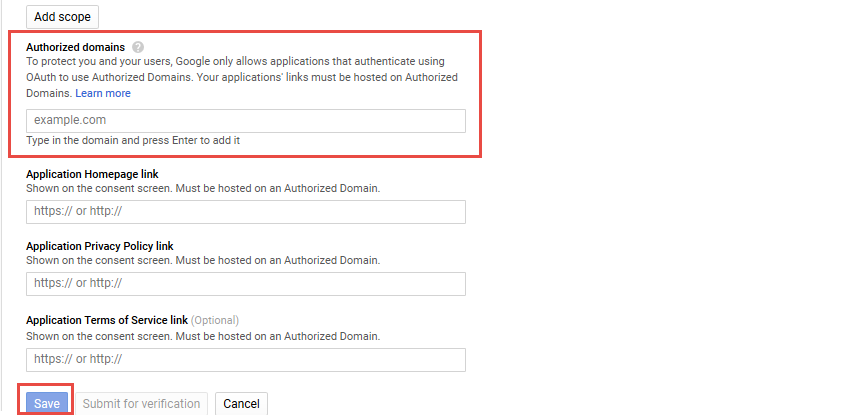
Authorized domains = 'Add Organizations Domain and sherpaaltitudeig.com'
Click 'Save'
Run the Google Owner search again.