Classification Overview
Gimmal Discover Classification provides a way to organize data-at-rest so it can effectively be used to drive business processes, enforce retention guidelines, and streamline eDiscovery. Customers can get started with the Classification process by completing three easy steps.
-
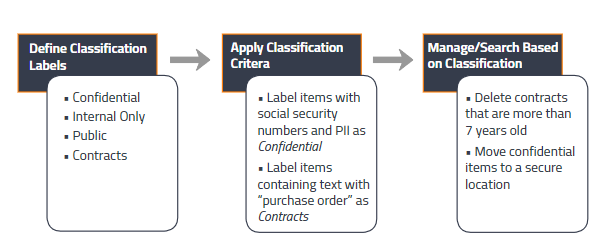
Define Classification Labels. Labels allow organizations to assign a category to their unstructured information based on their individually tailored definitions. These categories may include Confidential, Public, Contracts, etc.
-
Apply Classification Criteria. Depending on a company's classification scheme, at-rest data is then examined by a workflow process where a label is automatically attached. For example, items with social security numbers may be labeled "Confidential," while those that contain purchase order patterns are labeled as "Contracts," and so on.
-
Manage or Search Based on Classification. After successfully applying Classification labels, an organization may use them to enforce its compliance requirements by automatically deleting outdated content, enforcing retention policies, or performing eDiscovery searches.
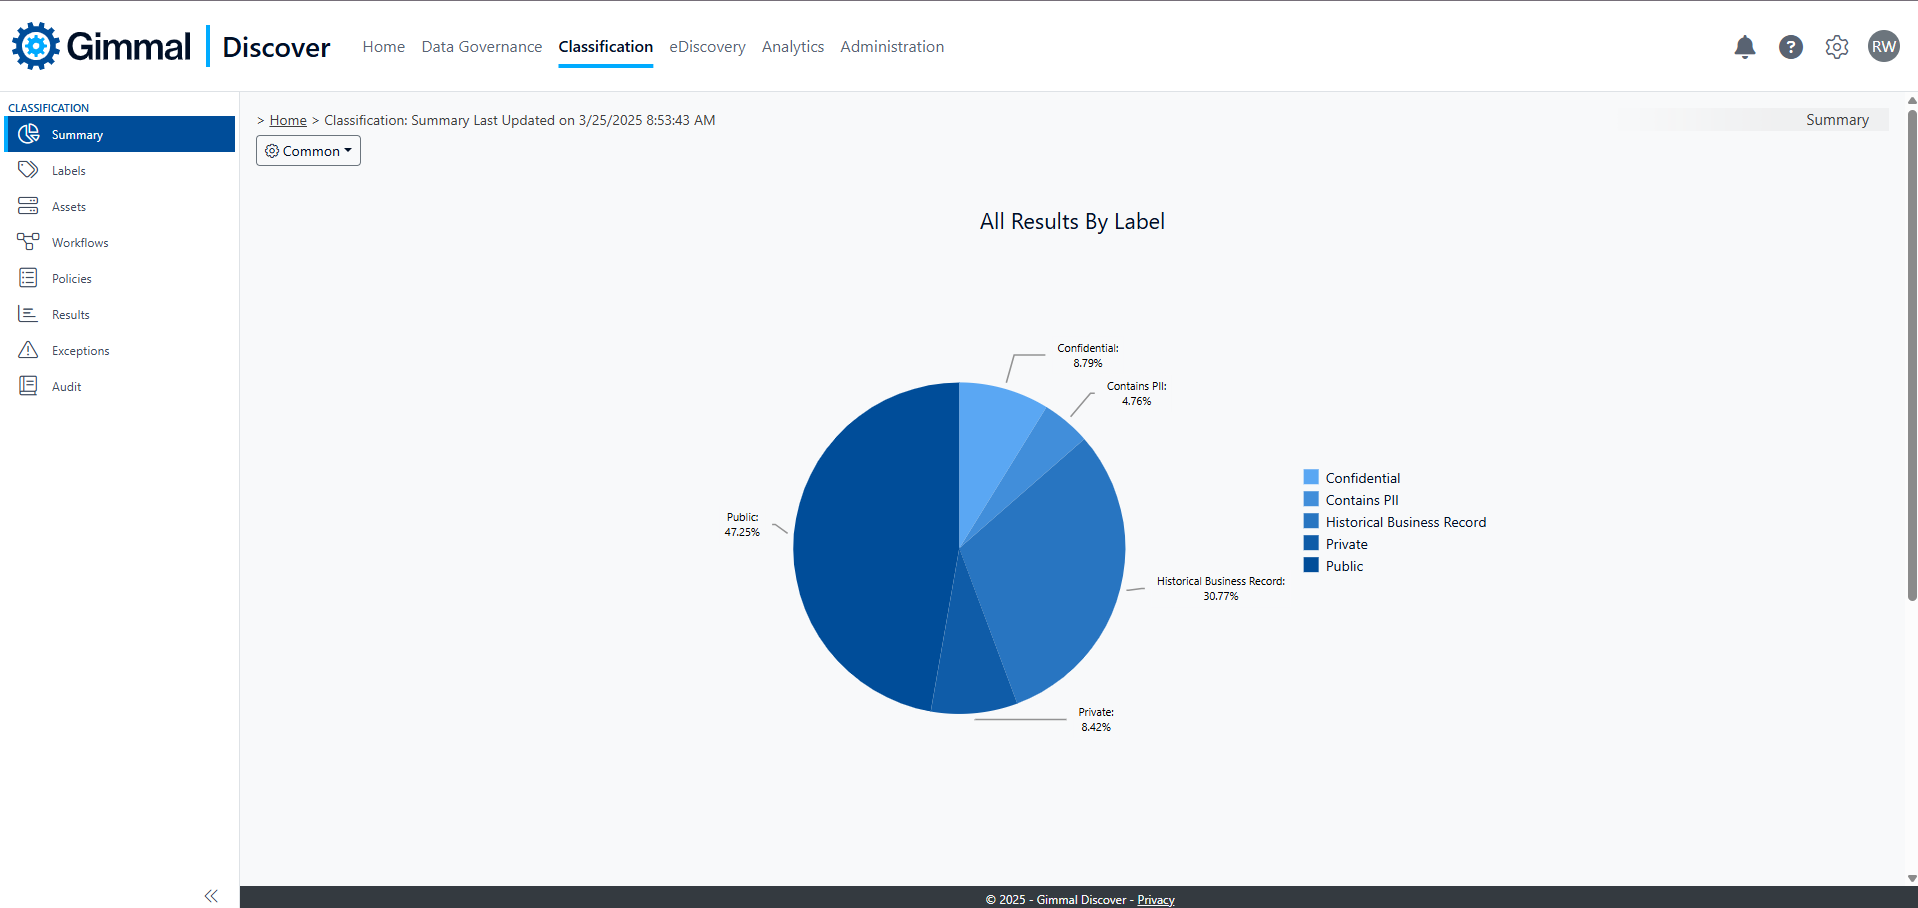
The Classification landing page provides a graphical overview of your labeled content. The pie chart at the top of the page reflects the percentage of content marked with each classification label you have defined. The accompanying table provides a count of the labeled results for each content source (email, files, and social).
Below this row, there is a separate pie chart for each of the source content types. These charts reflect the percentage of results labeled with that content type.
Labels
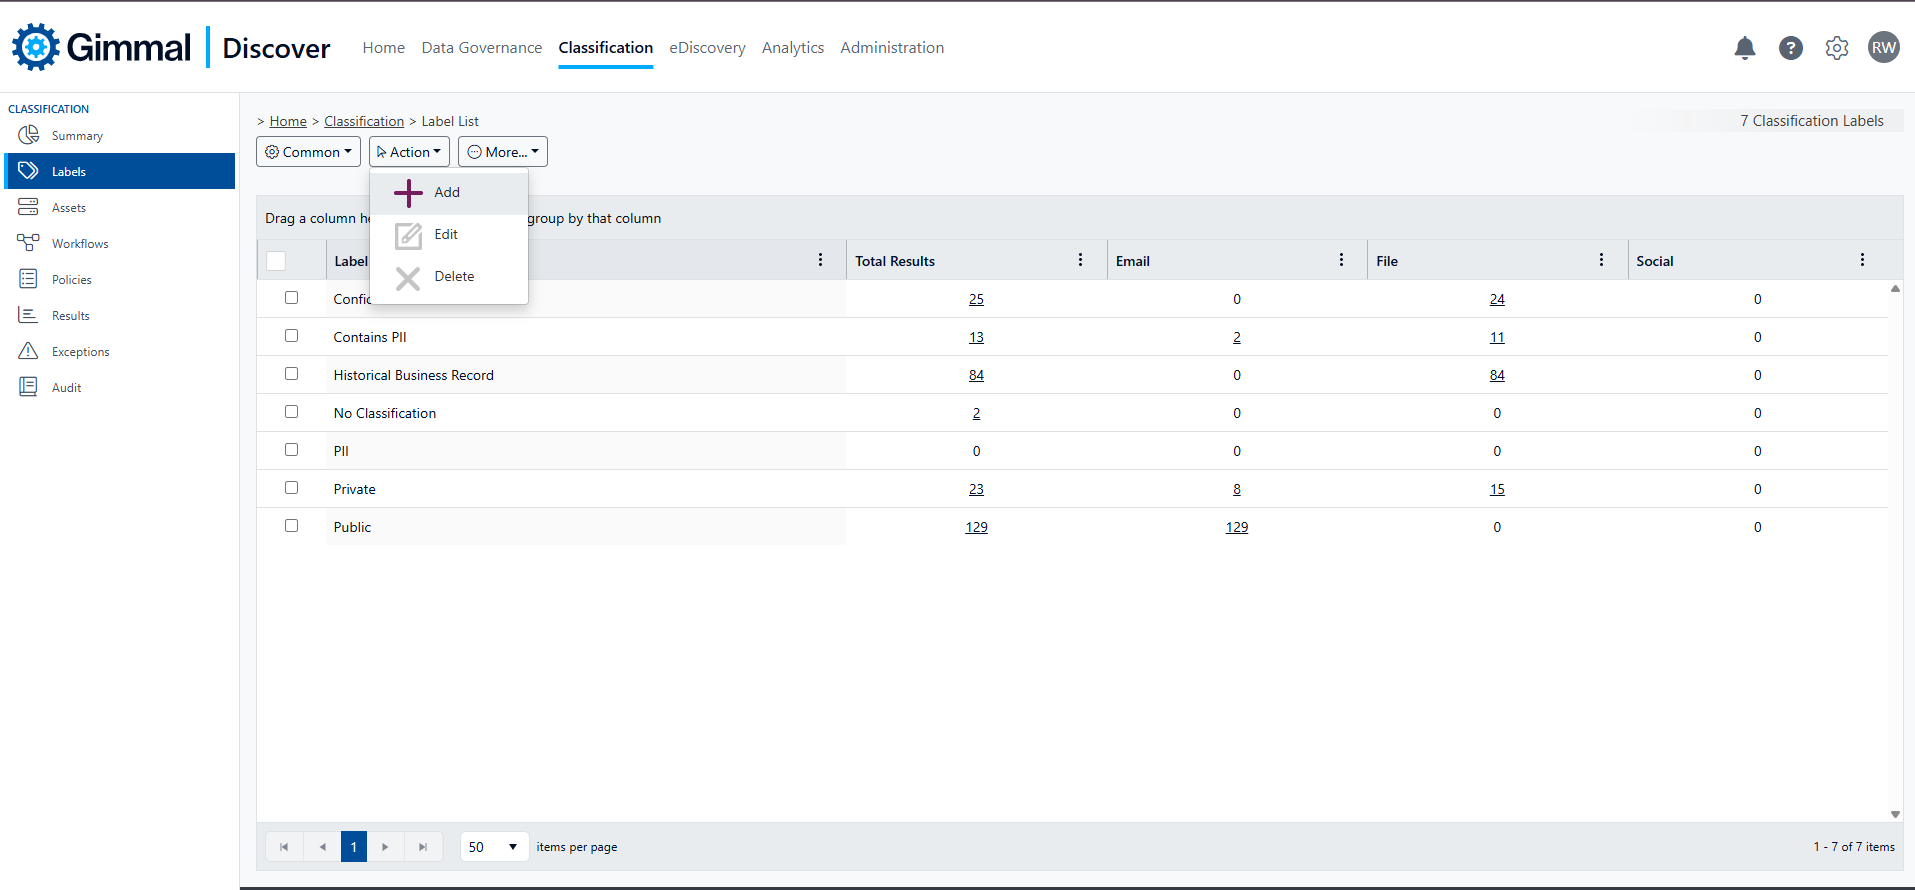
Gimmal Discover classification works by adding labels as extended metadata properties to each content type (email, files, SharePoint, etc.) so those items can be tracked and managed in aggregate. Clicking the Labels link in the left-hand navigation pane will allow you to manage classification labels.
Gimmal Discover ships with the pre-defined classification labels: confidential, public, private, and No Classification. Any of these pre-defined labels may be removed except No Classification, which is a system-provided category reserved for marking content that will always be exempt from classification processing. You may also add your classification labels by hovering over the Action button and clicking Add.
Once a classification policy has been run, this view also provides a sum of the total of items that carry a specific label, along with a count of the classified items in each category (email, files, or social).
If you have previously classified content, you may also select a label on this page, then hover over the More button and click one of the categories (files, email, social) to load a detailed grid view of the items from that category that have been classified. For example, selecting the Confidential label and then clicking More/Email Results will display a list of all email items currently classified as Confidential.
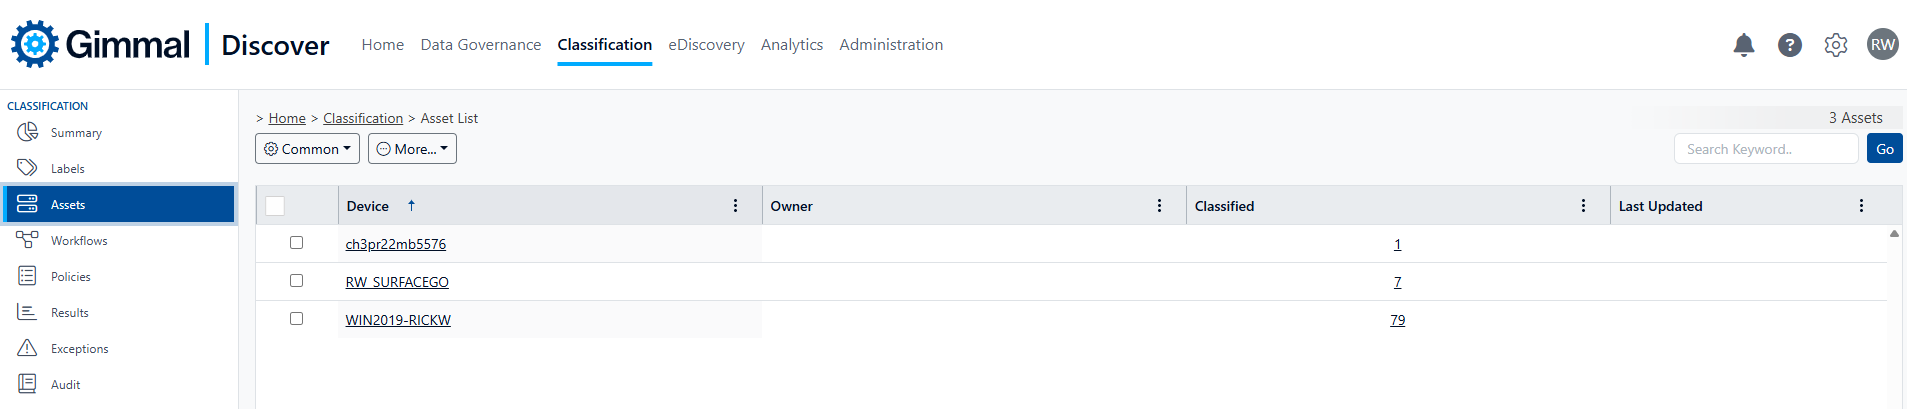
Assets
The Assets view of Classification provides a view of all the locations where information containing Gimmal Discover classification tags resides. These locations may include: file servers, desktops, Exchange servers, SharePoint sites, or Google (Gmail or GDrive). After selecting an Asset, you may hover over the green More button to drill into more detail about your classified information by selecting:
-
Show Targets - for example, show each folder on a network file share that has classified information
-
Classified Items – for example, show each file on a network file share that has classified information
-
Owner Results – show every classified item that is associated with a data owner
Workflows
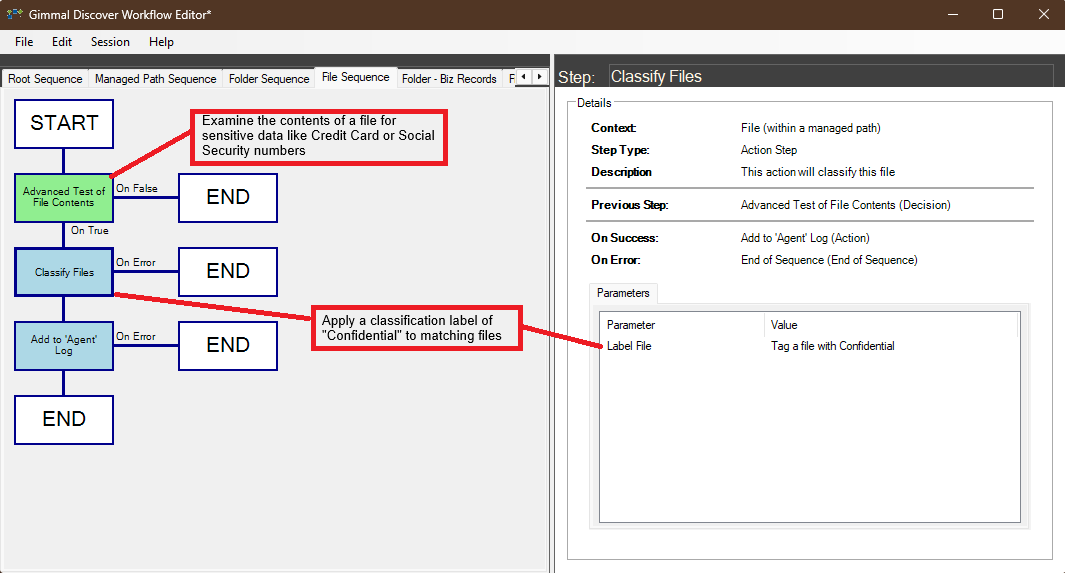
Classification workflows are where the business rules for classifying information are defined. Gimmal Discover provides one pre-built classification workflow template for each content type (files, emails, SharePoint, etc.). These templates may be accessed through the Workflow Editor application and modified to accommodate your specific business rules. For example, files containing a Social Security number pattern could be classified as confidential.
Since there can only be one Classification workflow per content type, it's important to clearly define the various criteria that should be evaluated to assign the proper classification category. The example below shows files being examined for specific keyword terms, and matching items being labeled as “Confidential”.
Policies
After editing workflows, they must be attached to a policy to perform the classification. During this step, you designate what Gimmal Discover data targets the classification should be applied to. The new policy creation screen is very similar to the one found in Data Governance. First, provide the new policy a name, then select the workflow from the drop-down list and specify whether full-text should be retrieved for the items being classified. There is one notable difference in a classification policy: the option to 're-classify' previously classified items. By default, Gimmal Discover will skip an item that already carries a classification label. Checking this box will instruct Gimmal Discover to examine all data targets and change the classification label if applicable.

Just as in Data Governance, the next step is to assign data targets. Policy data targets may include specific devices, users, groups from Active Directory, or targets (i.e. file shares, SharePoint sites, etc.) not associated with a data owner.
Finally, like Data Governance policies, the Classification version may be configured to run automatically on a scheduled basis or set to run on demand.
Results
The Results view in Classification provides a master list of all classified content. Any item tagged with a classification label will be displayed in this list.
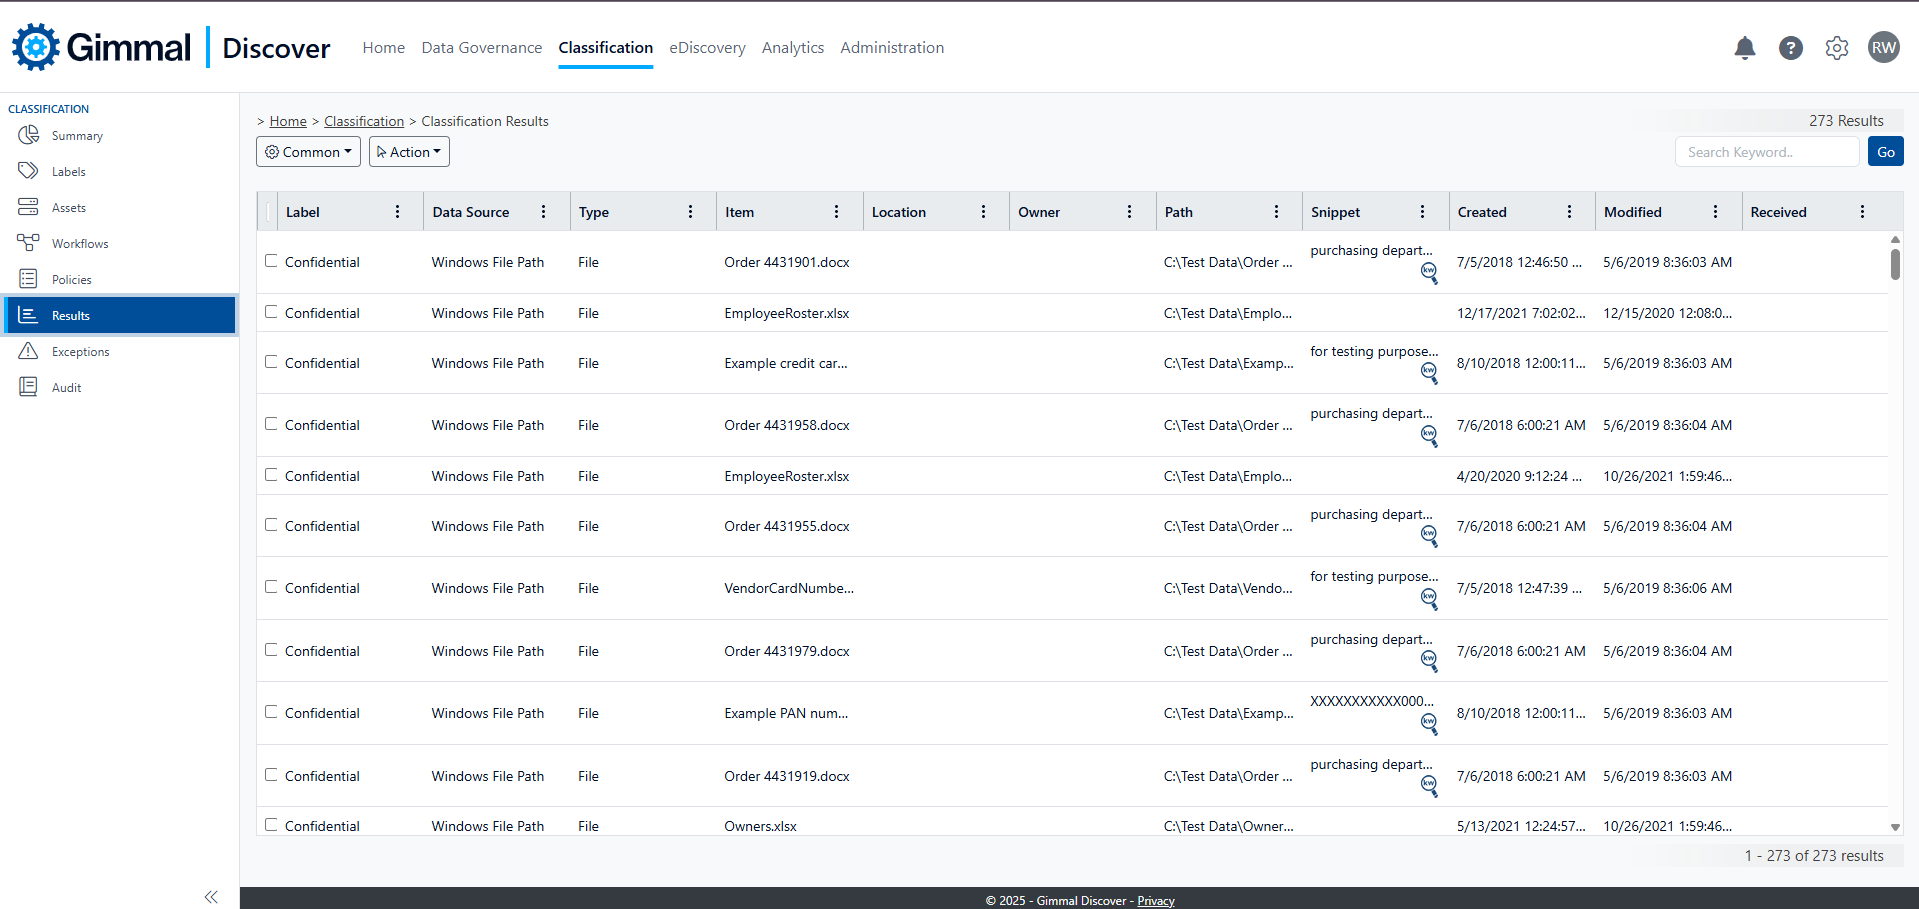
Like other grid displays in the Gimmal Discover dashboard, each column may be sorted in ascending or descending order by clicking the column header. You may also click on the ellipses (three dots) symbol in any grid column header in order to see additional filter options.
There are other options available from the Results view to help you manage classified content. If you select one or more classified items, then hover over the Action button, the additional actions available are:
-
Change or Remove classification labels
-
View the pending list of changes or remove tasks that are queued
-
Submit the pending change or remove requests for processing
Exceptions
The exceptions view will provide a detailed list of any content source where the classification process failed. From this view, you may also select a specific source and attempt to change or remove its classification.
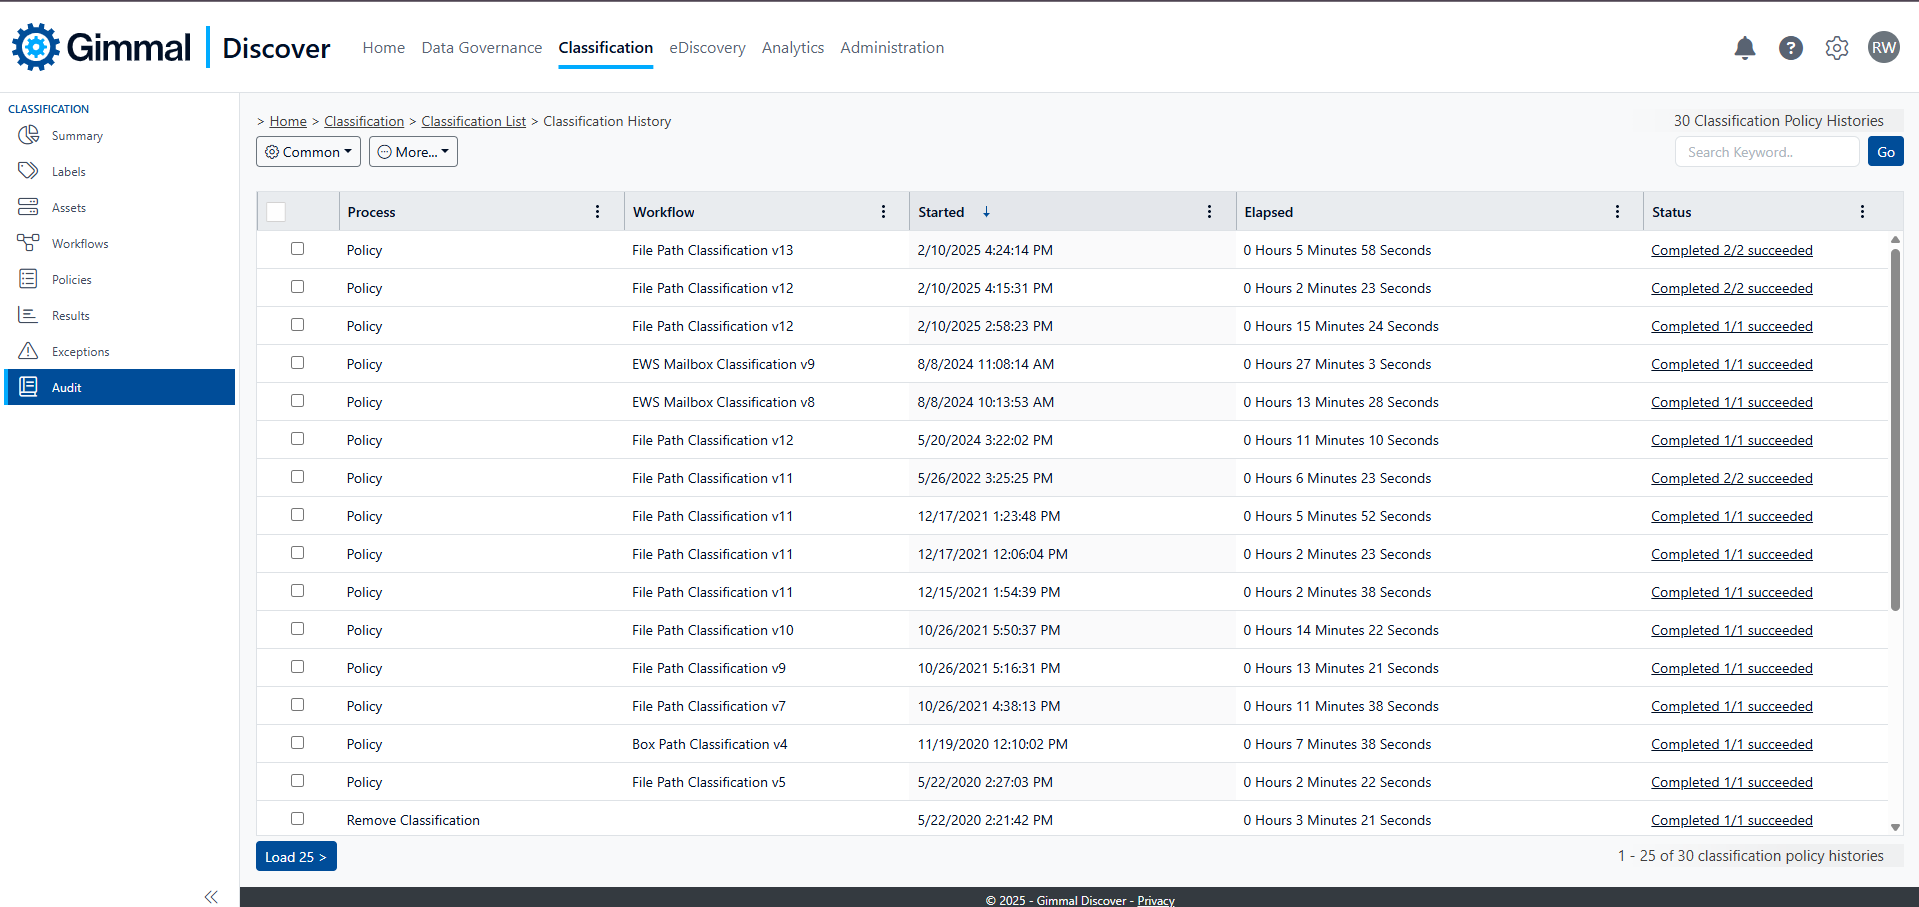
Audit
The audit view provides a complete record of any classification activity that has occurred. This may include policy runs, changing a classification, or removing a classification label. You may select any entry on the Audit view to see more detail about what occurred during that process by clicking on the checkbox to the left of the appropriate entry, hovering over the Action button, and clicking on "Classification Policy Execution"
Using Classification in Data Governance
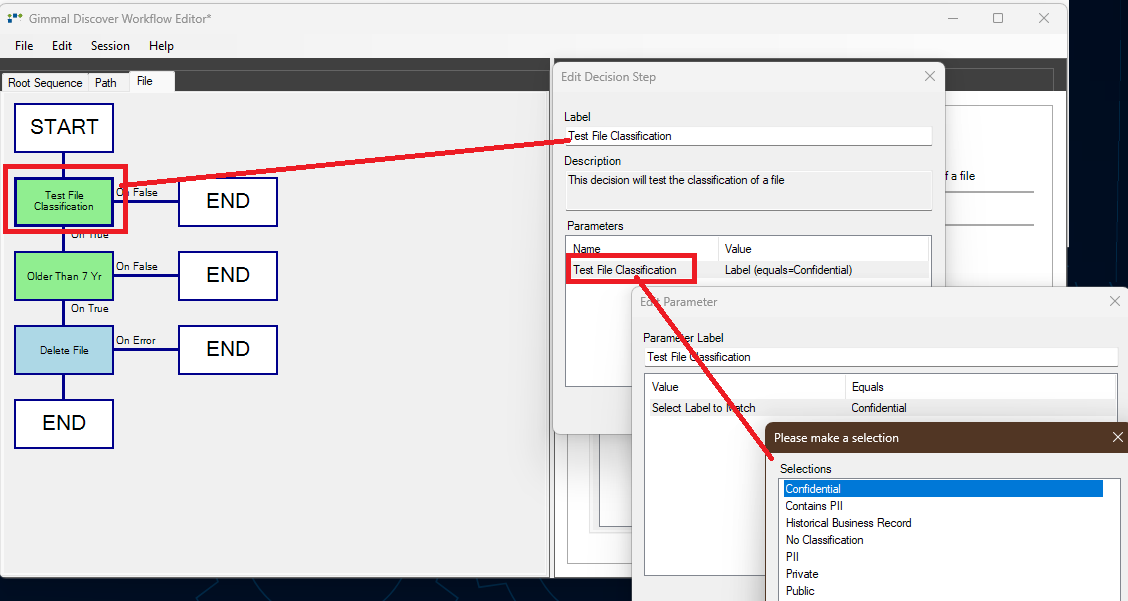
Classification labels are available as additional decision criteria for each content type and can be evaluated within a Data Governance workflow just like any other meta-data property:
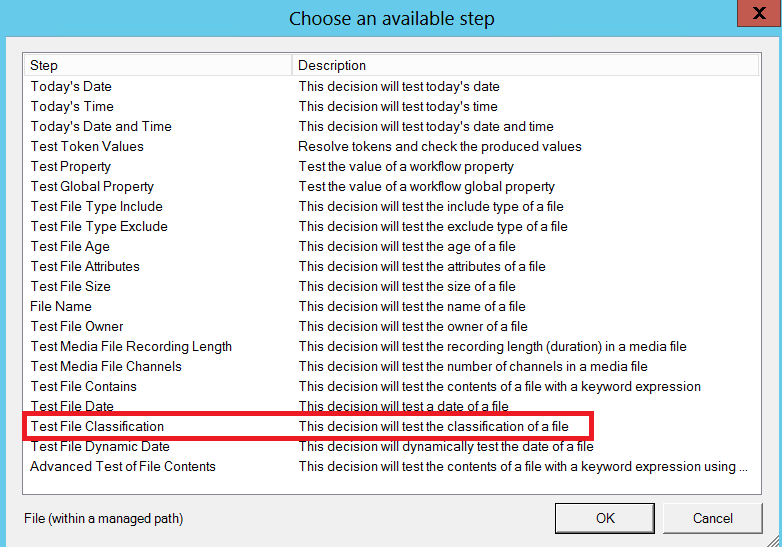
By combining a classification test with other decisions (i.e., age, date, content), it is very easy to apply retention rules to a content source. For example, delete any confidential file older than 7 years.
Using Classification in eDiscovery
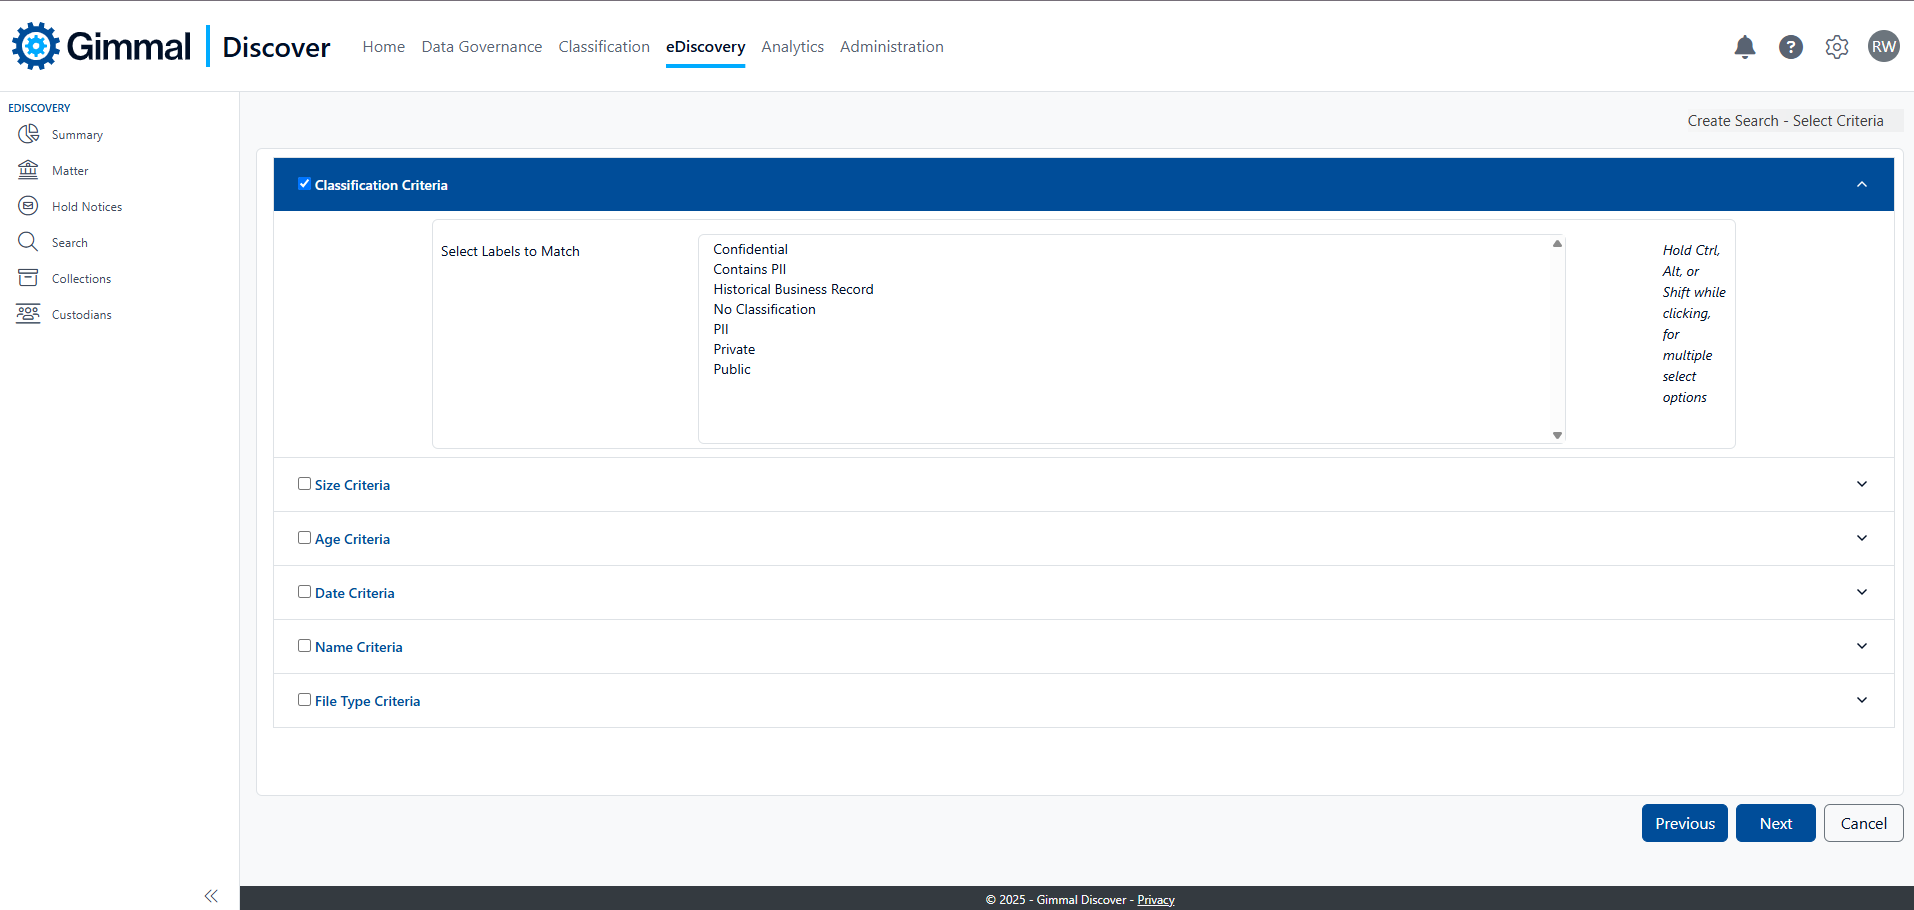
Classification labels appear as another criteria option when building an eDiscovery search. The screen capture below shows the 'Select Criteria' screen displayed when creating a new search. Checking the box 'Classification Criteria' will open the list of available classification labels that may be selected. You can click on a single label to select it or hold down the Ctrl key and click multiple items to add more than one label to your search.
Appendix A - File Classification Metadata
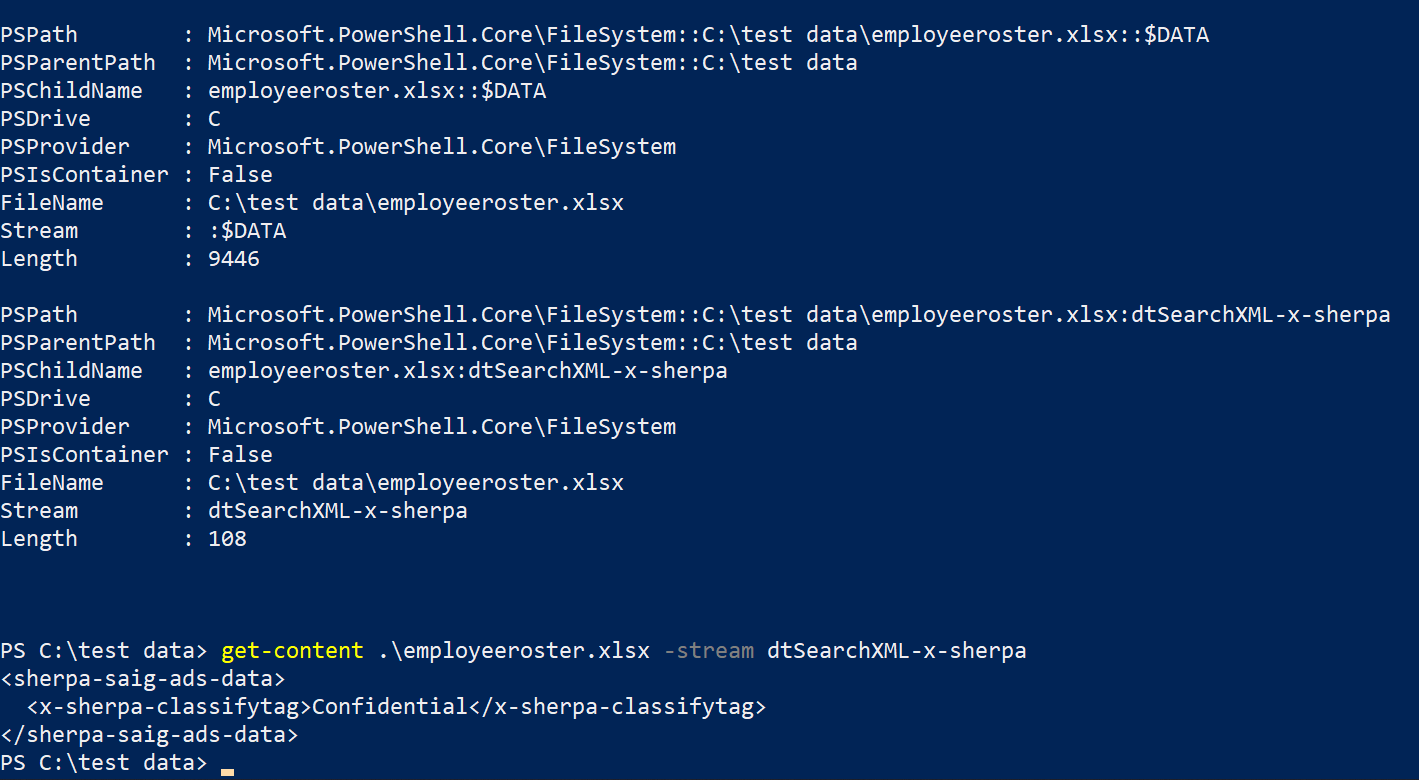
When Discovery applies a classification label to a file, that information is stored in the alternate data stream (ADS). As shown in the PowerShell screen capture below, the name of the ADS created by Discover is dtSearchXML-x-sherpa. Within that ADS entry, there will be a property called x-sherpa-classifytag which contains the label. To view the label, issue the command shown below in PowerShell (replace FILENAME with the actual name of the file within the quotes).
Get-content -Path "FILENAME" -Stream dtSearchXML-x-sherpa
In the example shown below, PowerShell confirms that the classification tag Confidential has been applied to the file.